Exploring Containers - Part 1
In this post
I have had the pleasure of talking at several tech-meetups about container technologies. Most of the time I explain to the attendees how these technologies can assist them in supplying value to their end-customers, more often and more efficiently, through various DevOps processes.
I suppose I get to talk about the “why” part often, but not enough about the “what” part of containers.
Way back when I did not understand the first thing about containers, the only thing I knew was that Docker made it possible for me to experiment with them. All the different forms of documentation and most of the blog posts I came across gave a general overview and did not get into the internals. It seemed incredibly “black-boxy” to me and for the longest of times I was perfectly content with being completely oblivious to what it was that made them work, until I decided that I might as well open the proverbial box and see what is inside.
Duct tape and glue
So, from what I was able to gather at the time was that containers were operating system virtualization, which is different to a VM (Virtual Machine). It was a good enough analogy for someone who has no concept of what a container is, but now I know it is not entirely technically correct. I would usually tell people that containers are a form of process isolation, combined with resource management and security features.
The concept of a container does not exist inside of Linux. A container is a term that is used to describe a combination of namespaces and control groups, which are Linux kernel features you can use to isolate processes from one another. Isolating a process this way is not an all or nothing approach as you can be very selective over what resources are isolated and which ones are not.
chroot(1)
Chroot, change root, is a command that allows you to set the root directory of a fresh process. It is a command that has been around for a while in the UNIX space and it has been used to do some interesting things. More importantly it has helped to pave the way for the whole containerization movement. We can use chroot to set the root directory of a process to any location that we would like it to use.
Let us try and do just that. You can skip this step if you want to run the chroot command in a Linux VM. I am going to launch a new docker container and use that to perform all the different tests. All Docker will be doing is pulling the Alpine 3.11 container image and spin up a container. The –rm flag will remove the container from your host after we exit out of it. The –privileged flag is needed because we need to be able create our own new namespaces and so we will need the correct permissions.
docker run -it --name docker-sandbox --rm --privileged alpine:3.11
To verify you are inside of your container you can use “cat /etc/issue”.
cat /etc/issue
# Welcome to Alpine Linux 3.11
# Kernel \r on an \m (\l)
We will make a new directory, start a new shell process, and make it believe that its’ root directory is “/newroot. We will put a file in there as well and once we’ve chrooted, we will try to read its contents.
mkdir /newroot
echo "Hello!" >> /newroot/foo.txt
chroot /newroot/ sh
We are greeted with an error, clearly, I am doing something wrong, or I purposely did that. Since the new child process’s root directory has been set to “/newroot” it is trying to find “/bin” directory to access the “sh” program.
Fair enough, we will copy the application over to the “/newroot/bin” directory. Let us look at the “/bin” folder (not the chrooted one) to see what it holds.
ls -lA /bin
# lrwxrwxrwx    1 root     root            12 Apr 20 00:00 arch -> /bin/busybox
# lrwxrwxrwx    1 root     root            12 Apr 20 00:00 ash -> /bin/busybox
# lrwxrwxrwx    1 root     root            12 Apr 20 00:00 base64 -> /bin/busybox
# lrwxrwxrwx    1 root     root            12 Apr 20 00:00 bbconfig -> /bin/busybox
# -rwxr-xr-x    1 root     root        841288 Apr 20 00:00 busybox
# lrwxrwxrwx    1 root     root            12 Apr 20 00:00 cat -> /bin/busybox
Interestingly, there are a lot of symlinks for various applications (cat, ash, etc..), that all point to the BusyBox binary. If you have not heard of Busybox, it is an extremely useful tool that “combines many common Unix utilities into a single executable”. Most people will create a link to BusyBox for each function they wish to use and BusyBox will act like whatever it was invoked as. You can assume that when we call “cat /etc/issue” it is similar to calling “busybox cat /etc/issue”.
We will need to recreate the same structure in our “/newroot/bin” directory if we want to be able to start a chrooted shell, this includes the symlinks.
mkdir /newroot/bin
cp /bin/busybox /newroot/bin/busybox
ln -s busybox /newroot/bin/sh
ln -s busybox /newroot/bin/ls
ln -s busybox /newroot/bin/cd
ln -s busybox /newroot/bin/cat
Hold on, if BusyBox has any dynamic dependencies (think DLLs, Windows friends) we will also need to fetch those and put them in the correct directories. Luckily the “ldd” command can help us to find said dependencies.
ldd /bin/busybox
#        /lib/ld-musl-x86_64.so.1 (0x7f77500a6000)
#        libc.musl-x86_64.so.1 => /lib/ld-musl-x86_64.so.1 (0x7f77500a6000)
This means that we will need to do the following for the BusyBox binary to work:
- Copy “ld-musl-x86_64.so.1” from the “
/lib” directory to the “/newroot/lib” directory. - Create a symlink for “libc.musl-x86_64.so.1” in “
/newroot/lib” that points to ld-musl-x86_64.so.1 in the “/newroot/lib” directory.
mkdir /newroot/lib
cp /lib/ld-musl-x86_64.so.1 /newroot/lib/ld-musl-x86_64.so.1
ln -s ld-musl-x86_64.so.1 /newroot/lib/libc.musl-x86_64.so.1
Now we can chroot our child process and since we added “cat”, “cd” and “ls” to our “/bin” directory we can use them to mess about.
If you try to use “cd /” you will technically always end up at “/newroot” but for all the chrooted process knows it is at “/”.
chroot /newroot sh
ls -lA
# total 20
# drwxr-xr-x    2 0        0             4096 Apr 20 00:00 bin
# -rw-r--r--    1 0        0                7 Apr 20 00:00 foo.txt
# drwxr-xr-x    2 0        0             4096 Apr 20 00:00 lib
cat foo.txt
# Hello!

ls -lA /bin
# total 832
# -rwxr-xr-x    1 0        0           841288 Apr 20 00:00 busybox
# lrwxrwxrwx    1 0        0                7 Apr 20 00:00 cat -> busybox
# lrwxrwxrwx    1 0        0                7 Apr 20 00:00 cd -> busybox
# lrwxrwxrwx    1 0        0                7 Apr 20 00:00 ls -> busybox
# lrwxrwxrwx    1 0        0                7 Apr 20 00:00 sh -> busybox
Can you imagine having to “ldd” all over the system just to map out your application’s dependencies? Luckily for you and me, some very smart people produced base images for Docker containers based off Ubuntu, Alpine and many other distributions. These base images come with a fully equipped root file system which, usually, hold a large set of directories, binaries, and libraries that your application might depend on.
Let us take a step back, open another shell on the host. We will start another, different shell process (ash) into your Docker container. We will use this shell to run top, which shows you which tasks are running and what they are currently consuming.
#Host machine
docker exec -it  docker-sandbox ash
#Inside container or VM
top
#  PID  PPID USER     STAT   VSZ %VSZ CPU %CPU COMMAND
#    4     0 root     S     1652   0%   1   0% ash
#    1     0 root     S     1648   0%   0   0% /bin/sh
#   65     1 root     S     1648   0%   0   0% sh
#   82     4 root     R     1584   0%   0   0% top
As you can see our chrooted process has process ID 65 spawned from PPID (parent process ID) 1, which is the shell process that started when we first used the Docker run command.
Security
Just so you know, this is not really a secure jail and chroot on its own is not going to magically make everything safer. There are a few subtle details you need to know about when you use chroot via a system call in C. For instance, the current working directory is not switched and relative paths still refer to files outside of this new root. On top of this, if you keep calling chroot it will only result in overriding your current chroot.
To demonstrate this, you can run the following C application to break out of your jail.
#include <sys/stat.h>
#include <unistd.h>
#include <stdio.h>

int main(void)
{
    printf("\nTime to break things\n\n");
    mkdir("newroot2", 0755);
    chroot("newroot2");
    chdir("../../../");
    chroot(".");
    return execl("/bin/busybox", "ash", NULL);
}
Save this as a file called “breakout.c” and compile the code with “gcc /newroot/breakout.c -o /newroot/bin/breakout”, you may need to pull in GCC with “apk add build-base.
We will start inside of process ID 1 and chroot into “/newroot, as we did before. Only this time we will excute our breakout application, which will allow us to end back outside the jail.
chroot /newroot sh
ls
# bin      foo.txt  lib
echo $$
# 207
breakout

# Time to break things

ls -lA # This is bad.
# total 92
# -rwxr-xr-x    1 root     root             0 Apr 20 00:00 .dockerenv
# drwxr-xr-x    2 root     root          4096 Apr 20 00:00 bin
# drwxr-xr-x   10 root     root          3280 Apr 20 00:00 dev
# drwxr-xr-x    1 root     root          4096 Apr 20 00:00 etc
# drwxr-xr-x    2 root     root          4096 Apr 20 00:00 home
# drwxr-xr-x    1 root     root          4096 Apr 20 00:00 lib
# drwxr-xr-x    5 root     root          4096 Apr 20 00:00 media
# drwxr-xr-x    2 root     root          4096 Apr 20 00:00 mnt
# drwxr-xr-x    5 root     root          4096 Apr 20 00:00 newroot
# drwxr-xr-x    2 root     root          4096 Apr 20 00:00 opt
# dr-xr-xr-x  160 root     root             0 Apr 20 00:00 proc
# drwx------    1 root     root          4096 Apr 20 00:00 root
# drwxr-xr-x    2 root     root          4096 Apr 20 00:00 run
# drwxr-xr-x    2 root     root          4096 Apr 20 00:00 sbin
# drwxr-xr-x    2 root     root          4096 Apr 20 00:00 srv
# dr-xr-xr-x   13 root     root             0 Apr 20 00:00 sys
# drwxrwxrwt    1 root     root          4096 Apr 20 00:00 tmp
# drwxr-xr-x    1 root     root          4096 Apr 20 00:00 usr
# drwxr-xr-x    1 root     root          4096 Apr 20 00:00 var
> echo $$
#209
If you launch “top” again you should see the following:
#  PID  PPID USER     STAT   VSZ %VSZ CPU %CPU COMMAND
#    1     0 root     S     1656   0%   0   0% /bin/sh
#    4     0 root     S     1652   0%   0   0% ash
#  207     1 root     S     1648   0%   1   0% sh
#  209   207 root     S     1656   0%   0   0% {busybox} ash
#  211     4 root     R     1584   0%   1   0% top
Our “breakout” process, PID 209, has a full view of the root filesystem and spawned from PID 207. Even though we called “chroot” multiple times in the code we do not get multiple child processes. Do not assume that just because you have used “chroot” you are safe!
To make things worse, upon mounting the /proc filesystem we can run “top” to see processes running on the outside of the jail! Similarly, if you mount the “/sys” filesystem you will be able to access device and device driver information. Try the following script outside of your chrooted processes, start from PID 1.
#Outside the chroot jail
mkdir /newroot/proc /newroot/sys
ln -s busybox /newroot/bin/top
ln -s busybox /newroot/bin/mount
chroot /newroot sh

#Inside of the chroot jail
mount -t proc proc /proc
top
#    1     0 0        S     1648   0%   1   0% /bin/sh
#   26     1 0        S     1648   0%   1   0% sh
#   28    26 0        R     1580   0%   1   0% top
mount -t sysfs sys /sys
ls -l /sys/class/net/ #Class directory contains every device class registered with the kernel.
total 0
# lrwxrwxrwx    1 0        0                0 Apr 20 00:00 eth0 -> ../../devices/virtual/net/eth0
# lrwxrwxrwx    1 0        0                0 Apr 20 00:00 ip6tnl0 -> ../../devices/virtual/net/ip6tnl0
# lrwxrwxrwx    1 0        0                0 Apr 20 00:00 lo -> ../../devices/virtual/net/lo
# lrwxrwxrwx    1 0        0                0 Apr 20 00:00 tunl0 -> ../../devices/virtual/net/tunl0
Namespaces
“chroot” stems from UNIX/POSIX systems and can be seen as a rudimentary form of namespaces. As I wrote earlier it ensures a process sees a completely new root filesystem and has no access to the original one, a more elegant way to isolate your process can be achieved by creating a new namespace.
Namespaces are a Linux kernel feature that allow us to wrap global system resources in an abstraction layer. Doing so allows you make processes, within the namespace, believe that they have their own isolated instance of the global resource. Changes to the global resource are visible to other processes that are members of the namespace but are invisible to other processes.
Linux extends the “chroot” concept to the other operating system layers, so a specific process can live in what is often referred to as a “virtualized OS”. This “virtualized OS” contains a new group of PIDs, a new set of users, a completely unshared IPC system, a dedicated network interface and its own hostname.
Here is an overview consisting of namespaces that have been implemented:
| Namespace | What does it Isolate? |
|---|---|
| Cgroup | Cgroup root directory |
| IPC | System V IPC, POSIX message queues |
| Mount | Mount points |
| Network | Network devices, stacks, ports, etc. |
| PID | Process IDs |
| Time | Boot and monotonic clocks |
| UTS | Hostname and NIS domain name |
| User | User and group IDs |
We can see the namespaces that our current process is a part of, all this information is available to us through the proc filesystem. Let us look at PID 1’s namespaces.
ls -lA /proc/$$/ns
# lrwxrwxrwx    1 root     root             0 Apr 20 00:00 cgroup -> cgroup:[4026531835]
# lrwxrwxrwx    1 root     root             0 Apr 20 00:00 ipc -> ipc:[4026532299]
# lrwxrwxrwx    1 root     root             0 Apr 20 00:00 mnt -> mnt:[4026532297]
# lrwxrwxrwx    1 root     root             0 Apr 20 00:00 net -> net:[4026532302]
# lrwxrwxrwx    1 root     root             0 Apr 20 00:00 pid -> pid:[4026532300]
# lrwxrwxrwx    1 root     root             0 Apr 20 00:00 pid_for_children -> pid:[4026532300]
# lrwxrwxrwx    1 root     root             0 Apr 20 00:00 user -> user:[4026531837]
# lrwxrwxrwx    1 root     root             0 Apr 20 00:00 uts -> uts:[4026532298]
As you can tell there is one link per namespace type. The target of the symlink can tell us which instance of a namespace the process belongs to, the contents of the symlink is always “ns-type: [inode-number]. If you have processes that have the same symlink target for a specific namespace type that means they belong to the same namespace type. If they do not match, they are in separate namespaces. At any moment, a process can only be part of one namespace per namespace type. Behind the scenes, namespaces are implemented using a file system that is only known to the kernel.
Hopefully, that does not sound too fuzzy. If it does let us try to rectify that by testing a few more commands in the shell. We need to have two shells inside of the same VM/container. If you have exited out of your container, just make a new one with “docker run -it --name docker-sandbox --rm --privileged alpine:3.11” and once it has started run “docker exec -it docker-sandbox ash” to create another shell inside the same container.
# In shell with PID 1
readlink /proc/$$/ns/uts
# uts:[4026532298]
hostname
# 2d95d7bdebc8  #Container ID in my case
And in your other shell run these commands:
# In your second shell with PID 4
readlink /proc/$$/ns/uts
# uts:[4026532298]
hostname
# 2d95d7bdebc8 #Container ID
Lo’ and behold they are in the same namespace, which makes sense.
Requirements
Depending on which namespaces you want to create, you will need to ensure that you have the correct privileges.
- User namespace
- No privileges required! 🎉
- Non-user namespace
- CAP_SYS_ADMIN
Namespace System Calls
There are a few interesting systems calls that we can use, they also appear as shell commands.
- fork(2)
- Creates a new child process by duplicating the calling process.
- The child process and the parent process run in separate memory spaces.
- clone(2)
- Create a new child process in a new namespace.
- Unlike fork(2), clone gives you more precise control over what pieces of execution context, such as virtual address space, is shared between the calling process and the child process.
- unshare(2)
- Create one or more new namespaces and move the caller into it/them.
- setns(2)
- Move an existing process to another namespace instance.
UTS Namespaces
Let us continue with our experiment using the UTS namespace, recall that in both shells we were seeing the same inode number and hostnames. We will use “unshare” to start a new shell process inside of a new UTS namespace. You will see that the new UTS namespace inherits a copy of the host- and domain name from the parent process’ UTS namespace.
# In shell with PID 1
readlink /proc/$$/ns/uts
# uts:[4026532298]
unshare --uts sh #unshare ONLY the UTS namespace
echo $$ # New process' ID
# 21
ls -lA /proc/$$/ns
# total 0
# lrwxrwxrwx    1 root     root             0 Apr 20 00:00 cgroup -> cgroup:[4026531835] # Unchanged
# lrwxrwxrwx    1 root     root             0 Apr 20 00:00 ipc -> ipc:[4026532299] # Unchanged
# lrwxrwxrwx    1 root     root             0 Apr 20 00:00 mnt -> mnt:[4026532297] # Unchanged
# lrwxrwxrwx    1 root     root             0 Apr 20 00:00 net -> net:[4026532302] # Unchanged
# lrwxrwxrwx    1 root     root             0 Apr 20 00:00 pid -> pid:[4026532300] # Unchanged
# lrwxrwxrwx    1 root     root             0 Apr 20 00:00 pid_for_children -> pid:[4026532300] # Unchanged
# lrwxrwxrwx    1 root     root             0 Apr 20 00:00 user -> user:[4026531837] # Unchanged
# lrwxrwxrwx    1 root     root             0 Apr 20 00:00 uts -> uts:[4026532384]  # A different UTS Namespace!
hostname
#2d95d7bdebc8 # Inherited settings from the parent, let's change it!
hostname thomas
# thomas
# #Success! We have a different hostname for processes in UTS namespace 4026532384!
What about our parent’s namespace? It should contain PID 1 and PID 4, which are both in UTS namespace 4026532298.
# In shell with PID 4
hostname
# 2d95d7bdebc8
# #Great success
Just so you know, if you do not explicitly tell the “unshare” command to create new namespaces (like we did with the “–-uts” flag), your name process will end up in the namespace instances that were associated with the parent process. Right now, the only difference is the “UTS” namespace. Our unshared process will still be in its parent’s “cgroup, “ipc, “mount, “network, “PID, “time” and “user” namespace.
To prove that the other namespaces are still associated with the parent process we can run the following commands in the first shell, the one with the unshared process:
# In shell with PID 21
readlink /proc/$$/ns/mnt
# mnt:[4026532297]
# In shell with PID 4
# mnt:[4026532297] # They match!
A fun command that you can also use is “nsenter, it allows you to run a process in the namespaces of another running process. It is simple to use, you get the PID of the process that has the namespaces you want your new process to use and you feed it into the command. You will also specify which namespace types your new process should use.
Starting from the second shell:
# In shell with PID 4
sudo nsenter --target 21 --uts ash
echo $$
# 49
readlink /proc/$$/ns/uts
# uts:[4026532384]
hostname
# thomas
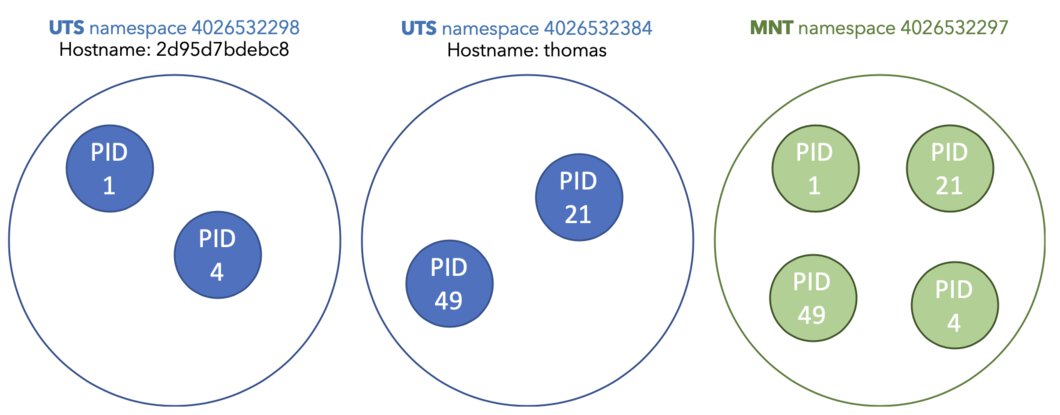
The end result should look similar to this:
If you are familiar with Kubernetes you might know that you can run multiple containers inside of the same pod, those containers can talk to each other over the localhost hostname. Are you beginning to understand how that might be possible?
Mount namespaces
This type of namespace is the first type that was created in 2002, and back then we did not really think we would ever have any need to isolate any other type of namespaces. If you come across documentation that uses the CLONE_NEWNS clone flag know that it refers to the mount namespace.
With the mount namespace we can isolate a set of mount points that is seen by a (group of) process(es). A mount point is a piece of information that includes the mount source, pathname, and parent mount ID. We can make it so one process sees a completely different directory hierarchy as opposed to a different process, which can have another different directory hierarchy entirely. This makes it perfect for creating a jail that is like chroot, but this one is a little more secure.
# In shell with PID 1
mkdir mytempfs
touch /mytempfs/parent.txt
ls -lA /mytempfs # We can see the parent.txt file
# total 0
# -rw-r--r--    1 root     root             0 Apr 20 00:00 parent.txt
readlink /proc/$$/ns/mnt
# mnt:[4026532297] # Our parent's mount namespace ID
unshare --mount sh
# mnt:[4026532384] # Our child process' new mount namespace!
df /mytempfs
#Filesystem           1K-blocks      Used Available Use% Mounted on
#overlay               15312232   1956624  12558068  13% /
ls -lA /mytempfs
#total 0
#-rw-r--r--    1 root     root             0 Apr 26 16:14 parent.txt
#We can see the parent.txt file, good!
mount -n -o size=10m -t tmpfs tmpfs mytempfs
touch /mytempfs/child.txt
df /mytempfs
# Filesystem           1K-blocks      Used Available Use% Mounted on
# tmpfs                    10240         0     10240   0% /mytempfs
ls -lA /mytempfs # The parent file is no longer visible since we have a different mount point.
#-rw-r--r--    1 root     root             0 Apr 20 00:00 child.txt
Right until the point where we execute “mount” the “mytempfs” directory is mounted to the parent’s “/” even after unsharing the mount namespace. Why is this? Remember that using “unshare --mount” means that we inherit a list of mount points from the parent process.
When we start editing mount points they will only be visible to processes within that mount namespace, 4026532384 in this case.
pivot_root(8)
I read that “chroot” is not used in containers any longer, instead we have switched to using the “pivot_root”. The concept of “pivot_root” is like to that of “chroot", except it changes what “/” means inside of the current mount namespace. Compared to “chroot” it allows you to access the old file system tree before it is unmounted, which is something you will handle.
If we take a look at the man page for “pivot_root” command:
NAME
       pivot_root - change the root filesystem
SYNOPSIS
       pivot_root new_root put_old
DESCRIPTION
       pivot_root moves the root file system of the current process to the
       directory put_old and makes new_root the new root file system.  Since
       pivot_root(8) simply calls pivot_root(2), we refer to the man page of
       the latter for further details.
It takes the current root, moves it to “old_root” with all mounts and sets “new_root” as the new root. To experiment with “pivot_root” inside our Alpine container, we will first need to download the program. Pivot_root is included in the util-linux package and will be placed in “/sbin”.
apk add util-linux
pivot_root --version
# pivot_root from util-linux 2.34
We will also need an appropriate root filesystem in order for “pivot_root” to work.
wget http://dl-cdn.alpinelinux.org/alpine/v3.11/releases/x86_64/alpine-minirootfs-3.11.6-x86_64.tar.gz
mkdir /myrootfs
tar -xvf alpine-minirootfs-3.11.6-x86_64.tar.gz --directory /myrootfs
ls -lA /myrootfs
# total 68
# drwxr-xr-x    2 root     root          4096 Apr 20 00:00 bin
# drwxr-xr-x    2 root     root          4096 Apr 20 00:00 dev
# drwxr-xr-x   15 root     root          4096 Apr 20 00:00 etc
# drwxr-xr-x    2 root     root          4096 Apr 20 00:00 home
# drwxr-xr-x    5 root     root          4096 Apr 20 00:00 lib
# drwxr-xr-x    5 root     root          4096 Apr 20 00:00 media
# drwxr-xr-x    2 root     root          4096 Apr 20 00:00 mnt
# drwxr-xr-x    2 root     root          4096 Apr 20 00:00 opt
# dr-xr-xr-x    2 root     root          4096 Apr 20 00:00 proc
# drwx------    2 root     root          4096 Apr 20 00:00 root
# drwxr-xr-x    2 root     root          4096 Apr 20 00:00 run
# drwxr-xr-x    2 root     root          4096 Apr 20 00:00 sbin
# drwxr-xr-x    2 root     root          4096 Apr 20 00:00 srv
# drwxr-xr-x    2 root     root          4096 Apr 20 00:00 sys
# drwxrwxrwt    2 root     root          4096 Apr 20 00:00 tmp
# drwxr-xr-x    7 root     root          4096 Apr 20 00:00 usr
# drwxr-xr-x   12 root     root          4096 Apr 20 00:00 var
As I mentioned earlier, using the container image as an example, root filesystem ensures that we have gotten all the dependencies that we expect there to be in a certain Linux distribution. We will also create a new mount namespace and add a mount point, this way other, non-child processes cannot snoop around inside.
unshare --mount sh
mount --bind /myrootfs /myrootfs
mkdir /myrootfs/.oldrootfs
cd /myrootfs
pivot_root . .oldrootfs
ls -lA /
# total 72
# drwxr-xr-x    1 root     root          4096 Apr 20 00:00 .oldrootfs
# drwxr-xr-x    2 root     root          4096 Apr 20 00:00 bin
# drwxr-xr-x    2 root     root          4096 Apr 20 00:00 dev
# drwxr-xr-x   15 root     root          4096 Apr 20 00:00 etc
# drwxr-xr-x    2 root     root          4096 Apr 20 00:00 home
# drwxr-xr-x    5 root     root          4096 Apr 20 00:00 lib
# drwxr-xr-x    5 root     root          4096 Apr 20 00:00 media
# drwxr-xr-x    2 root     root          4096 Apr 20 00:00 mnt
# drwxr-xr-x    2 root     root          4096 Apr 20 00:00 opt
# dr-xr-xr-x    2 root     root          4096 Apr 20 00:00 proc
# drwx------    2 root     root          4096 Apr 20 00:00 root
# drwxr-xr-x    2 root     root          4096 Apr 20 00:00 run
# drwxr-xr-x    2 root     root          4096 Apr 20 00:00 sbin
# drwxr-xr-x    2 root     root          4096 Apr 20 00:00 srv
# drwxr-xr-x    2 root     root          4096 Apr 20 00:00 sys
# drwxrwxrwt    2 root     root          4096 Apr 20 00:00 tmp
# drwxr-xr-x    7 root     root          4096 Apr 20 00:00 usr
# drwxr-xr-x   12 root     root          4096 Apr 20 00:00 var
We now have our new root ready to be used. If you look at “/.oldrootfs” you’d be able to see that it contains our old “/”, how can we make it so our process cannot access it?
umount -l .oldrootfs
ls -lA /.oldrootfs
# total 0
There we go, the old root filesystem has been unmounted and is no longer visible from inside the process.
Conclusion
Just by writing all of this down made me appreciate all the efforts that go into making container tools, since there are a lot of moving parts that you need to take into consideration if you want to achieve rock solid process isolation. Still, it is equally important to understand what it is that these tools are trying to solve.
As soon as the writing fatigue wears off, I will take a closer look at the remaining namespaces. 😁
Notice anything off? Please, let me know!