Exploring Containers - Part 3
In this post
After a slight detour writing about how chaos engineering can be applied to an Azure architecture, I decided to once again set my sights on exploring the internals of Linux containers. My primary motivation for writing about this is that I believe that container internals are not highlighted nearly as much as they could be, instead, most of it is abstracted behind (great) tools.
I do not think abstraction is necessarily a bad thing, certainly if you want to be productive. However, in this blog post, I will try to peel away some of the remaining layers of what makes a typical Linux ‘container’ a ‘container’.
The concept of a container does not exist in the Linux kernel, it is a term that is used to describe a combination of a set of Linux namespaces.
Linux Namespaces
To quickly summarize namespaces, let’s look at the definition:
Namespaces are a Linux kernel feature that allows us to wrap global system resources in an abstraction layer. Doing so allows you to make processes, within the namespace, believe that they have their own isolated instance of the global resource. Changes to the global resource are visible to other processes that are members of the namespace but are invisible to other processes.
I’ve included an overview of the namespaces I’ve written about:
| Namespace | What does it isolate? | Discussed |
|---|---|---|
| Mount | Mount points | Part 1 |
| UTS | Hostname and NIS domain name | Part 1 |
| IPC | System V IPC, POSIX message queues | Part 2 |
| Network | Network devices, stacks, ports, etc. | Part 2 |
| Time | Boot and monotonic clocks | Part 2 |
| PID | Process IDs | Part 3 |
| Control group | Cgroup root directory | Part 3 |
| User | User and group IDs | Part 3 |
I will again be using a Docker Linux container to run some experiments in a disposable environment. If you want to follow along through WSL2 or a Linux VM, that is fine as well.
docker run -it --name docker-sandbox --rm --privileged alpine:3.11
# Remember to never run your Docker container with --privileged in production unless you need it!
PID namespace
PID namespaces isolate, as the name suggests, a set of process identifier numbers. This means that processes running in different PID namespaces can have the same process ID numbers as other processes, running in a different PID namespace, without conflicting with one another.
PID namespaces can form a tree of PID namespaces, thus allowing them to be nested multiple levels deep, up to a maximum of 32 levels. This implies that each PID namespace has a parent PID namespace, with the very first PID namespace (initial/root PID namespace) being the exception.
A process is not only accessible to other processes in its current PID namespace but also each ancestor PID namespace, it is even possible to manipulate this process from another process like you normally would, by using system calls who can target that specific process ID. That being said, this also implies that processes in a child PID namespace cannot see processes that are running up in the parent or ancestor PID namespaces. A process can, however, see all the processes that are running in its current and descendants PID namespaces.
Michael Kerrisk, author of The Linux Programming Interface, created a great visual overview of a PID namespace hierarchy:
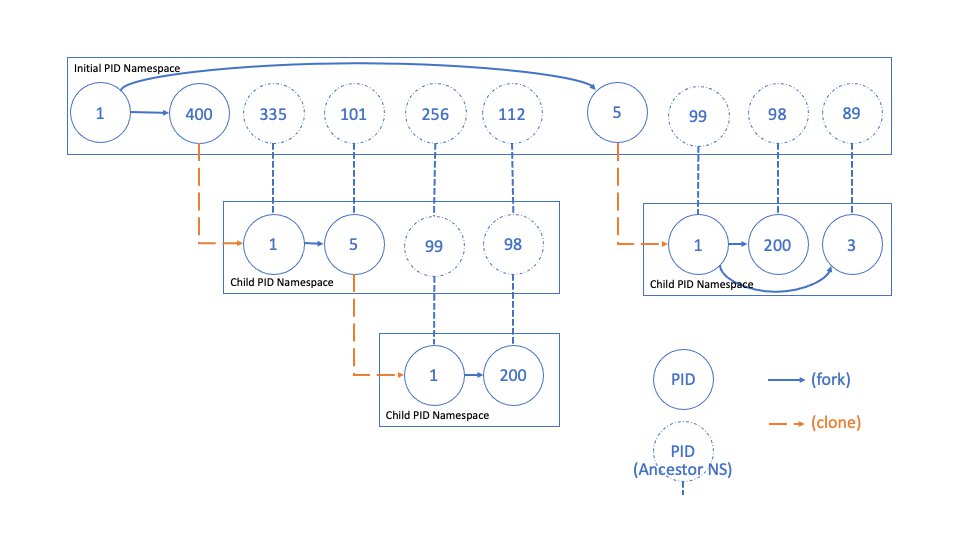
When we create a new PID namespace the first process has the identifier number one and it, for all intends and purposes, is labelled the “init” process of that particular namespace. Its behaviour is conceptually similar to the one of the init process of a Linux system, meaning that whenever we create additional processes within the new PID namespace they will be children of the PID namespace’s “init” process. Also, if an “init” process is terminated via a SIGKILL signal, it will terminate all processes in its current PID namespace, as well as any descendant namespaces.
A new process its PID namespace membership is determined at creation and cannot be changed afterwards. This behaviour also establishes a parent-child relationship which can be seen via the “/proc/[PID]/ns/pid_for_children” symbolic link.
Creating a PID namespace
To get a better visual understanding of how process ID namespaces work (and how the processes are related to one another) we can use the “--forest” flag of the “ps” command to help us visualize things more clearly.
This is why we need to update our default BusyBox “ps” command, that comes with Alpine 3.11, to a more recent build of procps.
apk --no-cache add procps
When we use the “ps” command along with the --forest" flag, you will notice we will get a hierarchical view of our processes.
Let’s try to create one new process in our initial namespace, one new process in a child PID namespaces and one new process in a grandchild namespace (relative to the initial namespace). We will and view them through “ps”.
ash # new process in the initial namespace
unshare --pid --fork ash # from the namespace of process one, crate process two, child namespace
unshare --pid --fork ash # from the namespace of process two, create process three in a grandchild namespace

ps -e --forest --sort=-pid
  PID TTY          TIME CMD
    1 pts/0    00:00:00 sh
    7 pts/1    00:00:00 ash
   20 pts/1    00:00:00  \_ unshare
   21 pts/1    00:00:00      \_ ash
   22 pts/1    00:00:00          \_ unshare
   23 pts/1    00:00:00              \_ ash
   24 pts/1    00:00:00                  \_ ps
Using “unshare --pid --fork” from a shell will fork a specified program as a child progress into a separate PID namespace, different from the one that that caller is in. We did this twice!
If we take a look at all of the processes’ PID inode numbers you will see that we have indeed created two nested PID namespaces, starting from the root PID namespace.
ls -lA /proc/7/ns/ #process: ash
# lrwxrwxrwx    1 root     root             0 Nov  5 20:09 pid -> pid:[4026532299]
# lrwxrwxrwx    1 root     root             0 Nov  5 20:09 pid_for_children -> pid:[4026532299]

ls -lA /proc/20/ns/ #process: unshare
# lrwxrwxrwx    1 root     root             0 Nov  5 20:09 pid -> pid:[4026532299]
# lrwxrwxrwx    1 root     root             0 Nov  5 20:09 pid_for_children -> pid:[4026532383]

ls -lA /proc/21/ns/ #process: ash
# lrwxrwxrwx    1 root     root             0 Nov  5 20:10 pid -> pid:[4026532383]
# lrwxrwxrwx    1 root     root             0 Nov  5 20:10 pid_for_children -> pid:[4026532383]

ls -lA /proc/22/ns/ #process: unshare
# lrwxrwxrwx    1 root     root             0 Nov  5 20:10 pid -> pid:[4026532383]
# lrwxrwxrwx    1 root     root             0 Nov  5 20:10 pid_for_children -> pid:[4026532384]

ls -lA /proc/23/ns/ #process: ash
# lrwxrwxrwx    1 root     root             0 Nov  5 20:10 pid -> pid:[4026532384]
# lrwxrwxrwx    1 root     root             0 Nov  5 20:10 pid_for_children -> pid:[4026532384]
You might have noticed something peculiar though, have a look at where our last “ps” process was running from. How is it possible that we are running “ps” from PID namespace 4026532384 and we can see into our initial namespace? Can we mess around with processes that are running in parent namespaces after all?
kill -9 7
# ash: can't kill pid 7: No such process

# ❓ Then what is our current PID in our current PID namespace?
echo $$
# 1
We are, at least, unable to mess about with processes that live in a parent or ancestor namespace and we have verified that our shell’s PID number for PID namespace 4026532384 is number 1.
Can’t fork
At first, I assumed that I was able to use the “unshare(1)” command without specifying the “--fork” flag, as we have not used “--fork” when using “unshare(1)” for any of the other types of namespaces. Let’s take a look and see what happens when we use the same approach when creating a new PID namespace.
unshare --pid ash
ls -lA
#ash: can't fork: Out of memory
exit
That’s no good and why is this even happening? Remember that for many of the other namespace types that we’ve discussed earlier, “unshare(1)” will associate a process to a brand new namespace.
PID namespaces are a bit different, “unshare(1)” will not associate the unshare process with a new PID namespace. The first child process following a “fork(2)” will be placed into a new PID namespace and receive the PID 1 number, becoming the new init process for the PID namespace.
From what I was able to gather, the “--pid” flag does not imply that the “--fork” flag is toggled as well, doing so “would cause the behaviour of “unshare(1)” to be inconsistent with how other namespace options map directly to “unshare(2)”, the system call, its flags. You must therefore explicitly add the “--fork” flag when you want to use the “--pid” flag.
CLONE_NEWPID: Unshare the PID namespace, so that the calling process has a new PID namespace for its children which is not shared with any previously existing process. The calling process is not moved into the new namespace. The first child created by the calling process will have the process ID 1 and will assume the role of init(1) in the new namespace.
PID namespaces and /proc
That leaves open the question of why we can view all processes on the entire host through “ps”?
Remember that in part one, where we discussed mount points, whenever we create a new process it is linked to the parents mount namespace and thus uses the same mount points.
This means that the proc filesystem from the initial mount namespace is also shared with our process. As you have already seen, the proc filesystem holds, amongst other things, a numerical subdirectory for each running process. We could try to fix this by using the “mount” command, to mount a new procfs instance, but doing so will impact the host’s mount points since we would be performing this against the initial mount namespace. We can verify that the grandchild process is in the ancestor’s mount namespace like so:
readlink /proc/1/ns/mnt
# mnt:[4026532296]
readlink /proc/23/ns/mnt
# mnt:[4026532296]
All the processes that we have created up until this point have used the same mount namespace so perhaps we should take a step back and reexamine our approach to how we use the “unshare(1)” command.
This is similar to the issue of having to use the “--fork” flag when creating a PID namespace. We can also use a flag called “--mount-proc”, which in conjunction with the “--pid” flag will mount a new procfs instance in a new mount namespace!.
unshare --pid --fork --mount-proc ash

ps -e
# PID TTY          TIME CMD
#   1 pts/0    00:00:00 ash
#  17 pts/0    00:00:00 ps

readlink /proc/1/ns/mnt
# mnt:[4026532384]
# 🥳
This mnt namespace is different (4026532384) from the parent process’ mnt namespace (4026532296), which is more along the lines of what we expect when isolating the process namespace, great!
Control groups
A cgroup, short for control group, is a mechanism that allows us to hierarchically group processes which are typically using some sort of system resource. Whenever we want to limit, control access, prioritize and monitor the use of these system resources by processes or threads, we can use a cgroup to do so.
Ideally, we will want to have system resource restrictions in place for processes, this way we can ensure that a specific process does not take up an excessive amount of CPU cycles, available memory or network bandwidth. Want to ensure that a specific set of processes run on a specific CPU core or that they have exclusive access to a particular device? Cgroups can help!
💡 If you’ve ever worked with a container orchestrator this may sound very familiar, in fact, you might have already used cgroups indirectly.
The cgroup feature has several great use cases, for instance, think about multi-tenancy inside of virtualized environments and how we would apply resource limits to different customer tenants! Another use case would be in the embedded programming space, where you want guarantees that system resource usage does not spiral out of control!
Meet the cgroup controllers
A cgroup controller is a kernel component that modifies the behaviour of the processes in a cgroup hierarchy.
There is not only version 1 of the cgroups feature but a version 2, as well. Development of version 1 cgroup controllers was largely uncoordinated which led to several inconsistencies which made the management of cgroup hierarchies difficult. Version two is intended as a replacement for version 1, though it still exists for compatibility issues.
On modern Linux systems, systemd will automatically mount cgroups v2 and its filesystem during the startup process. By default, the kernel exposes cgroups in /sys/fs/cgroup, which is part of a pseudo-filesystem called cgroupfs.
Let’s list those controllers, shall we?
ls -lA /sys/fs/cgroup/
# total 0
# drwxr-xr-x    2 root     root             0 Nov 23 21:20 blkio
# drwxr-xr-x    2 root     root             0 Nov 23 21:20 cpu
# drwxr-xr-x    2 root     root             0 Nov 23 21:20 cpuacct
# drwxr-xr-x    2 root     root             0 Nov 23 21:20 cpuset
# drwxr-xr-x    2 root     root             0 Nov 23 21:20 devices
# drwxr-xr-x    2 root     root             0 Nov 23 21:20 freezer
# drwxr-xr-x    2 root     root             0 Nov 23 21:20 hugetlb
# drwxr-xr-x    2 root     root             0 Nov 23 21:20 memory
# drwxr-xr-x    2 root     root             0 Nov 23 21:20 net_cls
# drwxr-xr-x    2 root     root             0 Nov 23 21:20 net_prio
# drwxr-xr-x    2 root     root             0 Nov 23 21:20 perf_event
# drwxr-xr-x    2 root     root             0 Nov 23 21:20 pids
# dr-xr-xr-x    5 root     root             0 Nov 23 18:28 rdma
# drwxr-xr-x    2 root     root             0 Nov 23 21:20 systemd
If you are curious about what each of these does, I’d recommend taking a look at the cgroups kernel docs:
| Name | Versions | Description |
|---|---|---|
| blkio | 1 | controls and monitors access to I/O on block devices by processes in cgroups |
| cpuacct | 1 | generates automatic reports on CPU resources used by processes in a cgroup |
| cpuset | 1 | assigns individual CPUs and memory nodes to cgroups |
| cpu | 1, 2 | used for CPU scheduling preferences, successor to the version 1 cpu and cpuacct |
| devices | 1 | allows or denies access to devices by processes in a cgroup |
| freezer | 1, 2 | suspends or resumes processes in a cgroup |
| hugetlb | 1, 2 | can be used to limit the usage of large size virtual memory pages by tasks in a cgroup |
| memory | 1, 2 | generates automatic reports on memory resources used by the processes in a cgroup and allows you to set limits on memory use of those processes |
| net_cls | 1 | places a classid, specified for the cgroup, on network packets created by a cgroup. These classids can then be used in firewall rules, as well as used to shape outbound traffic using tc(8) |
| net_prio | 1 | provides a way to dynamically set the priority of network traffic per each network interface for applications within various cgroups |
| perf_event | 1, 2 | allows perf monitoring of the set of processes in a cgroup |
| pids | 1, 2 | can set limits for a number of processes and their children in a cgroup |
| rdma | 1, 2 | can set limits on Remote Direct Memory Access/InfiniBand specific resources in a cgroup |
It is important to mention that a controller cannot be simultaneously used in both a cgroups v1 hierarchy and in the cgroups v2 hierarchy. As you can probably tell, Alpine 3.11 is working with cgroups v1.
To create a new cgroup we create a new subdirectory on a particular location. We can use the memory resource controller to place some restrictions on memory usage, we will need to create a subdirectory within the memory directory. Let’s also list the available options in regards to memory behaviour.
mkdir /sys/fs/cgroup/memory/my-oom-example
ls -lA /sys/fs/cgroup/memory/my-oom-example
# total 0
# -rw-r--r--    1 root     root             0 Nov 25 19:30 cgroup.clone_children
# --w--w--w-    1 root     root             0 Nov 25 19:30 cgroup.event_control
# -rw-r--r--    1 root     root             0 Nov 25 19:30 cgroup.procs
# -rw-r--r--    1 root     root             0 Nov 25 19:30 memory.failcnt
# --w-------    1 root     root             0 Nov 25 19:30 memory.force_empty
# -rw-r--r--    1 root     root             0 Nov 25 19:30 memory.kmem.failcnt
# -rw-r--r--    1 root     root             0 Nov 25 19:30 memory.kmem.limit_in_bytes
# -rw-r--r--    1 root     root             0 Nov 25 19:30 memory.kmem.max_usage_in_bytes
# -r--r--r--    1 root     root             0 Nov 25 19:30 memory.kmem.slabinfo
# -rw-r--r--    1 root     root             0 Nov 25 19:30 memory.kmem.tcp.failcnt
# -rw-r--r--    1 root     root             0 Nov 25 19:30 memory.kmem.tcp.limit_in_bytes
# -rw-r--r--    1 root     root             0 Nov 25 19:30 memory.kmem.tcp.max_usage_in_bytes
# -r--r--r--    1 root     root             0 Nov 25 19:30 memory.kmem.tcp.usage_in_bytes
# -r--r--r--    1 root     root             0 Nov 25 19:30 memory.kmem.usage_in_bytes
# -rw-r--r--    1 root     root             0 Nov 25 19:30 memory.limit_in_bytes
# -rw-r--r--    1 root     root             0 Nov 25 19:30 memory.max_usage_in_bytes
# -rw-r--r--    1 root     root             0 Nov 25 19:30 memory.memsw.failcnt
# -rw-r--r--    1 root     root             0 Nov 25 19:30 memory.memsw.limit_in_bytes
# -rw-r--r--    1 root     root             0 Nov 25 19:30 memory.memsw.max_usage_in_bytes
# -r--r--r--    1 root     root             0 Nov 25 19:30 memory.memsw.usage_in_bytes
# -rw-r--r--    1 root     root             0 Nov 25 19:30 memory.move_charge_at_immigrate
# -rw-r--r--    1 root     root             0 Nov 25 19:30 memory.oom_control
# ----------    1 root     root             0 Nov 25 19:30 memory.pressure_level
# -rw-r--r--    1 root     root             0 Nov 25 19:30 memory.soft_limit_in_bytes
# -r--r--r--    1 root     root             0 Nov 25 19:30 memory.stat
# -rw-r--r--    1 root     root             0 Nov 25 19:30 memory.swappiness
# -r--r--r--    1 root     root             0 Nov 25 19:30 memory.usage_in_bytes
# -rw-r--r--    1 root     root             0 Nov 25 19:30 memory.use_hierarchy
# -rw-r--r--    1 root     root             0 Nov 25 19:30 notify_on_release
# -rw-r--r--    1 root     root             0 Nov 25 19:30 tasks
As you can tell there are quite a few options, all related to memory behaviour, available. If you’d like to know more about what these options do in greater depth you can find additional information in the kernel cgroup v1 docs.
We will impose a 50 megabytes memory limit for processes that are assigned to the “my-oom-example” cgroup. This will set the maximum amount of user memory, including file cache.
echo 50m > /sys/fs/cgroup/memory/my-oom-example/memory.limit_in_bytes
Now, we can use the following C program to allocate and use blocks of 10 megabytes, it will keep using up blocks of 10 megabytes every second. Save the following contents as a file called “alloc.c” and compile the code with “gcc ./alloc.c -o ./alloc”, you may need to pull in GCC with “apk add build-base.
#include <stdio.h>
#include <stdlib.h>
#include <string.h>
#include <unistd.h>

#define KB (1024)
#define MB (1024 * KB)

int main(int argc, char *argv[])
{
    const int bytesToAllocate = 10 * MB;
    const int megabytesToAllocate = bytesToAllocate / MB;

    int totalMegabytesAllocated = 0;
    void *p;

    while (1)
    {
        p = malloc(bytesToAllocate);
        if (p == NULL)
        {
            perror("Unable to allocate memory, exiting..");
            return 1;
        }
        memset(p, 0, bytesToAllocate);

        totalMegabytesAllocated += megabytesToAllocate;
        printf("Total \t%d MB\n", totalMegabytesAllocated);
        sleep(1);
    }
    return 0;
}
We need to ensure that every process that is spawned from our current shell will be subjected to our memory restrictions, we can do just that by adding our shell’s PID to the tasks file. This file is available in every subdirectory that is created within the cgroupfs file system, allowing you to easily assign a particular PID to a cgroup.
Our process its child processes will be added to the “tasks” file automatically, you can even test this rather quickly by simply using “cat” on the “tasks” file. Since “cat” will spawn from our current shell you should see its PID in the “tasks” file!
echo $$ > /sys/fs/cgroup/memory/my-oom-example/tasks
cat /sys/fs/cgroup/memory/my-oom-example/tasks
# 1 # <= shell!
# 127 # <= cat!
Let’s use up some memory to test out our cgroup’s memory constraints.
./alloc
# Total         10 MB
# Total         20 MB
# Total         30 MB
# Total         40 MB
# Total         50 MB
# Killed
That seems to do the trick! We can even verify that the memory cgroup “my-oom-example” did kill the process “alloc”, by taking a look at the diagnostic messages.
dmesg
# [22438.382031] [  pid  ]   uid  tgid total_vm      rss pgtables_bytes swapents oom_score_adj name
# [22438.383091] [  11911]     0 11911      411      263    40960        0             0 sh
# [22438.384071] [  12396]     0 12396    12996    12836   139264        0             0 alloc <= 💡
# [22438.385212] oom-kill:constraint=CONSTRAINT_MEMCG,nodemask=(null),cpuset=abcd,mems_allowed=0,oom_memcg=/docker/abcd/my-oom-example <= 💡,task_memcg=/docker/abcd/my-oom-example,task=alloc,pid=12396,uid=0
# [22438.389079] Memory cgroup out of memory: Killed process 12396 (alloc) <= 💡 total-vm:51984kB, anon-rss:50884kB, file-rss:460kB, shmem-rss:0kB, UID:0 pgtables:136kB oom_score_adj:0
# [22438.396233] oom_reaper: reaped process 12396 (alloc) <= 💡, now anon-rss:0kB, file-rss:0kB, shmem-rss:0kB
We can also ensure that the system uses up an additional X amount of swap space before killing off the process. We will set the swappiness, the tendency of the kernel to swap out process memory used by tasks in the cgroup instead of reclaiming pages from the page cache, to the default setting and the maximum amount for the sum of the memory and swap usage.
❗️ memory.memsw.limit_in_bytes becomes available only after all memory limitations, set in memory.limit_in_bytes, have been exhausted. It is therefor important to set the memory.limit_in_bytes before setting the memory.memsw.limit_in_bytes!
We will allow for 50 megabytes of memory to be used and an additional 50 megabytes swap space, making for a total sum of 100 megabytes. If we use up more than 100 megabytes, the process will be killed!
echo 50m > /sys/fs/cgroup/memory/my-oom-example/memory.limit_in_bytes
echo 100m > /sys/fs/cgroup/memory/my-oom-example/memory.memsw.limit_in_bytes
echo 60 > /sys/fs/cgroup/memory/my-oom-example/memory.swappiness

./alloc
# Total   10 MB
# Total   20 MB
# Total   30 MB
# Total   40 MB
# Total   50 MB
# Total   60 MB
# Total   70 MB
# Total   80 MB
# Total   90 MB
# Killed
If you are struggling to find a way to see which cgroups a specific process is associated with, you can always take a look at the “/proc/[pid]/cgroup” file. Note that this is a different file from the inode file we usually inspect when dealing with namespaces, it is also kept at a different location.
Every entry can be read as “hierarchy-ID:controller-list:cgroup-path”, the information displayed in the cgroup file differs for v1 to v2. Here is a handy overview of the differences:
- v1:
- Hierarchy ID: unique number that can be matched to a hierarchy ID in /proc/cgroups.
- Controller list: comma-separated list of the controllers bound to the hierarchy.
- Cgroup-path: the pathname of the control group in the hierarchy to which the process belongs. This pathname is relative to the mount point of the hierarchy.
- v2:
- Hierarchy ID: contains the value 0.
- Controller list: contains no value.
- Cgroup-path: Same as v1.
cat /proc/self/cgroup
#14:name=systemd:/docker/555221f91c08458bf659e13e181479f0c11d8fe0e262657ae1faab16ecfb203e
#13:rdma:/
#12:pids:/docker/555221f91c08458bf659e13e181479f0c11d8fe0e262657ae1faab16ecfb203e
#11:hugetlb:/docker/555221f91c08458bf659e13e181479f0c11d8fe0e262657ae1faab16ecfb203e
#10:net_prio:/docker/555221f91c08458bf659e13e181479f0c11d8fe0e262657ae1faab16ecfb203e
#9:perf_event:/docker/555221f91c08458bf659e13e181479f0c11d8fe0e262657ae1faab16ecfb203e
#8:net_cls:/docker/555221f91c08458bf659e13e181479f0c11d8fe0e262657ae1faab16ecfb203e
#7:freezer:/docker/555221f91c08458bf659e13e181479f0c11d8fe0e262657ae1faab16ecfb203e
#6:devices:/docker/555221f91c08458bf659e13e181479f0c11d8fe0e262657ae1faab16ecfb203e
#5:memory:/docker/555221f91c08458bf659e13e181479f0c11d8fe0e262657ae1faab16ecfb203e
#4:blkio:/docker/555221f91c08458bf659e13e181479f0c11d8fe0e262657ae1faab16ecfb203e
#3:cpuacct:/docker/555221f91c08458bf659e13e181479f0c11d8fe0e262657ae1faab16ecfb203e
#2:cpu:/docker/555221f91c08458bf659e13e181479f0c11d8fe0e262657ae1faab16ecfb203e
#1:cpuset:/docker/555221f91c08458bf659e13e181479f0c11d8fe0e262657ae1faab16ecfb203e
You might be getting different results in the cgroup-path field if you’re following along from WSL or a Linux VM. My current shell’s memory control group settings are located in “/sys/fs/cgroup/memory/docker/555221..”, which is outside of my container’s mount namespace so I will not be able to access it.
This is all because I am trying to perform most of my exploration from within a Docker container and therefor I have to play by its rules. The Docker daemon (dockerd) uses a “/docker” as the cgroup-parent for containers that I create. Fortunately, it is easy to change the ‘cgroup-parent’ setting that dockerd uses, should you so desire.
Cgroup namespaces
Now that we have a basic understanding of what cgroups do, what happens when we isolate cgroups?
Similarly to everything we’ve seen thus far, a cgroup namespace will isolate the view of a process its cgroups. According to the man pages, it does the following:
Each cgroup namespace has its own set of cgroup root directories, which are the base points for the relative locations displayed in the corresponding records in the “/proc/[pid]/cgroup file.”
When a process creates a new cgroup namespace its current cgroups directories become the cgroup root directories of the new namespace.
Let’s see this in action, we will need the 2.36+ version of unshare to make this work, so the very first thing we will do is update it.
apk add --repository http://dl-cdn.alpinelinux.org/alpine/edge/main util-linux
Next, we will fire up another shell and assign it to a newly created memory control group subdirectory.
echo $$
# 1 # Currently in shell with PID 1
cat /proc/1/cgroup | grep memory
# 5:memory:/docker/8e855225ba6357d1da1125c9355f58322b037069970a45a4944ff6343374362b
# Inside shell 1
ash
## Inside shell 2
echo $$
# 7 ## Currently in shell #2 with PID 7
mkdir -p /sys/fs/cgroup/memory/memory-cgroup-example
echo 7 > /sys/fs/cgroup/memory/memory-cgroup-example/cgroup.procs
cat /proc/7/cgroup | grep memory
# 5:memory:/docker/8e855225ba6357d1da1125c9355f58322b037069970a45a4944ff6343374362b/memory-cgroup-example
Now we will launch yet another shell, by using “unshare”, in a new cgroup and mount namespace.
# Inside shell 2
unshare --cgroup --mount ash
# Inside shell 3, with the new cgroup and mount namespaces!
echo $$
# 21
If this is getting a little complex, we can still use the “--forest” flag along with the “ps” command to get a graphical overview of where we are right now. We did not create a different PID namespace so we should be able to see all the PIDs on the system.
## Inside shell 3, with the new cgroup and mount namespaces!
ps -e --forest --sort=-pid
#  PID TTY          TIME CMD
#    1 pts/0    00:00:00 sh
#    7 pts/0    00:00:00 ash
#   21 pts/0    00:00:00  \_ ash [❌ You are here]
#   23 pts/0    00:00:00      \_ ps
When we then inspect the “/proc/[pid]/cgroup” files of PIDS 23, 7 and 1 we notice the following:
## Inside shell 3, with the new cgroup and mount namespaces!
cat /proc/23/cgroup | grep memory
# 5:memory:/
cat /proc/7/cgroup | grep memory
# 5:memory:/ # Matched PID 23!
cat /proc/1/cgroup | grep memory
# 5:memory:/.. # 💡 notice the '..'
From the output of the first command, we see that the memory cgroup membership of PID 23 is relative to the memory cgroup root directory that was established when the new cgroup namespace was created. PID 23 resides in the “/memory-cgroup-example” memory cgroup.
The root directory of the memory cgroup hierarchy, in the new cgroup namespace, is also “/memory-cgroup-example” and so PID 23’s cgroup membership is displayed as “/”. The same applies when we look at PID 7’s cgroup file, since it is in the same “/memory-cgroup-example” memory cgroup. PID 1’s memory cgroup resides in the parent, relative to our memory cgroup of the new cgroup namespace.
The new cgroup namespace is making sure that we cannot see the actual value that we noticed earlier while inspected the cgroup file from shell 2:
# ⏪ Rewinding a couple of steps..
# Inside shell 2 (PID 7)
cat /proc/7/cgroup | grep memory
# 5:memory:/docker/8e855225ba6357d1da1125c9355f58322b037069970a45a4944ff6343374362b/memory-cgroup-example
One more thing that the man pages recommend that we take care of when dealing with cgroups namespaces is the fact that our mount points are not exactly on par with the definition of cgroup namespaces. Since we inherited a list of mount points from the parent mount namespace, this causes the memory-cgroup-example directory to appear.
## Inside shell 3, with the new cgroup and mount namespaces!
cat /proc/21/mountinfo | grep memory
# 296 269 0:33 /.. /sys/fs/cgroup/memory rw,nosuid,nodev,noexec,relatime - cgroup memory rw,memory
# 💡 <mount ID> <parent ID> <major:minor> <root> <mount point> <mount options> <optional fields> <separator> <filesystem type> <mount source> <super options>
ls -lA /sys/fs/cgroup/memory/
# ... omitted
# drwxr-xr-x    2 root     root             0 Dec  2 22:45 memory-cgroup-example # ❗️ You should not be here!
# -rw-r--r--    1 root     root             0 Dec  2 22:51 tasks
cat /sys/fs/cgroup/memory/memory-cgroup-example/cgroup.procs
# 7  # this is shell 2
# 21 # this is shell 3
# 28 # this is 'cat'
As you can see, the fourth field in the “mountinfo” file points to a mount entry for the cgroup filesystem corresponding to the initial cgroup namespace. This is technically correct, as we showed earlier, since it points to the parent directory of ‘memory-cgroup-example’. If we make the directory structure more in line with the definition of cgroup namespaces, we should make sure that it points to ‘/’ instead of ‘/..’
Here is what the man pages say about a cgroup namespace and its cgroup directories:
When a process creates a new cgroup namespace its current cgroups directories become the cgroup root directories of the new namespace.
## Inside shell 3, with the new cgroup and mount namespaces!
mount --make-rslave /
umount /sys/fs/cgroup/memory
mount -t cgroup -o memory memory /sys/fs/cgroup/memory
ls -lA /sys/fs/cgroup/memory/memory-cgroup-example
# ls: /sys/fs/cgroup/memory/memory-cgroup-example: No such file or directory
cat /sys/fs/cgroup/memory/cgroup.procs
# 7  # this is shell 2
# 21 # this is shell 3
# 39 # this is 'cat'
cat /proc/self/mountinfo | grep memory
# 296 269 0:33 / /sys/fs/cgroup/memory rw,relatime - cgroup memory rw,memory
# 💡 <mount ID> <parent ID> <major:minor> <root> <mount point> <mount options> <optional fields> <separator> <filesystem type> <mount source> <super options>
User namespaces
User namespaces not only isolate the user and group identifiers in a Linux system but the root directory, keys and capabilities as well. Like the other types of namespaces, you can nest user namespaces up to 32 levels deep. Once a child-parent association has been made, in this tree-structure, it cannot be changed.
A common use-case for user namespaces is that by using user namespaces, we will be able to have different UIDs and GIDs depending on the namespace that we are in, meaning that the UIDs and GIDs of a process can be different inside and outside of the namespace. A process gets assigned a user and group ID, which determines what types of operations it can execute. As you can already tell, this impacts the overall security of your system.
Interestingly, we can have a process that is running as root/privileged UID (UID 0) inside a particular user namespace while another process, running in a different user namespace, has an unprivileged UID. With this technique, we can allow for a process to have specific permissions in a certain context.
Mapping
The mechanism for linking UIDs and GIDs to a different set of UIDs and GIDs, in a parent user namespace, is particularly useful when you’re performing an operation that includes a permission check. For instance, when a process accesses a file, its user and group ID are mapped to the user and group ID in the initial user namespace.
Let’s take a look at our current effective user and group IDs.
id
# uid=0(root) gid=0(root) groups=0(root),1(bin),2(daemon),3(sys),4(adm),6(disk),10(wheel),11(floppy),20(dialout),26(tape),27(video)
When we “unshare” a process and create a new user namespace, you will notice that it will assign the process to the user “nobody”. This is happening because we have not set up a mapping between our two user namespaces, giving us the overflow user ID “65534(nobody)”.
unshare --user ash
id
# uid=65534(nobody) gid=65534(nobody) groups=65534(nobody),65534(nobody),65534(nobody),65534(nobody),65534(nobody),65534(nobody),65534(nobody),65534(nobody),65534(nobody),65534(nobody),65534(nobody)
exit
We can enable this mapping by using the “--map-root-user” flag “unshare”.
The “--map-root-user” flag only maps the current effective user and group IDs to the superuser UID and GID in the newly created user namespace. Using “--map-root-user” also implies that you will not be able to invoke “setgroups(2)”. Mapping multiple ranges of UIDs and GIDs is also not supported.
“unshare” has created a new user namespace and has modified the UID and GID mapping files under /proc/self/. Each row, regardless of whether it’s the UID or GID file, can be interpreted as follows:
<current-ns-start-id> <parent-ns-start-id> <id-range>
unshare --user --map-root-user ash
cat /proc/$$/uid_map
#         0          0          1
cat /proc/$$/gid_map
#         0          0          1
In our case, this means that our new namespace its starting user ID is set to 0 and it maps to user IDs in the associated parent user namespace. The mapping will only apply to numbers 0 since the id-range is set to 1. This may look a little strange but it is due to our running tests inside of a Docker container.
Let’s take another example, assume we have the following output from the uid mapping file:
cat /proc/1234/uid_map
#         11         133         5
This would mean that UIDs 11 through 15, in process 1234 its user namespace, maps to UIDs 133 through 137, in the parent user namespace.
Interaction with other types of namespaces
A user namespace has another great trick up its sleeve. It can become the owner of other types of namespaces, such as the ones we have discussed earlier:
- Mount
- UTS
- IPS
- Network
- Time
- PID
- Cgroups
When a user namespace is created along with a different namespace type, the kernel assigns the creating process its’ user namespace as the owner of the new type.
We can test this by creating a user namespace and a UTS namespace with “unshare(1)”, with root mappings:
unshare --user --map-root-user --uts
hostname thomas
hostname
# thomas
When a process wants to perform an action against an isolated resource, like by changing the hostname of our newly created UTS namespace, a permissions check will occur against the user namespace, which owns the UTS namespace, but not against the root namespace.
If the process has the correct set of capabilities it will be able to modify the hostname!
In closing
What a long, strange trip it’s been.
Reading through all of the various docs, issue trackers and source code materials I began to appreciate the incredible amount of work that people have put into creating (and maintaining), what has essentially become, the foundations of containers and plenty of other interesting technologies.
Isolating a process correctly and securely is important but fortunately, that’s where all of these various technologies come to our aid!
If you’d like to know more about Kubernetes and how it can work with Microsoft Azure, for instance, you’re in luck. Last year, Microsoft MVP Micha Wets and I spoke about “Kubernetes in a Microsoft World” at Azure Saturday 2019 and I have turned our talk into a blog series.
If you have been following along, I hope I have cleared up some of the mysteries surrounding containers for you.