Exploring Windows Containers
In this post
📣 Dive into the code samples from this blog on GitHub!
A little over a year ago I began writing about all the various parts that make up a Linux container. My motivation for doing so was because I thought, and still think, that the “why” is more often discussed as opposed to the “what”. Mind you, I do not think it always necessary to delve into the “what” as long as you are capable of being productive. 🙃
A few months ago I was thinking of how far Windows support has come in Kubernetes since v1.14 was released. That specific version marked the “production level support for Windows worker nodes and containers”. You might have noticed that the support for Windows worker nodes in the Kubernetes ecosystem been steadily improving ever since, as well.
Fast forward to Ignite 2021 and you can see that Microsoft is still working on new features for Windows containers, while also taking a critical look at improving the deployment and management experience. All of these advancements made me want to tinker with Windows containers once more.
I’ve always felt very curious to learn more about the technical underpinnings of Windows containers. These details are oftentimes abstracted away from the user, usually for good reason. At any rate, I’ve wanted to create a Windows-equivalent to the “Exploring (Linux) Containers” articles, to highlight some of the things that make this technology possible.
💡 The samples discussed in this article (available on Github) were built and tested on an Azure Virtual Machine that supports nested virtualization, using the latest Visual Studio on Windows Server 2019 image from the Azure Marketplace. For more information, have a glance at the following Azure Docs page.
Duct tape and glue
Containers are very different from virtual machines, though you may often find introductory material that refers to them as such. It’s a good enough analogy when you’re just starting to learn about containers, but I think it does not paint a complete picture. To power the containers technology on Windows, many different features were added to the operating system over the years and this all culminated in the Windows kernel being able to, essentially, run multiple instances of user-mode without the use of a hypervisor.
As with Linux, the concept of a container does not exist inside of the Windows kernel as there is no singular object that you can refer to as the go-to container type(*). Windows containers are created by combining features from the Windows-equivalents to control groups and several different types of namespaces (process, network, time, etc..).
Hold on - whats and whos?
- Control groups (cgroups)
- Allows you to set resource controls for processes that use system resources.
- Useful for limiting a process its maximum amount of CPU cycles, working memory, etc…
- Namespaces:
- They can provide processes with an isolated view of certain system resources.
- All of these views, inside a container, can be different from what is active on the host or any other container.
- A process can, for example, have one of the following items completely separate from the host: process table, list of users, IPC system, network stack, hostname and timezone.
* Although you could argue “server silos” come pretty close to it, more on those in a moment.
Architectural decisions
Let’s start by taking a look at the Linux side of things… The container runtime, containerd in this case, call into lower-level components which in turn fire off a “few” syscalls to create the required container. You can swap the upper part out with any other runtime, like Docker’s for instance.
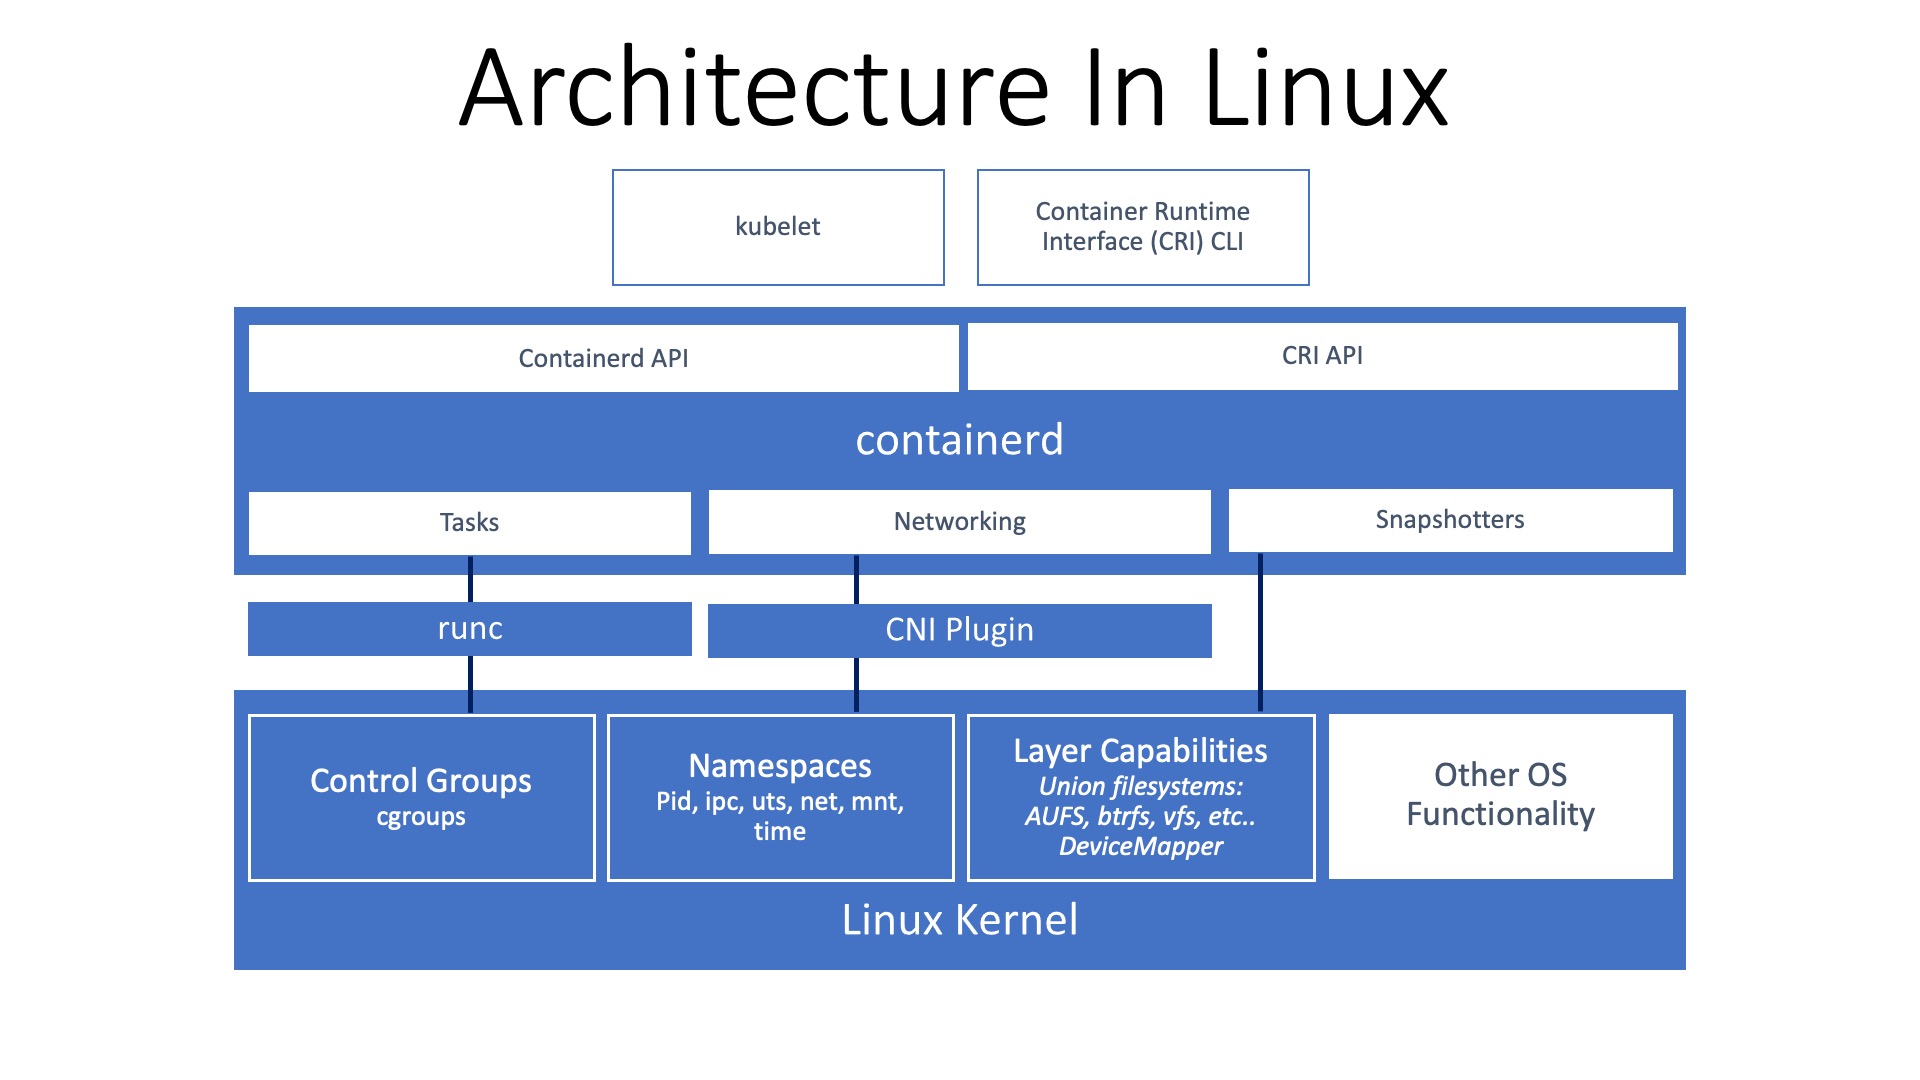
In Linux, processes have the ability to opt-in or opt-out of certain cgroups or namespace, depending on the relationship that the process has to the other cgroups or namespaces, via syscalls such as “unshare(2)” or “setns(2)”. This provides more granular control over what global resource (process tree, mount points, networking stack) you can isolate and which cgroups or namespaces to utilize.
The virtualization team at Microsoft contemplated whether they should mirror the manner in which Linux exposes containerization kernel primitives. The team went with a different option entirely, as they explained in their “Introducing the Host Compute Service (HCS)” blog post:
“After a bit of thinking, we decided to go with a third option. We created a new management service called the Host Compute Service (HCS), which acts as a layer of abstraction above the low-level functionality. The HCS was a stable API Docker could build upon, and it was also easier to use. Making a Windows Server Container with the HCS is just a single API call. Making a Hyper-V Container instead just means adding a flag when calling into the API. Figuring out how those calls translate into actual low-level implementation is something the Hyper-V team has already figured out.”
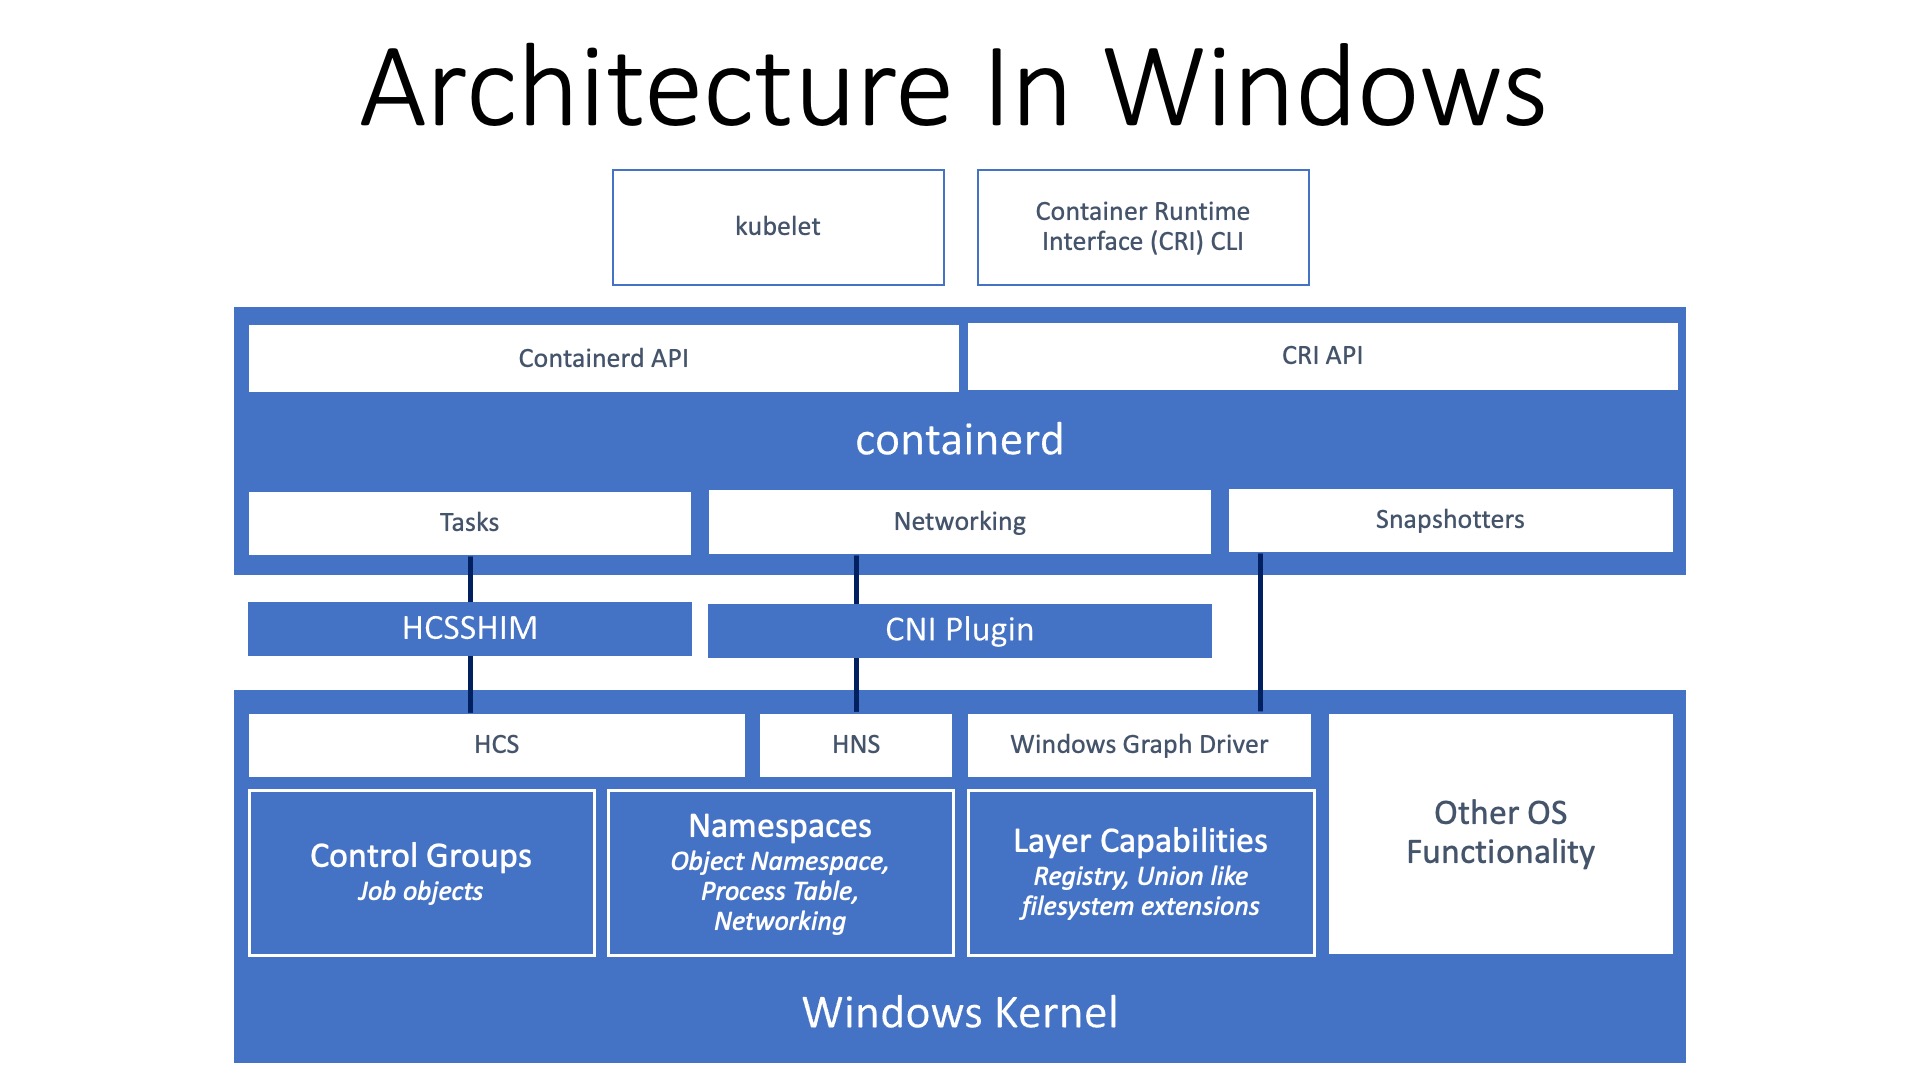
As you can tell from looking at both architectures, they are incredibly similar and only differ in the way they implement process isolation in the operating system itself. For example, setting container resource controls in Linux is done by, essentially, editing config files (cgroups) and in Windows it is done by assigning the process to a Job object.
Windows takes a different approach compared to Linux when it comes to syscalls. Windows discourages the use of using syscalls directly, which sit on the border of kernel and user-mode. On Windows, it is recommended that user applications should call into one or more subsystem DLLs, which will in turn proxy a call (more or less) to the appropriate syscall. By exposing the lower level syscalls through something like HCS, Microsoft can iterate on the internal workings while still providing a stable interface.
Windows Kernel + Container compatibility
It is critically important that the Windows container’s version matches the host Windows version, as images based on older Windows versions will not run on newer host kernel versions and vice versa. Here is a quote from the Microsoft Docs regarding this topic:
“Windows Server containers are blocked from starting when the build number between the container host and the container image are different. For example, when the container host is version 10.0.14393.(Windows Server 2016) and container image is version 10.0.16299. (Windows Server version 1709), the container won’t start.”
Microsoft maintains a compatibility matrix which lists all the possible host/container configurations, along with some practical examples and what-if scenarios. Work is being done to improving the compatibility and relax these restrictions, but these must be performed at the OS level.
Isolation modes
Windows Containers on Windows (WCOW) come in a few different flavours. Back when Windows Server 2016 launched you could select from two types of containers, however starting with the release of Windows Server 2022 there will be a third type of container.
This means we have the following isolation modes:
- Process
- Default mode, causes your process to run against the same kernel as the host but has an isolated view on system resources and thus isolating it from the rest of the system.
- HyperV
- Runs the process inside a lightweight, stateless and immutable Hyper-V Windows guest VM which has a separate kernel.
- Inside the VM the process runs as if was running in “Process” mode.
- HostProcess (new)
- Similar to “Process” isolation, except containers run directly on the host and can be created in the host’s network namespace instead of their own.
- Useful for Kubernetes cluster management scenarios.
- More details can be found in the Kubernetes Enhancement Proposal 1981: Windows Privileged Containers and Host Networking Mode.
Switching between isolation modes is incredibly easy.. Using the default docker tools you simply set the “--isolation” parameter and the runtime takes care of it for you!

Hyper-V containers are slightly different as they run an isolated process (container) within a virtual machine, this provides an additional isolation guarantee due to the added hypervisor layer. These virtual machines are highly optimized and their sole purpose is to run containers as quickly and securely as possible.
Booting the VM doesn’t take very long and it is faster after it has been booted once. New VMs are cloned from a state where the original VM had loaded just enough services and kernel configurations.
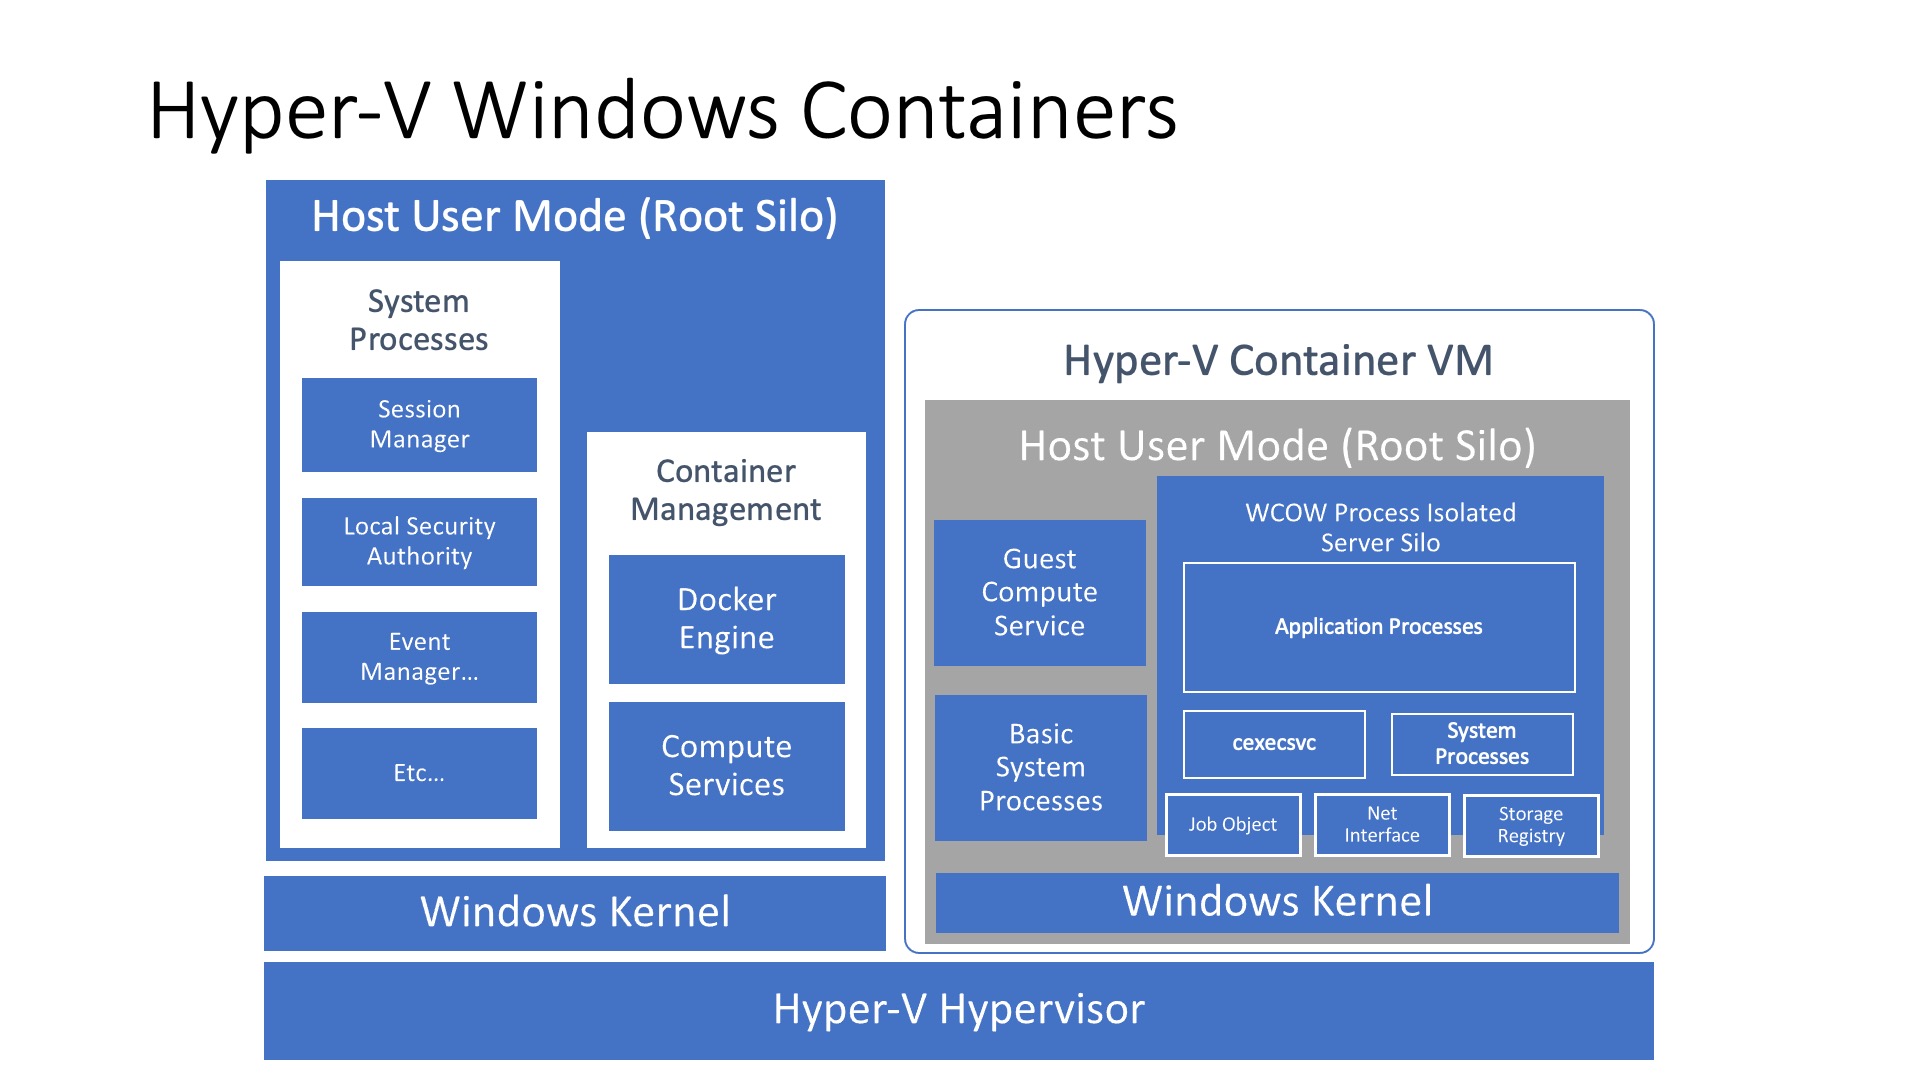
💡 According to Benjamin Armstrong, Principle Program Manager at Microsoft and who has done a lot of work in the virtualization field, Azure services such as Azure Automation and Azure Machine Learning have both utilized Hyper-V containers at some point in their respective products’ lifecycle. This is due to the fact that running workloads, which essentially contain untrusted third-party/customer code, in process isolation mode (against a single shared kernel) would be a larger security risk for these types of services, compared to running them wrapped inside an additional hypervisor layer.
Enough with the introduction, let’s take a look under the hood.
Job Objects
Processes can be part of one or many different job objects, which is a kernel object that allows you to manage a group of processes as a single unit. Should you perform a modification to the job object, all processes inside of the job will be affected.
Once a process has been assigned to a job object, you cannot change its relationship. Typically all descendant processes will be assigned to the same job object as their parent unless you set a specific flag so the new process can break away from its parent’s job and if the job object itself allows that breakaway operation to happen.
Starting with Windows 8 and Server 2012 nested Jobs were introduced, if your process is already part of a job and gets added to another job, the jobs are nested by default (thus creating a hierarchy) as long as the system can form a valid job hierarchy and neither job sets UI limits.
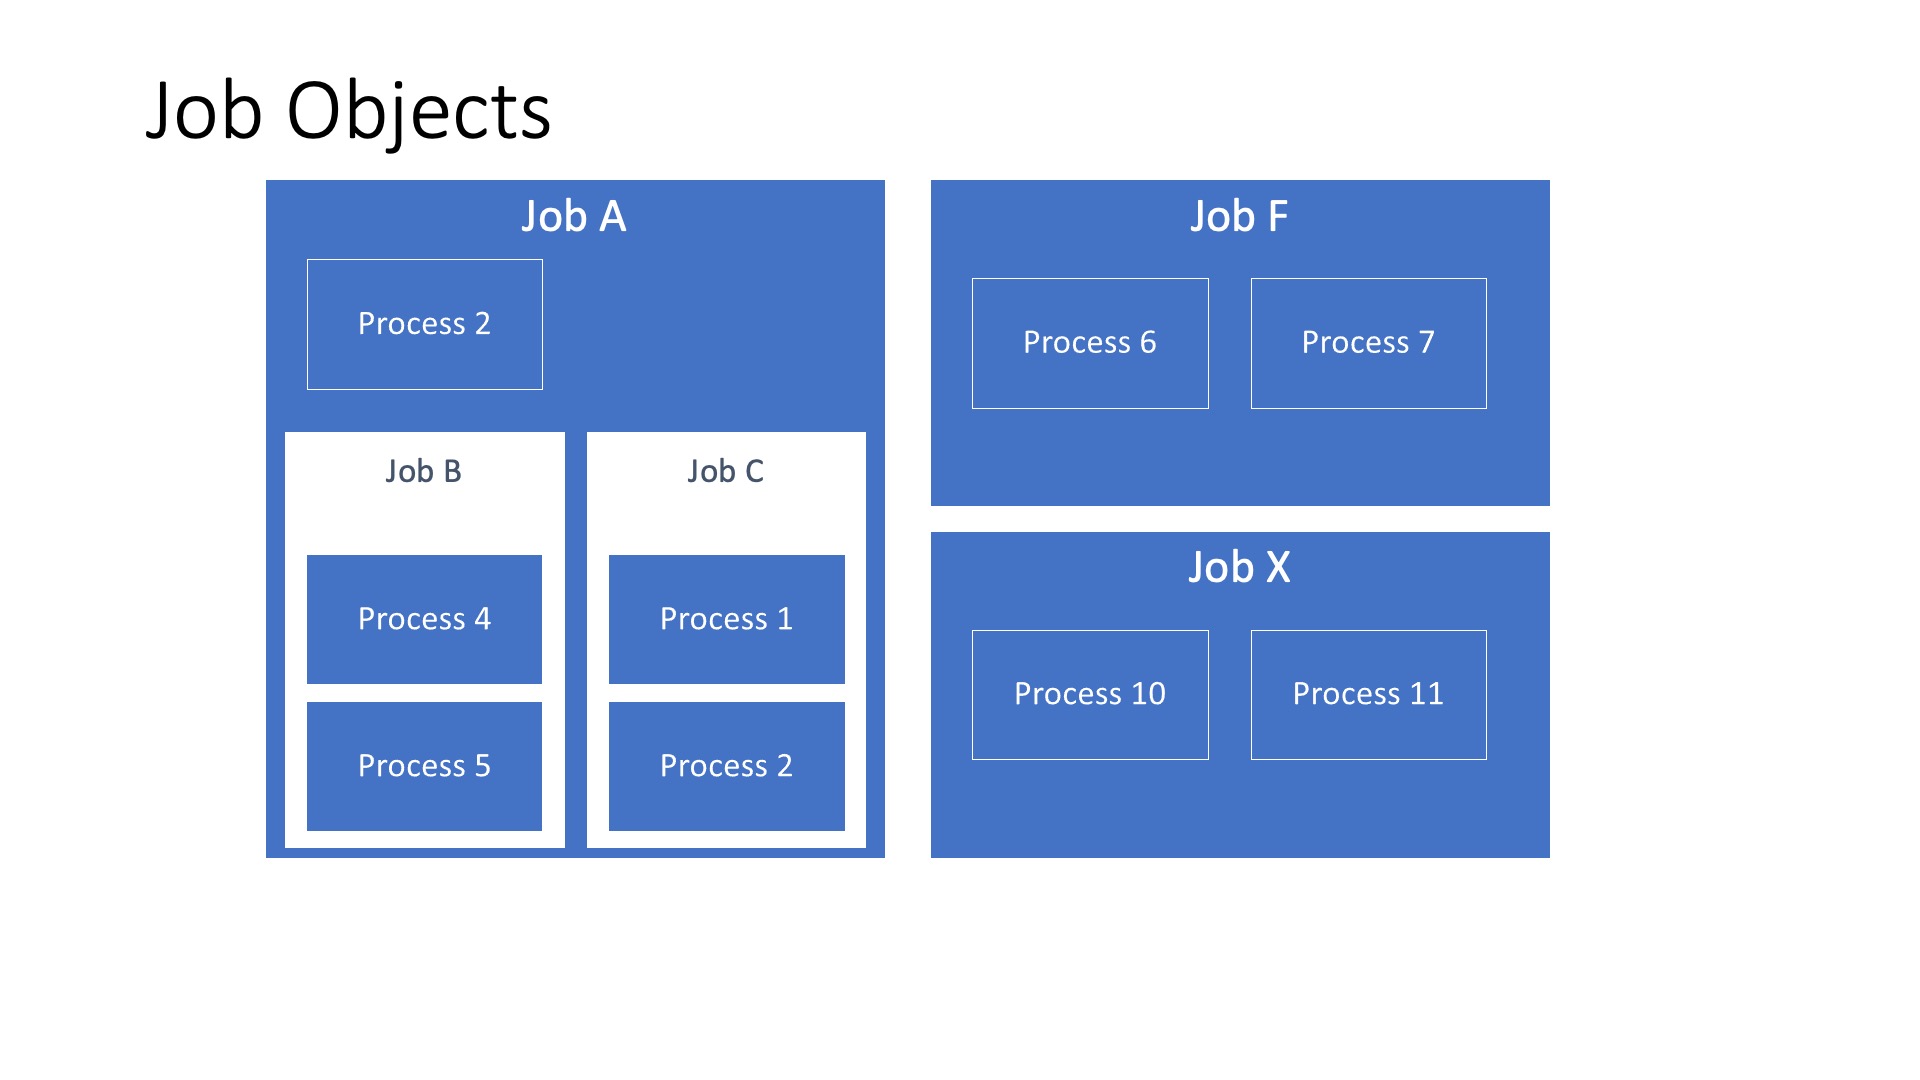
Jobs also record accounting information (IO counters, page fault count, total processes, total terminated processes, etc.. ) for every process that has been part of a job, even the ones that have been killed. For nested job objects, the accounting information is aggregated in its parent job.
You can monitor for violations to Job I/O-related limits, additionally, these limits can also trigger notifications when they are exceeded. Limits enforced on nested Jobs can never be less restrictive than the parent Job’s limit, though they can be more restrictive.
To give you an idea of what sorts of limits you can set:
- User-interface restrictions
- Reading and writing to the clipboard, prevent processes inside the Job from creating desktops, perform logoffs, etc…
- CPU rate control
- Maximum CPU time that a Job is allowed to consume.
- Process priority classes
- Processes associated with the Job to use the same priority class.
- Should the Job be nested, the active priority class will be the lowest priority class in the job chain.
This list is by no means exhaustive, you can take a look at a more complete overview right here.
Additionally, you can also set tolerances and tolerance intervals so your Job’s I/O does not get throttled immediately. An example of this would be allowing a process to exceed its network rate control limit by 60% of its maximum allowed bandwidth in bytes.
💡 To me, this all looks very similar to what Linux control groups offer. I am even going to go out on a limb and say that I think this is the primary mechanism that Windows uses as the equivalent to Linux control groups.
Refresher on Processes
You may already know, an application consists of one or more processes. In Windows, processes consist of resources that are used when you execute an instance of a program. Let’s go through a quick refresher on what Windows processes are comprised of:
- Unique process ID (PID)
- Private virtual address space
- Chunk of memory addresses that your process can use.
- An executable program
- Sequence of static instructions which get mapped into the process its virtual address space.
- Threads
- Executes any part of the program, including parts currently being executed by another thread.
- Collection of open handles
- Mappings to various system objects currently used by various threads.
- This can be semaphores, sync objects, files, etc…
- Security context
- In the form of an access token that identifies a user, SID, group SIDs, privileges, logon session, etc…
- Copy of environment variables
- Scheduling priority class
- Threads are scheduled to run based on their scheduling priority, each process belongs to one priority class.
- Every priority class also has a priority level.
- The priority of each thread is determined by combining the class and level to form the base priority of a thread.
- Minimum & maximum working set sizes
- A working set is a collection of pages, in the process its virtual address space, that has been recently referenced.
- Includes pages that contain all instructions your application executes, including those in your DLLs and the system DLLs.
We will need to use some of these concepts in the next section.
Applying resource controls using Job objects
I was curious about how difficult it would be to set up a Job using the Win32 API, so I decided to give it a try. All I wanted to achieve was to attach my console app to a newly created Job and apply a few different types of limits that the Win32 API is able to provide us with.
This ended up being very straight forward, let’s take a look at the following C++ code (View on GitHub):
#include <iostream>
#include <windows.h>
#include <jobapi2.h>
#define MAX_THREADS 4
// Simulate some work later on
DWORD WINAPI SimulateWork(LPVOID lpParam);
int main()
{
// A handle to be able to modify our Job
HANDLE jobHandle = nullptr;
// Structs that will hold some of the settings we will need.
SECURITY_ATTRIBUTES securityAttributes;
JOBOBJECT_CPU_RATE_CONTROL_INFORMATION cpuRateControlInfo;
JOBOBJECT_BASIC_LIMIT_INFORMATION basicLimitInfo;
JOBOBJECT_EXTENDED_LIMIT_INFORMATION extendedLimitInfo;
// Initialize the structs.
ZeroMemory(&securityAttributes, sizeof(SECURITY_ATTRIBUTES));
ZeroMemory(&cpuRateControlInfo, sizeof(JOBOBJECT_CPU_RATE_CONTROL_INFORMATION));
ZeroMemory(&basicLimitInfo, sizeof(JOBOBJECT_BASIC_LIMIT_INFORMATION));
ZeroMemory(&extendedLimitInfo, sizeof(JOBOBJECT_EXTENDED_LIMIT_INFORMATION));
// Create a security attribute that has
// a security descriptor associated with
// the access token of the calling process.
securityAttributes.nLength = sizeof(SECURITY_ATTRIBUTES);
securityAttributes.lpSecurityDescriptor = nullptr;
securityAttributes.bInheritHandle = 0;
// Give the Job a name (pick one that will stand out) and
// Associate the current process to the Job
jobHandle = CreateJobObjectW(&securityAttributes, L"ThomasVanLaereExploringWindowsContainers");
if (jobHandle == nullptr) {
DWORD lastErr = GetLastError();
fprintf(stderr, "Error value: %d Message: unable to create Job object.\n", lastErr);
return lastErr;
}
BOOL assignProcessToJobObjectResult = AssignProcessToJobObject(
jobHandle,
GetCurrentProcess());
if (!assignProcessToJobObjectResult) {
DWORD lastErr = GetLastError();
fprintf(stderr, "Error value: %d Message: unable to assign current process to Job object.\n", lastErr);
return lastErr;
}
// We will set a hard CPU limit to 1,5% (1,5 x 100 CPU cycles == 150).
// Processes within the job will not be able to exceed it (for long)
JOBOBJECTINFOCLASS cpuRateinfoClass = JOBOBJECTINFOCLASS::JobObjectCpuRateControlInformation;
cpuRateControlInfo.ControlFlags = JOB_OBJECT_CPU_RATE_CONTROL_ENABLE | JOB_OBJECT_CPU_RATE_CONTROL_HARD_CAP;
cpuRateControlInfo.CpuRate = 150;
BOOL setSetInformationJobObjectCpuRateControlResult = SetInformationJobObject(
jobHandle,
cpuRateinfoClass,
&cpuRateControlInfo,
sizeof(cpuRateControlInfo));
if (!setSetInformationJobObjectCpuRateControlResult) {
DWORD lastErr = GetLastError();
fprintf(stderr, "Error value: %d Message: unable to set Job object CPU rate control.\n", lastErr);
TerminateJobObject(jobHandle, lastErr);
}
// We can set multiple limits, so let's set:
basicLimitInfo.LimitFlags = JOB_OBJECT_LIMIT_PRIORITY_CLASS | JOB_OBJECT_LIMIT_PROCESS_MEMORY;
// - the priority class 'BELOW_NORMAL_PRIORITY'
basicLimitInfo.PriorityClass = BELOW_NORMAL_PRIORITY_CLASS;
// - the process memory limit to 20ish megabytes
extendedLimitInfo.BasicLimitInformation = basicLimitInfo;
extendedLimitInfo.ProcessMemoryLimit = 20971520;
BOOL setSetInformationJobObjectExtendedLimitResult = SetInformationJobObject(
jobHandle,
JOBOBJECTINFOCLASS::JobObjectExtendedLimitInformation,
&extendedLimitInfo,
sizeof(extendedLimitInfo));
if (!setSetInformationJobObjectExtendedLimitResult) {
DWORD lastErr = GetLastError();
fprintf(stderr, "Error value: %d Message: unable to set Job object priority class and max memory limit.\n", lastErr);
TerminateJobObject(jobHandle, lastErr);
}
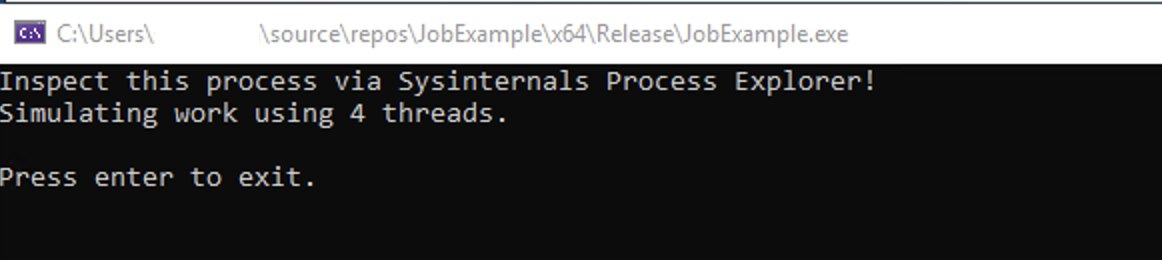
printf("Inspect this process via Sysinternals Process Explorer!\n");
printf("Simulating work using %d threads.\n", MAX_THREADS);
//Simulate some work
for (int i = 0; i < MAX_THREADS; i++)
CreateThread(NULL, 0, SimulateWork, NULL, 0, NULL);
// Making sure our process does not get closed
printf("\nPress enter to exit.\n");
std::cin.get();
// Clean up in case we hit enter
if (jobHandle != nullptr) TerminateJobObject(jobHandle, 0);
}
// Do something completely trivial
DWORD WINAPI SimulateWork(LPVOID lpParam) {
float calculation = 1.2345f;
while (true)
{
calculation *= calculation;
}
return 0;
}
If you’d like you can paste this code sample in a new Visual C++ console project, hit your “run” button combination and the console app should start.
Job inspection with ProcExp
Now we’re ready to take a look at what the result of this operation looks like, to do this we will use some of the tools that come with the “Sysinternals Suite”. If you’ve never heard of Sysinternals before, here is a summary from the Windows Sysinternals docs:
💡 The Sysinternals website was created in 1996 by Mark Russinovich to host his advanced system utilities and technical information. Whether you’re an IT Pro or a developer, you’ll find Sysinternals utilities to help you manage, troubleshoot and diagnose your Windows systems and applications.
Windows comes with a tool called “Task Manager”, which can provide you with basic insights into process activity on your system. Task manager does not show as much information as you might hope, it can be a good enough starting point when debugging a misbehaving application simply by looking at running processes, services and performance graphs. In our case, we need to be able to have a peek at some of the lower-level constructs.
Instead, we will be using the “Sysinternals Process Explorer”, also known as “ProcExp”, to get to those details more easily.
Go ahead and download Process Explorer here, then fire it up with administrator privileges. Right away you should be able to see a whole lot of processes getting listed, though we just want to filter out the “JobExample.exe” application. Go ahead and apply the filter using the search box in the top right corner.
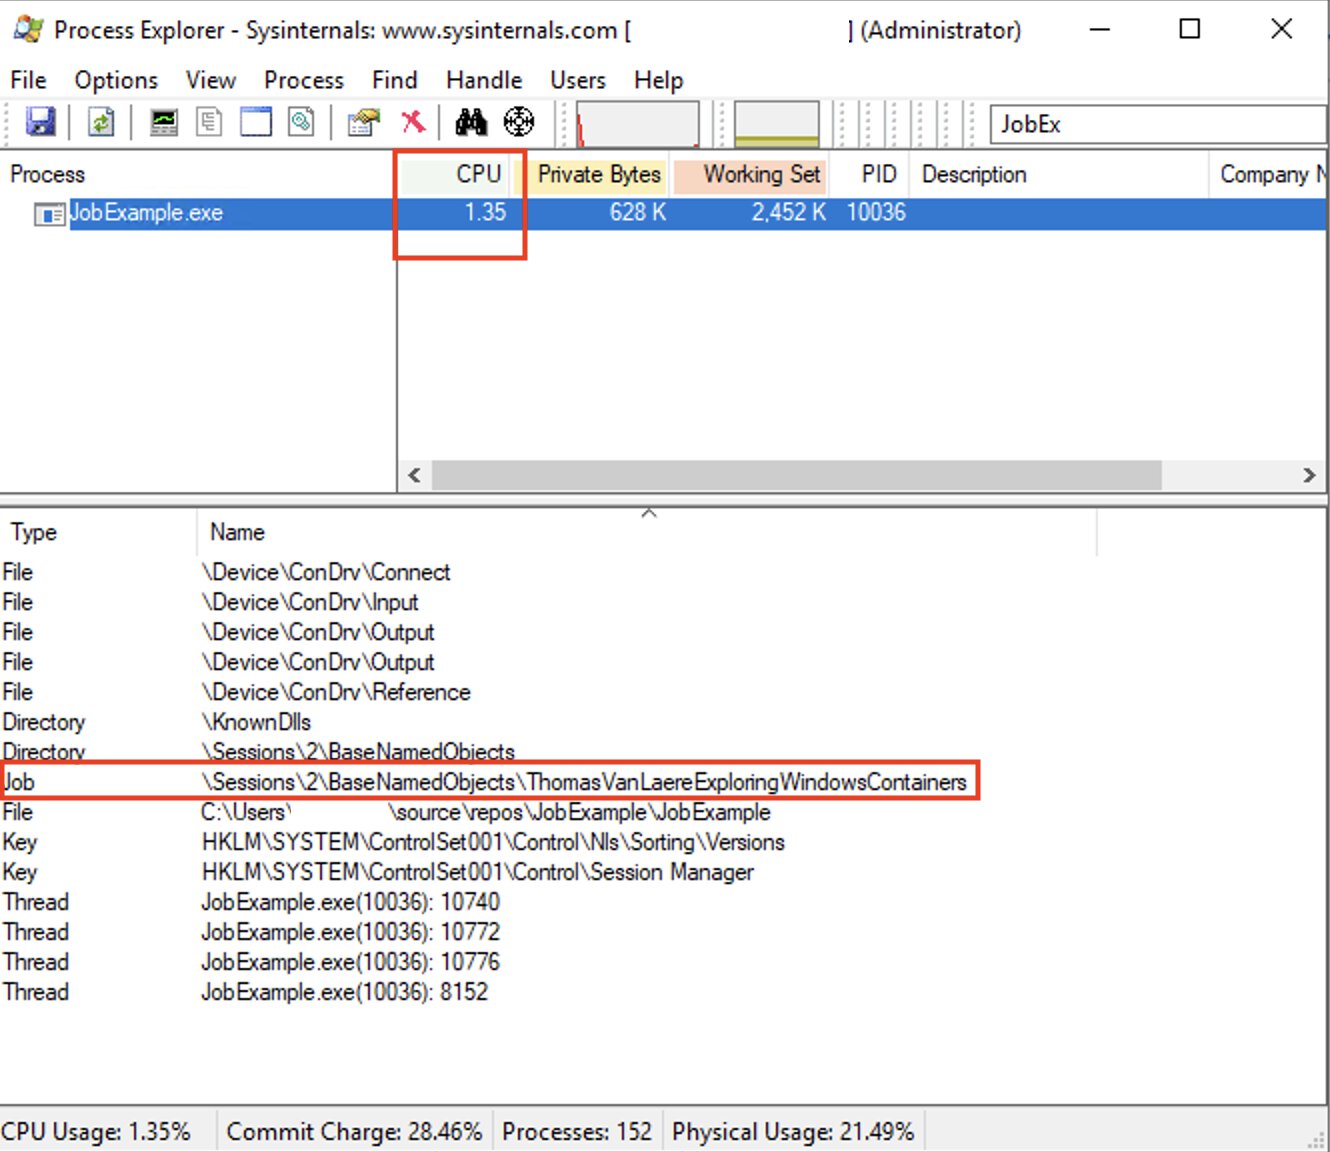
There are a couple of things I would like to highlight in this picture because a lot is going on:
- Due to our CPU rate controls, the CPU usage for “JobExample.exe” should be capped at around 1.5% at all times.
- Our Job has the “ThomasVanLaereExploringWindowsContainers” name.
When you right-click the process, select “Properties” and go into the “Job” tab, a few things will become apparent:
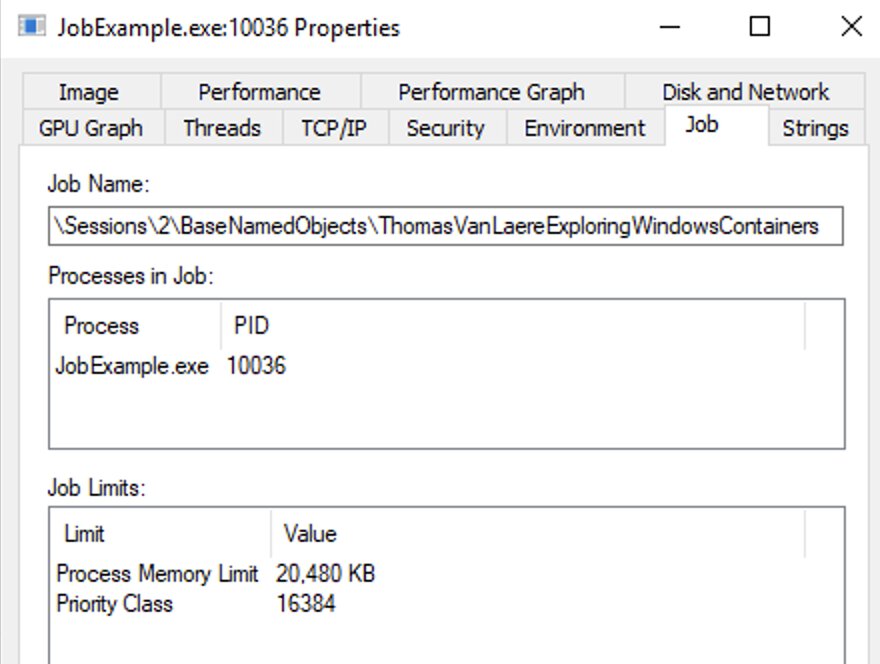
- The priority class limit we assigned, “
BELOW_NORMAL_PRIORITY_CLASS”, seems to be there. It does indeed have a value of “16384” or “0x00004000” and this does seem to match with what is mentioned in the Win32 API reference. - The process memory limit of 20 megabytes is also present, excellent.
Try to switch the “JobExample.exe” its “Priority” and notice that it will default back to “BELOW_NORMAL_PRIORITY_CLASS”, you can test this out by right-clicking the process from the filtered list, selecting “Set Priority” and then switching it to anything you want.
⚠️ A little disclaimer on the CPU rate control: it does not seem to show up in the Job tab for some reason, although in my case the throttling does get applied. You can always modify |"
cpuRateControlInfo.CpuRate = 150;" to a value that is SLIGHTLY higher, like “200” or even “500”. Though how quickly the throttling will kick in, if at all, depends on the power of your CPU.
Based on the capabilities that Jobs offer it looks like a good equivalent to control groups, from what I can tell. When you read through the Microsoft docs regarding resource controls in Windows Containers, you’ll notice that the the job limits we implemented are also used to apply resource constraints to Windows containers. Rad!😎
Silos
Silos are an extension of Job objects, they also take on the job (no pun intended) of isolating various system resources. A silo’s primary goal is to encapsulate as much of Windows user-mode space as is required, depending on the type of silo.
Silos have the following capabilities:
- Job Object capabilities
- A set of processes that can be managed as a single unit.
- Resource controls imposed via limits such as maximum working set memory, maximum CPU usage.
- A set of virtualized resources.
There are two types of silos: “application silos” and “server silos”. Application silos are used in technology such as the Desktop Bridge tooling and MSIX. We are interested in the latter as the server silos tech was built to enable Windows (Server) containers.
An isolated process, running in a server silo, can run its separate copy (or isolated view) of the resources that are listed below:
- Object manager namespace
- Process IDs
- Sessions
- Virtual registry namespace
- File system
- Network compartment
Object Manager Namespace
The Windows kernel-mode object manager component manages all objects in a Windows system, all of which are represented in kernel mode. These objects are things such as:
- Files
- Devices
- Synchronization primitives
- Mutexes, semaphores, etc..
- Registry keys
- Jobs
- Various other objects..
When a user-mode application wants to access such an object it can acquire a handle, in kernel mode objects can be referenced by pointers. Remember, in the “JobExample.exe” demo we used such a handle in order to modify the Job object we had created.
The kernel-mode environment stores objects in a virtual directory system, also known as the object namespace. The namespace itself consists of a hierarchical object directory structure, which is not like traditional file system directories and does not correspond to any directories on disk.
By using a server silo, we should be able to get a completely isolated list of object directories.
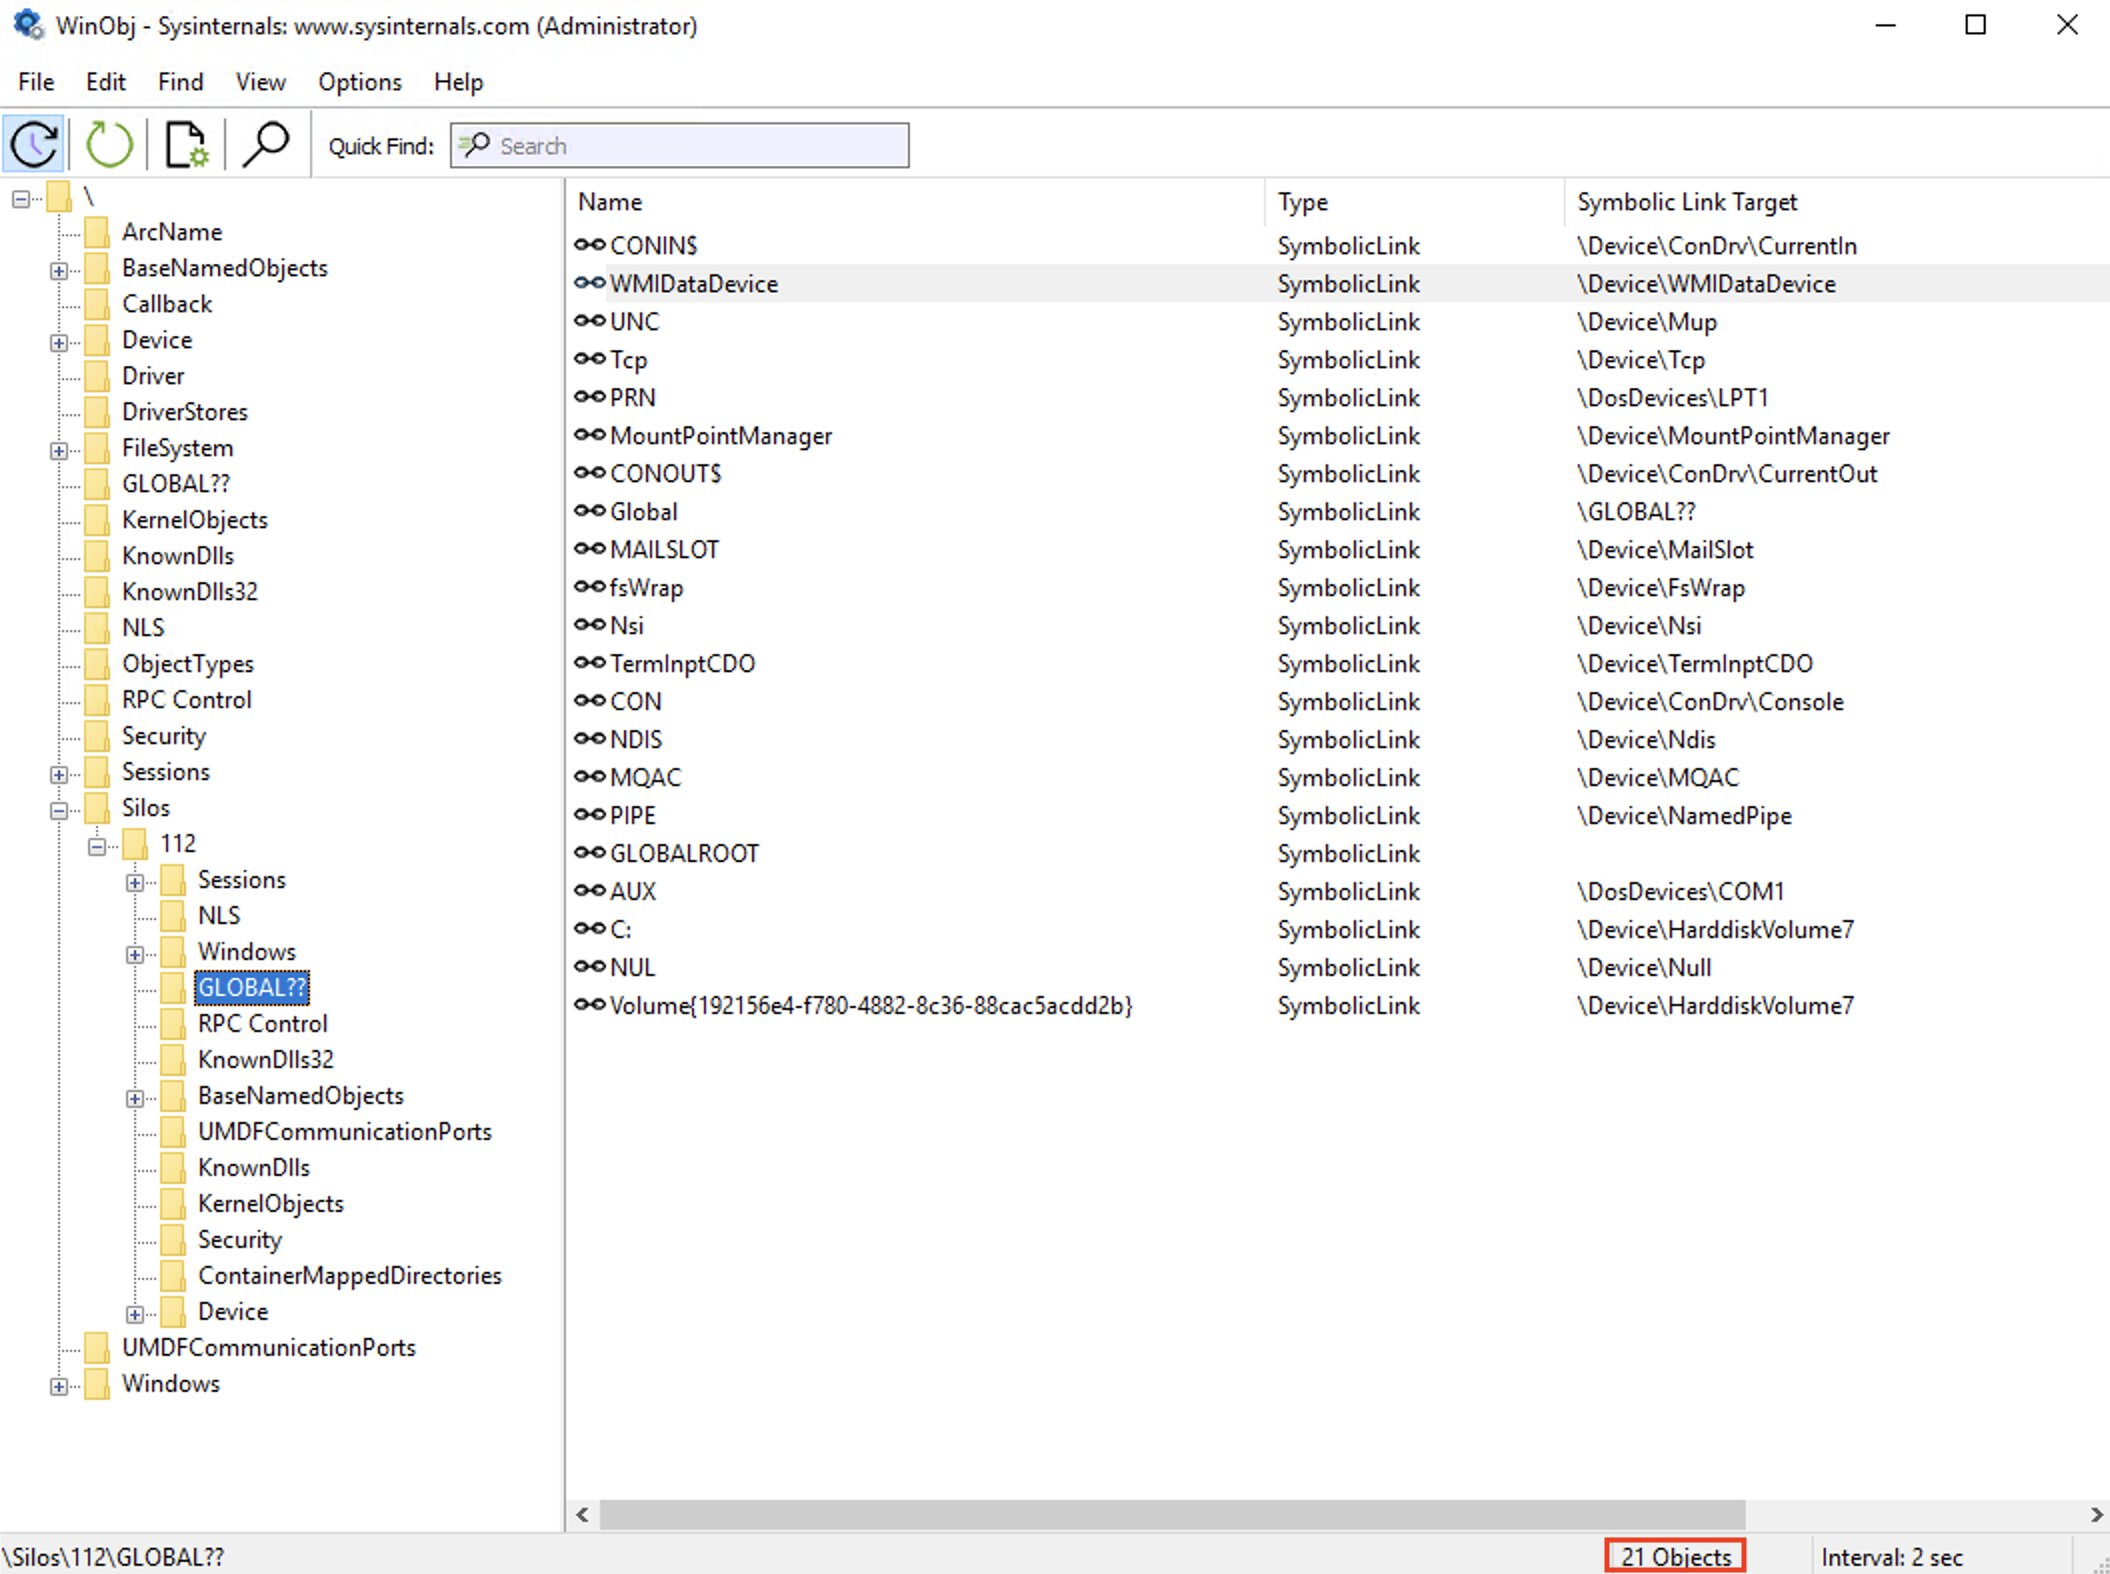
With a different Sysinternals tool, WinObj, we will be able to look at the information stored in the Object Manager’s namespace. If you browse to “\GLOBAL??\\” you will see all the devices that are available to the host: storage devices, video devices, VM_GENCOUNTER, etc…

Notice that there is also a “\Silos” object directory which is currently empty, unless you’ve used software that created a silo.
Speaking of such software, let’s start a new container.
docker run -it --rm --isolation=process mcr.microsoft.com/windows/servercore:ltsc2019 powershell

# Windows PowerShell
# Copyright (C) Microsoft Corporation. All rights reserved.
#
# PS C:\>
Once the container has started, head back into “WinObj” and click the refresh button, you will notice that the “\Silos” object directory is now expandable.
If we take a look at “\Silos\112\GLOBAL??\\” you will see that it contains a subset of devices that are also present at the host level. After starting the container you will see that a few new devices will have been added to the host’s “\GLOBAL??\\”, as well.
In my opinion this is in line with what Windows containers set out to do, which is to run a particular version of Windows user-mode (by that I mean: Nano Server, Server Core, Server (preview) or Windows) with only the necessary dependencies, down to the ‘Ntdll.dll’, to get apps to function in a way you would expect.
Notice that the “C:” device inside of “silo 112” is mapped to a different device than the one in the host’s “\GLOBAL??\\”, this is one of the mechanisms through which Windows can do something similar to “chroot(2)” (In Linux, this changes the root directory for a process and its children.)
Process table
The same concept applies to the process table, our container will have its isolated view of the process table. Fortunately, We can easily take a look at this, through the use of PowerShell.
# Inside the process isolated container

Get-Process | Sort-Object -Property Id

# Handles  NPM(K)    PM(K)      WS(K)     CPU(s)     Id  SI ProcessName
# -------  ------    -----      -----     ------     --  -- -----------
#       0       0       56          8                 0   0 Idle
#    3488       0      192        156      82.33      4   0 System
#     409      15     6144      12596       0.27   1832   4 svchost
#     297      15     2224       8276       0.06   2436   4 svchost
#      50       3      516       1240       0.13   2636   0 smss
#     223      11     1964       5124       0.09   2884   4 csrss
#     174      13     2832       8944       0.06   3192   4 svchost
#     462      20    17032      28776       2.39   3860   4 svchost
#     860      31    12400      28120       3.45   4516   4 svchost
#      49       6      948       3324       0.05   4664   4 fontdrvhost
#      97       7     1204       4864       0.11   5188   4 conhost
#     228      13     2648       9944       0.13   5372   4 msdtc
#     351      13     2728      10232       0.11   5388   4 svchost
#     123       7     1220       5768       0.02   5732   4 svchost
#     113       5     1024       4740       0.02   6292   4 CExecSvc
#     702      49    64328      81952       5.92   6472   4 powershell
#     766      22     4404      13056       0.36   6604   4 lsass
#     176      11     1368       7004       0.05   7236   4 wininit
#     147       8     1464       6456       0.08   7700   4 svchost
#     197      10     2372       6728       0.33   7792   4 services
#     482      34     5884      18672       0.34   8168   4 svchost
Run the same Get-Process command on your host to see the difference, there will be more processes running there. To echo the earlier sentiment:
💡 Windows is a highly integrated system and thus some of the foundational processes have been duplicated and run inside the container because they are required for containerized Windows applications to function properly.
I noticed that, in contrast to Linux, processes inside process isolated Windows containers do not (re)start their PID numbers at 1, they appear to have the same PIDs inside and outside of the container.
Important to note is that the “CExecSvc” process implements the container execution service and uses a named pipe to communicate with the container tooling and “Host Compute Service” on the host. “CExecSvc” ultimately launches the actual containerized applications, which is PowerShell in this case. An additional “SSMS” process is also started per container to ensure that additional service or console sessions can be started.
Silos compared to Linux namespaces
If I understood this correctly from the MS Ignite 2015 and Dockercon 2016 sessions on the internals of Windows containers, the Windows implementation of namespaces does not appear to have the same level of flexibility, as opposed to Linux, in that you are not able to opt-in or opt-out of particular types of namespaces. For example, in Linux, your process could be part of a different PID namespace, whilst still being in the same network namespace as the host.
Though I suppose you could argue that this restriction is being relaxed a bit with the new “HostProcess” isolation option where your process can access some of the root silo’s resources, even still it is not opt-in/opt-out as with Linux.
Host Compute Service
Setting up a server silo from scratch, in the same manner as I was able to do through the Win32 API by using individual building blocks, remains an undocumented mystery. However, we can fire up Windows containers through Docker or similar tools… How do they do it?
It turns out that Docker, containerd and others will ultimately have to call into the “Host Compute Service”, which works as a public interface that abstracts various low-level capabilities such as the ones we discussed earlier.
When you enable the “Containers” features on your Windows environment it will activate the “Host Compute Service”, amongst other things. Interfacing with the “HCS” is done by invoking methods in the “vmcompute.dll”, for which Microsoft has decided to create two language bindings:
- HCSShim
- A library written in Go.
- Used in containerd and moby.
- dotnet-computevirtualization
- A C# .NET sample library.
Since I wanted to learn a little more about how all the different parts work, I decided to try a few different approaches.
Talk to HCS via PowerShell
I wondered if I could use PowerShell to talk to the “HCS” since, after all, .NET can interface with unmanaged code… It seemed to work just fine!
The following script allows you to call into the “vmcompute.dll” and invoke the “HcsEnumerateComputeSystems” function, doing so will return a list of all the existing compute systems (which includes containers). (View on GitHub)
#Requires -RunAsAdministrator
#Requires -Version 5.1

<#
.SYNOPSIS
    A sample script to demonstrate how to interface with a portion of unmanaged code located in 'vmcompute.dll'.
.DESCRIPTION
    A sample script to demonstrate how to interface with a portion of unmanaged code located in 'vmcompute.dll'.
.INPUTS
    None. You cannot pipe objects to Invoke-HcsEnumerateComputeSystemsSample.
.OUTPUTS
    A table that lists the different compute systems on a Windows Host.
.EXAMPLE
    PS C:\> .\Invoke-HcsEnumerateComputeSystemsSample.ps1
.EXAMPLE
    PS C:\> .\Invoke-HcsEnumerateComputeSystemsSample.ps1
#>
[CmdletBinding()]
param ()

Add-Type -TypeDefinition @'
using System;
using System.Runtime.InteropServices;

public static class VmCompute{
    [DllImport("vmcompute.dll", ExactSpelling = true)]
    public static extern int HcsEnumerateComputeSystems(string query, [MarshalAs(UnmanagedType.LPWStr)] out string computeSystems, [MarshalAs(UnmanagedType.LPWStr)] out string result);
}
'@

$computeSystemsJson = ""
$result = ""
$query = ""
$hresult = [VmCompute]::HcsEnumerateComputeSystems($query, [ref] $computeSystemsJson, [ref]$result)

if ($hresult -eq 0) {
    if ($computeSystemsJson) {
        $computeSystems = $computeSystemsJson | ConvertFrom-Json
        if ($computeSystems) {
            $computeSystems | Format-Table -AutoSize
        }
        else {
            Write-Warning -Message "No compute systems found"
        }
    }
}
else {
    [System.Runtime.InteropServices.Marshal]::GetExceptionForHR($hresult).Message
}
After a little bit of tinkering, I was able to get a list of all active compute systems!
Id                                                               SystemType RuntimeOsType Name                                                             Owner  ObRoot        RuntimeId                            State
--                                                               ---------- ------------- ----                                                             -----  ------        ---------                            -----
2e4e2c2f7bbad7abef56b2ee495b42cd94323e7ecc0d64d13a3f295e268a7d74 Container  Windows       2e4e2c2f7bbad7abef56b2ee495b42cd94323e7ecc0d64d13a3f295e268a7d74 docker \\.\Silos\444 00000000-0000-0000-0000-000000000000 Running
37b10afc660b398a62816ad4d99aa3e11087e791b57dfd62881a42037a662f85 Container  Windows       37b10afc660b398a62816ad4d99aa3e11087e791b57dfd62881a42037a662f85 docker \\.\Silos\112 00000000-0000-0000-0000-000000000000 Running
Talk to HCS via .NET language binding with PowerShell
We can take things a step further if we create a .NET standard build of the dotnet-computevirtualization DLL ourselves and import it in a PowerShell (5.1+) session. Let’s try to get a container up and running. (View on GitHub)
To start a Windows container we will need:
- A HNS (host networking service) network ID.
- We will get the ID by looking for the first available NAT network.
- A path to the base image’s “layerchain.json”, somewhere on disk.
- Should be under “%programdata%\docker\windowsfilter”
- Create a writable layer scratch (aka sandbox) layer.
- Pick a command that we would like to execute inside the container.
#Requires -RunAsAdministrator
#Requires -Version 5.1

<#
.SYNOPSIS
    A sample script to demonstrate how to start a process isolated Windows container
    through a .NET language binding for the Host Compute Service. (https://github.com/microsoft/dotnet-computevirtualization)
.DESCRIPTION
    A sample script to demonstrate how to start a process isolated Windows container
    through a .NET language binding for the Host Compute Service. (https://github.com/microsoft/dotnet-computevirtualization)
.PARAMETER ScratchLayerPath
    Provide the path to the scratch layer directory.
.PARAMETER BaseImageName
    Provide the base container image name.
.PARAMETER ContainerId
    Provide an ID for the container.
.PARAMETER ContainerCommand
    Provide the command to be executed inside the container.
.INPUTS
    None. You cannot pipe objects to Invoke-HcsProcessIsolationSample.
.OUTPUTS
    None.
.EXAMPLE
    PS C:\> .\Invoke-HcsProcessIsolationSample.ps1 -ScratchLayerPath "C:\temp" -BaseImageName "mcr.microsoft.com/windows/servercore:ltsc2019" -ContainerId (New-Guid) -ContainerCommand "cmd.exe /k dir C:\ & whoami"
.EXAMPLE
    PS C:\> .\Invoke-HcsProcessIsolationSample.ps1 -ScratchLayerPath "C:\temp" -BaseImageName "mcr.microsoft.com/windows/servercore:ltsc2019" -ContainerCommand "powershell.exe -Command Get-Service"
#>
[CmdletBinding()]
param (
    [Parameter(
        Mandatory = $true,
        HelpMessage = "Provide path to the scratch layer directory.")]
    [string]
    $ScratchLayerPath,
    [Parameter(
        Mandatory = $true,
        HelpMessage = "Provide the base container image name.")]
    [string]
    $BaseImageName,
    [Parameter(
        Mandatory = $false,
        HelpMessage = "Provide the new container's ID.")]
    [string]
    $ContainerId = (New-Guid),
    [Parameter(
        Mandatory = $true,
        HelpMessage = "Provide the command to be executed inside the container.")]
    [string]
    $ContainerCommand
)

Import-Module "Microsoft.Windows.ComputeVirtualization.dll"
$ErrorActionPreference = 'Stop'

function Get-HnsNatNetwork {
    [CmdletBinding()]
    param()
    $networkId = [Microsoft.Windows.ComputeVirtualization.HostComputeService]::FindNatNetwork()
    return $networkId
}

$networkId = Get-HnsNatNetwork -ErrorAction SilentlyContinue

if ($null -eq $networkId) {
    Write-Error -Message "Host Networking Service could not find any networks with network mode 'NAT'."
}
else {
    ("Found network '{0}' with network mode 'NAT' " -f $networkId) |  Write-Host
}

$imageInspectionResponse = (docker image inspect $baseImageName) | ConvertFrom-Json
if ($null -eq $imageInspectionResponse) {
    Write-Error -Message "Image not found."
}

if (!(Test-Path -Path $imageInspectionResponse[0].GraphDriver.Data.Dir)) {
    Write-Error -Message "Directory associated with image not found."
}

$imageLayerChainPath = Join-Path -Path $imageInspectionResponse[-1].GraphDriver.Data.Dir -ChildPath "layerchain.json"
if (!(Test-Path -Path $imageLayerChainPath)) {
    Write-Error -Message "Layerchain.json associated with layer not found."
}

$imageLayerParentLayerPath = Get-Content -Path $imageLayerChainPath | ConvertFrom-Json
if ($null -eq $imageLayerParentLayerPath) {
    Write-Error "Layerchain.json associated with *parent* layer not found."
}

$scratchLayerNewPath = Join-Path -Path $scratchLayerPath -ChildPath $containerId

$parentLayerPaths = New-Object 'System.Collections.Generic.List[Microsoft.Windows.ComputeVirtualization.Layer]'
$parentLayerPaths.Add([Microsoft.Windows.ComputeVirtualization.Layer]@{
        Id   = $containerId
        Path = $imageLayerParentLayerPath
    })

[Microsoft.Windows.ComputeVirtualization.ContainerStorage]::CreateSandbox($scratchLayerNewPath, $parentLayerPaths)
"Created sandbox.VHDX at '{0}'." -f $scratchLayerNewPath | Write-Host

$containerSettings = New-Object 'Microsoft.Windows.ComputeVirtualization.ContainerSettings' -Property @{
    HyperVContainer   = $false
    KillOnClose       = $true
    Layers            = $parentLayerPaths
    MappedDirectories = $null
    NetworkId         = $networkId
    SandboxPath       = $scratchLayerNewPath
    UtilityVmPath     = ""
}

$serverContainer = [Microsoft.Windows.ComputeVirtualization.HostComputeService]::CreateContainer($ContainerId.Guid, $containerSettings)
# 👆  Our process isolated container is now created by the host compute service and
#     queryable through HcsEnumerateComputeSystems but not with 'docker container ls -a'.
#     Although I am not certain, I believe this is due to fact that our container is
#     anything but OCI runtime spec compliant.

$serverContainer.Start();

$processStartInfo = New-Object "Microsoft.Windows.ComputeVirtualization.ProcessStartInfo" -Property @{
    CommandLine            = $ContainerCommand
    KillOnClose            = $true
    RedirectStandardOutput = $true
    RedirectStandardError  = $true
    RedirectStandardInput  = $false # 👈 Keep this false for now, redirecting stdin, stdout and stderr
}                                   # with pure PowerShell would make this demo confusing.

$serverContainerProcess = $serverContainer.CreateProcess($processStartInfo)

Write-Warning -Message ("Executing command: {0}" -f $processStartInfo.CommandLine)

$serverContainerProcess.StandardOutput.ReadToEnd() | Write-Host
$serverContainerProcess.StandardError.ReadToEnd() | Write-Host -ForegroundColor Red

$serverContainerProcess.WaitForExit() | Out-Null
Write-Warning -Message ("Process exited with code {0}." -f $serverContainerProcess.ExitCode)
$serverContainer.Shutdown()
Write-Warning -Message ("Container {0} shut down." -f $ContainerId)
[Microsoft.Windows.ComputeVirtualization.ContainerStorage]::DestroyLayer($scratchLayerNewPath)
Write-Warning -Message ("Scratch layer removed: {0}." -f $scratchLayerNewPath)
Running the script should cause a container to start up very briefly to execute the “dir” and “whoami” command in “cmd.exe”, after which the container will simply exit.
Found network 'da5c2cc2-4ec2-46ea-aa7c-0b715559d5e0' with network mode 'NAT'
Created sandbox.VHDX at 'C:\temp\8292d3e9-f3ac-47cf-81c4-bdd9166e3ee7'.
WARNING: Executing command: cmd.exe /k dir C:\ & whoami
Volume in drive C has no label.
Volume Serial Number is 206A-2407

Directory of C:\

05 / 07 / 2020  04:48 AM             5, 510 License.txt
05 / 07 / 2020  05:10 AM    <DIR>          Program Files
05 / 07 / 2020  05:08 AM    <DIR>          Program Files (x86)
05 / 07 / 2020  05:11 AM    <DIR>          Users
05 / 07 / 2020  05:11 AM    <DIR>          Windows
1 File(s)          5, 510 bytes
4 Dir(s)  21, 299, 843, 072 bytes free
user manager\containeradministrator

C:\Windows\system32>

WARNING: Process exited with code 0.
WARNING: Container 8292d3e9-f3ac-47cf-81c4-bdd9166e3ee7 shut down.
WARNING: Scratch layer removed: C:\temp\8292d3e9-f3ac-47cf-81c4-bdd9166e3ee7.
💡 If you want to have the same type of behaviour as with “
docker run -t -i”, so you can enter commands and read the output and errors.. I’d advise you to write the stream redirection logic in C#. I found it more convenient to redirect all three streams by writing C# code because I’m able to work with sync primitives and threads more easily as opposed to doing it in PowerShell. I have included an example of this in the GitHub repo.
I don’t see any reason you would ever want to create containers this way, but that is beside the point. For me, the point was to figure out how the “HCS” works and what parameters it expects when performing some standard operations. 😅
Conclusion
I would say it was no small feat getting the Windows kernel up to a point where containers would work and after investigating this subject a bit more closely it’s safe to assume that a ton of work went into making it a reality.
Jobs have come long way back since their introduction in Windows 2000. A lot of the technologies that we use today such as the Desktop Bridge, Windows Defender Application Guard, Windows Server containers and Windows Hyper-V containers are all built on top of the capabilities of the Job object (and others - I know).
There are still a few topics in the “Silo” space that we have not touched upon: networking, registry, file system and sessions. If you are eager to learn more, I would recommend taking a look at the Microsoft docs for Windows containers. The docs are a good starting point for anyone looking to get a better understanding on a few of the remaining concepts. But who knows, maybe I can deal with those subjects in a separate blog post.
There is a lot of interesting literature and talks on the subject of Windows containers out in the vastness of the internet, all of which that you can consult yourself. If you want to have a great starting point for learning the inner workings of Windows, I cannot speak highly enough of Windows Internals, Part 1 - 7th edition. The book contains a plethora of insightful information on the workings of Windows containers as well!
Compiling all this information into a single article was challenging and I’m sure I’ve made a mistake here or there. If you’ve spotted one (or more) please feel free to let me know by contacting me!