Exploring Containers - Part 2
In this post
About three months ago, I wrote the first part of what makes containers function the way they do. My primary motivation for this is because I think it isn’t highlighted nearly as much as it could be. I also could not fit everything into one single post as it was already rather lengthy, so now I will continue with walking through the remaining namespaces on the list.
As I stated in my earlier post, the concept of a container does not exist inside of Linux. A container is a term that is used to describe a combination of namespaces and control groups, which are Linux kernel features you can use to isolate processes from one another. Isolating a process this way is not an all or nothing approach as you can be very selective over what resources are isolated and which ones are not.
To get started, I will fire up a Docker container so I can perform my tests in a disposable environment. Everything I am about to do can also be done in a Linux VM. Please note that I am specifying the –privileged flag here since we will need some additional capabilities such as NET_ADMIN (specifically to perform various network-related operations). I highly recommend that you use a Linux Docker host, running kernel 5.6+.
docker run -it --name docker-sandbox --rm --privileged alpine:3.11
Namespaces
To recap: a specific process can live in what is often referred to as a “virtualized OS”. This “virtualized OS” contains a new group of PIDs, a new set of users, a completely unshared IPC system, a dedicated network interface and its own hostname.
Namespaces are a Linux kernel feature that allows us to wrap global system resources in an abstraction layer. Doing so allows you to make processes, within the namespace, believe that they have their own isolated instance of the global resource. Changes to the global resource are visible to other processes that are members of the namespace but are invisible to other processes.
I’ve included an overview of the implemented namespaces and where it was, is or will be discussed:
| Namespace | What does it isolate? | Discussed |
|---|---|---|
| Mount | Mount points | Part 1 |
| UTS | Hostname and NIS domain name | Part 1 |
| IPC | System V IPC, POSIX message queues | Part 2 |
| Network | Network devices, stacks, ports, etc. | Part 2 |
| Time | Boot and monotonic clocks | Part 2 |
| PID | Process IDs | Part 3 (WIP) |
| User | User and group IDs | Part 3 (WIP) |
| Cgroup | Cgroup root directory | Part 3 (WIP) |
IPC namespace
An IPC namespace isolates interprocess communication resources, this can be any of the System V IPC objects and POSIX message queues. As with other types of namespaces, processes added to a specific IPC namespace can all share IPC objects, they cannot see IPC objects that are members of a different IPC namespace.
System V IPC is the name given to three interprocess communication mechanisms that are widely available on UNIX systems since 1983: message queues, semaphore, and shared memory. POSIX message queues provide an alternative API for achieving the same result. POSIX stems from the single UNIX specification, which was created to standardise interfaces on UNIX-based systems, and is considered to be an improvement in both simplicity and functionality, over the System V standard.
Let us try to demonstrate this by creating two processes that read from a SYSV shared memory segment, which is bound to the IPC namespace. The first process will allow you to produce a message, a second process will allow you to read it.
processA.c
#include <stdio.h>
#include <stdlib.h>
#include <unistd.h>
#include <string.h>
#include <sys/ipc.h>
#include <sys/shm.h>

#define KEY 0x01
#define SEGMENT_SIZE 0xff

int getSharedMemory(char id);
void usage();

int main(int argc, const char *argv[]){
        if(argc < 2) usage();

        int shared_id = getSharedMemory(KEY);

        char *shared_memory;
        if((shared_memory = shmat(shared_id, NULL, 0)) == -1){
                perror("Shared memory cannot be attached");
                exit(EXIT_FAILURE);
        }

        memcpy(shared_memory, argv[1], strlen(argv[1]) + 1);

        if(shmdt(shared_memory) == -1){
                perror("Shared memory cannot be detached");
                exit(EXIT_FAILURE);
        }

        return 0;
}

int getSharedMemory(char id){
        key_t shared_key = ftok(".", id);
        printf("Created key %X\n", shared_key);

        int shared_id;
        if((shared_id = shmget(shared_key, SEGMENT_SIZE, IPC_CREAT | 0666)) == -1){
                perror("Cannot retrive shared memory");
                exit(EXIT_FAILURE);
        }

        return shared_id;
}

void usage(){
        printf("processA <message>\n");
        exit(EXIT_FAILURE);
}
processB.c
#include <stdio.h>
#include <stdlib.h>
#include <unistd.h>
#include <string.h>
#include <sys/ipc.h>
#include <sys/shm.h>

#define KEY 0x01
#define SEGMENT_SIZE 0xff

int getSharedMemory(char id);
void removeSharedMemory(int shared_id);

int main(int argc, const char *argv[]){

        int shared_id = getSharedMemory(KEY);

        char *shared_memory;
        if((shared_memory = shmat(shared_id, NULL, SHM_RDONLY)) == -1){
                perror("Shared memory cannot be attached");
                exit(EXIT_FAILURE);
        }

        printf("Reading shared memory:\n%s\n",shared_memory);

        if(shmdt(shared_memory) == -1){
                perror("Shared memory cannot be detached");
                exit(EXIT_FAILURE);
        }

        sleep(1);
        removeSharedMemory(shared_id);
        return 0;
}


int getSharedMemory(char id){
        key_t shared_key = ftok(".", id);
        printf("Created key %X\n", shared_key);

        int shared_id;
        if((shared_id = shmget(shared_key, SEGMENT_SIZE, IPC_CREAT | 0660)) == -1){
                perror("Cannot retrive shared memory");
                exit(EXIT_FAILURE);
        }

        return shared_id;
}

void removeSharedMemory(int shared_id){
        struct shmid_ds info;

        if(shmctl(shared_id, IPC_RMID, NULL) == -1){
                perror("Cannot remove shared memory");
                exit(EXIT_FAILURE);
        }
        printf("Shared memory removed\n");
}
All there is left to do is to compile the binaries from these files, you may need to pull in GCC with “apk add build-base”.
gcc processA.c -o ./processA
gcc processB.c -o ./processB
If you place a message in the shared memory you should be able to read from it, since both processes are being executed inside the same IPC namespace.
#Hello from PPID
./processA "Hello from $$"
./processB
# Created key 170F06A
# Reading shared memory:
# Hello from 1
# Shared memory removed

readlink /proc/$$/ns/ipc
# ipc:[4026532301]
With that working, we will place another message in the shared memory object in IPC namespace 4026532301. Next, we will run processB from a different namespace, which will show you that it will not be able to see the shared memory object.
#Hello from PPID
./processA "Hello from $$"
Now go back to your host machine and open a new terminal window, from there we will start another shell, which will run inside of the same namespaces as PID 1.
Via the unshare command, by default, a newly created namespace is automatically torn down when the last process, in the new namespace, terminates or leaves the namespace. Since our processA will exit once it has done its job, I decided to wrap it in another ash shell and have the shell start in a new IPC namespace. We can create as many processA child processes as we want, doing so will have them run in the new IPC namespace.
# Shell #2
docker exec -it docker-sandbox ash
readlink /proc/$$/ns/ipc
# ipc:[4026532301]

unshare --ipc ash
readlink /proc/$$/ns/ipc
# ipc:[4026532386]
If we try to read the message from the shared memory, you will notice that it returns an empty string.
# Shell #2
./processB
# Created key 170F06A
# Reading shared memory:
# <empty>
# Shared memory removed
Running processA in IPC namespace 4026532386, as opposed to 4026532301, will allow processB to read from the shared memory object!
# Shell #2
#Hello from PPID
./processA "Hello from $$"

./processB
# Reading shared memory:
# Hello from 177
# Shared memory removed
Networking namespace
Next up, we want to make our containers more useful, from a networking perspective.
Network namespace isolation will allow you to have a great deal of flexibility when it comes to isolating resources that are associated with network devices, IP routing tables, firewall rules, etc.. A network namespace is another instance of the network stack, with its own routes, firewall rules, and network devices.
You can find these properties at “/proc/net”, which is a symbolic link to “/proc/$$/net”. Whenever a new network namespace is created, it is will get its very own loopback interface. From the shell with PID 1, let us begin by adding iproute2 to our Alpine container. This will make it a bit easier to work with various networking namespace related commands and we will need to do less switching between multiple shells.
apk add iproute2
# OK: 10 MiB in 18 packages

ip link list
1: lo: <LOOPBACK,UP,LOWER_UP> mtu 65536 qdisc noqueue state UNKNOWN mode DEFAULT group default qlen 1000
    link/loopback 00:00:00:00:00:00 brd 00:00:00:00:00:00
2: tunl0@NONE: <NOARP> mtu 1480 qdisc noop state DOWN mode DEFAULT group default qlen 1000
    link/ipip 0.0.0.0 brd 0.0.0.0
3: ip6tnl0@NONE: <NOARP> mtu 1452 qdisc noop state DOWN mode DEFAULT group default qlen 1000
    link/tunnel6 :: brd ::
10: eth0@if11: <BROADCAST,MULTICAST,UP,LOWER_UP> mtu 1500 qdisc noqueue state UP mode DEFAULT group default
    link/ether 01:02:ac:10:00:01 brd ff:ff:ff:ff:ff:ff link-netnsid 0
By default a process inherits its network namespace from its parent, initially, all the processes share the same default network namespace from the init process. Things are a little different for processes that end up in their own unique networking namespace.
To see this in action, type:
# Shell PID 1
unshare --net ash
ip link list

# 1: lo: <LOOPBACK> mtu 65536 qdisc noop state DOWN qlen 1000 #Down state!
#     link/loopback 00:00:00:00:00:00 brd 00:00:00:00:00:00
# 2: tunl0@NONE: <NOARP> mtu 1480 qdisc noop state DOWN qlen 1000
#     link/ipip 0.0.0.0 brd 0.0.0.0
# 3: ip6tnl0@NONE: <NOARP> mtu 1452 qdisc noop state DOWN qlen 1000
#     link/tunnel6 00:00:00:00:00:00:00:00:00:00:00:00:00:00:00:00 brd 00:00:00:00:00:00:00:00:00:00:00:00:00:00:00:00
You will notice that eth0, a physical device, is missing. A physical network device is present in only one network namespace.
Once we enable the loopback interface, inside of our new network namespace, we can begin to use it.
# unshared shell
ping 127.0.0.1
# PING 127.0.0.1 (127.0.0.1): 56 data bytes
# ping: sendto: Network unreachable

ip link set dev lo up #Set the device 'lo' as active.
ip link list

ping 127.0.0.1
# PING 127.0.0.1 (127.0.0.1): 56 data bytes
# 64 bytes from 127.0.0.1: seq=0 ttl=64 time=0.039 ms
# 64 bytes from 127.0.0.1: seq=1 ttl=64 time=0.049 ms

# Go back to shell PID 1
exit
With “ip netsn add” we can create additional network namespaces, without having to explicitly use “unshare”.
# Shell PID 1

# Doing ip netns add creates an entry at /var/run/netns
ip netns add mynetns
ip netns list
# mynetns
You can use a virtual Ethernet device pair to create tunnels between network namespaces. This technique can also be used to create a bridge to a physical network device in another namespace. Destroying a network namespace destroys any and all virtual Ethernet devices, and moves physical interfaces back up to the initial network namespace.
Veth devices are always created as a pair of devices in a tunnel-like fashion in order for messages, written to the device on one end come out of the device on the other end. You might guess that we could easily have one end in the initial network namespace and the other in our child network namespace, this way we can have inter-network-namespace communication. One end of the network pair will be plugged into a bridged interface, whereas the other end will be assigned to the target container.
# Shell PID 1

# Add both veth1 and peer it with br-veth1
# This happens in our initial network namespace, we will move it later.
ip link add veth1 type veth peer name br-veth1
ip link show type veth

# Enable the loopback interface in mynetns
ip netns exec mynetns ip link set dev lo up
We can prevent having to switch between shells with the ip netns exec command, which will execute a command in a specific network namespace. Veth1 will be moved from our initial namespace to the newly created mynetns.
# Move veth1 to the mynetns network namespace
ip link set veth1 netns mynetns

# Verify that veth1 is no longer in our initial network namespace
# You should only see br-veth1.
ip link show type veth

# Verify that veth1 is in the mynetns network namespace
# You should only see veth1.
ip netns exec mynetns ip link show type veth
In order to make our virtual Ethernet devices function properly, we still need to assign an IP and then enable both devices, in both namespaces.
# Assign veth1 10.0.0.11/24 in the mynetns namespace
ip netns exec mynetns ip addr add 10.0.0.11/24 dev veth1

# Power on br-veth1, in the initial networking namespace
ip link set dev br-veth1 up
# Power on veth1, in the mynetns namespace
ip netns exec mynetns ip link set dev veth1 up
We should now see that both devices are online, veth1 has IP address 10.0.0.11.
ip addr show br-veth1
ip netns exec mynetns ip addr show veth1
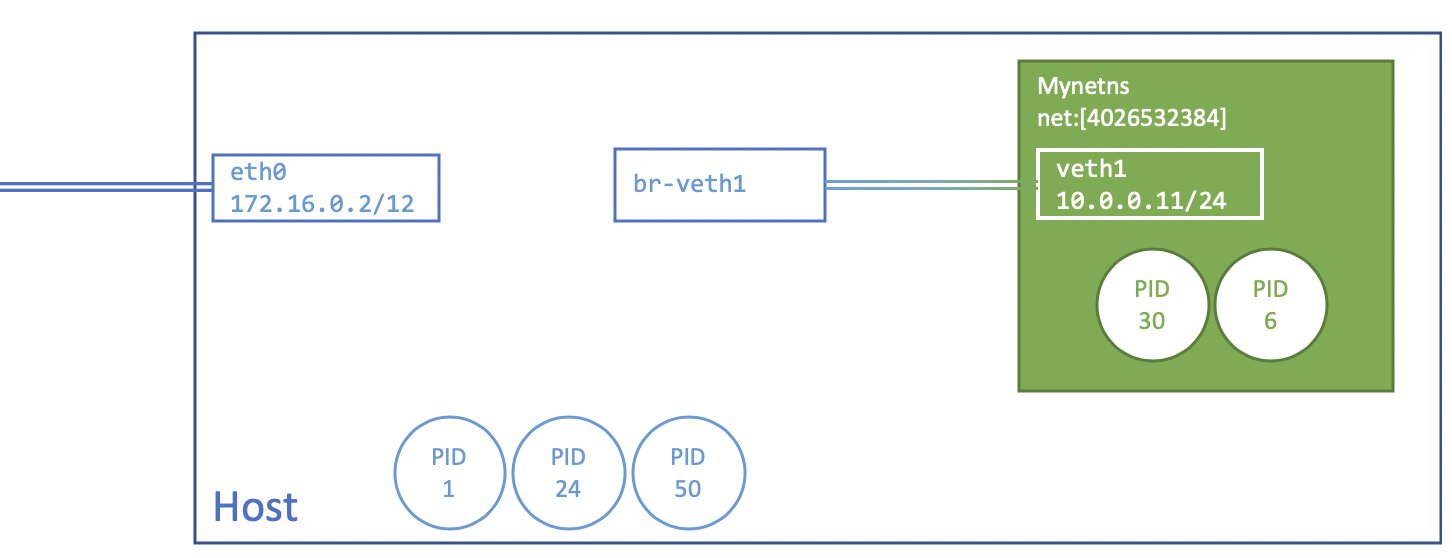
To get a visual sense of what was created, have a look at the following diagram. eth0 and br-veth1 are part of the initial namespace, while veth1 is part of the network namespace with inode link 4026532384. br-veth1 and veth1 are a virtual Ethernet device pair. Don’t worry if you do not have any processes living in those networking namespaces at the moment, but know that they can live there.
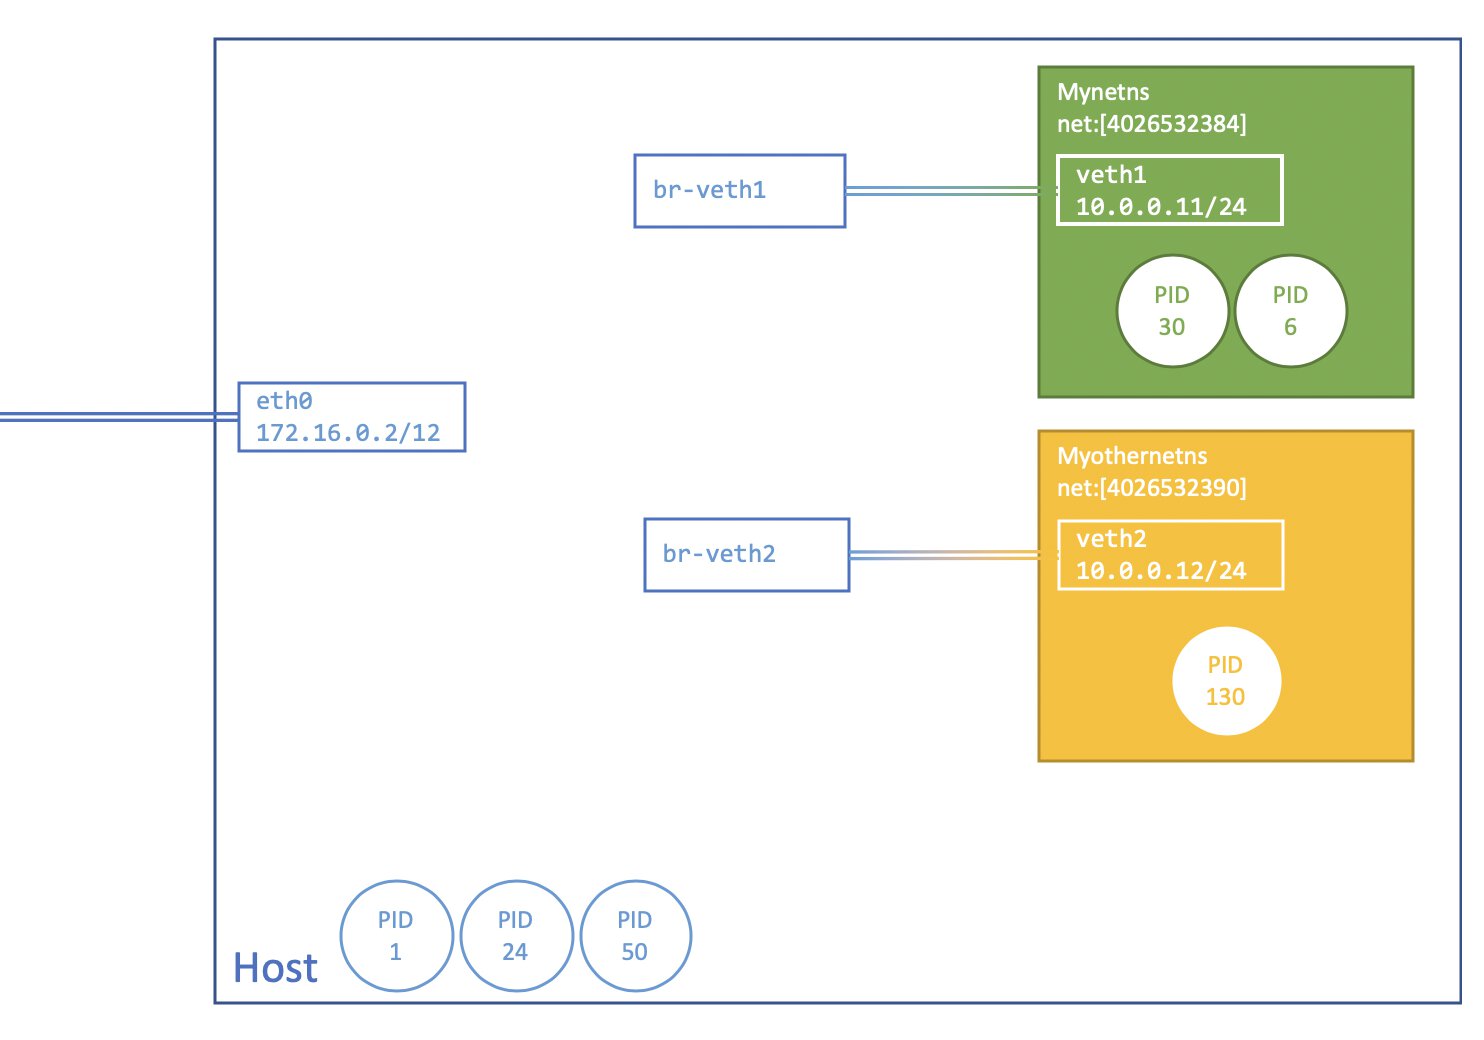
If you add multiple network namespaces you will need to repeat the previous steps of adding the virtual Ethernet pairs.
ip netns add myothernetns
ip netns exec myothernetns ip link set dev lo up

ip link add veth2 type veth peer name br-veth2
ip link set veth2 netns myothernetns

ip netns exec myothernetns ip addr add 10.0.0.12/24 dev veth2

ip link set dev br-veth2 up
ip netns exec myothernetns ip link set dev veth2 up
If we update our visual overview, it ends up looking like this.
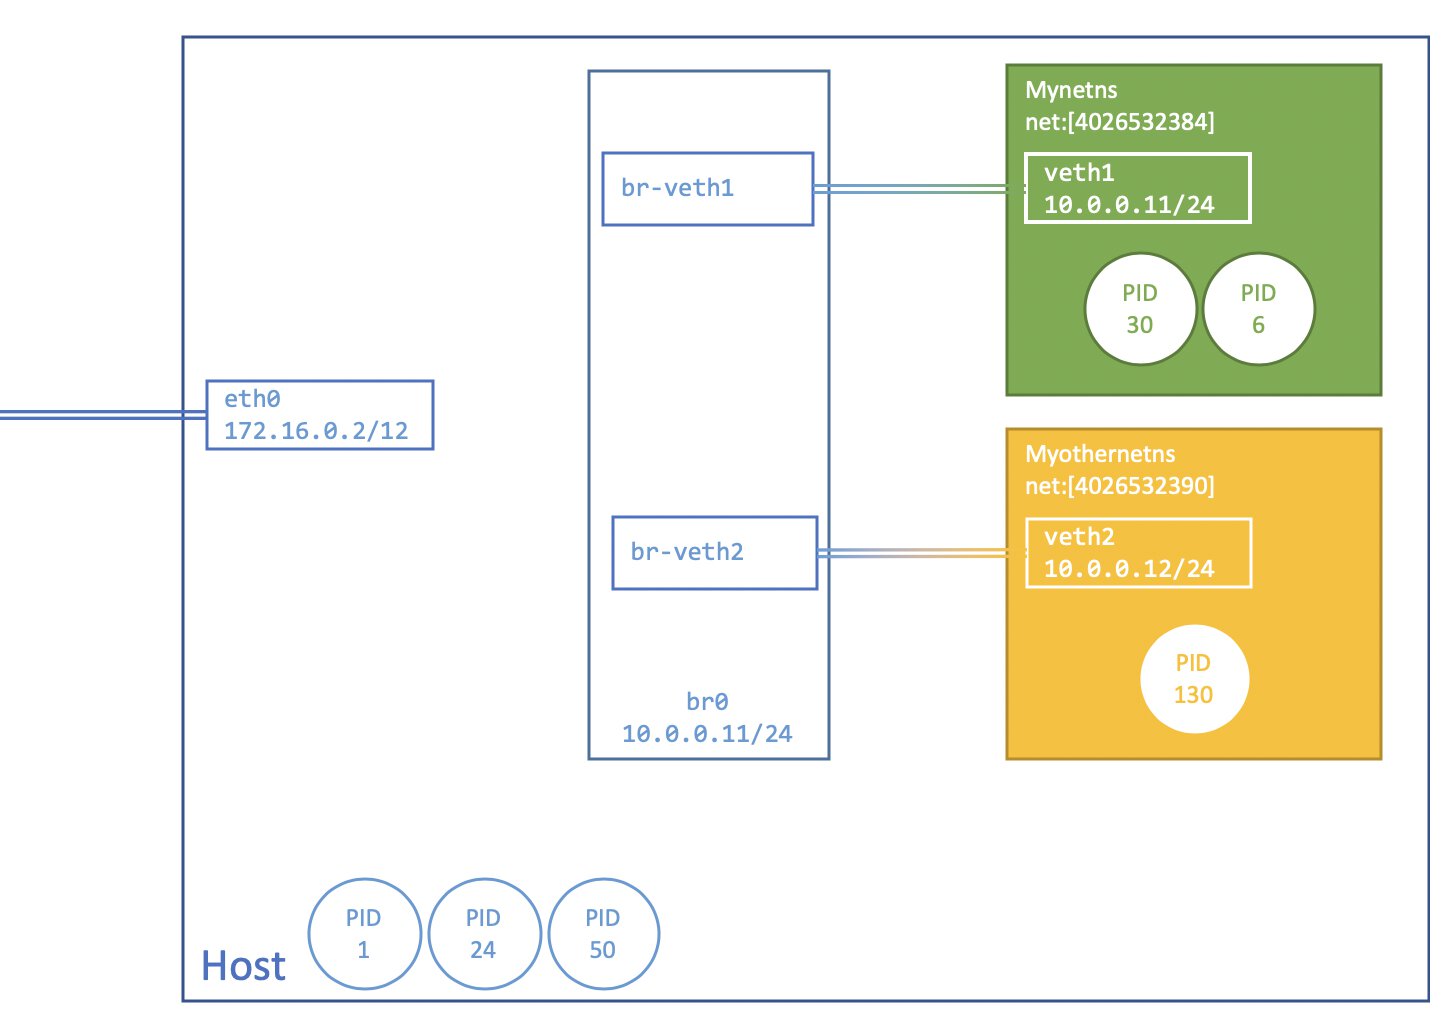
In case you would like processes in different networking namespaces to talk to each other, we will also need to create a network bridge. A bridge behaves similarly to a virtual network switch, real and virtual devices can be connected to the bridge.
# In our initial networking namespace, create a bridge called br0.
ip link add br0 type bridge

# Set the bridge device as master
ip link set br-veth1 master br0
ip link set br-veth2 master br0

# Add an IP to the bridge while also setting the broadcast address
ip addr add dev br0 10.0.0.10/24 broadcast +

#Power on the bridge
ip link set br0 up
And now, our visual overview looks like so:
We should now be able to reach veth1 from veth2.
ip netns exec myothernetns ping -I veth2 -c3 10.0.0.11
# PING 10.0.0.11 (10.0.0.11): 56 data bytes
# 64 bytes from 10.0.0.11: seq=0 ttl=64 time=0.045 ms
# 64 bytes from 10.0.0.11: seq=1 ttl=64 time=0.065 ms
# 64 bytes from 10.0.0.11: seq=2 ttl=64 time=0.063 ms
Currently, both our routing tables in the new networking namespaces do not have a default gateway set up. This means they cannot reach outside of the 10.0.0.0/24 range. Let’s fix that by ensuring that all packets, with destinations that do not match the other available routes, are routed to the bridge instead.
ip netns exec mynetns ping 8.8.8.8
#connect: Network is unreachable

# Add the bridge's default route to all our the current network namespace's (initial) child network namespaces.
ip -all netns exec ip route add default via 10.0.0.10

# Display the routes in every namespace
ip -all netns exec ip route
#netns: mynetns
#default via 10.0.0.10 dev veth1
#10.0.0.0/24 dev veth1 proto kernel scope link src 10.0.0.11

#netns: myothernetns
#default via 10.0.0.10 dev veth2
#10.0.0.0/24 dev veth2 proto kernel scope link src 10.0.0.12
Packets sent over the bridge will be NATed by eth0 and sent out into the wild by using the host’s IP, as long as we have the proper settings enabled.
#Enable IPv4 IP forwarding
echo 1 > /proc/sys/net/ipv4/ip_forward

# Create a NAT rule, in the POSTROUTING chain
# Masquerading is equivalent to specifying a mapping to the IP address of the interface the packet is going out of
iptables -t nat -A POSTROUTING -s 10.0.0.0/24 -j MASQUERADE
Our network topology ends up like this:

We should now be able to ping Google’s primary DNS servers from all available namespaces.
ip -all netns exec ping -c3 8.8.8.8
# netns: mynetns
# PING 8.8.8.8 (8.8.8.8): 56 data bytes
# 64 bytes from 8.8.8.8: seq=0 ttl=36 time=15.841 ms
# 64 bytes from 8.8.8.8: seq=1 ttl=36 time=18.234 ms
# 64 bytes from 8.8.8.8: seq=2 ttl=36 time=12.087 ms

# --- 8.8.8.8 ping statistics ---
# 3 packets transmitted, 3 packets received, 0% packet loss
# round-trip min/avg/max = 12.087/15.387/18.234 ms

# netns: myothernetns
# PING 8.8.8.8 (8.8.8.8): 56 data bytes
# 64 bytes from 8.8.8.8: seq=0 ttl=36 time=12.206 ms
# 64 bytes from 8.8.8.8: seq=1 ttl=36 time=18.378 ms
# 64 bytes from 8.8.8.8: seq=2 ttl=36 time=18.335 ms
Clarification on ip-netns
If you are unfamiliar with ip-netns it might seem as if there’s quite a bit of magic going on, allow me to clarify.
In part one, I spoke about how we can see the namespaces that our current process is a part of, by looking at the target of the symlinks found in “/proc/$$/ns/”. Each of these files can tell us which instance of a particular namespace type the process belongs to.
The contents of the symlink is always “ns-type: [inode-number]. If you have processes that have the same symlink target for a specific namespace type that means they belong to the same namespace type. If they do not match, they are in separate namespaces.
# What is netns holding on to?
ls -l /run/netns
# -r--r--r--    1 root     root             0 Jul 20 14:00 mynetns
# -r--r--r--    1 root     root             0 Jul 20 14:00 myothernetns

#Let's check the contents
cat mynetns
# cat: read error: Invalid argument

# 🤔
stat mynetns
# ⚠️ Note that the inode number is 4026532384.

#   File: /run/netns/mynetns
#   Size: 0               Blocks: 0          IO Block: 4096   regular empty file
# Device: 3h/3d   Inode: 4026532384  Links: 1
# Access: (0444/-r--r--r--)  Uid: (    0/    root)   Gid: (    0/    root)
# Access: 2020-07-20 14:00:00.000000000
# Modify: 2020-07-20 14:00:00.000000000
# Change: 2020-07-20 14:00:00.000000000

# So if we start ash in mynetns and have a look at the symlinks
ip netns exec mynetns ash

echo "Process: $$";
# Process: 55

readlink /proc/$$/ns/net
# net:[4026532384] matches the mynetns's inode number!
It appears we use “ip netsn add <NAME>” a new bind mount is created at “/var/run/netns/<NAME>”. “ip netns” holds on to network namespaces by mounting a reference to those inode symlinks. As soon as the bind-mount is removed, the network namespace is destroyed.
Time namespace
The time namespace was first proposed back in 2018 and entered the mainline kernel in the first second quarter of 2020 with Linux 5.6. Up until recently one thing that remained visible to every process on a host was the concept of the system time, now it is possible for a process to have its own instance of the time resource.
This allows for some, very specific, use cases. It will be particularly useful for container live migration scenarios such as CRIU. At a (very) basic level it allows you to set a specific date and time, with fewer impacted processes outside of the namespace. I mentioned ‘fewer’ because there are multiple system clocks and only two of them are virtualized.
CLOCK_MONOTONIC- “a non-settable clock that represents the monotonic time since—as described by POSIX (some unspecified point in the past).”
CLOCK_BOOTTIME- “a non-settable clock that is identical to
CLOCK_MONOTONIC, except that it also includes any time that the system is suspended.”
- “a non-settable clock that is identical to
CLOCK_REALTIME is not virtualized, so this means that you could potentially still impact the host if you were to set CLOCK_REALTIME through something like date(1).
I decided to update the unshare binary to version 2.36, which at the time was only available through the edge channel. Needless to say that you should not use this in production, but it should suffice our testing needs.
In order for the tests to work, verify that you’re running Linux kernel 5.6 or higher on the Docker host.
# Download version 2.36 from the edge branch
apk add --repository http://dl-cdn.alpinelinux.org/alpine/edge/main util-linux=2.36

unshare --version
#unshare from util-linux 2.36

unshare --help
# Usage:
# unshare [options] [<program> [<argument>...]]

# Run a program with some namespaces unshared from the parent.

# ptions:
# -m, --mount[=<file>]      unshare mounts namespace
# -u, --uts[=<file>]        unshare UTS namespace (hostname etc)
# -i, --ipc[=<file>]        unshare System V IPC namespace
# -n, --net[=<file>]        unshare network namespace
# -p, --pid[=<file>]        unshare pid namespace
# -U, --user[=<file>]       unshare user namespace
# -C, --cgroup[=<file>]     unshare cgroup namespace
# -T, --time[=<file>]       unshare time namespace
#  ...
# --monotonic <offset>      set clock monotonic offset (seconds) in time namespaces
# --boottime <offset>       set clock boottime offset (seconds) in time namespaces
Every time namespace has offsets associated with it. These offsets are in respect to the initial time namespace, they define the values of the monotonic and boot-time clocks in that namespace.
We will apply a 24 hours time offset (86400 seconds) to CLOCK_BOOTTIME as we run ash in the new time namespace, this will cause uptime to effectively return a different result as opposed to when it is run in the initial time namespace.
# Display format:
# <current time> <system running time> <average system load 1 min ago> <average system load 5 mins ago> <average system load 15 mins ago>

uptime # initial namespace
# 13:40:00 up  4:00,  load average: 0.00, 0.00, 0.00

unshare --time --boottime 86400 ash
uptime
# 13:50:00 up 1 day,  4:00,  load average: 0.00, 0.00, 0.00
The offsets are exposed via a file “/proc/self/timens_offsets”. After the first process has been created or if it has entered the namespace subsequent writes to this file will not work.
Inside the file the offsets are expressed, per line, in the following manner: <clock-id> <offset-secs> <offset-nanosecs>
# shell in new time namespace

cat /proc/self/timens_offsets
# 1 0 0
# 7 86400 0
The clock-ids aren’t too complicated to figure out:
- 1 == CLOCK_MONOTONIC
- 7 == CLOCK_BOOTTIME
When we return to our initial time namespace, we see that both the monotonic and boot-time clocks are unaffected after shifting the time offsets in the other time namespaces, which is exactly what we’ve come to expect!
Conclusion
The conclusion I wrote at the end of part one still holds up for part two. By writing and gathering all the information on this topic, I’ve learned to value the efforts that go into making container tools. There so many moving parts and intricacies that you need to take into consideration if you want to achieve process isolation. It’s still nice to know what’s going on behind all the magic!
Now on to part three.