Azure Confidential Computing: Confidential Temp Disk Encryption
In this post
📣 Dive into the code samples from this blog on GitHub!
One of the things I think that Microsoft’s Confidential Compute team has to get right to make the offering more compelling is to raise the feature parity with what is currently already available on Azure. I can imagine that this is no easy feat, since there’s years of development that have gone into making those features. Things like support for Azure Site Recovery and Azure Backup are on the top of my wish list, but these are two services that would be extremely complex to get working right, especially since you’d have to make sure that the vTPM keys are somehow synced between the regions.. Though this is an assumption from my end. The decision to pursue such features also raises philosophical questions, as the core principle hinges on Microsoft maintaining no access.
Similar complexities arise in the realm of disk encryption for Azure confidential computing, so I was pleasantly surprised to read about the public preview of “temporary disk encryption”. Temporary disk encryption for AMD SEV-SNP confidential VMs will allow Azure customers to encrypt the temporary disk attached to their Confidential VMs using platform or customer-managed keys. This ensures any sensitive data on those disks is protected at rest.
What’s even better, is that the implementation of this encryption mechanism appears to leverage the Secure Key Release mechanism, a topic I’ve previously discussed in my other blog posts.
Managed Disk Roles
Confidential VMs employ a process known as Confidential OS disk encryption (sometimes known as full disk encryption), focusing solely on encrypting the OS disk and occurs when the VM is deployed. This is in contrast to the mechanism used in typical scenarios involving Azure Disk Encryption for encrypting other types of disks, including temporary disks and data disks.
Azure uses three disk roles, each serving a distinct purpose and corresponding to disks connected to a virtual machine.
- OS Disk
- Every virtual machine has one attached operating system disk, comes with a pre-installed OS.
- Contains the boot volume necessary for system initialization.
- Data Disk
- Attached to a virtual machine to store application data.
- The VM SKU determines how many of these you can use.
- Temporary Disk
- Most VMs contain a temporary disk, which is not categorized as a managed disk.
- Data may be lost during a maintenance event, when you redeploy or stop the VM.
A whole lot of encryption options
Whether you’re dealing with a regular virtual machine or a confidential one, managed disks have a range of encryption possibilities. Conceptually, these encryption technologies can be split into four main categories.
- Server Side Encryption (SSE), which is performed by the storage service backend.
- Azure Disk Encryption (ADE), which you can enable on the OS and data disks for your VMs.
- Encryption at host, if you have an Azure Dedicated Host you can also opt-in.
- This mode enhances Azure Disk Storage Server-Side Encryption to ensure that all temp disks and disk caches are encrypted at rest and flow encrypted to the Storage clusters.
- Confidential Disk Encryption
Microsoft has a great overview page with all the different encryption options for managed disks, which I’ve shamelessly copied here:
| Server-Side Encryption | Encryption at Host | Azure Disk Encryption | Confidential disk encryption (OS disk) | |
|---|---|---|---|---|
| Encryption at rest (OS and data disks) | Yes | Yes | Yes | Yes |
| Temp disk encryption | No | Yes | Yes | No |
| Encryption of caches | No | Yes | Yes | Yes |
| Data flows encrypted between Compute and Storage | No | Yes | Yes | Yes |
| Customer control of keys | Yes (via DES) | Yes (via DES) | Yes (via KEK) | Yes (via DES) |
| HSM Support | Azure Key Vault Premium and Managed HSM | Azure Key Vault Premium and Managed HSM | Azure Key Vault Premium | Azure Key Vault Premium and Managed HSM |
| Does not use your VM’s CPU | Yes | Yes | No | No |
| Works for custom images | Yes | Yes | No Does not work for custom Linux images | Yes |
| Enhanced Key Protection | No | No | No | Yes |
| Microsoft Defender for Cloud disk encryption status* | Unhealthy | Healthy | Healthy | Not applicable |
📖 For the latest updates, you might want to check out the documentation.
For the longest time, we’ve been able to use the Azure Disk Encryption (ADE) VM extension on non-confidential VM SKUs to encrypt OS and data disks. Though with this public preview we can use ADE to enable temp disk encryption for Confidential VMs as well.
⚠️ I want to stress that if you want to enable ADE, you get some experience on a test machine first. Read through the documentation very carefully and pay attention to specifics such as your OS type and the presence of previously created data disks.
For Linux VMs in particular, be very wary of the
EncryptFormatAllfeature. It is required to enable encryption of your temp disks. However, this formats all mounted data disks and all the data on them will be lost.
An attempt was made
While I was reading into this announcement and examining the associated scripts, I pondered whether the process of enabling temp disk encryption for confidential VMs differed significantly from the conventional Azure disk encryption procedure. Drawing from my recent experience with Azure Disk Encryption (ADE), I recollected the subtleties of its background operations. It’s important to note that when you enable temp disk encryption for confidential VMs, you must set it’s type to Data instead of All.
A first important step is to enable confidential OS disk encryption, which can only be done at deployment phase. Should you endeavor to enable temp disk encryption for a Confidential VM (CVM) that does not use confidential OS disk encryption, there will be trouble as the resource manager will issue the following error:
VM has reported a failure when processing extension ‘AzureDiskEncryptionForLinux’ (publisher ‘Microsoft.Azure.Security’ and type ‘AzureDiskEncryptionForLinux’). Error message: “Encryption operation EnableEncryption is not supported to ConfidentialVM, volume type: Data, OS encryption status: EnableEncryption”. More information on troubleshooting is available at https://aka.ms/VMExtensionADELinuxTroubleshoot. (Code: VMExtensionProvisioningError)
To prevent this error, we must deploy the Confidential VM (CVM) and activate confidential disk encryption during the deployment phase. Simultaneously, it is highly recommended that you enable managed identity for the CVM. This will allow us to create a Key Vault access policy or role assignment that ensures that the CVM is authorized to execute the key release operation. Additionally, it is crucial for your RSA key to have to the correct Secure Key Release (SKR) policy; otherwise, the VM may encounter difficulties accessing the key throughout the Azure Disk Encryption process.
💡 For an in-depth understanding of the key release process, I have extensively covered it in my other blog posts. If you are unfamiliar with the process, I recommend reviewing those posts.
Dangers of Portal Deployments
During my initial test of the temp disk encryption public preview, I encountered issues due to an incorrectly deployed Key Vault setup. In my eagerness to quickly test the preview, I opted for a quick deployment via the Azure Portal, assuming that the minimal components required would make the process easier and faster. However, this approach led to unintended errors. After enabling Azure Disk Encryption, I encountered the following error message:
Traceback (most recent call last): File “/var/lib/waagent/Microsoft.Azure.Security.AzureDiskEncryptionForLinux-1.4.0.5/main/handle.py”, line 806, in enable check_Util.precheck_for_fatal_failures(public_settings, encryption_status, DistroPatcher, existing_volume_type,check_release_rsa_or_ec_key) File “/var/lib/waagent/Microsoft.Azure.Security.AzureDiskEncryptionForLinux-1.4.0.5/main/check_util.py”, line 426, in precheck_for_fatal_failures self.validate_skr_release_rsa_or_ec_key(public_settings,check_release_rsa_or_ec_key) File “/var/lib/waagent/Microsoft.Azure.Security.AzureDiskEncryptionForLinux-1.4.0.5/main/check_util.py”, line 414, in validate_skr_release_rsa_or_ec_key raise Exception(msg)
Exception: The managed identity provided in public settings is not correct or not authorized to do secure key release operation in your key vault/HSM. Please verify and re-run ADE install after fixing the issue.
Well I guess you could say this is a happy accident. I was now aware that the Azure Disk Encryption extension, v1.4.0.5 to be exact, ships with logic for performing the secure key release against a Key Vault. I thought this was rather interesting so I cloned the source code from the GitHub repo and started looking around.
While this seemed like an unfortunate mistake, it turned out to be an fun experience. I discovered that the Azure Disk Encryption extension, version 1.4.0.5, includes logic for performing secure key release against a Key Vault. I I thought this was rather interesting and decided to I examine the source code on GitHub.
sudo vi /var/lib/waagent/Microsoft.Azure.Security.AzureDiskEncryptionForLinux-1.4.0.5/main/check_util.py
Aha! I uncovered that the extension looks for a binary called AzureAttestSKR; this binary, I presumed, was a practical implementation for secure key release, which likely leveraged the Confidential Computing Guest Attestation library. If you’ve read some of my more recent blog posts, you might have seen that this library is available for both Windows and Linux, and it is used to attest that the confidential compute VM is running in a compliant state.
💡 The TL;DR is that the secure key release works in a few simple steps:
- Aquire an attestation token from an attestation provider, which cryptographically verifies that the CVM is a compliant Azure CVM.
- Present this token to Azure Key Vault when performing the key release operation on a key.
- The token is validated against a SKR policy and if the token passes the validation, then the key is returned.
- You can compare this policy to an Azure Policy, made up of JSON.
Anyway, let’s get back to zeroing in on my issue with the Azure Portal. Let’s rule out that the AzureAttestSKR binary is not missing from the filesystem. To investigate further, I located the binary using the command:
sudo find / -name "AzureAttestSKR" 2> /dev/null
#   /var/lib/waagent/Microsoft.Azure.Security.AzureDiskEncryptionForLinux-1.4.0.5/AzureAttestSKR
Now that we’ve located the binary, we can try to perform the same command as in the Python script.
./AzureAttestSKR -n 123456 -k https://skr-kve2jebmdvrbtpu.vault.azure.net/keys/myskrkey/e473cd4c66224d16870bbe2eb4c58078 -c imds
# Exception occured. Details - [json.exception.type_error.302] type must be string, but is null
To delve deeper, I installed PowerShell and executed a script from my Secure Key Release (SKR) blog.
.\Invoke-SecureKeyRelease.ps1 -AttestationTenant "https://sharedweu.weu.attest.azure.net" -VaultBaseUrl "https://skr-kve2jebmdvrbtpu.vault.azure.net/" -KeyName "myskrkey" -KeyVersion "e473cd4c66224d16870bbe2eb4c58078"
I encountered an error that indicated there were issues with the policy:
Invoke-WebRequest: /home/thomas/skr/Invoke-SecureKeyRelease.ps1:85:29
Line |
  85 |  … yResponse = Invoke-WebRequest -Method POST -Uri $kvReleaseKeyUrl -Hea …
     |                ~~~~~~~~~~~~~~~~~~~~~~~~~~~~~~~~~~~~~~~~~~~~~~~~~~~~~~~~~
     | {"error":{"code":"Forbidden","message":"Target environment attestation does not meet key release requirements.","innererror":{"code":"AccessDenied"}}}
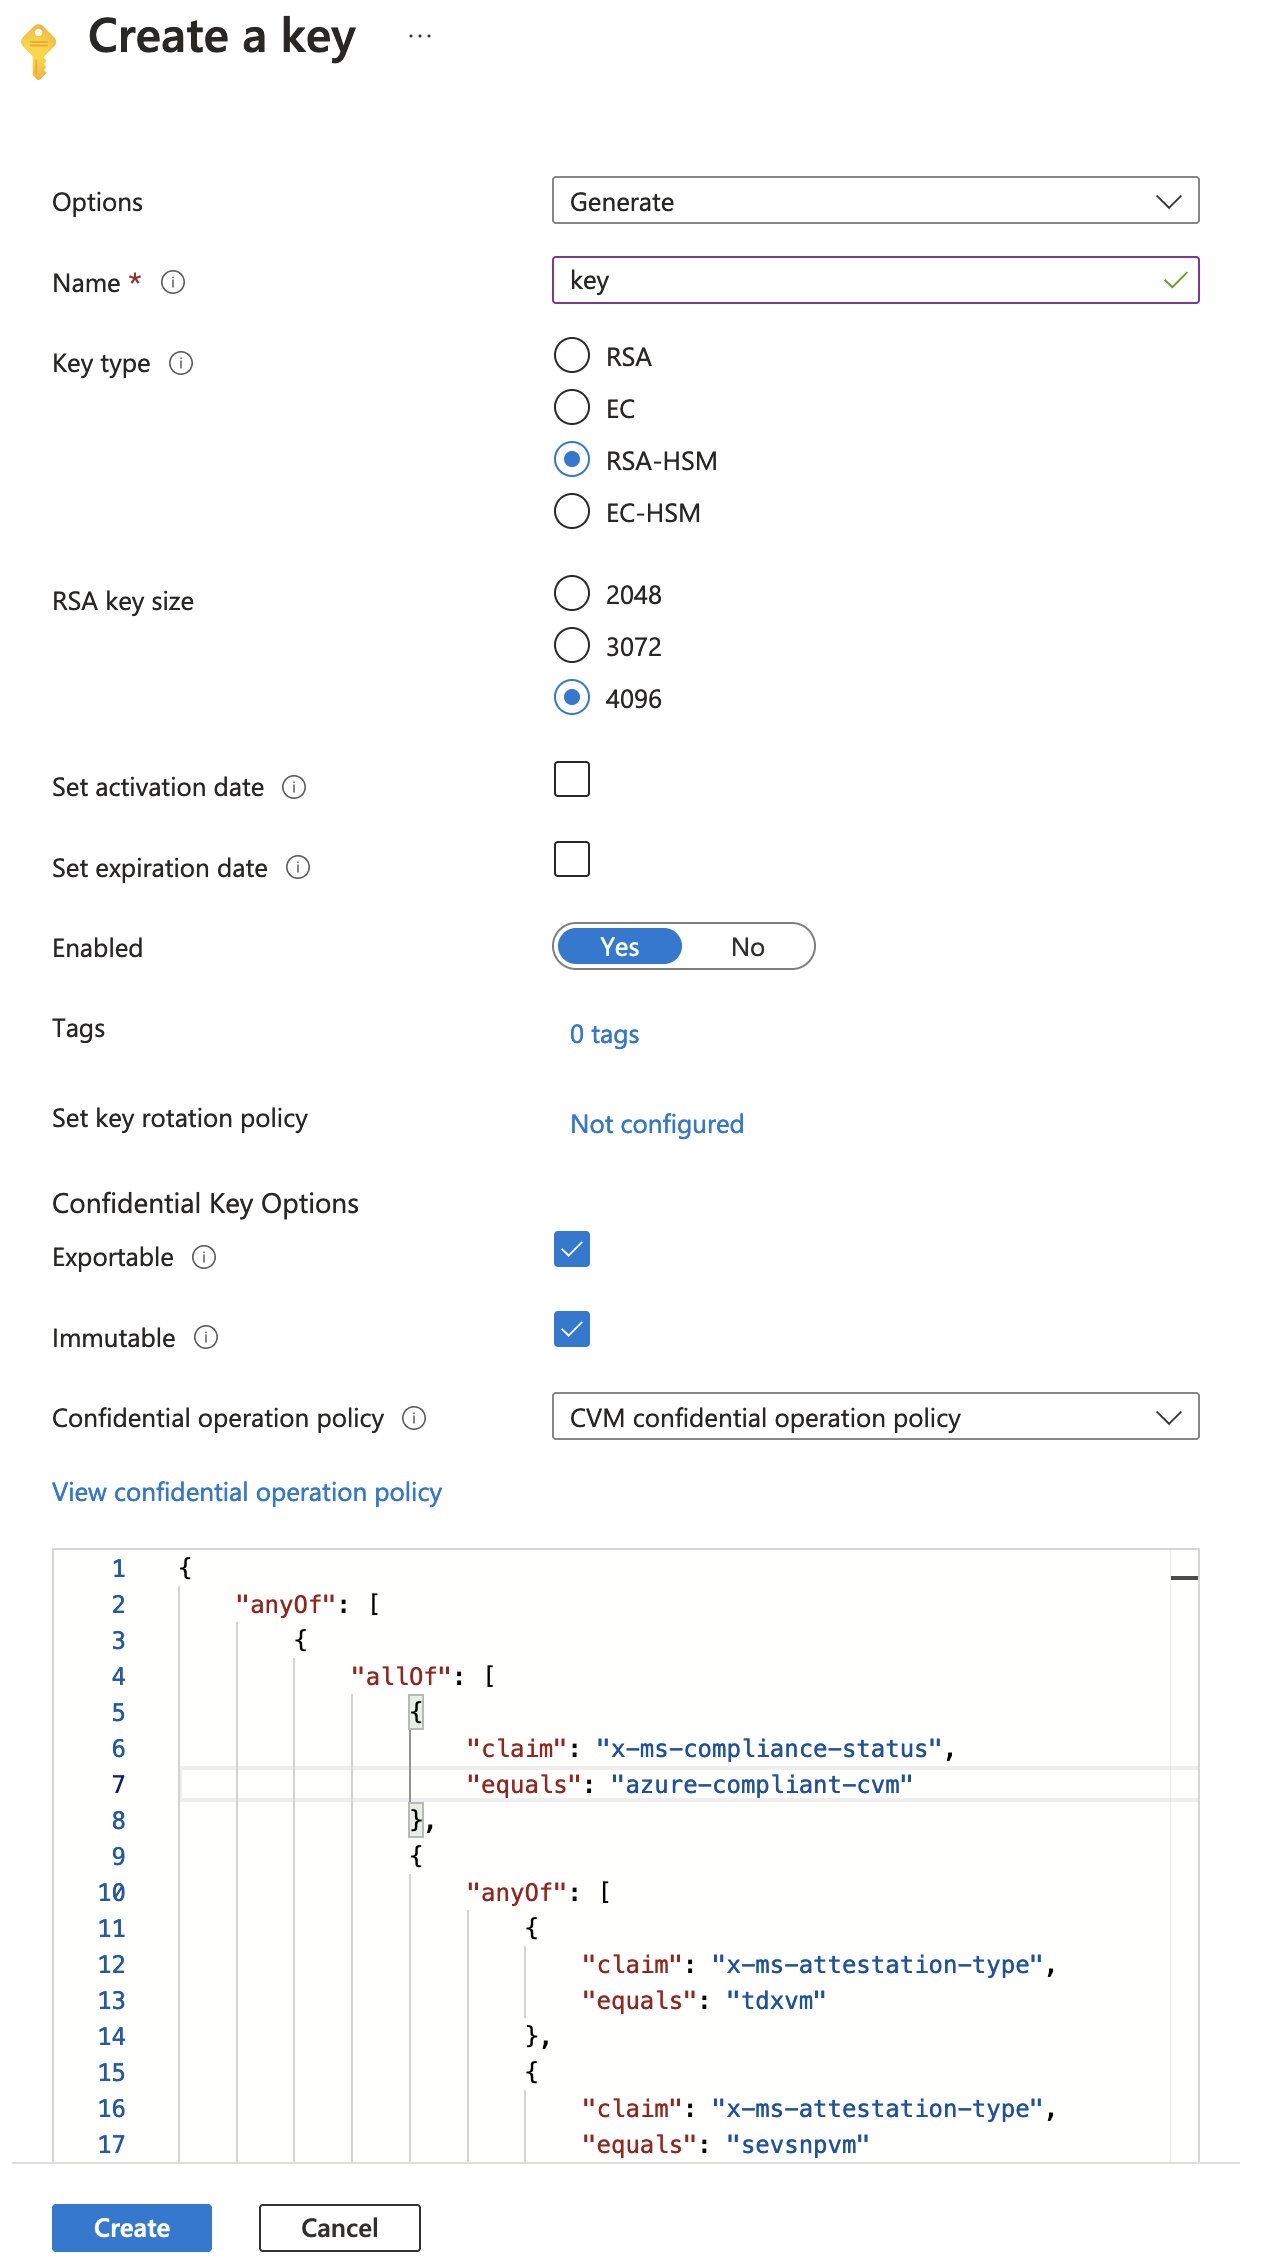
Well it seems like the attestation token’s contents is not matching with the release policy. Could that be the case? Remember, we first have to attest that our CVM is running in “a compliant state”. The SKR policy that’s associated with the key most likely follows a JSONPATH-ish expression and checks whether certain values are available, so let’s check the policy against the token. Here is the SKR policy (aka confidential operation policy_) that is deployed by default, when you configure “Confidential Key Options” via Azure Portal UI.
{
    "anyOf": [
        {
            "allOf": [
                {
                    "claim": "x-ms-compliance-status",
                    "equals": "azure-compliant-cvm"
                },
                {
                    "anyOf": [
                        {
                            "claim": "x-ms-attestation-type",
                            "equals": "tdxvm"
                        },
                        {
                            "claim": "x-ms-attestation-type",
                            "equals": "sevsnpvm"
                        }
                    ]
                }
            ],
            "authority": "https://sharedeus.eus.attest.azure.net/"
        },
        {
            "allOf": [
                {
                    "claim": "x-ms-compliance-status",
                    "equals": "azure-compliant-cvm"
                },
                {
                    "anyOf": [
                        {
                            "claim": "x-ms-attestation-type",
                            "equals": "tdxvm"
                        },
                        {
                            "claim": "x-ms-attestation-type",
                            "equals": "sevsnpvm"
                        }
                    ]
                }
            ],
            "authority": "https://sharedwus.wus.attest.azure.net/"
        }
        // ... list goes on for all shared regions
    ],
    "version": "1.0.0"
}
After some digging, it appeared that the policy associated with the Key was not up-to-date when it’s being deployed through the Portal. The x-ms-attestation-type claim is not correct, as it tries to map to a property in the attestation token under the path $.x-ms-attestation-type. The correct path appears to be x-ms-isolation-tee.x-ms-attestation-type. The SKR policy should be changed to the following:
{
    "version": "1.0.0",
    "anyOf": [
        {
            "authority": "https://sharedweu.weu.attest.azure.net",
            "allOf": [
                {
                    "anyOf": [
                        {
                            "claim": "x-ms-isolation-tee.x-ms-attestation-type",
                            "equals": "tdxvm"
                        },
                        {
                            "claim": "x-ms-isolation-tee.x-ms-attestation-type",
                            "equals": "sevsnpvm"
                        }
                    ]
                },
                {
                    "claim": "x-ms-isolation-tee.x-ms-compliance-status",
                    "equals": "azure-compliant-cvm"
                }
            ]
        }
    ]
}
Here is what it looks like in the Azure portal, more specifically the key creation screen and the confidential operation policy:
Deployment overview
Unfortunately it appears that altering the policy contents via the Portal is not an option. Therefore, I’ll have to employ an alternative method to modify it. Deploying an ARM template, Bicep template, or Terraform is a viable approach to achieve this change. Since it’s the Christmas holidays I’ll provide examples for all three of these technologies. 🙂
In my prior blog entries on Confidential Computing, I consistently used the same Bicep/ARM template for configuring my test environment but I will slightly modify the existing templates. As for the Terraform code, I will be creating an entirely new set of examples.
At a high level, the infra-as-code will execute the following actions:
- Deploy the CVM
- Confidential OS disk encryption enabled, with a platform managed key
- Enable Managed Identity
- Deploy an Azure Key Vault Premium.
- Create a role assignment to allow the CVM to perform the
releaseoperation againstkeyobjects. - Grant permission for its objects to be utilized in Azure Disk Encryption.
- Create a role assignment to allow the CVM to perform the
- Create an RSA key, which will be HSM-backed.
- Mark as exportable
- Attach an SKR policy
The SKR policy’s validation criteria will encompass:
- Verification that the attestation token was signed by the sharedweu Azure Attestation instance.
- Confirmation that the CVM is of type
sevsnpvm(AMD SEV-SNP) ortdxvm(Intel TDX).
Additionally deploying the ADE extension will be necessary which requires specific parameters to seamlessly integrate with the Key Vault.
Bicep comes to my rescue
resource confidentialVm 'Microsoft.Compute/virtualMachines@2023-09-01' = {
  name: vmName
  location: location
  identity: {
    type: 'SystemAssigned'
  }
  properties: {
    diagnosticsProfile: {
      bootDiagnostics: {
        enabled: bootDiagnostics
      }
    }
    hardwareProfile: {
      vmSize: vmSize
    }
    storageProfile: {
      osDisk: {
        createOption: 'FromImage'
        managedDisk: {
          storageAccountType: osDiskType
          securityProfile: {
            securityEncryptionType: securityType
          }
        }
      }
      imageReference: imageList[osImageName]
    }
    networkProfile: {
      networkInterfaces: [
        {
          id: networkInterface.id
        }
      ]
    }
    osProfile: {
      computerName: vmName
      adminUsername: adminUsername
      adminPassword: adminPasswordOrKey
      linuxConfiguration: ((authenticationType == 'password') ? null : {
        disablePasswordAuthentication: 'true'
        ssh: {
          publicKeys: [
            {
              keyData: adminPasswordOrKey
              path: '/home/${adminUsername}/.ssh/authorized_keys'
            }
          ]
        }
      })
      windowsConfiguration: (!isWindows ? null : {
        enableAutomaticUpdates: 'true'
        provisionVmAgent: 'true'
      })
    }
    securityProfile: {
      uefiSettings: {
        secureBootEnabled: true
        vTpmEnabled: true
      }
      securityType: 'ConfidentialVM'
    }
  }
}

resource kv 'Microsoft.KeyVault/vaults@2023-07-01' = {
  name: keyVaultName
  location: location
  properties: {
    enabledForDeployment: enabledForDeployment
    enabledForDiskEncryption: enabledForDiskEncryption
    enabledForTemplateDeployment: enabledForTemplateDeployment
    tenantId: tenantId
    enableRbacAuthorization: true
    sku: {
      name: 'premium'
      family: 'A'
    }
    networkAcls: {
      defaultAction: 'Allow'
      bypass: 'AzureServices'
    }
  }
}

resource key 'Microsoft.KeyVault/vaults/keys@2023-07-01' = {
  parent: kv
  name: keyName
  properties: {
    kty: keyType
    attributes: {
      exportable: keyExportable
      enabled: keyEnabled
      nbf: keyNotBefore == -1 ? null : keyNotBefore
      exp: keyExpiration == -1 ? null : keyExpiration
    }
    curveName: curveName
    keySize: keySize == -1 ? null : keySize
    keyOps: keyOps
    release_policy: {
      contentType: releasePolicyContentType
      data: releasePolicyData
    }
  }
}

var roleDefKeyVaultCryptoServiceReleaseUser = resourceId('Microsoft.Authorization/roleAssignments', '08bbd89e-9f13-488c-ac41-acfcb10c90ab')
resource releaseKeyRoleAssignment 'Microsoft.Authorization/roleAssignments@2022-04-01' = {
  name: guid(key.id, confidentialVm.id, roleDefKeyVaultCryptoServiceReleaseUser)
  scope: key
  properties: {
    principalType: 'ServicePrincipal'
    principalId: confidentialVm.identity.principalId
    // Key Vault Crypto Service Release User
    // Release keys. Only works for key vaults that use the 'Azure role-based access control' permission model.
    roleDefinitionId:roleDefKeyVaultCryptoServiceReleaseUser
  }
}
Deploying a VM extension is straightforward, but it’s crucial to examine any nuanced configuration distinctions between Linux and Windows, as they often bubble up. One notable difference is the version of the disk encryption extension for each operating system. Using an incorrect version can lead to complications and really hinder the deployment process.
var extensionName =  isWindows ? 'AzureDiskEncryption' : 'AzureDiskEncryptionForLinux'
var extensionVersion = isWindows ? '2.2' :'1.0'
var extensionPublisher = 'Microsoft.Azure.Security'

resource vmExtension 'Microsoft.Compute/virtualMachines/extensions@2023-09-01' = {
  parent: confidentialVm
  name: extensionName
  location: location
  properties: {
    publisher: extensionPublisher
    type: extensionName
    typeHandlerVersion: extensionVersion
    autoUpgradeMinorVersion: true
    settings: {
      EncryptionOperation: 'EnableEncryption'
      KeyVaultURL: kv.properties.vaultUri
      KeyVaultResourceId: kv.id
      KeyEncryptionAlgorithm: 'RSA-OAEP'
      VolumeType: 'Data'
      KeyEncryptionKeyURL: key.properties.keyUriWithVersion
      KekVaultResourceId: split(key.id, '/keys')[0]
    }
  }
  dependsOn: [
    releaseKeyRoleAssignment
  ]
}
Make sure you review the complete template on GitHub; it should suffice for a successful deployment of all these components.
Terraform can do it too
Deploying a confidential VM via Terraform is possible, but it’s subtlely different from doing it with Bicep. With Bicep, you have control over the securityType attribute and you should set it to ConfidentialVM. Then you can optionally set the VM’s secure boot and activate the vTPM, obviously you should enable these.
In contrast, Terraform doesn’t provide a manual option to set the securityType. Instead, it is automatically determined based on the security_encryption_type attribute of the VM’s OS disk. When this attribute is set to DiskWithVMGuestState, Terraform sets the securityType to ConfidentialVM if secure boot and vTPM are also enabled. You can check this out in the Azure Terraform provider source code for azurerm_linux_virtual_machine.
resource "azurerm_linux_virtual_machine" "cvm" {
  resource_group_name = azurerm_resource_group.tempdiskblog.name
  location            = azurerm_resource_group.tempdiskblog.location

  name = local.vm_name
  size = "Standard_DC2ads_v5"
  identity {
    type = "SystemAssigned"
  }

  admin_username                  = var.admin_username
  admin_password                  = local.is_password ? var.password_or_key_path : null
  disable_password_authentication = local.is_password ? false : true
  network_interface_ids           = [azurerm_network_interface.cvm.id]

  dynamic "admin_ssh_key" {
    for_each = local.is_password == false ? ["enabled"] : []
    content {
      username   = var.admin_username
      public_key = file(var.password_or_key_path)
    }
  }

  os_disk {
    caching                  = "ReadWrite"
    storage_account_type     = "Standard_LRS"
    security_encryption_type = "DiskWithVMGuestState" # Confidential Disk Encryption
                                                      # secure_boot_enabled must be set to `true` when set to "DiskWithVMGuestState"
                                                      # vtpm_enabled must be set to `true` when any other value is specified
  }

  source_image_reference {
    publisher = "Canonical"
    offer     = "0001-com-ubuntu-confidential-vm-jammy"
    sku       = "22_04-lts-cvm"
    version   = "latest"
  }
  secure_boot_enabled = true                        # Must be set to to true
  vtpm_enabled        = true                        # Must be set to to true
}

resource "azurerm_key_vault" "cvm" {
  resource_group_name = azurerm_resource_group.tempdiskblog.name
  location            = azurerm_resource_group.tempdiskblog.location

  name      = local.kv_name
  sku_name  = "premium"
  tenant_id = data.azurerm_client_config.current.tenant_id

  enable_rbac_authorization   = true
  enabled_for_disk_encryption = true
  purge_protection_enabled    = false # Change this if you need it
  soft_delete_retention_days  = 7
}

data "azurerm_client_config" "current" {}

resource "azurerm_role_assignment" "current_user" {
  principal_id         = data.azurerm_client_config.current.object_id
  scope                = azurerm_key_vault.cvm.id
  role_definition_name = "Key Vault Crypto Officer"
}

resource "azurerm_role_assignment" "cvm_key_release" {
  principal_id         = azurerm_linux_virtual_machine.cvm.identity[0].principal_id
  scope                = azapi_resource.cvm_key.id
  role_definition_name = "Key Vault Crypto Service Release User"
}
Unfortunately, as of AzureRM provider version 3.85.0 the azurerm_key_vault_key resource does not give you the option to mark the key as exportable or to set a release_policy. Until this is fixed, it’s a good idea to use the AzAPI provider, which is a very thin layer on top of the Azure ARM REST APIs. To discover the available properties, you can simply open up the ARM template reference for microsoft.keyvault/vaults/keys.
data "local_file" "cvm_release_policy" {
  filename = "${path.root}/../../assets/cvm-release-policy.json"
}

resource "azapi_resource" "cvm_key" {
  type                   = "Microsoft.KeyVault/vaults/keys@2022-07-01"
  name                   = local.vm_name
  parent_id              = azurerm_key_vault.cvm.id
  response_export_values = ["properties.keyUriWithVersion"]
  body = jsonencode({
    properties = {
      attributes = {
        enabled    = true
        exportable = true
      }
      keyOps = [
        "encrypt",
        "decrypt"
      ]
      keySize = 2048
      kty     = "RSA-HSM"
      release_policy = {
        contentType = "application/json; charset=utf-8"
        # The Auzre Key Vault backend stores a minified version of your policy
        # it will also remove the padding. To prevent Terraform from wanting to update
        # the release_policy on subsequent runs, trim the equals characters.
        data = trim(data.local_file.cvm_release_policy.content_base64, "=")
      }
    }
  })
}
We can then hook everything up to deploy the disk encryption extension.
resource "azurerm_virtual_machine_extension" "cvm_ade" {
  name                       = "AzureDiskEncryptionForLinux"
  virtual_machine_id         = azurerm_linux_virtual_machine.cvm.id
  type_handler_version       = "1.1"
  publisher                  = "Microsoft.Azure.Security"
  type                       = "AzureDiskEncryptionForLinux"
  auto_upgrade_minor_version = true
  settings                   = <<EOF
{
  "EncryptionOperation": "EnableEncryption",
  "KeyVaultURL": "${azurerm_key_vault.cvm.vault_uri}",
  "KeyVaultResourceId": "${azurerm_key_vault.cvm.id}",
  "KeyEncryptionAlgorithm": "RSA-OAEP",
  "VolumeType": "Data",
  "KeyEncryptionKeyURL": "${jsondecode(azapi_resource.cvm_key.output).properties.keyUriWithVersion}",
  "KekVaultResourceId": "${azapi_resource.cvm_key.parent_id}"
}
  EOF
  depends_on = [ azurerm_role_assignment.cvm_key_release ]
}
If you take a look at the full source code, you will see that I have organized the code for deploying a Windows VM and a Linux VM into distinct folders. My intention was to maintain simplicity and avoid cluttering the code with conditional resources. In Bicep, achieving this separation is straightforward without introducing complexity. However, with Terraform, you must leverage the count or for_each meta-argument for conditional deployments, potentially making the code less intuitive for newcomers to comprehend.
Tracking ADE progress
As always, you need to wait until the encryption process has completed. You can track this process a little bit by calling into the instanceView API:
https://management.azure.com/subscriptions/><sub-id>/resourceGroups/<rg>/providers/Microsoft.Compute/virtualMachines/<vm-name>?$expand=instanceView&api-version=2022-11-01
Alternatively, using the Az PowerShell modules, you can execute Get-AzVmDiskEncryptionStatus. On Linux systems, you have the option to inspect specific log files related to ADE for additional details.
tail /var/log/azure/Microsoft.Azure.Security.AzureDiskEncryptionForLinux/ade_vol_notif-2023-12-16T21-37-47.log
# [2023-12-16 21:37:58] : Device path: /devices/LNXSYSTM:00/LNXSYBUS:00/ACPI0004:00/VMBUS:00/f8b3781a-1e82-4818-a1c3-63d806ec15bb/host0/target0:0:0/0:0:0:1/# block/sdb/sdb1
# [2023-12-16 21:37:58] : is_initialized: 1
# [2023-12-16 21:37:58] : adding Device node /dev/sdb1 in list
#
# [2023-12-16 21:37:58] : [removed] change to crypt, syspath /sys/devices/LNXSYSTM:00/LNXSYBUS:00/ACPI0004:00/VMBUS:00/f8b3781a-1e82-4818-a1c3-63d806ec15bb/# host0/target0:0:0/0:0:0:1/block/sdb/sdb1
# [2023-12-16 21:37:58] : deque item count: 0
# [2023-12-16 21:37:58] : Processing udev monitoring event is done!
Verify ADE works
After SSHing into your Linux Confidential VM (CVM), you can employ the lsblk command to check that the temporary disk, identified as sdb in our example, is now securely encrypted.
lsblk
# NAME                                                     MAJ:MIN RM   SIZE RO TYPE  MOUNTPOINTS
# loop0                                                      7:0    0  63.5M  1 loop  /snap/core20/2015
# loop1                                                      7:1    0 111.9M  1 loop  /snap/lxd/24322
# loop2                                                      7:2    0  40.9M  1 loop  /snap/snapd/20290
# sda                                                        8:0    0    30G  0 disk
# ├─sda1                                                     8:1    0    29G  0 part
# │ └─cloudimg-rootfs-b0e1cd91-2a47-40f0-942d-18f3329812d2 253:0    0    29G  0 crypt /
# ├─sda14                                                    8:14   0     4M  0 part
# └─sda15                                                    8:15   0     1G  0 part  /boot/efi
# sdb                                                        8:16   0    75G  0 disk
# └─sdb1                                                     8:17   0    75G  0 part
#   └─resourceencrypt                                      253:1    0    75G  0 crypt /mnt 💡
# sdc                                                        8:32   0    48M  0 disk
# └─sdc1                                                     8:33   0    46M  0 part  /mnt/azure_bek_disk
# sr0                                                       11:0    1   628K  0 rom
For Windows users, accessing Disk Management allows you to verify the Bitlocker encryption status. In the provided example, both the C-disk and the D-disk should have Bitlocker encryption active. The D-disk corresponds to the temporary disk.
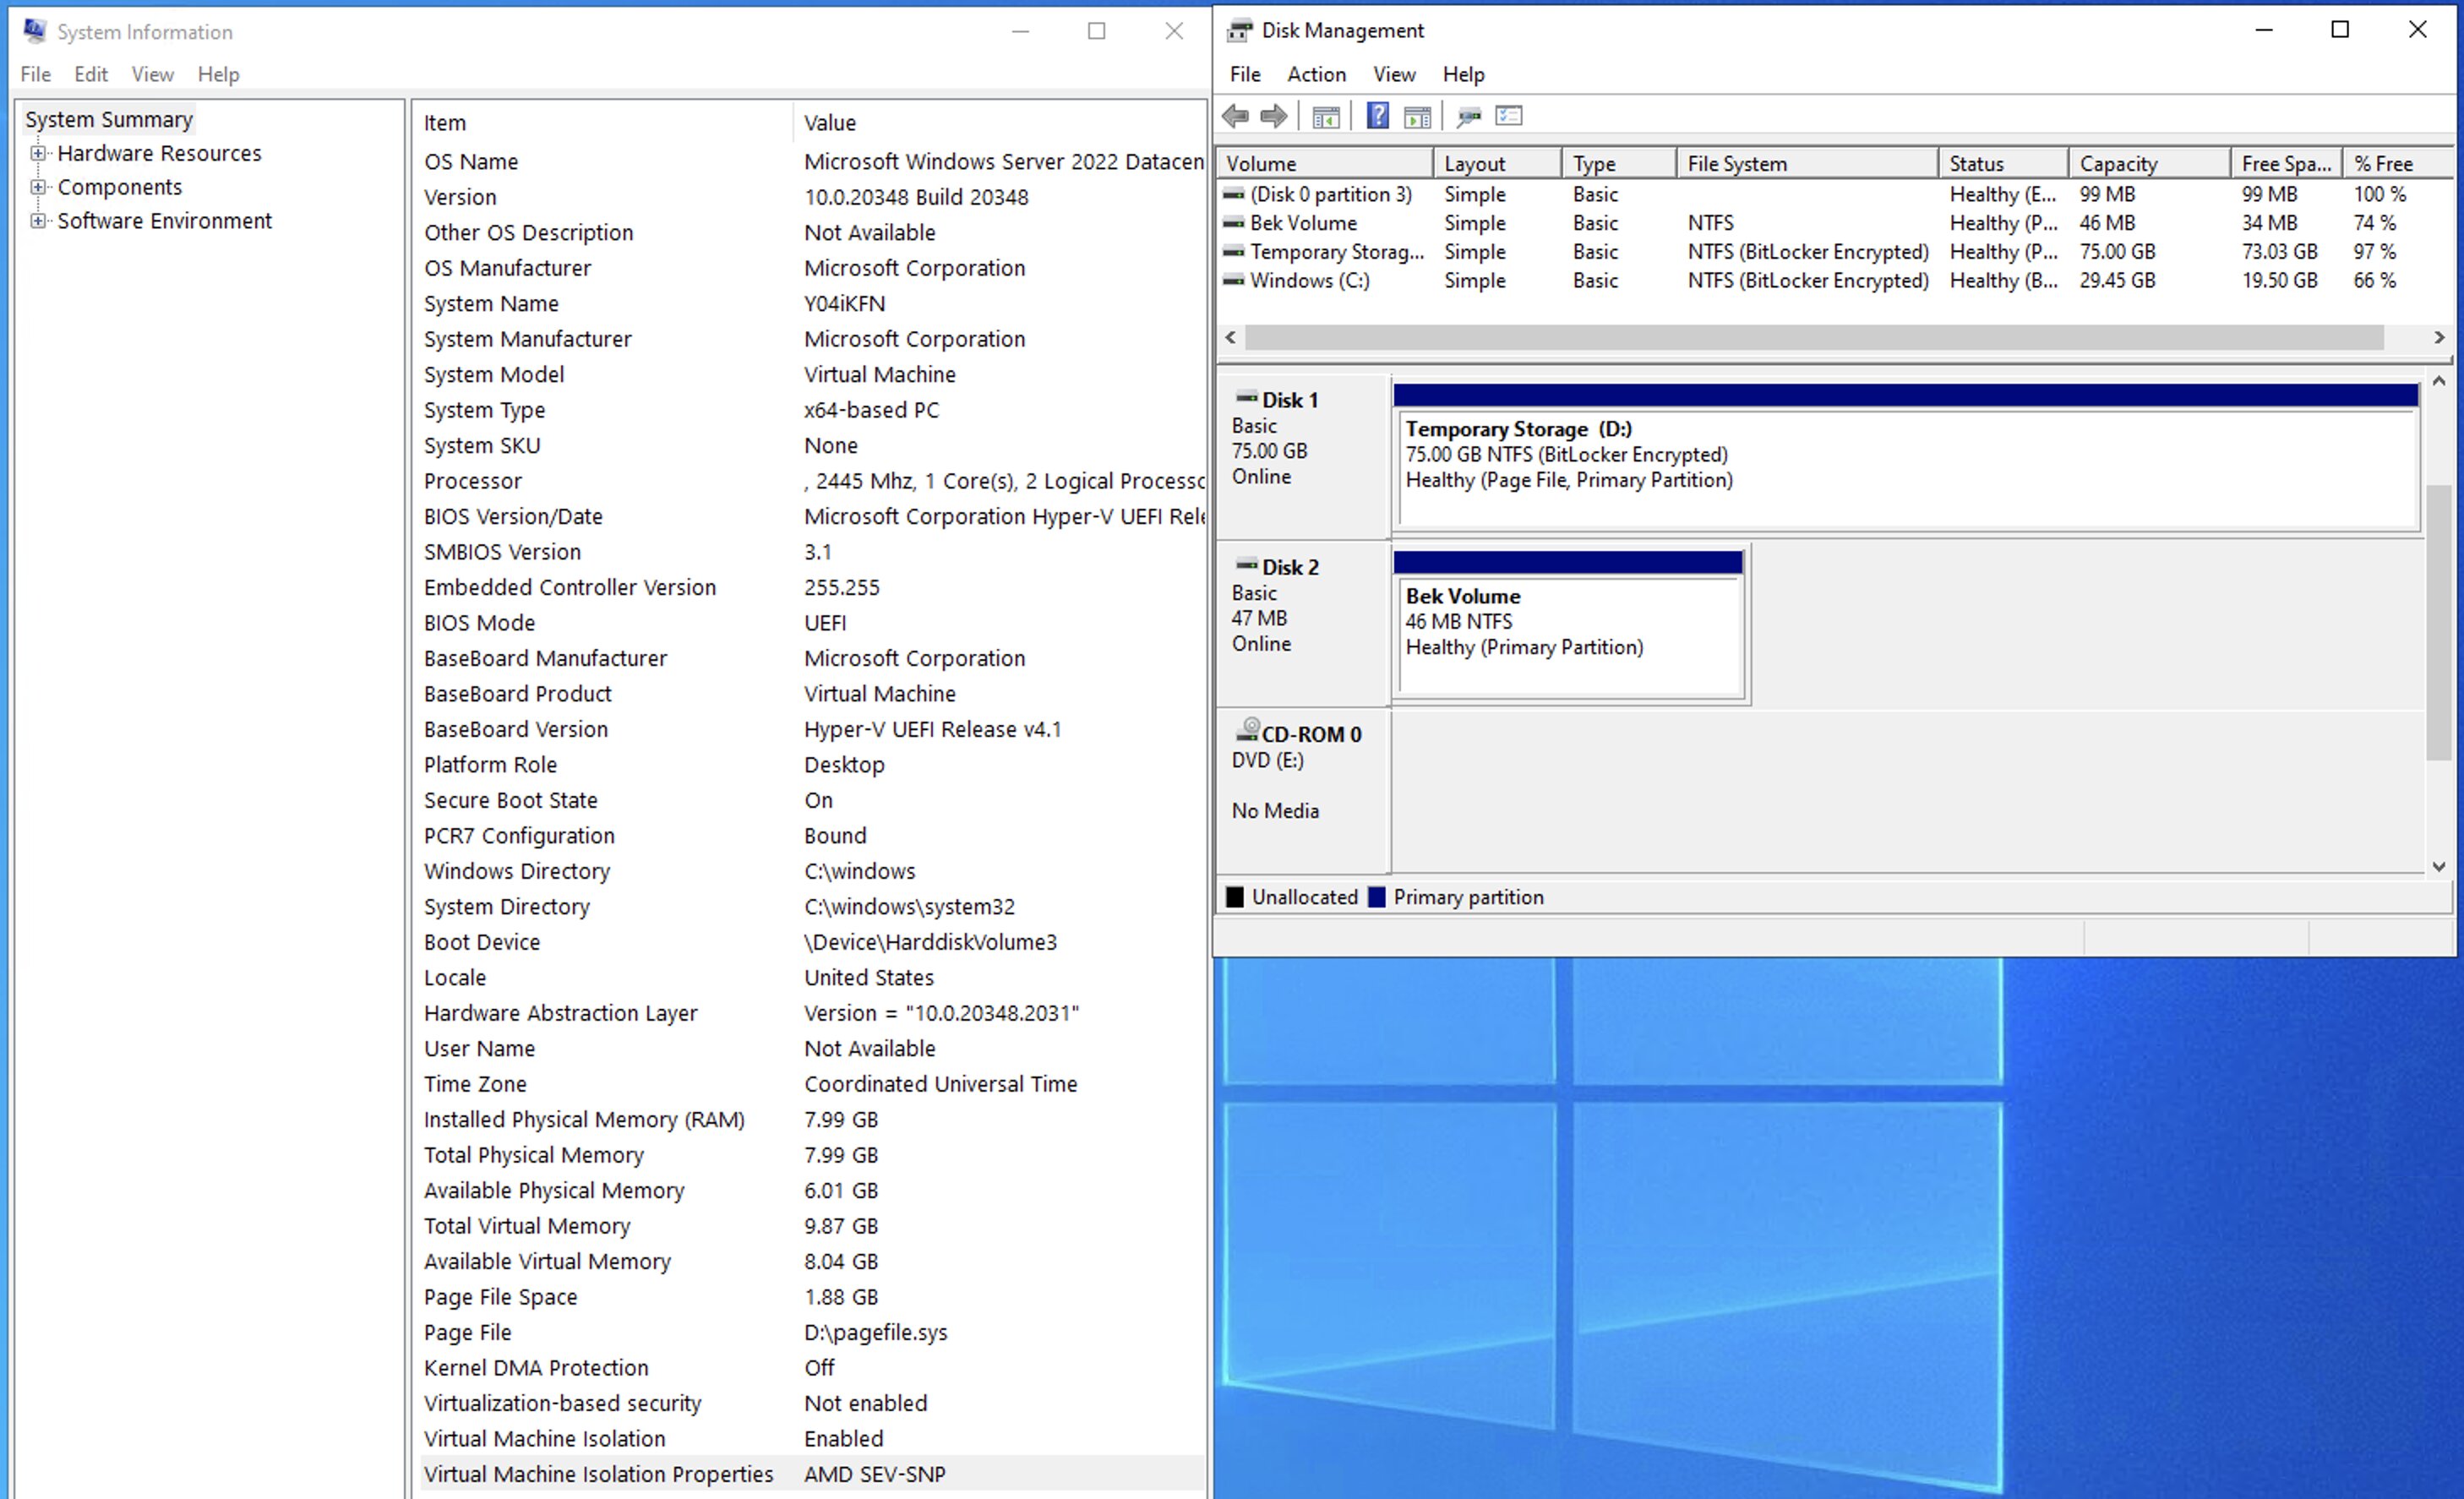
💡 On the Key Vault side of things, I noticed that there is no Bitlocker Encryption Key (BEK) secret. This is a little different from a non-CVM approach. If you want to know how the encryption process works, take a look at the
def import_tokenfunction in the source code for ADE 1.4.0.5.
Troubleshooting Errors
I made quite a few mistakes when deploying the ADE extension. This is somewhat par for the course as there are a lot of moving parts that have to be configured just right, in order for this all to work. It seemed like a good idea to write them down here.
Identity not authorized
If you encounter errors during the Azure Disk Encryption process, such as the following:
{
    "status": "Failed",
    "error": {
        "code": "VMExtensionProvisioningError",
        "message": "VM has reported a failure when processing extension 'AzureDiskEncryptionForLinux' (publisher 'Microsoft.Azure.Security' and type 'AzureDiskEncryptionForLinux'). Error message: \"Traceback (most recent call last):\n  File \"/var/lib/waagent/Microsoft.Azure.Security.AzureDiskEncryptionForLinux-1.4.0.5/main/handle.py\", line 806, in enable\n    check_Util.precheck_for_fatal_failures(public_settings, encryption_status, DistroPatcher, existing_volume_type,check_release_rsa_or_ec_key)\n  File \"/var/lib/waagent/Microsoft.Azure.Security.AzureDiskEncryptionForLinux-1.4.0.5/main/check_util.py\", line 426, in precheck_for_fatal_failures\n    self.validate_skr_release_rsa_or_ec_key(public_settings,check_release_rsa_or_ec_key)\n  File \"/var/lib/waagent/Microsoft.Azure.Security.AzureDiskEncryptionForLinux-1.4.0.5/main/check_util.py\", line 414, in validate_skr_release_rsa_or_ec_key\n    raise Exception(msg)\nException: The managed identity provided in public settings is not correct or not authorized to do secure key release operation in your key vault/HSM. Please verify and re-run ADE install after fixing the issue.\n\". More information on troubleshooting is available at <https://aka.ms/VMExtensionADELinuxTroubleshoot>. "
    }
}
This error is likely due to:
- The VM’s managed identity not being activated.
- The Key Vault lacking an access policy or an RBAC role assignment that permits the VM to execute the key
releaseoperation. - The attestation token used during the disk encryption process not matching the key’s
release_policy.- Ensure that your decoded attestation token contains the correct properties and that the key release policy matching algorithm can find them based on the JSONPath.
Intel TDX
While attempting the temporary disk encryption preview with the new Intel TDX supported SKUs (DCedsv5 and ECedsv5), I was unable to get past the VM extension provisioning stage. Running the AzureAttestSKR binary manually on a TDX-capable VM gave me the following error:
sudo /var/lib/waagent/Microsoft.Azure.Security.AzureDiskEncryptionForLinux-1.4.0.5/AzureAttestSKR -a "https://sharedweu.weu.attest.azure.net" -k "https://skr-kve2jebmdv.vault.azure.net/keys/tvl-acc-tdencr-vm/37a9cebc82a6470782eda8bbe0fbc771" -c imds -r
# WARNING:esys:src/tss2-esys/api/Esys_NV_Read.c:311:Esys_NV_Read_Finish() Received TPM Error
# ERROR:esys:src/tss2-esys/api/Esys_NV_Read.c:105:Esys_NV_Read() Esys Finish ErrorCode (0x0000014a)
# WARNING:esys:src/tss2-esys/api/Esys_NV_Read.c:311:Esys_NV_Read_Finish() Received TPM Error
# ERROR:esys:src/tss2-esys/api/Esys_NV_Read.c:105:Esys_NV_Read() Esys Finish ErrorCode (0x0000014a)
# terminate called after throwing an instance of 'Tss2Exception'
#   what():  tpm2-tss exception : message=Failed to read from TPM NV RAM, code=330
# Aborted
I am not certain what might be causing this error, but I believe that there is a chance that AzureAttestSKR does not yet include support for TDX? It is a relatively new technology, and the support for it in various tools and extensions may still be under development.
These virtual machines are in public preview and not recommended for production usage. These VMs are available in West Europe, Central US, East US 2 and North Europe.
Conclusion
The inclusion of temporary disk encryption, albeit in its public preview phase, represents another big step forward for Confidential virtual machines, aligning them more closely with their non-confidential counterparts in terms of features. These incremental improvements will be very important for encouraging adoption, as users increasingly value a consistent set of experiences and options across all types of virtual machines.
The continuous efforts from Microsoft’s Confidential Compute team, in rolling out such features, really contributes to the overall improvement of the platform. I, for one, think this is another great addition from the Microsoft confidential compute team. I’m looking forward to seeing this becoming generally available. 😎
Related posts
- Azure Confidential Computing: Secure Key Release - Part 2
- Azure Confidential Computing: Azure RBAC for Secure Key Release
- Azure Confidential Computing: CoCo - Confidential Containers
- Azure Confidential Computing: Secure Key Release
- Key Vault for Azure virtual machines extension
- Azure Confidential Computing: Microsoft Azure Attestation
- Azure Confidential Computing: Verifying Microsoft Azure Attestation JWT tokens
- Azure Confidential Inferencing with Oblivious HTTP
- Making Sense of AI
- Azure Confidential Computing: Confidential GPUs and AI
- Windows Containers: Azure Pipeline Agents with Entra Workload ID in Azure Kubernetes Service
- Register Azure Pipeline Agents using Entra Workload ID on Azure Kubernetes Service
- Azure Confidential Computing: Confidential VMs
- Azure Confidential Computing: IaaS
- Azure Confidential Computing