Azure Confidential Computing: Microsoft Azure Attestation
In this post
📣 Dive into the code samples from this blog on GitHub!
At the end of April 2023, I had the opportunity to talk about Azure Confidential Computing at a Belgian community meetup hosted by the Microsoft Cloud and Client Management community (MC2MC). In my presentation, I briefly discussed the core components that required for Azure Confidential Computing to function seamlessly on Microsoft Azure.
- Hardware root of trust
- Remote attestation
- Memory isolation and encryption
- Secure Key Management
- Trusted launch
“Remote attestation”, one of these important elements, often gets only mentioned briefly due to time constraints. However, it’s a vital cornerstone of confidential computing that I think deserves its own dedicated blog post.
I’ve been considering putting together a blog post to demystify the concept of remote attestation for some time now. The notion of attestation within confidential computing is intricate but very essential. Given Microsoft Azure’s robust support for various technologies such as TPM/VBS, Intel SGX, AMD SEV-SNP, and (soon) Intel TDX, which can all benefit from remote attestation, the topic could easily fill a long post where I could go through all of the different mechanisms.
💡 Fortunately, there are already some really valuable resources you can check out on this topic. You might find the “An Exploratory Study of Attestation Mechanisms for Trusted Execution Environments” to be a very interesting read!
I came across a great Confidential Computing Consortium webinar that introduced me to the concept of the “Remote ATtestation ProcedureS Architecture”. The presentation was given by Dave Thaler (Microsoft), who is an editor for the Remote ATtestation ProcedureS (RATS) working group. This group operates under the Internet Engineering Task Force (IETF) and is focused on remote attestation architecture and standardizing data formats, including those relevant to Confidential Computing. If you have some time to watch it, I’d highly recommend that you invest the effort to do so.
As I delved deeper into the architecture proposed by the RATS working group, I realized that sharing insights could be incredibly helpful for those eager to understand remote attestation better. I also put this newfound knowledge into action by setting up an isolated Microsoft Azure Attestation instance so I could deploy a signed appraisal policy, which involved a bit of PowerShell creativity.
Why, What and How of Attestation
One of the foundational components of confidential computing is the concept of attestation, both local and remote.
Attestation lets you verify the integrity of a confidential computing environment, ensuring that firmware, software or hardware on which workloads run are both genuine and secure, before granting them access to sensitive data. In this process, a verifier assesses the trustworthiness of an attester, a potentially untrusted peer.
💡 Attestation provides an answer to the question: “How do we know that something is running in the intended operating state?”
Through the use of attestation, we can increase the confidence we have in an attester’s trustworthiness, which is done by providing a report about the Trusted Execution Environment’s (TEE) state. This report, obtained by the verifier, is authentic, accurate, and timely. Because of these properties relying parties can be assured that only intended software operates on trusted hardware.
The Confidential Computing Consortium mentions in “Why is Attestation Required for Confidential Computing?” that hardware and software providers have frequently made promises regarding security, but these promises have often failed to meet expectations. Due to this, many users are sceptical of new technologies that claim to have newer, better, security mechanisms. Attestation takes on a vital role by providing those users with a practical way to obtain answers to some of their burning questions:
- Can the Trusted Execution Environment offer evidence, validating its security assurances?
- Who supplies this evidence?
- How is the evidence acquired?
- Is the evidence valid, authentic, and delivered securely?
- Who evaluates the evidence?
- What standards govern the evaluation of this evidence?
It should also be noted that, conversely, a system failing to be attested and verified could face reduced privileges or we could even flag virtual machines and their outdated firmware/software for decommissioning.
Local Attestation
Local attestation is an essential aspect of confidential computing when using Intel SGX, as it allows for the validation of the integrity and authenticity of a Trusted Execution Environment (aka SGX enclave) by another TEE, which is executed on the same hardware.
When a TEE, or more specifically an SGX enclave, undergoes local attestation, the CPU generates a report. This report contains vital integrity information about the enclave being attested. The second enclave retrieves its report key and verifies the report using this report key.
If you’re running multiple Intel SGX enclaves on the same machine within the Azure environment, you can take advantage of local attestation. This facilitates the validation of enclaves’ integrity and authenticity within the same hardware context.
💡 Intel’s upcoming Trust Domain Extensions (TDX) will support the same attestation mechanisms as used in SGX. Attestation of a Trust Domain consists of generating a local attestation report, which can be verified on the same platform and then extending this report with digital signatures and certificates to enable remote attestation of the TD off the platform. If you’re curious and would like some more information, take a look at the “Intel TDX Module v1.5 Base Architecture Specification”, more specifically “2.7 Measurement and Attestation” (page 23).
Remote Attestation
Remote attestation serves three main purposes: confirming the identity of the Trusted Execution Environment, ensuring it hasn’t been tampered with, and verifying that it’s running safely within a platform that supports a Trusted Execution Environment. This process is vital for establishing trust in remote systems and involves a hardware entity or a combination of hardware and software (attester) building trust with a relying party to facilitate secure information exchange.
A remote attestation service is great at simplifying this process by efficiently collecting and consolidating server information and measurement details. For instance, imagine a fictional data centre with thousands of servers. While local attestation and enforcement of firmware and configuration might be feasible for individual servers, the immense scale of a data centre presents a formidable challenge for manual tracking by operations personnel. The significance of remote attestation is even more pronounced in cloud and data centre environments, where operational scale renders local attestation impractical.
The remote attestation process involves the measurement details (fingerprint) of a Trusted Execution Environment’s firmware, software, and hardware configuration details. These specifics are then extended to the hardware root of trust for storage and reporting, providing a robust means of monitoring the firmware on a given platform.
💡 A Remote Attestation service grants the ability to verify against a collective set of approved rules, as opposed to relying solely on a local system enforcing a policy. Perhaps just as important; it grants operators increased flexibility and control within a robust, cryptographically secured, framework.
Remote ATtestation ProcedureS Architecture
Typically, whenever I talk about remote attestation, I present this simplified version:
                  .-------------------------.
          .------>|         Verifier        +-----.
         |        '-------------------------'      |
         |                                         |
         | Evidence                    Attestation |
         |                             Results     |
         |                                         |
         |                                         v
   .-----+----.                                .---------------.
   | Attester |                                | Relying Party |
   '----------'                                '---------------'
At a minimum, there are three entities with the following roles:
- Attester: a TEE that creates “Evidence”, which is then conveyed to a “Verifier”.
- Verifier: software that uses the “Evidence” and applies a policy to assess the trustworthiness of the “Attester”, in turn, the verifier creates the “Attestation Results”.
- Relying Party: most likely another TEE that uses “Attestation Results” to make application-specific decisions.
Again, this is a simplified version of what the “Remote ATtestation ProcedureS Architecture” is all about. From what I’ve gathered from the RCF 9334, several additional roles are essential in the RATS architecture. These roles are defined by the unique combinations of artifacts they produce and consume. Returning to the simplified version, an example of artifacts would be the Evidence and the Attestation Results.
- Evidence: A set of Claims generated by an Attester to be appraised by a Verifier to establish its relevance, compliance, and timeliness. Evidence may include configuration data, measurements, telemetry, or inferences.
- Attestation results: The output generated by a Verifier, typically including information about an Attester, where the Verifier vouches for the validity of the results.
Let’s take a closer look at what a more complete version of remote attestation would look like:
    .--------.     .---------.       .--------.       .-------------.
   | Endorser |   | Reference |     | Verifier |     | Relying Party |
    '-+------'    | Value     |     | Owner    |     | Owner         |
      |           | Provider  |      '---+----'       '----+--------'
      |            '-----+---'           |                 |
      |                  |               |                 |
      | Endorsements     | Reference     | Appraisal       | Appraisal
      |                  | Values        | Policy for      | Policy for
      |                  |               | Evidence        | Attestation
       '-----------.     |               |                 | Results
                    |    |               |                 |
                    v    v               v                 |
                  .-------------------------.              |
          .------>|         Verifier        +-----.        |
         |        '-------------------------'      |       |
         |                                         |       |
         | Evidence                    Attestation |       |
         |                             Results     |       |
         |                                         |       |
         |                                         v       v
   .-----+----.                                .---------------.
   | Attester |                                | Relying Party |
   '----------'                                '---------------'
As you can see, there are three additional roles that assist the Verifier in making a correct decision, and one additional role has been added to help the Relying Party.
- Roles typically performed by a manufacturer:
- Endorser: A role whose Endorsements may help Verifiers appraise the authenticity of Evidence and infer further capabilities of the Attester.
- Reference Value Provider: A role whose Reference Values help Verifiers appraise Evidence to determine if acceptable known Claims have been recorded by the Attester.
- Roles typically performed by an authorized administrator:
- Verifier Owner: A role performed by an entity that is authorized to configure an Appraisal Policy for Evidence in a Verifier.
- Relying Party Owner: A role performed by an entity that is authorized to configure an Appraisal Policy for Attestation Results in a Relying Party.
Just as before, these roles introduce new artifacts that are consumed by the verifier and the relying party.
- Used by the verifier:
- Endorsement: A secure statement that an Endorser vouches for the integrity of an Attester’s various capabilities, such as Claims collection and Evidence signing.
- Example: a manufacturer certificate that signs a public key whose corresponding private key is only known inside the device’s hardware.
- Reference values: A set of known-good values against which values of Claims can be compared to the evidence, as part of applying an “Appraisal Policy for Evidence”.
- Appraisal Policy for Evidence: A set of rules that are used to evaluate the validity of information about an Attester.
- Example: an equality comparison against a Reference Value, a check for being in a range bounded by Reference Values.
- Endorsement: A secure statement that an Endorser vouches for the integrity of an Attester’s various capabilities, such as Claims collection and Evidence signing.
- Used by the relying party:
- Appraisal Policy for Attestation Results: A set of rules that direct how a Relying Party uses the Attestation Results regarding an Attester generated by the Verifiers.
- Example: a check against values in other Claims.
- Appraisal Policy for Attestation Results: A set of rules that direct how a Relying Party uses the Attestation Results regarding an Attester generated by the Verifiers.
The RFC often refers to “claims,” which it defines as “a piece of asserted information, often in the form of a key/value pair.” Claims constitute the usual structure of Evidence and other RATS conceptual messages.
// Example of a JSON Web Token
{
  "iss": "foo",
  "exp": 1672533296,
  "http://example.com/is_user": true
}
The Verifier (when appraising Evidence) or the Relying Party (when appraising Attestation Results) checks the values of matched Claims against constraints specified in its appraisal policy. Upon completing all appraisal policy constraints, the remaining Claims are accepted as input toward determining Attestation Results (when appraising Evidence) or as input to a Relying Party (when appraising Attestation Results).
💡 These roles don’t necessarily translate to different pieces of software or binaries that have to run separately. According to the RFC, “An entity can take on multiple RATS roles (e.g., Attester, Verifier, Relying Party, etc.) at the same time. Multiple entities can cooperate to implement a single RATS role as well. In essence, the combination of roles and entities can be arbitrary.”
Mapping the Data Exchanges
To gain a better understanding of how attestation works in practice, the RFC describes the entire process using two reference models, or sometimes a combination of both. This process is often likened to real-life examples involving passports and background checks. However, always remember that the core concept remains the same: the Attester conveys its Evidence to the Verifier for Appraisal, and the Relying Party receives the Attestation Result from the Verifier.
It’s important to keep in mind that both the Verifier, during the evaluation of Evidence, and the Relying Party, when assessing Attestation Results, examine the values of matched Claims against the criteria defined in their respective Appraisal Policies. After satisfying all Appraisal Policy constraints, the remaining Claims are then considered as input for determining either Attestation Results (in the case of Evidence evaluation) or for processing by a Relying Party (in the case of Attestation Results assessment).
The Passport Model
The Passport Model gets its name by drawing a parallel with the passport issuance process. The type of Evidence a person needs to provide can vary based on the local authority of a specific country. In this model, citizens assume the role of Attesters, while passport-issuing agencies take on the role of Verifiers. The passport itself represents an Attestation Result, something that Relying Parties, such as airport border control officers, rely on.
In this model, Attesters convey Evidence to Verifiers, who then issue Attestation Results. These results are opaque to Attesters and can be presented to Relying Parties for comparison against their Appraisal Policies, forming the basis for making decisions in your application. Failures may occur if Evidence or Attestation Results do not meet the Appraisal Policies or if Verifiers are inaccessible.
   .------------. Compare evidence
   |  Verifier  | against
   '----------+-' appraisal policy
          ^   |
          |   |   Attestation
 Evidence |   |   Result
          |   |
          |   v
   .------+-----.                      .---------------. Compare attestation
   |  Attester  +--------------------->| Relying Party | result against
   '------------'  Attestation Result  '---------------' appraisal policy
The Background-Check Model
This model bears similarity to background-check procedures commonly conducted by employers and volunteer organizations. In this comparison, the Attester’s role corresponds to that of a potential volunteer or employee, while the entity seeking validation, often an employer, assumes the position of the Relying Party. The Verifier mirrors the role of an organization approached by an employer to vouch for an Attester’s credibility by issuing verification reports.
In the Background-Check Model, information flows through a few distinct stages: the Attester provides Evidence to the Relying Party, which then transmits this Evidence to the Verifier. The Verifier evaluates the Evidence against its Appraisal Policy and produces an Attestation Result. This Attestation Result is then communicated back to the Relying Party. Afterwards, the Relying Party assesses the Attestation Result based on its specific Appraisal Policy.
⚠️ The Relying Party does not process the Evidence itself; instead, it sits between the Attester and Relying Party. To optimize efficiency, the RFC recommends aligning the format of the Attestation Result with the pre-existing serialization format supported by the Relying Party, particularly if there are concerns about limited resources and maintaining a small code attack surface.
                              .----------------. Compare evidence
                              |    Verifier    | against
                              '------+---------' appraisal policy
                                 ^   |
                                 |   |   Attestation
                        Evidence |   |   Result
                                 |   |
                                 |   v
   .------------.             .--+------------. Compare attestation
   |  Attester  +------------>| Relying Party | result against
   '------------' Evidence    '---------------' appraisal policy
Introducing MAA
Microsoft Azure Attestation (MAA) closely aligns with the concept of Remote ATtestation ProcedureS, offering a practical implementation of remote attestation within the context of Microsoft’s cloud infrastructure. MAA was designed as a unified framework for attesting multiple implementations of Trusted Execution Environments (TEEs), including Intel Software Guard Extensions (SGX) enclaves, virtualization-based security (VBS) enclaves, Trusted Platform Modules (TPMs), Trusted Launch, and Azure Confidential Virtual Machines (SEV SNP).
This service is available free of charge, comes with a Service Level Agreement (SLA), and is equipped to handle various forms of evidence, including those generated by Intel SGX and AMD SEV-SNP. It currently supports private endpoints, allowing your service instance to be accessible solely within your Azure Virtual Network. (This feature is often a requirement for enterprise security teams.) To ensure the security of customer data, Azure Attestation stores its data in Azure Storage. The data is encrypted as it’s stored in data centres and decrypted for customer access. Microsoft manages the encryption keys used for this process.
💡 Azure Government customers can even access the source code for the Microsoft Azure Attestation service via the “Microsoft Code Center Premium Tool”. (source)
Trust issues
But wait a moment… Isn’t the essence of Confidential Computing to trust the cloud service provider by reducing the need for trust across various aspects of the compute cloud infrastructure? This question might seem deceptively intricate, and after a bit of thorough consideration and online research, I’ve arrived at the following conclusion:
On one hand, when we opt-in to Confidential Computing we should aim to exclude the cloud service provider (CSP) from the trust boundary, as entrusting them with the software that powers the remote attestation verifier seems to contradict the very premise of Confidential Computing.
On the other hand, as the Confidential Computing Consortium mentions, constructing your own attestation mechanism and dealing with the attestation evidence generated by these Trusted Execution Environments (TEEs) demands a high level of technical proficiency. This might not be feasible for all organizations, especially those without specialization in computing infrastructure security. It’s here that the role of a trusted third party comes into play. A third party, possessing security expertise, Microsoft in this case, evaluating the evidence could strike a balance between security and the complexities involved.
MAA’s Three Trust Models
The Microsoft Azure Attestation (MAA) service operates within three distinct trust models, each defining the authorization model for attestation providers in terms of creating and updating appraisal policies.
- Shared
- Azure AD (AAD) authorization
- Isolated
The primary distinction among these modes of operation lies in the usable operations within each, and whether the customer is required to create an instance of the provider.
| Service Mode | Instance Creation | Attestation | Policy Get | Policy Set | Signed Policies | Policy Management Certificate |
|---|---|---|---|---|---|---|
| Shared | No | Yes | Yes | No | No | No |
| AAD | Yes | Yes | Yes | Yes | Optional | No |
| Isolated | Yes | Yes | Yes | Yes | Yes | Yes |
Shared Model
If you’ve come across any of my previous blog posts on Azure Confidential Computing, especially those related to Confidential VMs, you might have noticed my frequent use of the AMD-SEV SNP reports sent to the Microsoft Azure Attestation service. For simplicity, I often rely on and trust the regional shared providers (marked by URLs starting with shared<AzureRegion>.<AzureRegion>.attest.azure.net). However, for those seeking a more enterprise-level setup, deploying a customized instance is a better, and probably mandatory, option.
Every region in which the MAA service functions has a “shared” attestation instance. This instance enables customers to conduct basic attestation operations on their enclaves without the need to set up an attestation instance themselves. The actions this shared instance can perform are limited; for instance, it has a “default” attestation policy that attests to the correctness of the Intel SGX attestation collateral. These shared instances are not suited for all attestation types (such as the TPM), which require customers to provide their own attestation policy. Nevertheless, customers seeking to perform attestation operations on the other types of TEEs (SGX and AMD SEV-SNP) can utilize the shared instance without creating a dedicated one.
Examples of shared instances include these endpoints:
- sharedeus2.eus2.attest.azure.net
- sharedweu.weu.attest.azure.net
- shareduks.uks.attest.azure.net
AAD Model
Instances following the AAD model are designed for customers who can place their trust in Azure’s Role-Based Access Control (RBAC) for authorization decisions related to policy management. It should be noted, however, that attestation policies can be cryptographically signed or remain unsigned, under this model.
Isolated Model
The isolated model relies on customer-managed cryptographic keys and guarantees the non-tampering of customer-submitted appraisal policies.
MAA instances provisioned under the isolated model cater to customers desiring an elevated level of authorization beyond what ARM RBAC authorization allows. When a customer creates an isolated attestation instance, they also need to generate an asymmetric key pair and an X.509 certificate containing that key (the certificate can be self-signed or issued by a certificate authority).
Attestation policies must be signed with one of the private keys associated with the instance, either during instance creation or added via the API.
📖 From the docs: “While processing the attestation request, Azure Attestation will validate the signature of the policy using the public key represented by either the “jwk” or the “x5c” parameter in the header. Azure Attestation will also verify if the public key in the request header is in the list of trusted signing certificates associated with the attestation provider. In this way, the relying party (Azure Attestation) can trust a policy signed using the X.509 certificates it knows about.”
Deploying the AAD Model
Setting up an instance of Microsoft Azure Attestation that exclusively utilizes the Azure Active Directory (AAD) model is a relatively straightforward process. All you require is the following minimal Bicep template, and you’ll be ready to proceed:
@description('Optional. Name of the Attestation provider. Must be between 3 and 24 characters in length and use numbers and lower-case letters only.')
param attestationProviderName string = uniqueString(resourceGroup().name)

@description('Optional. Location for all resources.')
param location string = resourceGroup().location

resource attestationProvider 'Microsoft.Attestation/attestationProviders@2021-06-01' = {
  name: attestationProviderName
  location: location
  properties: {}
}

output attestationName string = attestationProviderName
We can then deploy this template using the following PowerShell script. We will also verify the deploying by taking a look at the trustModel property, which should have a value of AAD assigned to it.
$attestationResourceGroup = "tvl-remote-attestation-rg"
$attestationResourceGroupLocation = "westeurope"
$attestationProviderName = "tvlaadmaa"

if ($null -eq (Get-AzResourceGroup -Name $attestationResourceGroup -ErrorAction SilentlyContinue)) {
    New-AzResourceGroup -Name $attestationResourceGroup -Location $attestationResourceGroupLocation
}

New-AzResourceGroupDeployment -TemplateFile "maa_aad.bicep" -ResourceGroupName $attestationResourceGroup -attestationProviderName $attestationProviderName

# We will check the trust model..
Get-AzResource -ResourceName $attestationProviderName -ExpandProperties | Format-List -Property "Properties"
# Drum roll please.. 👇     ✅
#Properties : @{trustModel=AAD; status=Ready; attestUri=https://tvlaadmaa.weu.attest.azure.net;
After creating an attestation provider in this resource group, an Azure AD user must possess the Attestation Contributor role on the provider to carry out operations such as policy configuration and policy signer certificate management. Specifically, your role should include permissions for the following:
| Required action |
|---|
| Microsoft.Attestation/attestationProviders/attestation/read |
| Microsoft.Attestation/attestationProviders/attestation/write |
| Microsoft.Attestation/attestationProviders/attestation/delete |
💡 These permissions are also part of the
OwnerandContributorroles.
To deploy a custom attestation policy, PowerShell can be used:
$policyFormat = "Text" # The policy format can be either Text or JSON Web Token (JWT).
$teeType = "OpenEnclave" # Four types of environment are supported: SgxEnclave, OpenEnclave, CyResComponent and VBSEnclave.
$policy = @"
version= 1.1;
configurationrules
{
    => issueproperty(type="x-ms-sgx-tcbidentifier", value="10");
};
authorizationrules{
    => permit();
};
issuancerules
{
    c:[type=="x-ms-sgx-is-debuggable"] => issue(type="is-debuggable", value=c.value);
    c:[type=="x-ms-sgx-mrsigner"] => issue(type="sgx-mrsigner", value=c.value);
    c:[type=="x-ms-sgx-mrenclave"] => issue(type="sgx-mrenclave", value=c.value);
    c:[type=="x-ms-sgx-product-id"] => issue(type="product-id", value=c.value);
    c:[type=="x-ms-sgx-svn"] => issue(type="svn", value=c.value);
    c:[type=="x-ms-attestation-type"] => issue(type="tee", value=c.value);
};
"@

Set-AzAttestationPolicy -Name $attestationProviderName `
    -ResourceGroupName $attestationResourceGroup `
    -PolicyFormat $policyFormat `
    -Tee $teeType `
    -Policy $policy -Verbose -Debug
Just like that, you can configure custom attestation policies! We will take a look at how we can sign them in a moment.
Detour: JSON Web Tokens
In the background, PowerShell sends an HTTP request to our Microsoft Azure Attestation (MAA) instance. Using the -Debug switch we can inspect the debug output of the Set-AzAttestationPolicy:
DEBUG: ============================ HTTP REQUEST ============================

HTTP Method:
POST

Absolute Uri:
https://tvlaadmaa.weu.attest.azure.net/operations/policy/updatepolicy?api-version=2018-09-01-preview&tee=OpenEnclave

Headers:
Accept-Language               : en-US
x-ms-client-request-id        : <guid>

Body:
"eyJhbGciOiJub25lIn0.eyJBdHRlc3RhdGlvblBvbGljeSI6ICJkbVZ5YzJsdmJqMGdNUzR4T3dwamIyNW1hV2QxY21GMGFXOXVjblZzWlhNS2V3b2dJQ0FnUFQ0Z2FYTnpkV1Z3Y205d1pYSjBlU2gwZVhCbFBTSjRMVzF6TFhObmVDMTBZMkpwWkdWdWRHbG1hV1Z5SWl3Z2RtRnNkV1U5SWpFd0lpazdDbjA3Q21GMWRHaHZjbWw2WVhScGIyNXlkV3hsYzNzS0lDQWdJRDAtSUhCbGNtMXBkQ2dwT3dwOU93cHBjM04xWVc1alpYSjFiR1Z6Q25zS0lDQWdJR002VzNSNWNHVTlQU0o0TFcxekxYTm5lQzFwY3kxa1pXSjFaMmRoWW14bElsMGdQVDRnYVhOemRXVW9kSGx3WlQwaWFYTXRaR1ZpZFdkbllXSnNaU0lzSUhaaGJIVmxQV011ZG1Gc2RXVXBPd29nSUNBZ1l6cGJkSGx3WlQwOUluZ3RiWE10YzJkNExXMXljMmxuYm1WeUlsMGdQVDRnYVhOemRXVW9kSGx3WlQwaWMyZDRMVzF5YzJsbmJtVnlJaXdnZG1Gc2RXVTlZeTUyWVd4MVpTazdDaUFnSUNCak9sdDBlWEJsUFQwaWVDMXRjeTF6WjNndGJYSmxibU5zWVhabElsMGdQVDRnYVhOemRXVW9kSGx3WlQwaWMyZDRMVzF5Wlc1amJHRjJaU0lzSUhaaGJIVmxQV011ZG1Gc2RXVXBPd29nSUNBZ1l6cGJkSGx3WlQwOUluZ3RiWE10YzJkNExYQnliMlIxWTNRdGFXUWlYU0E5UGlCcGMzTjFaU2gwZVhCbFBTSndjbTlrZFdOMExXbGtJaXdnZG1Gc2RXVTlZeTUyWVd4MVpTazdDaUFnSUNCak9sdDBlWEJsUFQwaWVDMXRjeTF6WjNndGMzWnVJbDBnUFQ0Z2FYTnpkV1VvZEhsd1pUMGljM1p1SWl3Z2RtRnNkV1U5WXk1MllXeDFaU2s3Q2lBZ0lDQmpPbHQwZVhCbFBUMGllQzF0Y3kxaGRIUmxjM1JoZEdsdmJpMTBlWEJsSWwwZ1BUNGdhWE56ZFdVb2RIbHdaVDBpZEdWbElpd2dkbUZzZFdVOVl5NTJZV3gxWlNrN0NuMDcifQ."
This request body is, in essence, a JSON Web Token (JWT). A JWT typically consists of three parts, separated by dots:
- A JSON Object Signing and Encryption (JOSE) header
- A JSON Web Signature (JWS) payload, a.k.a. a set of claims.
- A JWS signature
However, in this case, the HTTP request contains only two sections instead of three. This is because, when using the Azure AD (AAD) model, creating a signature is entirely optional. We used the -PolicyFormat "Text" parameter with the Set-AzAttestationPolicy command, which is why the signature was omitted. If you wish to sign the policy, you will first need to add a signer certificate using the Add-AzAttestationPolicySigner cmdlet.
To delve deeper into the JWT structure, let’s break down each section:
The JOSE header specifies the cryptographic algorithm used for securing the JWS. In this case, it’s set to “none,” indicating that no digital signature or MAC has been applied.
{"alg":"none"}
The JWS payload, or set of claims, contains a single property named AttestationPolicy.
{"AttestationPolicy": "dmVyc2lvbj0gMS4xOwpjb25maWd1cmF0aW9ucnVsZXMKewogICAgPT4gaXNzdWVwcm9wZXJ0eSh0eXBlPSJ4LW1zLXNneC10Y2JpZGVudGlmaWVyIiwgdmFsdWU9IjEwIik7Cn07CmF1dGhvcml6YXRpb25ydWxlc3sKICAgID0-IHBlcm1pdCgpOwp9Owppc3N1YW5jZXJ1bGVzCnsKICAgIGM6W3R5cGU9PSJ4LW1zLXNneC1pcy1kZWJ1Z2dhYmxlIl0gPT4gaXNzdWUodHlwZT0iaXMtZGVidWdnYWJsZSIsIHZhbHVlPWMudmFsdWUpOwogICAgYzpbdHlwZT09IngtbXMtc2d4LW1yc2lnbmVyIl0gPT4gaXNzdWUodHlwZT0ic2d4LW1yc2lnbmVyIiwgdmFsdWU9Yy52YWx1ZSk7CiAgICBjOlt0eXBlPT0ieC1tcy1zZ3gtbXJlbmNsYXZlIl0gPT4gaXNzdWUodHlwZT0ic2d4LW1yZW5jbGF2ZSIsIHZhbHVlPWMudmFsdWUpOwogICAgYzpbdHlwZT09IngtbXMtc2d4LXByb2R1Y3QtaWQiXSA9PiBpc3N1ZSh0eXBlPSJwcm9kdWN0LWlkIiwgdmFsdWU9Yy52YWx1ZSk7CiAgICBjOlt0eXBlPT0ieC1tcy1zZ3gtc3ZuIl0gPT4gaXNzdWUodHlwZT0ic3ZuIiwgdmFsdWU9Yy52YWx1ZSk7CiAgICBjOlt0eXBlPT0ieC1tcy1hdHRlc3RhdGlvbi10eXBlIl0gPT4gaXNzdWUodHlwZT0idGVlIiwgdmFsdWU9Yy52YWx1ZSk7Cn07"}
The value for AttestationPolicy is, in fact, a Base64URL-encoded (not Base64!) appraisal policy, which decodes to:
version= 1.1;
configurationrules
{
    => issueproperty(type="x-ms-sgx-tcbidentifier", value="10");
};
authorizationrules{
    => permit();
};
issuancerules
{
    c:[type=="x-ms-sgx-is-debuggable"] => issue(type="is-debuggable", value=c.value);
    c:[type=="x-ms-sgx-mrsigner"] => issue(type="sgx-mrsigner", value=c.value);
    c:[type=="x-ms-sgx-mrenclave"] => issue(type="sgx-mrenclave", value=c.value);
    c:[type=="x-ms-sgx-product-id"] => issue(type="product-id", value=c.value);
    c:[type=="x-ms-sgx-svn"] => issue(type="svn", value=c.value);
    c:[type=="x-ms-attestation-type"] => issue(type="tee", value=c.value);
};
Deploying the Isolated Model
Configuring an instance of Microsoft Azure Attestation (MAA) using the isolated model is a slightly more involved process, but it’s entirely feasible. We’ll start by creating a Bicep template, with an approach slightly expanded from what we used for the Azure AD (AAD) model deployment. In this case, we’ll need to include a public key. It’s worth noting that there are multiple ways to establish an isolated model instance.
The crucial part is to correctly configure the $.properties.policySigningCertificates.keys array. It appears that how this array is set up influences how MAA handles the certificate. You have the flexibility to provide private or public keys for RSA or Elliptic Curve Cryptography (EC). To specify the cryptographic algorithm in use, set the $.properties.policySigningCertificates.keys[*].use property as either RSA or EC. For this example, I will generate a random RSA key pair.
⚠️ Keep in mind that this value is case-sensitive.
Furthermore, it’s essential to define the intended purpose of the public key. You can set the $.properties.policySigningCertificates.keys[*].use property to either of the following values:
enc: indicates the public key’s use for encrypting data.sig: signifies the public key’s use for verifying digital signatures.
For simplicity, we’ll deploy a self-signed X.509 certificate. This can be achieved by passing a chain of one or more PKIX certificates to the $.properties.policySigningCertificates.keys[*].x5c property. The certificate chain is represented as a JSON array of Base64-encoded certificate value strings.
Here is what the bicep template will look like…
@description('Optional. Name of the Attestation provider. Must be between 3 and 24 characters in length and use numbers and lower-case letters only.')
param attestationProviderName string = uniqueString(resourceGroup().name)

@description('Optional. Location for all resources.')
param location string = resourceGroup().location

@description('Optional. List of JSON Web Keys (JWK)')
param policySigningCertificateKeys array = []

resource attestationProvider 'Microsoft.Attestation/attestationProviders@2021-06-01' = {
  name: attestationProviderName
  location: location
  properties: {
    policySigningCertificates: {
      keys: policySigningCertificateKeys
    }

  }
}

output attestationName string = attestationProviderName
Now, we’ll utilize PowerShell to generate the values that should be added to objects within the keys array. Feel free to adapt this process to your preferred scripting language.
To begin, let’s create a new self-signed certificate. In this example, I used OpenSSL for the task. However, if you’re working with PowerShell on a Windows system, you can achieve the same outcome using the New-SelfSignedCertificate cmdlet.
$keyFile = "key.pem"
$certFile = "certificate.pem"

# Create and export a random 4096-bit RSA key to a file
$rsa = [System.Security.Cryptography.RSA]::Create(4096)
$rsa.ExportPkcs8PrivateKeyPem() | Out-File $keyFile -Force

# Create an X509 certificate, using our RSA key file.
$certSubject = "/C=BE/ST=Antwerp/L=Antwerp/O=Thomas Van Laere, CommV./OU=IT/CN=thomasvanlaere.com"
openssl req -key $keyFile -x509 -days 365 -subj $certSubject  -out $certFile
openssl x509 -text -noout -in $certFile
Once you’ve generated the pem files, we’ll extract the contents of the certificate.pem file and remove newline characters, as well as the -----BEGIN CERTIFICATE----- and -----END CERTIFICATE----- tokens. This will leave us with the Base64-encoded (not Base64URL) public certificate, which we’ll use to create a JsonWebKey object.
$tokensToRemove = @("`n", "`r", "-----BEGIN CERTIFICATE-----", "-----END CERTIFICATE-----")

$certData = (Get-Content -Path $certFile -Raw)
$tokensToRemove | ForEach-Object { $certData = $certData -replace $_, "" }

# Initialize an array with a JsonWebKey object
$policySigningCertificateKeys = @(
    @{
        kty = "RSA"
        use = "sig"
        x5c = @($certData)
    }
)
Now that we have our certificate and key, we can proceed to deploy the isolated instance of the Microsoft Attestation Service.
$attestationResourceGroup = "tvl-remote-attestation-rg"
$attestationResourceGroupLocation = "westeurope"
$attestationProviderName = "tvlisolatedmaa"
$bicepFile = "maa_isolated.bicep"

if ($null -eq (Get-AzResourceGroup -Name $attestationResourceGroup -ErrorAction SilentlyContinue)) {
    New-AzResourceGroup -Name $attestationResourceGroup -Location $attestationResourceGroupLocation
}

New-AzResourceGroupDeployment -TemplateFile $bicepFile `
  -ResourceGroupName $attestationResourceGroup `
  -attestationProviderName $attestationProviderName `
  -policySigningCertificateKeys $policySigningCertificateKeys

# We will verify the trust model..
Get-AzResource -ResourceName $attestationProviderName -ExpandProperties | Format-List -Property "Properties"
#  Drum roll please.. 👇      ✅
# Properties : @{trustModel=Isolated; status=Ready; attestUri=https://tvlisolatedmaa.weu.attest.azure.net; publicNetworkAccess=; tpmAttestationAuthentication=}
That should have deployed your isolated instance of the Microsoft Attestation Service, with an attestation policy signer certificate! You can access your isolated attestation provider and its policy signing certificates through the Azure Portal. Locate and select the attestation provider instance. Under its settings, where you’ll find an option labelled “Policy Signer Certificates.” Click on this option to download the policy signing certificates, resulting in a file named policycerts.txt.
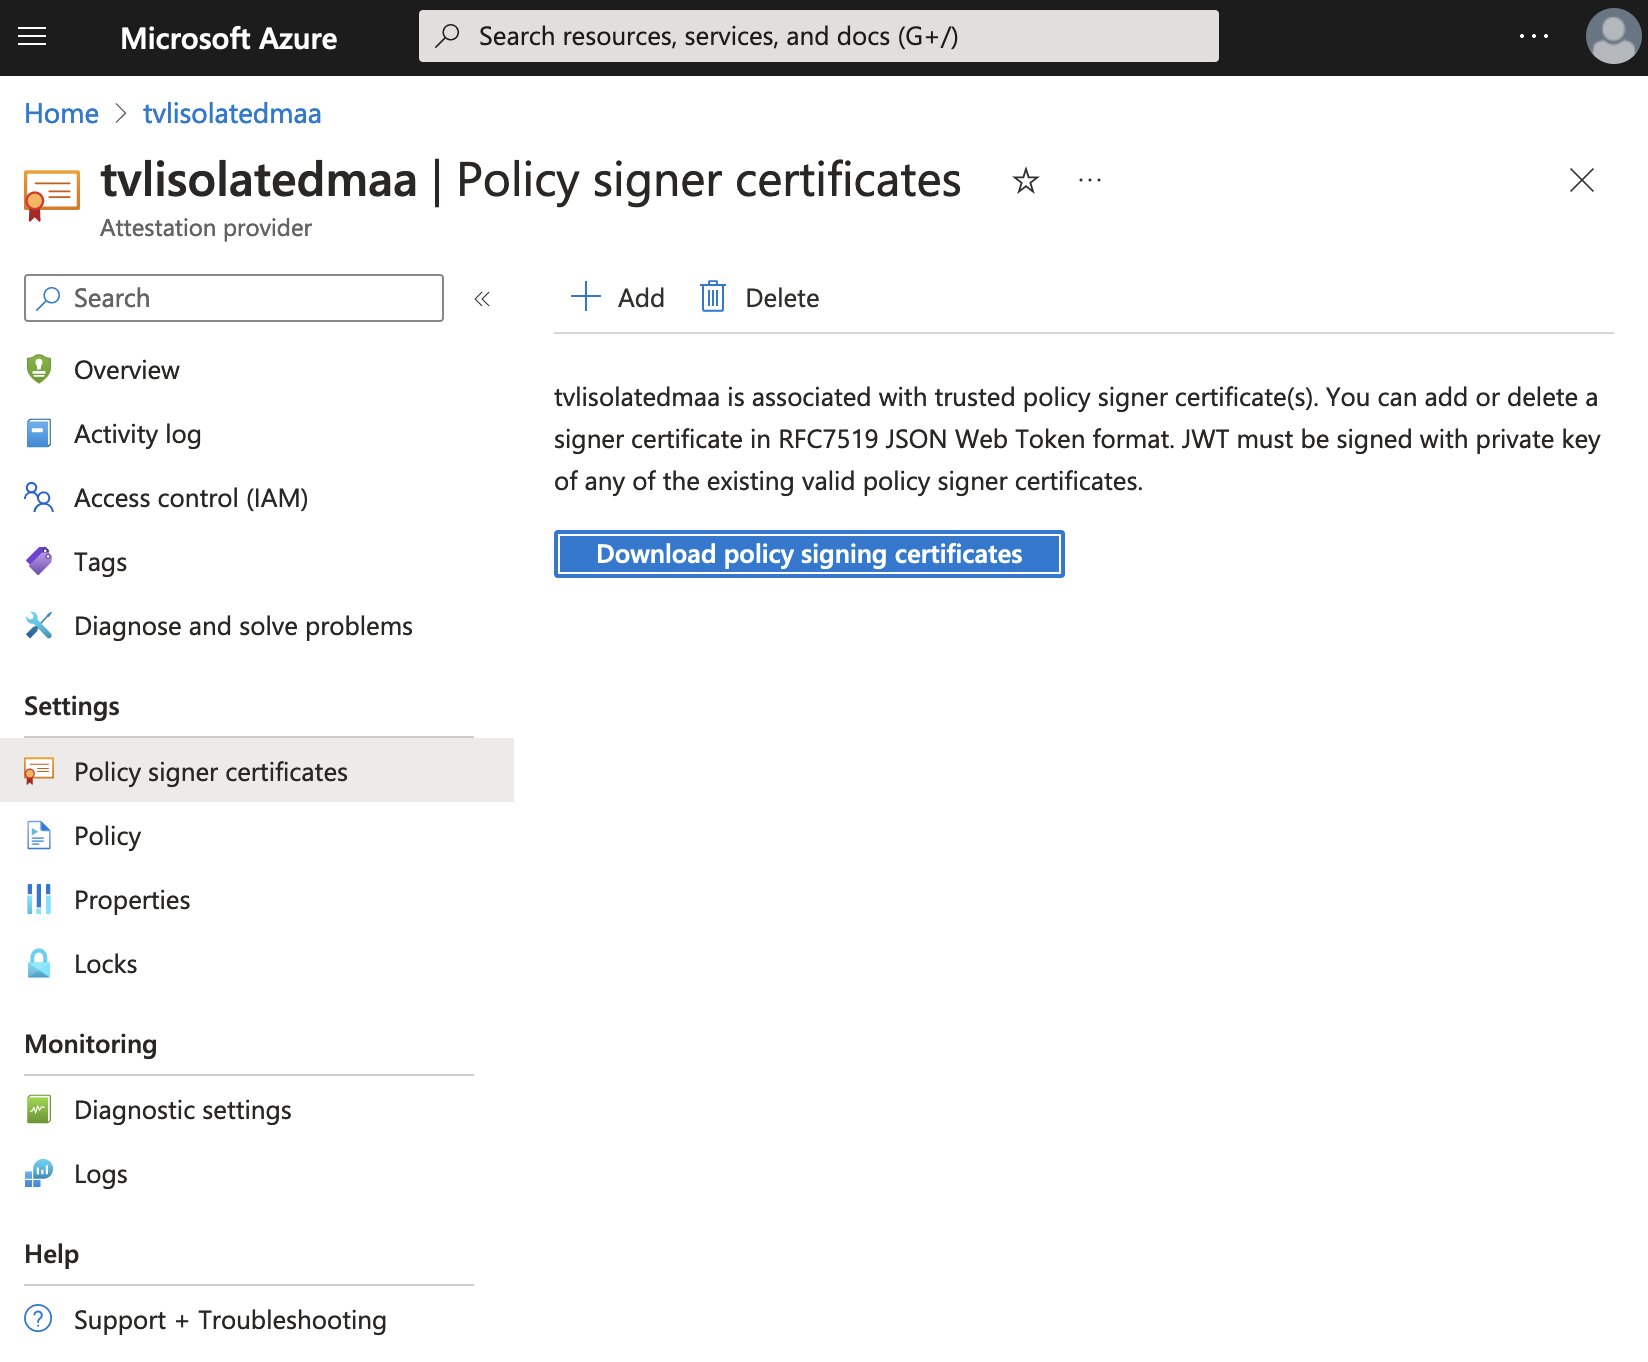
The provided text file contains a JSON object with several properties. Among these properties, the most intriguing one is the JWT property, which represents a JSON Web Token (JWT):
{
    "Jwt": "eyJhbGciOiJSUzI1NiIsImprdSI6Imh0dHBzOi8vdHZsaXNvbGF0ZWRtYWEud2V1LmF0dGVzdC5henVyZS5uZXQvY2VydHMiLCJraWQiOiJkUktoK2hCY1dVZlFpbVNsM0l2NlpoU3RXM1RTT3QwVGh3aVRnVVVxWkFvPSIsInR5cCI6IkpXVCJ9.eyJhYXMtcG9saWN5Q2VydGlmaWNhdGVzIjp7ImtleXMiOlt7ImFsZyI6IlJTMjU2Iiwia3R5IjoiUlNBIiwidXNlIjoic2lnIiwieDVjIjpbIk1JSUYzVENDQThXZ0F3SUJBZ0lVUFY3cVVqbUxpWDhJR0wvbE1jSWo2WHN2UVNVd0RRWUpLb1pJaHZjTkFRRUxCUUF3ZmpFTE1Ba0dBMVVFQmhNQ1FrVXhFREFPQmdOVkJBZ01CMEZ1ZEhkbGNuQXhFREFPQmdOVkJBY01CMEZ1ZEhkbGNuQXhJVEFmQmdOVkJBb01HRlJvYjIxaGN5QldZVzRnVEdGbGNtVXNJRU52YlcxV0xqRUxNQWtHQTFVRUN3d0NTVlF4R3pBWkJnTlZCQU1NRW5Sb2IyMWhjM1poYm14aFpYSmxMbU52YlRBZUZ3MHlNekE0TWpReU1EUTNOREphRncweU5EQTRNak15TURRM05ESmFNSDR4Q3pBSkJnTlZCQVlUQWtKRk1SQXdEZ1lEVlFRSURBZEJiblIzWlhKd01SQXdEZ1lEVlFRSERBZEJiblIzWlhKd01TRXdId1lEVlFRS0RCaFVhRzl0WVhNZ1ZtRnVJRXhoWlhKbExDQkRiMjF0Vmk0eEN6QUpCZ05WQkFzTUFrbFVNUnN3R1FZRFZRUUREQkowYUc5dFlYTjJZVzVzWVdWeVpTNWpiMjB3Z2dJaU1BMEdDU3FHU0liM0RRRUJBUVVBQTRJQ0R3QXdnZ0lLQW9JQ0FRQ3gvdldobXZQOGxiREtJMThzK1YxNTRWZUtrNjl1cFkybm1nMjBqbmNwQ0p0bkZ1dUxXckJPZW1EYUZydXRrZXJrWGpaQkI4WUhIZzFaTElOTGd0TGdqaUdDcU96SkRvVk80bm4yd0NscmhNZWx0ZDN4eHB6QVh2azF3eTdkc3VZRnluRFdmc0l3TkFTekZGbllvSXFWME92cFVzdGFvSXFLVkthejYxVDZxY3Y0dVRZT053OUVXNnFwWU9MVnMwZnV1dHpLemJFK0hxNkxycE9xSG94Z0M5S05wUjBzeWYrRHZsaGNzR0ZONWZQK2VSMkgrMlVQQUNNejY2Z1Q1VWRDbmRUeVYwckVGRDU3eG5ZTGpOQXVRVHpPdFZ4OWNlUkE3YmZyOHliUlJjSFJrcUxIUndtTWRsTC9HMmtQU1d5cURiZW9QbVNNV1ZOVkZOWmlwUm1tKy95NEdWVXJ3bzB3dG5WQmlsckN4dWVVZUFkM1pkeG93TUlkdEErMk45WGJqeDBQQ2VLUndkZWhaV2dJYVc5WkZmemYxOFg2a2lIaDQ3RHlvdnlBQ2ZqMy9TZHE4TllBMEdrV3FCRmpUSk01UDJqdUlmMmxxMERrUDA4N2JBbkxteC9vU3ptQVZXQ1h3YUpiaE9YdXJvUTF2MHJrUzdFNCtjbitJR0tCQ0lWclFtZEl1eDlxTTNJNWtvTlZ0cWpEQysrakVuQU9pcnVRT1FCNHl1ZDdHTW5mWXNQaDR3Y2xLRDY5cThoR1ZyT3ptanpLeXk3elA5SEJJLzdrUmphV0E1d09rc29XOEQ3K2ZNZ1EwaUdkOUYzUjNzdHg3NXZkZmlHOVRFMmdwUG5VRDVnZFlQSXJSakdCMUljN0Uyb3pyQVp3N3hRK21jM1k2YnYyV2pOa1BRSURBUUFCbzFNd1VUQWRCZ05WSFE0RUZnUVUzdE9mUmRkRHpqN3RURkNHOXJEa09ncWdlU0F3SHdZRFZSMGpCQmd3Rm9BVTN0T2ZSZGREemo3dFRGQ0c5ckRrT2dxZ2VTQXdEd1lEVlIwVEFRSC9CQVV3QXdFQi96QU5CZ2txaGtpRzl3MEJBUXNGQUFPQ0FnRUFhdzBxVnNoNlBsdnZldmVXRE9jd3pCbU9MQmNCMzJSbDZHbnRPc0tEczFXRERtRlo5T2lwSk9XVjd6Y2JWQUEySEpRZmIwNm8rODVnc25Kb3FNaFhEeVpzcExqUW9ZMTJsVUhoWHdzZjBlYzgxUVVRbGJxcmVCSEJSTDh2ZHRxSmk2c1d0TUUxYWtkT0k0TjFva0dCU2JOM01IZTNlWjJ1K0g4QkRIQ3M3eUFSc1pkMEk4aGVFZjd5Qnd0WXZUQlgrUXYvcE16N1JiUVY5dFJCVUdQd2dZV3hqaFlWajloZ0wrSFhDSE1kZW1FQTRWekpxOW9RN1luV0o0NDUyK0xQZXNtc1VnSVU4THU3N3JSMXlZK0I0K015RmdZWEhsNGN0T2wrOFluRFdRNThXT01ydnEwNzlhd3VhL2hPeCtnRjhNMnFLcVpYVjBQT29VNmIyaUhHMS9FaUtHN09lZ3hyU2tqemIrUnJQQXRVRWdxcFNqNFduQUVhY3hOUllPT3hoWWE1bXdTMThGRW9Rc2FCdmhrNGVFQUlqTWlLa25PZXdzcDRObGtCQ0E5T3IxT3l4UjdjR3NGTmtPSU5FQ2ViTkJ5VUNaU1lDcVZpQS9TZWM0SW9RR2dsTUZHbVQxaTY0S3BHeVl2dEZKS2NqR0JKdHJLT1E3Z2FhQjVVcXVlR2QvVGJLRDlCbHVJVVA2ZEhhRjBGOHErL3lhOWNzS2IrWUZ6VlRmbkJXTjRpQnFOdFVDNmtSZTVNRW1mdExxb2ZGbWE5dHZSOVpMM1JvRWVVVzVnQ2hxSjA4UlpnVUVIYmE5MHl3a1JCbHpwYm5CdEI1U2NQd2Z1bVRybHZmbTdLaEtMY2h6YzBmLzJMSk5UdWNLNXVoZVplNVpMK2VqQ0NqMEhCYTlBZVkwMD0iXX1dfSwiZXhwIjoxNjkzMDA3ODUyLCJpYXQiOjE2OTMwMDQyNTIsImlzcyI6Imh0dHBzOi8vdHZsaXNvbGF0ZWRtYWEud2V1LmF0dGVzdC5henVyZS5uZXQiLCJtYWEtcG9saWN5Q2VydGlmaWNhdGVzIjp7ImtleXMiOlt7ImFsZyI6IlJTMjU2Iiwia3R5IjoiUlNBIiwidXNlIjoic2lnIiwieDVjIjpbIk1JSUYzVENDQThXZ0F3SUJBZ0lVUFY3cVVqbUxpWDhJR0wvbE1jSWo2WHN2UVNVd0RRWUpLb1pJaHZjTkFRRUxCUUF3ZmpFTE1Ba0dBMVVFQmhNQ1FrVXhFREFPQmdOVkJBZ01CMEZ1ZEhkbGNuQXhFREFPQmdOVkJBY01CMEZ1ZEhkbGNuQXhJVEFmQmdOVkJBb01HRlJvYjIxaGN5QldZVzRnVEdGbGNtVXNJRU52YlcxV0xqRUxNQWtHQTFVRUN3d0NTVlF4R3pBWkJnTlZCQU1NRW5Sb2IyMWhjM1poYm14aFpYSmxMbU52YlRBZUZ3MHlNekE0TWpReU1EUTNOREphRncweU5EQTRNak15TURRM05ESmFNSDR4Q3pBSkJnTlZCQVlUQWtKRk1SQXdEZ1lEVlFRSURBZEJiblIzWlhKd01SQXdEZ1lEVlFRSERBZEJiblIzWlhKd01TRXdId1lEVlFRS0RCaFVhRzl0WVhNZ1ZtRnVJRXhoWlhKbExDQkRiMjF0Vmk0eEN6QUpCZ05WQkFzTUFrbFVNUnN3R1FZRFZRUUREQkowYUc5dFlYTjJZVzVzWVdWeVpTNWpiMjB3Z2dJaU1BMEdDU3FHU0liM0RRRUJBUVVBQTRJQ0R3QXdnZ0lLQW9JQ0FRQ3gvdldobXZQOGxiREtJMThzK1YxNTRWZUtrNjl1cFkybm1nMjBqbmNwQ0p0bkZ1dUxXckJPZW1EYUZydXRrZXJrWGpaQkI4WUhIZzFaTElOTGd0TGdqaUdDcU96SkRvVk80bm4yd0NscmhNZWx0ZDN4eHB6QVh2azF3eTdkc3VZRnluRFdmc0l3TkFTekZGbllvSXFWME92cFVzdGFvSXFLVkthejYxVDZxY3Y0dVRZT053OUVXNnFwWU9MVnMwZnV1dHpLemJFK0hxNkxycE9xSG94Z0M5S05wUjBzeWYrRHZsaGNzR0ZONWZQK2VSMkgrMlVQQUNNejY2Z1Q1VWRDbmRUeVYwckVGRDU3eG5ZTGpOQXVRVHpPdFZ4OWNlUkE3YmZyOHliUlJjSFJrcUxIUndtTWRsTC9HMmtQU1d5cURiZW9QbVNNV1ZOVkZOWmlwUm1tKy95NEdWVXJ3bzB3dG5WQmlsckN4dWVVZUFkM1pkeG93TUlkdEErMk45WGJqeDBQQ2VLUndkZWhaV2dJYVc5WkZmemYxOFg2a2lIaDQ3RHlvdnlBQ2ZqMy9TZHE4TllBMEdrV3FCRmpUSk01UDJqdUlmMmxxMERrUDA4N2JBbkxteC9vU3ptQVZXQ1h3YUpiaE9YdXJvUTF2MHJrUzdFNCtjbitJR0tCQ0lWclFtZEl1eDlxTTNJNWtvTlZ0cWpEQysrakVuQU9pcnVRT1FCNHl1ZDdHTW5mWXNQaDR3Y2xLRDY5cThoR1ZyT3ptanpLeXk3elA5SEJJLzdrUmphV0E1d09rc29XOEQ3K2ZNZ1EwaUdkOUYzUjNzdHg3NXZkZmlHOVRFMmdwUG5VRDVnZFlQSXJSakdCMUljN0Uyb3pyQVp3N3hRK21jM1k2YnYyV2pOa1BRSURBUUFCbzFNd1VUQWRCZ05WSFE0RUZnUVUzdE9mUmRkRHpqN3RURkNHOXJEa09ncWdlU0F3SHdZRFZSMGpCQmd3Rm9BVTN0T2ZSZGREemo3dFRGQ0c5ckRrT2dxZ2VTQXdEd1lEVlIwVEFRSC9CQVV3QXdFQi96QU5CZ2txaGtpRzl3MEJBUXNGQUFPQ0FnRUFhdzBxVnNoNlBsdnZldmVXRE9jd3pCbU9MQmNCMzJSbDZHbnRPc0tEczFXRERtRlo5T2lwSk9XVjd6Y2JWQUEySEpRZmIwNm8rODVnc25Kb3FNaFhEeVpzcExqUW9ZMTJsVUhoWHdzZjBlYzgxUVVRbGJxcmVCSEJSTDh2ZHRxSmk2c1d0TUUxYWtkT0k0TjFva0dCU2JOM01IZTNlWjJ1K0g4QkRIQ3M3eUFSc1pkMEk4aGVFZjd5Qnd0WXZUQlgrUXYvcE16N1JiUVY5dFJCVUdQd2dZV3hqaFlWajloZ0wrSFhDSE1kZW1FQTRWekpxOW9RN1luV0o0NDUyK0xQZXNtc1VnSVU4THU3N3JSMXlZK0I0K015RmdZWEhsNGN0T2wrOFluRFdRNThXT01ydnEwNzlhd3VhL2hPeCtnRjhNMnFLcVpYVjBQT29VNmIyaUhHMS9FaUtHN09lZ3hyU2tqemIrUnJQQXRVRWdxcFNqNFduQUVhY3hOUllPT3hoWWE1bXdTMThGRW9Rc2FCdmhrNGVFQUlqTWlLa25PZXdzcDRObGtCQ0E5T3IxT3l4UjdjR3NGTmtPSU5FQ2ViTkJ5VUNaU1lDcVZpQS9TZWM0SW9RR2dsTUZHbVQxaTY0S3BHeVl2dEZKS2NqR0JKdHJLT1E3Z2FhQjVVcXVlR2QvVGJLRDlCbHVJVVA2ZEhhRjBGOHErL3lhOWNzS2IrWUZ6VlRmbkJXTjRpQnFOdFVDNmtSZTVNRW1mdExxb2ZGbWE5dHZSOVpMM1JvRWVVVzVnQ2hxSjA4UlpnVUVIYmE5MHl3a1JCbHpwYm5CdEI1U2NQd2Z1bVRybHZmbTdLaEtMY2h6YzBmLzJMSk5UdWNLNXVoZVplNVpMK2VqQ0NqMEhCYTlBZVkwMD0iXX1dfSwibmJmIjoxNjkzMDA0MjUyfQ.NlELEY0AgD5ZZPjCeZbLr-aMwC6TpObt7VRdsMqSeXRbeCm0dC8L8UOlOifgYb2fTWW8X0bhW_q5ZBVGupw3Fn8Bdvn0fFMmP8g0Z5JuENbpLkp7S4eDRZ9FYKv7tOamYVPJMmNIuIXLEyjQ5WyD8gwcrh228iKNPhxnmpe4MFoq5yGav71L-Xt8TQ22IBeW26DIXg3MuxgQnfYPJm0LUxPiYz68AqZ10a73s0keEPdjx6g3tmRCjzGeCfKP_T7Q6TjRbEDislHMk6ApOiGaVliIQnYWGrRDibbi798zjE1Ouz1wpfkW1nLF1RXx8nUhqfmnYYIjR4sI7yc5h1vBmQ",
    "Algorithm": "RS256",
    "JKU": "https://tvlisolatedmaa.weu.attest.azure.net/certs",
    "Certificates": [
        {
            "alg": "RS256",
            "kty": "RSA",
            "use": "sig",
            "x5c": [
                "MIIF3TCCA8WgAwIBAgIUPV7qUjmLiX8IGL/lMcIj6XsvQSUwDQYJKoZIhvcNAQELBQAwfjELMAkGA1UEBhMCQkUxEDAOBgNVBAgMB0FudHdlcnAxEDAOBgNVBAcMB0FudHdlcnAxITAfBgNVBAoMGFRob21hcyBWYW4gTGFlcmUsIENvbW1WLjELMAkGA1UECwwCSVQxGzAZBgNVBAMMEnRob21hc3ZhbmxhZXJlLmNvbTAeFw0yMzA4MjQyMDQ3NDJaFw0yNDA4MjMyMDQ3NDJaMH4xCzAJBgNVBAYTAkJFMRAwDgYDVQQIDAdBbnR3ZXJwMRAwDgYDVQQHDAdBbnR3ZXJwMSEwHwYDVQQKDBhUaG9tYXMgVmFuIExhZXJlLCBDb21tVi4xCzAJBgNVBAsMAklUMRswGQYDVQQDDBJ0aG9tYXN2YW5sYWVyZS5jb20wggIiMA0GCSqGSIb3DQEBAQUAA4ICDwAwggIKAoICAQCx/vWhmvP8lbDKI18s+V154VeKk69upY2nmg20jncpCJtnFuuLWrBOemDaFrutkerkXjZBB8YHHg1ZLINLgtLgjiGCqOzJDoVO4nn2wClrhMeltd3xxpzAXvk1wy7dsuYFynDWfsIwNASzFFnYoIqV0OvpUstaoIqKVKaz61T6qcv4uTYONw9EW6qpYOLVs0fuutzKzbE+Hq6LrpOqHoxgC9KNpR0syf+DvlhcsGFN5fP+eR2H+2UPACMz66gT5UdCndTyV0rEFD57xnYLjNAuQTzOtVx9ceRA7bfr8ybRRcHRkqLHRwmMdlL/G2kPSWyqDbeoPmSMWVNVFNZipRmm+/y4GVUrwo0wtnVBilrCxueUeAd3ZdxowMIdtA+2N9Xbjx0PCeKRwdehZWgIaW9ZFfzf18X6kiHh47DyovyACfj3/Sdq8NYA0GkWqBFjTJM5P2juIf2lq0DkP087bAnLmx/oSzmAVWCXwaJbhOXuroQ1v0rkS7E4+cn+IGKBCIVrQmdIux9qM3I5koNVtqjDC++jEnAOiruQOQB4yud7GMnfYsPh4wclKD69q8hGVrOzmjzKyy7zP9HBI/7kRjaWA5wOksoW8D7+fMgQ0iGd9F3R3stx75vdfiG9TE2gpPnUD5gdYPIrRjGB1Ic7E2ozrAZw7xQ+mc3Y6bv2WjNkPQIDAQABo1MwUTAdBgNVHQ4EFgQU3tOfRddDzj7tTFCG9rDkOgqgeSAwHwYDVR0jBBgwFoAU3tOfRddDzj7tTFCG9rDkOgqgeSAwDwYDVR0TAQH/BAUwAwEB/zANBgkqhkiG9w0BAQsFAAOCAgEAaw0qVsh6PlvveveWDOcwzBmOLBcB32Rl6GntOsKDs1WDDmFZ9OipJOWV7zcbVAA2HJQfb06o+85gsnJoqMhXDyZspLjQoY12lUHhXwsf0ec81QUQlbqreBHBRL8vdtqJi6sWtME1akdOI4N1okGBSbN3MHe3eZ2u+H8BDHCs7yARsZd0I8heEf7yBwtYvTBX+Qv/pMz7RbQV9tRBUGPwgYWxjhYVj9hgL+HXCHMdemEA4VzJq9oQ7YnWJ4452+LPesmsUgIU8Lu77rR1yY+B4+MyFgYXHl4ctOl+8YnDWQ58WOMrvq079awua/hOx+gF8M2qKqZXV0POoU6b2iHG1/EiKG7OegxrSkjzb+RrPAtUEgqpSj4WnAEacxNRYOOxhYa5mwS18FEoQsaBvhk4eEAIjMiKknOewsp4NlkBCA9Or1OyxR7cGsFNkOINECebNByUCZSYCqViA/Sec4IoQGglMFGmT1i64KpGyYvtFJKcjGBJtrKOQ7gaaB5UqueGd/TbKD9BluIUP6dHaF0F8q+/ya9csKb+YFzVTfnBWN4iBqNtUC6kRe5MEmftLqofFma9tvR9ZL3RoEeUW5gChqJ08RZgUEHba90ywkRBlzpbnBtB5ScPwfumTrlvfm7KhKLchzc0f/2LJNTucK5uheZe5ZL+ejCCj0HBa9AeY00="
            ]
        }
    ],
    "CertificateCount": 1
}
To decipher the content of the JWT property, it’s necessary to decode the Base64URL-encoded data. Here’s the JOSE header:
{
  "alg": "RS256",
  "jku": "https://tvlisolatedmaa.weu.attest.azure.net/certs",
  "kid": "dRKh+hBcWUfQimSl3Iv6ZhStW3TSOt0ThwiTgUUqZAo=",
  "typ": "JWT"
}
Likewise, the following represents the decoded JWT payload:
{
  "aas-policyCertificates": {
    "keys": [
      {
        "alg": "RS256",
        "kty": "RSA",
        "use": "sig",
        "x5c": [
          "MIIF3TCCA8WgAwIBAgIUPV7qUjmLiX8IGL/lMcIj6XsvQSUwDQYJKoZIhvcNAQELBQAwfjELMAkGA1UEBhMCQkUxEDAOBgNVBAgMB0FudHdlcnAxEDAOBgNVBAcMB0FudHdlcnAxITAfBgNVBAoMGFRob21hcyBWYW4gTGFlcmUsIENvbW1WLjELMAkGA1UECwwCSVQxGzAZBgNVBAMMEnRob21hc3ZhbmxhZXJlLmNvbTAeFw0yMzA4MjQyMDQ3NDJaFw0yNDA4MjMyMDQ3NDJaMH4xCzAJBgNVBAYTAkJFMRAwDgYDVQQIDAdBbnR3ZXJwMRAwDgYDVQQHDAdBbnR3ZXJwMSEwHwYDVQQKDBhUaG9tYXMgVmFuIExhZXJlLCBDb21tVi4xCzAJBgNVBAsMAklUMRswGQYDVQQDDBJ0aG9tYXN2YW5sYWVyZS5jb20wggIiMA0GCSqGSIb3DQEBAQUAA4ICDwAwggIKAoICAQCx/vWhmvP8lbDKI18s+V154VeKk69upY2nmg20jncpCJtnFuuLWrBOemDaFrutkerkXjZBB8YHHg1ZLINLgtLgjiGCqOzJDoVO4nn2wClrhMeltd3xxpzAXvk1wy7dsuYFynDWfsIwNASzFFnYoIqV0OvpUstaoIqKVKaz61T6qcv4uTYONw9EW6qpYOLVs0fuutzKzbE+Hq6LrpOqHoxgC9KNpR0syf+DvlhcsGFN5fP+eR2H+2UPACMz66gT5UdCndTyV0rEFD57xnYLjNAuQTzOtVx9ceRA7bfr8ybRRcHRkqLHRwmMdlL/G2kPSWyqDbeoPmSMWVNVFNZipRmm+/y4GVUrwo0wtnVBilrCxueUeAd3ZdxowMIdtA+2N9Xbjx0PCeKRwdehZWgIaW9ZFfzf18X6kiHh47DyovyACfj3/Sdq8NYA0GkWqBFjTJM5P2juIf2lq0DkP087bAnLmx/oSzmAVWCXwaJbhOXuroQ1v0rkS7E4+cn+IGKBCIVrQmdIux9qM3I5koNVtqjDC++jEnAOiruQOQB4yud7GMnfYsPh4wclKD69q8hGVrOzmjzKyy7zP9HBI/7kRjaWA5wOksoW8D7+fMgQ0iGd9F3R3stx75vdfiG9TE2gpPnUD5gdYPIrRjGB1Ic7E2ozrAZw7xQ+mc3Y6bv2WjNkPQIDAQABo1MwUTAdBgNVHQ4EFgQU3tOfRddDzj7tTFCG9rDkOgqgeSAwHwYDVR0jBBgwFoAU3tOfRddDzj7tTFCG9rDkOgqgeSAwDwYDVR0TAQH/BAUwAwEB/zANBgkqhkiG9w0BAQsFAAOCAgEAaw0qVsh6PlvveveWDOcwzBmOLBcB32Rl6GntOsKDs1WDDmFZ9OipJOWV7zcbVAA2HJQfb06o+85gsnJoqMhXDyZspLjQoY12lUHhXwsf0ec81QUQlbqreBHBRL8vdtqJi6sWtME1akdOI4N1okGBSbN3MHe3eZ2u+H8BDHCs7yARsZd0I8heEf7yBwtYvTBX+Qv/pMz7RbQV9tRBUGPwgYWxjhYVj9hgL+HXCHMdemEA4VzJq9oQ7YnWJ4452+LPesmsUgIU8Lu77rR1yY+B4+MyFgYXHl4ctOl+8YnDWQ58WOMrvq079awua/hOx+gF8M2qKqZXV0POoU6b2iHG1/EiKG7OegxrSkjzb+RrPAtUEgqpSj4WnAEacxNRYOOxhYa5mwS18FEoQsaBvhk4eEAIjMiKknOewsp4NlkBCA9Or1OyxR7cGsFNkOINECebNByUCZSYCqViA/Sec4IoQGglMFGmT1i64KpGyYvtFJKcjGBJtrKOQ7gaaB5UqueGd/TbKD9BluIUP6dHaF0F8q+/ya9csKb+YFzVTfnBWN4iBqNtUC6kRe5MEmftLqofFma9tvR9ZL3RoEeUW5gChqJ08RZgUEHba90ywkRBlzpbnBtB5ScPwfumTrlvfm7KhKLchzc0f/2LJNTucK5uheZe5ZL+ejCCj0HBa9AeY00="
        ]
      }
    ]
  },
  "exp": 1693007852,
  "iat": 1693004252,
  "iss": "https://tvlisolatedmaa.weu.attest.azure.net",
  "maa-policyCertificates": {
    "keys": [
      {
        "alg": "RS256",
        "kty": "RSA",
        "use": "sig",
        "x5c": [
          "MIIF3TCCA8WgAwIBAgIUPV7qUjmLiX8IGL/lMcIj6XsvQSUwDQYJKoZIhvcNAQELBQAwfjELMAkGA1UEBhMCQkUxEDAOBgNVBAgMB0FudHdlcnAxEDAOBgNVBAcMB0FudHdlcnAxITAfBgNVBAoMGFRob21hcyBWYW4gTGFlcmUsIENvbW1WLjELMAkGA1UECwwCSVQxGzAZBgNVBAMMEnRob21hc3ZhbmxhZXJlLmNvbTAeFw0yMzA4MjQyMDQ3NDJaFw0yNDA4MjMyMDQ3NDJaMH4xCzAJBgNVBAYTAkJFMRAwDgYDVQQIDAdBbnR3ZXJwMRAwDgYDVQQHDAdBbnR3ZXJwMSEwHwYDVQQKDBhUaG9tYXMgVmFuIExhZXJlLCBDb21tVi4xCzAJBgNVBAsMAklUMRswGQYDVQQDDBJ0aG9tYXN2YW5sYWVyZS5jb20wggIiMA0GCSqGSIb3DQEBAQUAA4ICDwAwggIKAoICAQCx/vWhmvP8lbDKI18s+V154VeKk69upY2nmg20jncpCJtnFuuLWrBOemDaFrutkerkXjZBB8YHHg1ZLINLgtLgjiGCqOzJDoVO4nn2wClrhMeltd3xxpzAXvk1wy7dsuYFynDWfsIwNASzFFnYoIqV0OvpUstaoIqKVKaz61T6qcv4uTYONw9EW6qpYOLVs0fuutzKzbE+Hq6LrpOqHoxgC9KNpR0syf+DvlhcsGFN5fP+eR2H+2UPACMz66gT5UdCndTyV0rEFD57xnYLjNAuQTzOtVx9ceRA7bfr8ybRRcHRkqLHRwmMdlL/G2kPSWyqDbeoPmSMWVNVFNZipRmm+/y4GVUrwo0wtnVBilrCxueUeAd3ZdxowMIdtA+2N9Xbjx0PCeKRwdehZWgIaW9ZFfzf18X6kiHh47DyovyACfj3/Sdq8NYA0GkWqBFjTJM5P2juIf2lq0DkP087bAnLmx/oSzmAVWCXwaJbhOXuroQ1v0rkS7E4+cn+IGKBCIVrQmdIux9qM3I5koNVtqjDC++jEnAOiruQOQB4yud7GMnfYsPh4wclKD69q8hGVrOzmjzKyy7zP9HBI/7kRjaWA5wOksoW8D7+fMgQ0iGd9F3R3stx75vdfiG9TE2gpPnUD5gdYPIrRjGB1Ic7E2ozrAZw7xQ+mc3Y6bv2WjNkPQIDAQABo1MwUTAdBgNVHQ4EFgQU3tOfRddDzj7tTFCG9rDkOgqgeSAwHwYDVR0jBBgwFoAU3tOfRddDzj7tTFCG9rDkOgqgeSAwDwYDVR0TAQH/BAUwAwEB/zANBgkqhkiG9w0BAQsFAAOCAgEAaw0qVsh6PlvveveWDOcwzBmOLBcB32Rl6GntOsKDs1WDDmFZ9OipJOWV7zcbVAA2HJQfb06o+85gsnJoqMhXDyZspLjQoY12lUHhXwsf0ec81QUQlbqreBHBRL8vdtqJi6sWtME1akdOI4N1okGBSbN3MHe3eZ2u+H8BDHCs7yARsZd0I8heEf7yBwtYvTBX+Qv/pMz7RbQV9tRBUGPwgYWxjhYVj9hgL+HXCHMdemEA4VzJq9oQ7YnWJ4452+LPesmsUgIU8Lu77rR1yY+B4+MyFgYXHl4ctOl+8YnDWQ58WOMrvq079awua/hOx+gF8M2qKqZXV0POoU6b2iHG1/EiKG7OegxrSkjzb+RrPAtUEgqpSj4WnAEacxNRYOOxhYa5mwS18FEoQsaBvhk4eEAIjMiKknOewsp4NlkBCA9Or1OyxR7cGsFNkOINECebNByUCZSYCqViA/Sec4IoQGglMFGmT1i64KpGyYvtFJKcjGBJtrKOQ7gaaB5UqueGd/TbKD9BluIUP6dHaF0F8q+/ya9csKb+YFzVTfnBWN4iBqNtUC6kRe5MEmftLqofFma9tvR9ZL3RoEeUW5gChqJ08RZgUEHba90ywkRBlzpbnBtB5ScPwfumTrlvfm7KhKLchzc0f/2LJNTucK5uheZe5ZL+ejCCj0HBa9AeY00="
        ]
      }
    ]
  },
  "nbf": 1693004252
}
To confirm the validity of the generated certificate, you can use these PowerShell commands:
$certToCheck = [System.Security.Cryptography.X509Certificates.X509Certificate2]([System.Convert]::FromBase64String("MIIF3TCCA8WgAwIBAgIUPV7qUjmLiX8IGL/lMcIj6XsvQSUwDQYJKoZIhvcNAQELBQAwfjELMAkGA1UEBhMCQkUxEDAOBgNVBAgMB0FudHdlcnAxEDAOBgNVBAcMB0FudHdlcnAxITAfBgNVBAoMGFRob21hcyBWYW4gTGFlcmUsIENvbW1WLjELMAkGA1UECwwCSVQxGzAZBgNVBAMMEnRob21hc3ZhbmxhZXJlLmNvbTAeFw0yMzA4MjQyMDQ3NDJaFw0yNDA4MjMyMDQ3NDJaMH4xCzAJBgNVBAYTAkJFMRAwDgYDVQQIDAdBbnR3ZXJwMRAwDgYDVQQHDAdBbnR3ZXJwMSEwHwYDVQQKDBhUaG9tYXMgVmFuIExhZXJlLCBDb21tVi4xCzAJBgNVBAsMAklUMRswGQYDVQQDDBJ0aG9tYXN2YW5sYWVyZS5jb20wggIiMA0GCSqGSIb3DQEBAQUAA4ICDwAwggIKAoICAQCx/vWhmvP8lbDKI18s+V154VeKk69upY2nmg20jncpCJtnFuuLWrBOemDaFrutkerkXjZBB8YHHg1ZLINLgtLgjiGCqOzJDoVO4nn2wClrhMeltd3xxpzAXvk1wy7dsuYFynDWfsIwNASzFFnYoIqV0OvpUstaoIqKVKaz61T6qcv4uTYONw9EW6qpYOLVs0fuutzKzbE+Hq6LrpOqHoxgC9KNpR0syf+DvlhcsGFN5fP+eR2H+2UPACMz66gT5UdCndTyV0rEFD57xnYLjNAuQTzOtVx9ceRA7bfr8ybRRcHRkqLHRwmMdlL/G2kPSWyqDbeoPmSMWVNVFNZipRmm+/y4GVUrwo0wtnVBilrCxueUeAd3ZdxowMIdtA+2N9Xbjx0PCeKRwdehZWgIaW9ZFfzf18X6kiHh47DyovyACfj3/Sdq8NYA0GkWqBFjTJM5P2juIf2lq0DkP087bAnLmx/oSzmAVWCXwaJbhOXuroQ1v0rkS7E4+cn+IGKBCIVrQmdIux9qM3I5koNVtqjDC++jEnAOiruQOQB4yud7GMnfYsPh4wclKD69q8hGVrOzmjzKyy7zP9HBI/7kRjaWA5wOksoW8D7+fMgQ0iGd9F3R3stx75vdfiG9TE2gpPnUD5gdYPIrRjGB1Ic7E2ozrAZw7xQ+mc3Y6bv2WjNkPQIDAQABo1MwUTAdBgNVHQ4EFgQU3tOfRddDzj7tTFCG9rDkOgqgeSAwHwYDVR0jBBgwFoAU3tOfRddDzj7tTFCG9rDkOgqgeSAwDwYDVR0TAQH/BAUwAwEB/zANBgkqhkiG9w0BAQsFAAOCAgEAaw0qVsh6PlvveveWDOcwzBmOLBcB32Rl6GntOsKDs1WDDmFZ9OipJOWV7zcbVAA2HJQfb06o+85gsnJoqMhXDyZspLjQoY12lUHhXwsf0ec81QUQlbqreBHBRL8vdtqJi6sWtME1akdOI4N1okGBSbN3MHe3eZ2u+H8BDHCs7yARsZd0I8heEf7yBwtYvTBX+Qv/pMz7RbQV9tRBUGPwgYWxjhYVj9hgL+HXCHMdemEA4VzJq9oQ7YnWJ4452+LPesmsUgIU8Lu77rR1yY+B4+MyFgYXHl4ctOl+8YnDWQ58WOMrvq079awua/hOx+gF8M2qKqZXV0POoU6b2iHG1/EiKG7OegxrSkjzb+RrPAtUEgqpSj4WnAEacxNRYOOxhYa5mwS18FEoQsaBvhk4eEAIjMiKknOewsp4NlkBCA9Or1OyxR7cGsFNkOINECebNByUCZSYCqViA/Sec4IoQGglMFGmT1i64KpGyYvtFJKcjGBJtrKOQ7gaaB5UqueGd/TbKD9BluIUP6dHaF0F8q+/ya9csKb+YFzVTfnBWN4iBqNtUC6kRe5MEmftLqofFma9tvR9ZL3RoEeUW5gChqJ08RZgUEHba90ywkRBlzpbnBtB5ScPwfumTrlvfm7KhKLchzc0f/2LJNTucK5uheZe5ZL+ejCCj0HBa9AeY00="))

# Display detailed information about the certificate
$certToCheck | Format-List *

# EnhancedKeyUsageList :
# DnsNameList          :
# SendAsTrustedIssuer  :
# Archived             : False
# Extensions           : {System.Security.Cryptography.Oid, System.Security.Cryptography.Oid, System.Security.Cryptography.Oid}
# FriendlyName         :
# HasPrivateKey        : False
# PrivateKey           :
# IssuerName           : System.Security.Cryptography.X509Certificates.X500DistinguishedName
# NotAfter             : 8/23/2024 10:47:42 PM
# NotBefore            : 8/24/2023 10:47:42 PM
# PublicKey            : System.Security.Cryptography.X509Certificates.PublicKey
# RawData              : {48, 130, 5, 221…}
# RawDataMemory        : System.ReadOnlyMemory<Byte>[1505]
# SerialNumber         : 3D5EEA52398B897F0818BFE531C223E97B2F4125
# SignatureAlgorithm   : System.Security.Cryptography.Oid
# SubjectName          : System.Security.Cryptography.X509Certificates.X500DistinguishedName
# Thumbprint           : B226EA2AAF8BFCF2CCEDEFC9C340BF2998F6E66A
# Version              : 3
# Handle               : 140273094319152
# Issuer               : CN=thomasvanlaere.com, OU=IT, O="Thomas Van Laere, CommV.", L=Antwerp, S=Antwerp, C=BE
# Subject              : CN=thomasvanlaere.com, OU=IT, O="Thomas Van Laere, CommV.", L=Antwerp, S=Antwerp, C=BE
# SerialNumberBytes    : System.ReadOnlyMemory<Byte>[20]
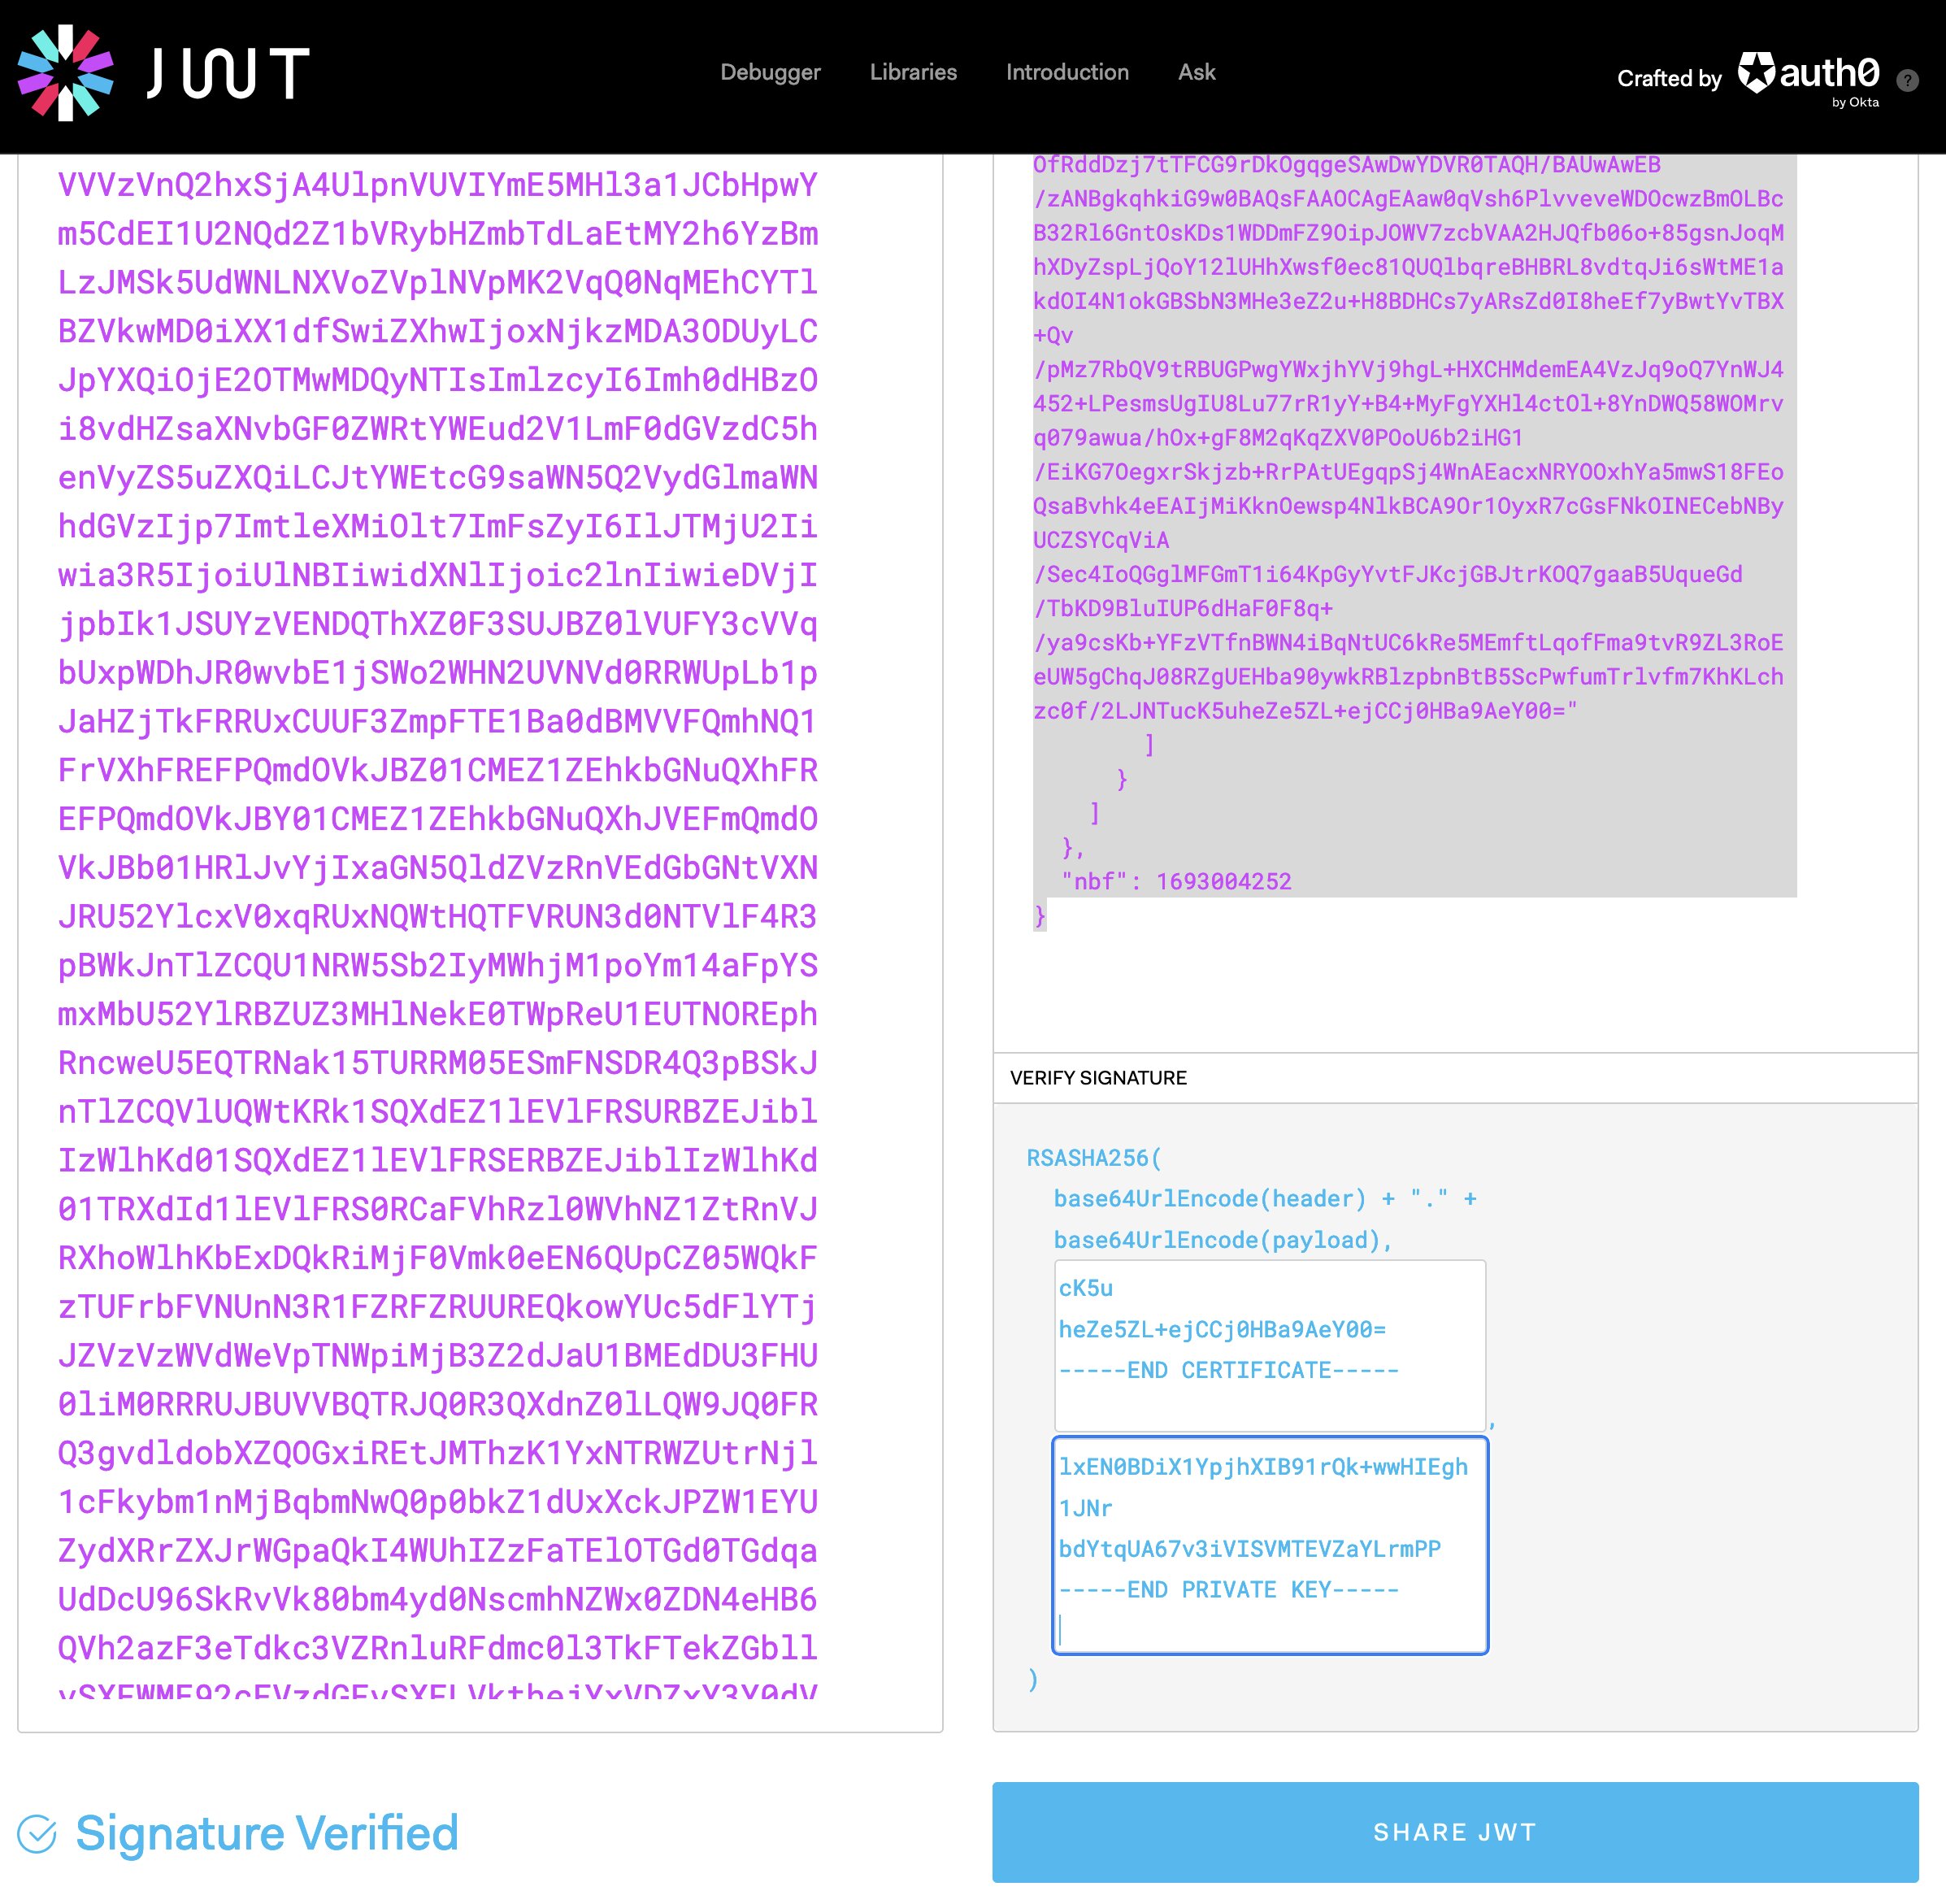
We can utilize JWT.io to assess the JWT’s validity, although it’s important to note that this approach is not recommended for production JWTs, we should keep those private. When inputting the public certificate and private key into JWT.io, you should receive a confirmation message indicating the successful validation of the token’s signature.
JWT attestation policy
With our isolated MAA instance up and running, we can now deploy signed attestation policies to it. To achieve this, we’ll utilize PowerShell along with functions that can encode data to Base64 or Base64URL.
📖 These functions were originally featured in my blog post on “Verifying Microsoft Azure Attestation JWT Tokens”, and they will serve us well here.
function ConvertTo-Base64UrlEncodedString {
    param (
        [Parameter(Position = 0, ParameterSetName = "text")]
        [string]$Text,
        [Parameter(Position = 0, ParameterSetName = "bytes")]
        [byte[]]$Bytes
    )
    switch ($PSCmdlet.ParameterSetName) {
        'text' {
            $bytes = [System.Text.UTF8Encoding]::UTF8.GetBytes($text)
            break
        }
    }
    [Convert]::ToBase64String($bytes).Replace('+', '-').Replace('/', '_').Split("=")[0]
}

function ConvertTo-ByteArray {
    param (
        [string]$Base64UrlEncodedData
    )
    $Base64EncodedString = ConvertTo-Base64EncodedString -Base64UrlEncodedData $Base64UrlEncodedData
    return [Convert]::FromBase64String($Base64EncodedString)
}

function ConvertTo-Base64EncodedString {
    param (
        [string]$Base64UrlEncodedData
    )
    $Base64EncodedString = $Base64UrlEncodedData.Replace('-', '+').Replace('_', '/')
    switch ($Base64EncodedString.Length % 4) {
        0 { break; }
        2 { $Base64EncodedString += '=='; break; }
        3 { $Base64EncodedString += '='; break; }
    }
    return $Base64EncodedString
}
With these functions loaded into memory, we can proceed. Similar to the AAD model example, we’ll use the same policy, but now we must set the PolicyFormat parameter to JWT instead of Text.
$policyFormat = "JWT" # 👈 This has changed! The policy format can be either Text or JSON Web Token (JWT).
$teeType = "OpenEnclave" # Four types of environment are supported: SgxEnclave, OpenEnclave, CyResComponent and VBSEnclave.
$policy = @"
version= 1.1;

configurationrules
{
    => issueproperty(type="x-ms-sgx-tcbidentifier", value="10");
};
authorizationrules{
    => permit();
};

issuancerules
{
    c:[type=="x-ms-sgx-is-debuggable"] => issue(type="is-debuggable", value=c.value);
    c:[type=="x-ms-sgx-mrsigner"] => issue(type="sgx-mrsigner", value=c.value);
    c:[type=="x-ms-sgx-mrenclave"] => issue(type="sgx-mrenclave", value=c.value);
    c:[type=="x-ms-sgx-product-id"] => issue(type="product-id", value=c.value);
    c:[type=="x-ms-sgx-svn"] => issue(type="svn", value=c.value);
    c:[type=="x-ms-attestation-type"] => issue(type="tee", value=c.value);
    c:[type=="x-ms-attestation-type"] => issue(type="tee", value=c.value);
};
"@
A signed JWT consists of not two, but three parts: a header, payload, and signature. Each of these segments is separated by dots. Our goal is to replicate this structure:
eyJ<something>.eyJ<something>.<signature>
Let’s start by creating the JWS header and JWS payload strings. By using the -Compress flag with the ConvertTo-Json cmdlet, you will minify the JSON strings.
$jwsHeader = [ordered]@{
    alg = "RS256"
    x5c = @($certData)
} | ConvertTo-Json -Compress

$jwsPayload = [ordered]@{
    AttestationPolicy = ConvertTo-Base64UrlEncodedString -Text $policy
} | ConvertTo-Json -Compress
Next, we Base64URL-encode the header and the payload and concatenate them into one string. Afterwards, we generate a SHA256 hash of this string, which requires the concatenated result as a byte array.
$JwsResult = "{0}.{1}" -f (ConvertTo-Base64UrlEncodedString -Text $jwsHeader), (ConvertTo-Base64UrlEncodedString -Text $jwsPayload)
$JwsResultAsByteArr = [System.Text.UTF8Encoding]::UTF8.GetBytes($JwsResult)
$hash = [System.Security.Cryptography.SHA256]::Create().ComputeHash($JwsResultAsByteArr)
Now we must cryptographically sign our hash with our private key. The hash alone is insufficient to guarantee that the message came from us; signing it with the private key ensures that MAA can verify its origin using the public key. (Of course, unless someone steals your private key, which is a separate security concern.) The public key can be freely shared and used to verify that the signature was generated by the owner of the private key.
$hashAlgorithm = [System.Security.Cryptography.HashAlgorithmName]::SHA256;
$padding = [System.Security.Cryptography.RSASignaturePadding]::Pkcs1
$signedResult = $rsa.SignHash($hash, $hashAlgorithm, $padding)
Once these steps are completed, we concatenate the result to obtain our three-part JWT.
$signedResultb64url = ConvertTo-Base64UrlEncodedString -Bytes $signedResult
$JwsResult += ".{0}" -f $signedResultb64url
As an optional step, you can use the following commands to verify that everything proceeded correctly.
$jwsSignatureBytes = ConvertTo-ByteArray -Base64UrlEncodedData $signedResultb64url
$rsa.VerifyHash($hash, $jwsSignatureBytes, $hashAlgorithm, $padding)
# True
With these actions completed, we can deploy the policy, and MAA will verify, using the signer certificate created during the deployment step, that the hash was indeed created using our private key.
Set-AzAttestationPolicy -Name $attestationProviderName `
    -ResourceGroupName $attestationResourceGroup `
    -PolicyFormat $policyFormat `
    -Tee $teeType `
    -Policy $JwsResult
That should have worked!
Potential Mistakes
If not executed correctly, you may encounter the following error messages:
Set-AzAttestationPolicy: Operation returned HTTP Status Code 400
 Code: InvalidOperation
 Message: Attestation Enclave operation failed with 104: Exception(0) 83FF0068 Bad message
     Msg:[The signature of the JWT being parsed indicates that it has been tampered with.]

 Unhandled Enclave Exception: "Bad message"
In the event of deploying an unsigned policy to this isolated instance, MAA will prompt you with this error message:
Set-AzAttestationPolicy: Operation returned HTTP Status Code 400
 Code: InvalidOperation
 Message: Attestation Enclave operation failed with 104: Exception(0) 83FF0068 Bad message
 Msg:[Unsigned JWS specified but enclave is configured with signing certificates.]

 Unhandled Enclave Exception: "Bad message"
DIY-Attestation
You can build your own attestation mechanisms with components in Azure. Building your own attestation processes may require the use of Trusted Hardware Identity Management (THIM).
📖 From the docs: “The Trusted Hardware Identity Management service handles cache management of certificates for all trusted execution environments (TEEs) that reside in Azure. It also provides trusted computing base (TCB) information to enforce a minimum baseline for attestation solutions.”
Building your own attestation process is not for the faint of heart, but it might help you meet regulatory and compliance requirements when doing so. You will have full control over the attestation processes and you can create your own integrations with other computing technologies.
Conclusion
I’ve long awaited the opportunity to share this blog post. While various Trusted Execution Environments employ specific mechanisms for local and remote attestation, I chose to write a post that focused on the Remote ATtestation ProcedureS Architecture (RATS) and Microsoft Azure Attestation (MAA).
However, we’ve only scratched the surface of what the Microsoft Azure Attestation service can offer. For instance, we’ve yet to delve into the syntax employed to write the attestation (appraisal) policies. In fact, exploring this aspect in-depth could easily become a dedicated blog post on its own! 😁
Remote attestation isn’t just a theoretical concept; it’s a practical solution that is a foundational component of (Azure) Confidential Computing. I hope that, with these newfound insights, you’re now better equipped to navigate the world of remote attestation and (Azure) Confidential Computing.
Happy attesting! 🎫
Related posts
- Azure Confidential Computing: Confidential Temp Disk Encryption
- Azure Confidential Computing: Secure Key Release - Part 2
- Azure Confidential Computing: Azure RBAC for Secure Key Release
- Azure Confidential Computing: Verifying Microsoft Azure Attestation JWT tokens
- Azure Confidential Inferencing with Oblivious HTTP
- Making Sense of AI
- Azure Confidential Computing: Confidential GPUs and AI
- Windows Containers: Azure Pipeline Agents with Entra Workload ID in Azure Kubernetes Service
- Register Azure Pipeline Agents using Entra Workload ID on Azure Kubernetes Service
- Azure Confidential Computing: CoCo - Confidential Containers
- Azure Confidential Computing: Secure Key Release
- Azure Confidential Computing: Confidential VMs
- Azure Confidential Computing: IaaS
- Azure Confidential Computing
- Key Vault for Azure virtual machines extension