Register Azure Pipeline Agents using Entra Workload ID on Azure Kubernetes Service
In this post
I’ve been working with Azure DevOps for quite some time now, tracing back to when it was known as Visual Studio Team Foundation Server and Visual Studio Team Services. Over the years, I’ve developed a strong familiarity with it. When Microsoft acquired GitHub and started investing heavily in it, my colleague Micha Wets and I decided to examine both platforms closely. We even put together a session for PowerShell Summit to share our insights. Since then, both products have seen significant new features.
Many enterprises I work with rely on Azure DevOps as their primary “DevOps” tool. It’s easy to understand why, Azure DevOps excels in many areas and integrates seamlessly with existing setups. While it’s true that similar outcomes can be achieved with GitHub, it often requires more effort, especially if teams are accustomed to a Microsoft/Windows-focused environment.
Until recently the only practical way to connect self-hosted Azure Pipelines Agents was through a “personal access token” (PAT). However, I came across this announcement which introduced the ability to connect to Azure DevOps APIs using service principals or managed identities. Here’s an excerpt from that particular announcement:
“Service Principals can be set up in Azure DevOps and granted permissions to specific assets (projects, repos, pipelines), just like regular users. This allows applications that use Managed Identities or Service Principals to connect to Azure DevOps and perform actions on their own behalf, rather than on behalf of a user, as PATs do.”
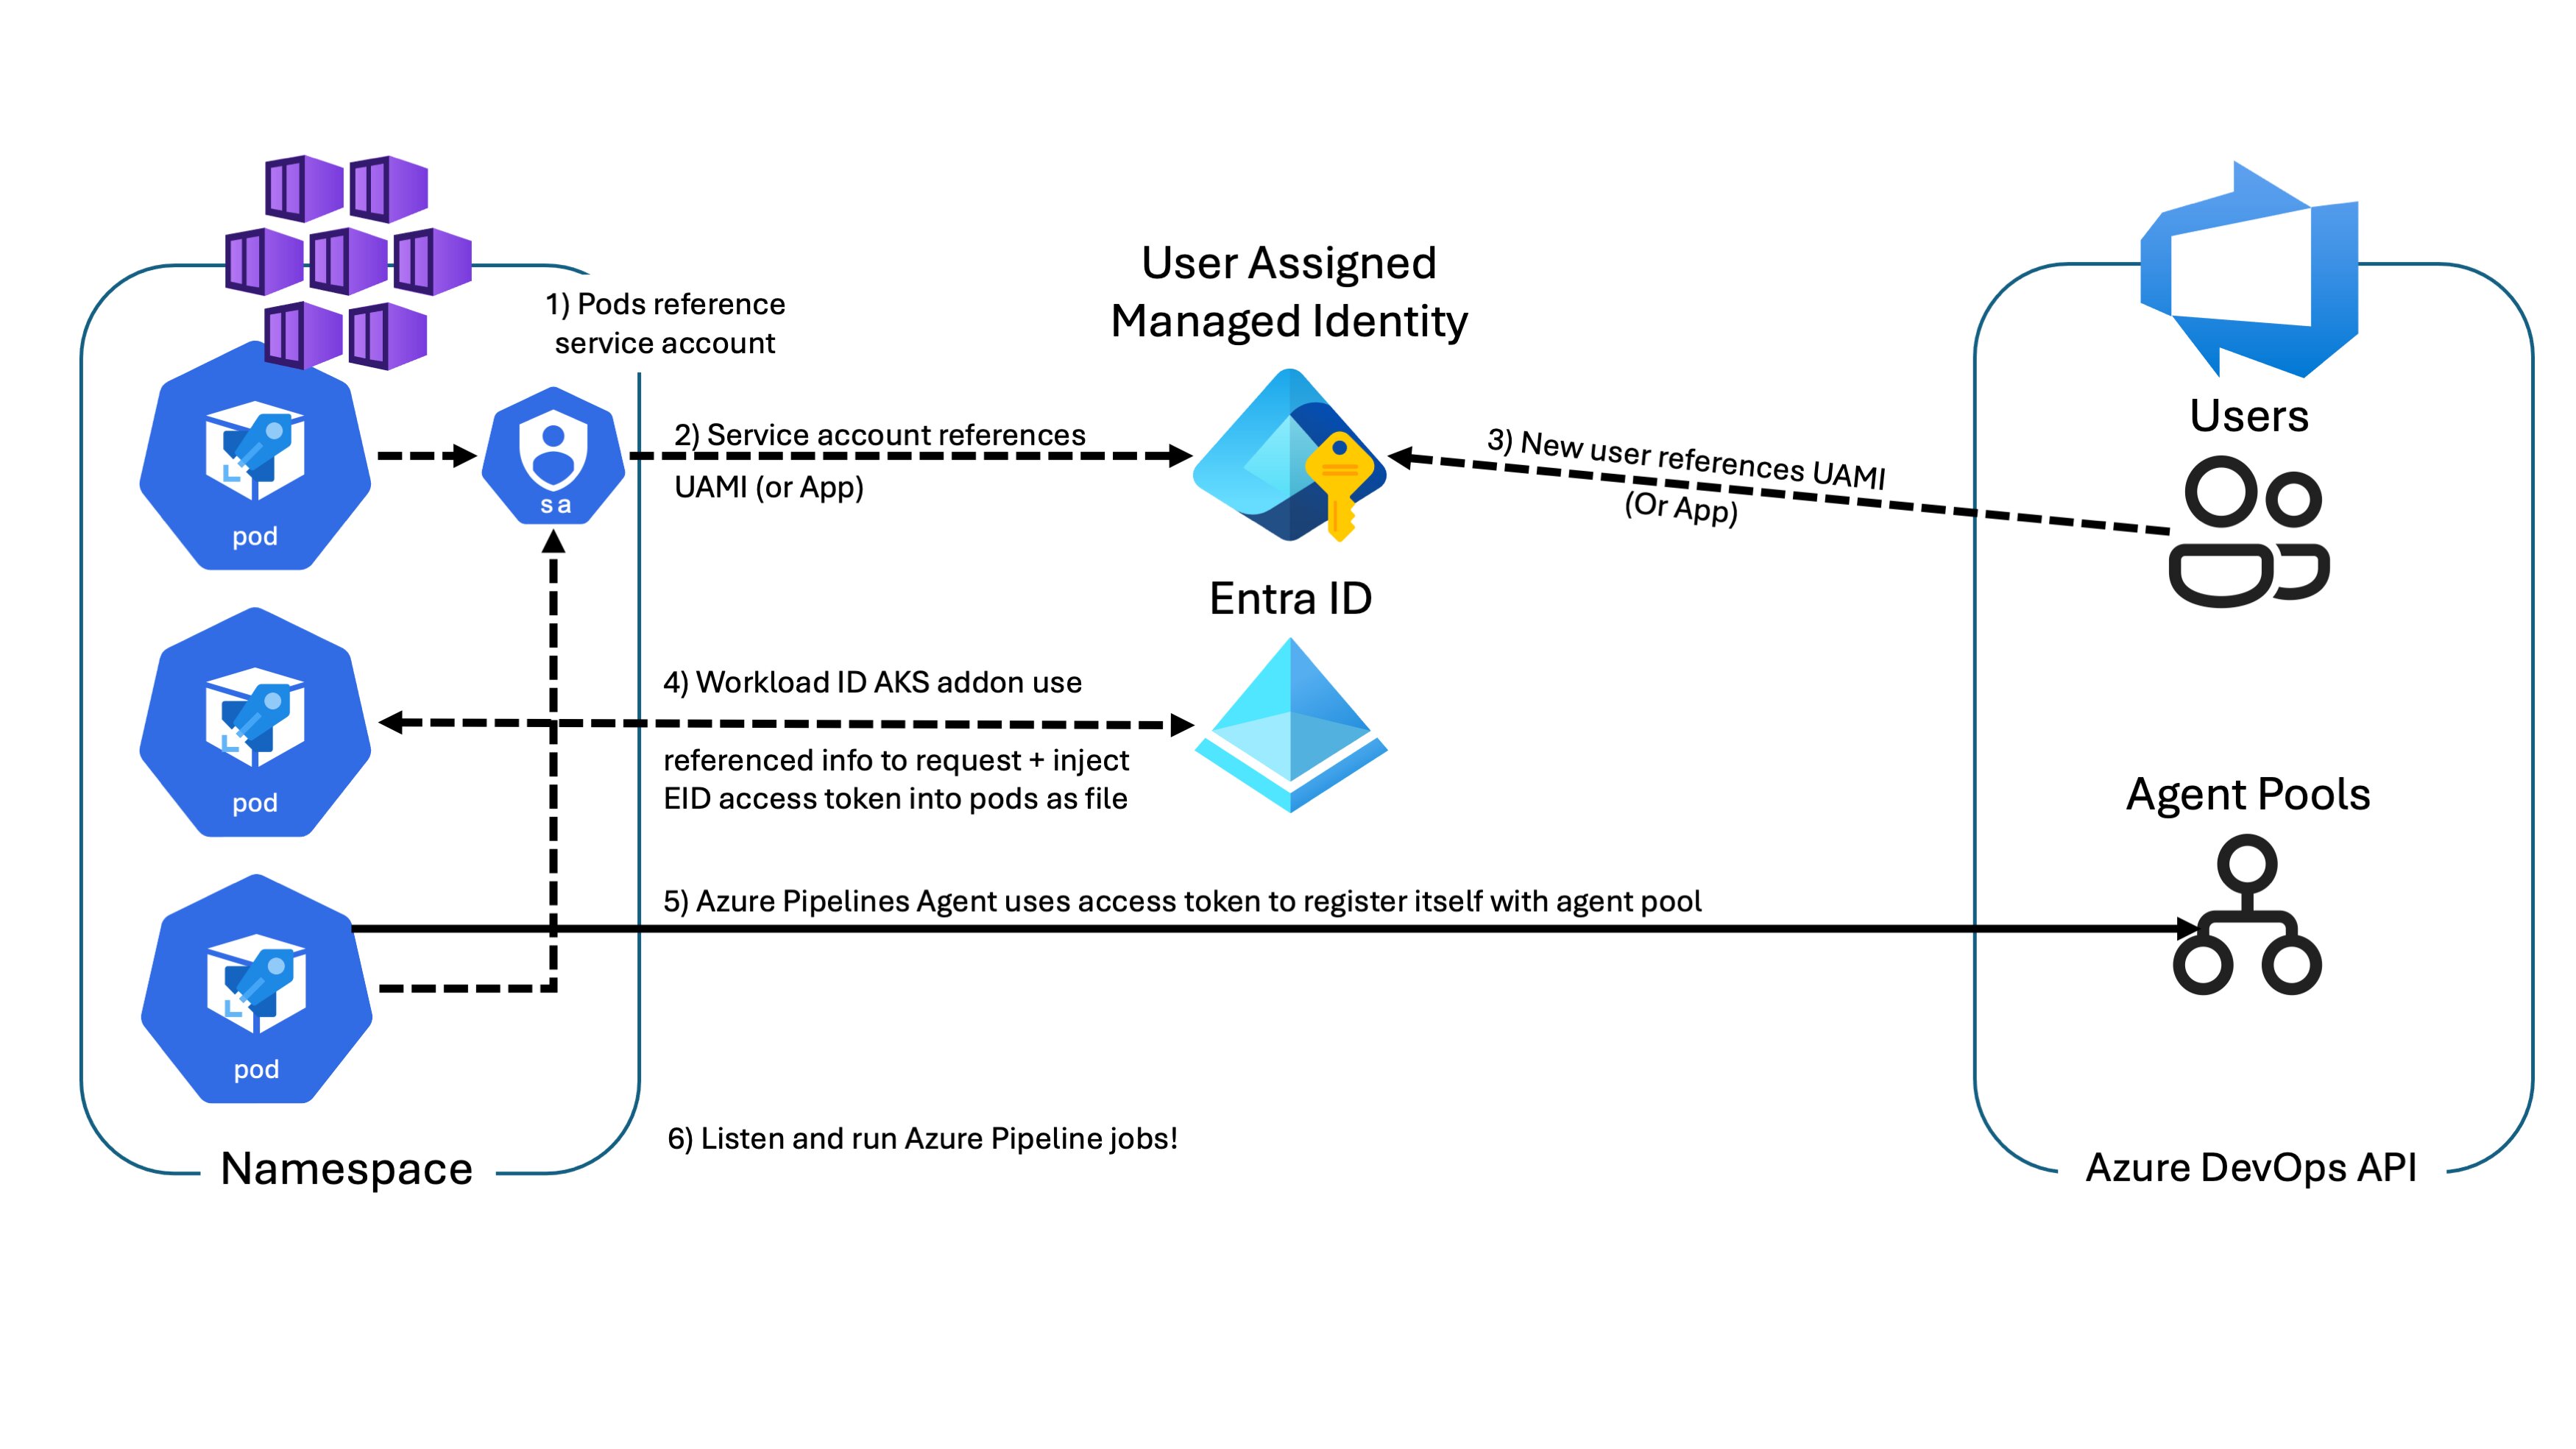
I figured I’d try to host the Azure Pipelines Agent for Linux in a pod on Azure Kubernetes Service (AKS) and use the new Entra Workload ID feature to obtain an access token for the Azure DevOps API. With the correct configuration, it should be possible to register the containerized agent to a specific agent pool in Azure DevOps and use it to run pipelines.
Refresher on Azure Pipelines
To build or deploy your software using Azure Pipelines, you need at least one agent. As your codebase and team grow, you’ll require even more agents. An agent is registered with a single pool, and when you create a pipeline, you specify the pool it will run in. The pipeline runs on an agent from that pool that meets its demands. In Azure Pipelines, pools are scoped to the entire organization, allowing agent machines to be shared across projects.
Early in your Azure DevOps journey, you need to decide between two types of build agents for your pipelines:
- Microsoft-hosted agents
- Self-hosted agents
If you’re using Azure Pipelines (YAML pipelines), Microsoft-hosted agents are the more convenient option. With these agents, maintenance and upgrades are handled for you, and you always get the latest version of the VM image specified in your pipeline. The VM is discarded after one job, so any changes made to the file system, such as checking out code, won’t persist to the next job. Microsoft-hosted agents can run jobs directly on the VM or in a container.
The Azure Pipelines agent itself is a .NET application, and its source code is available on GitHub.
Reasons for Self-hosting Pipeline Agents
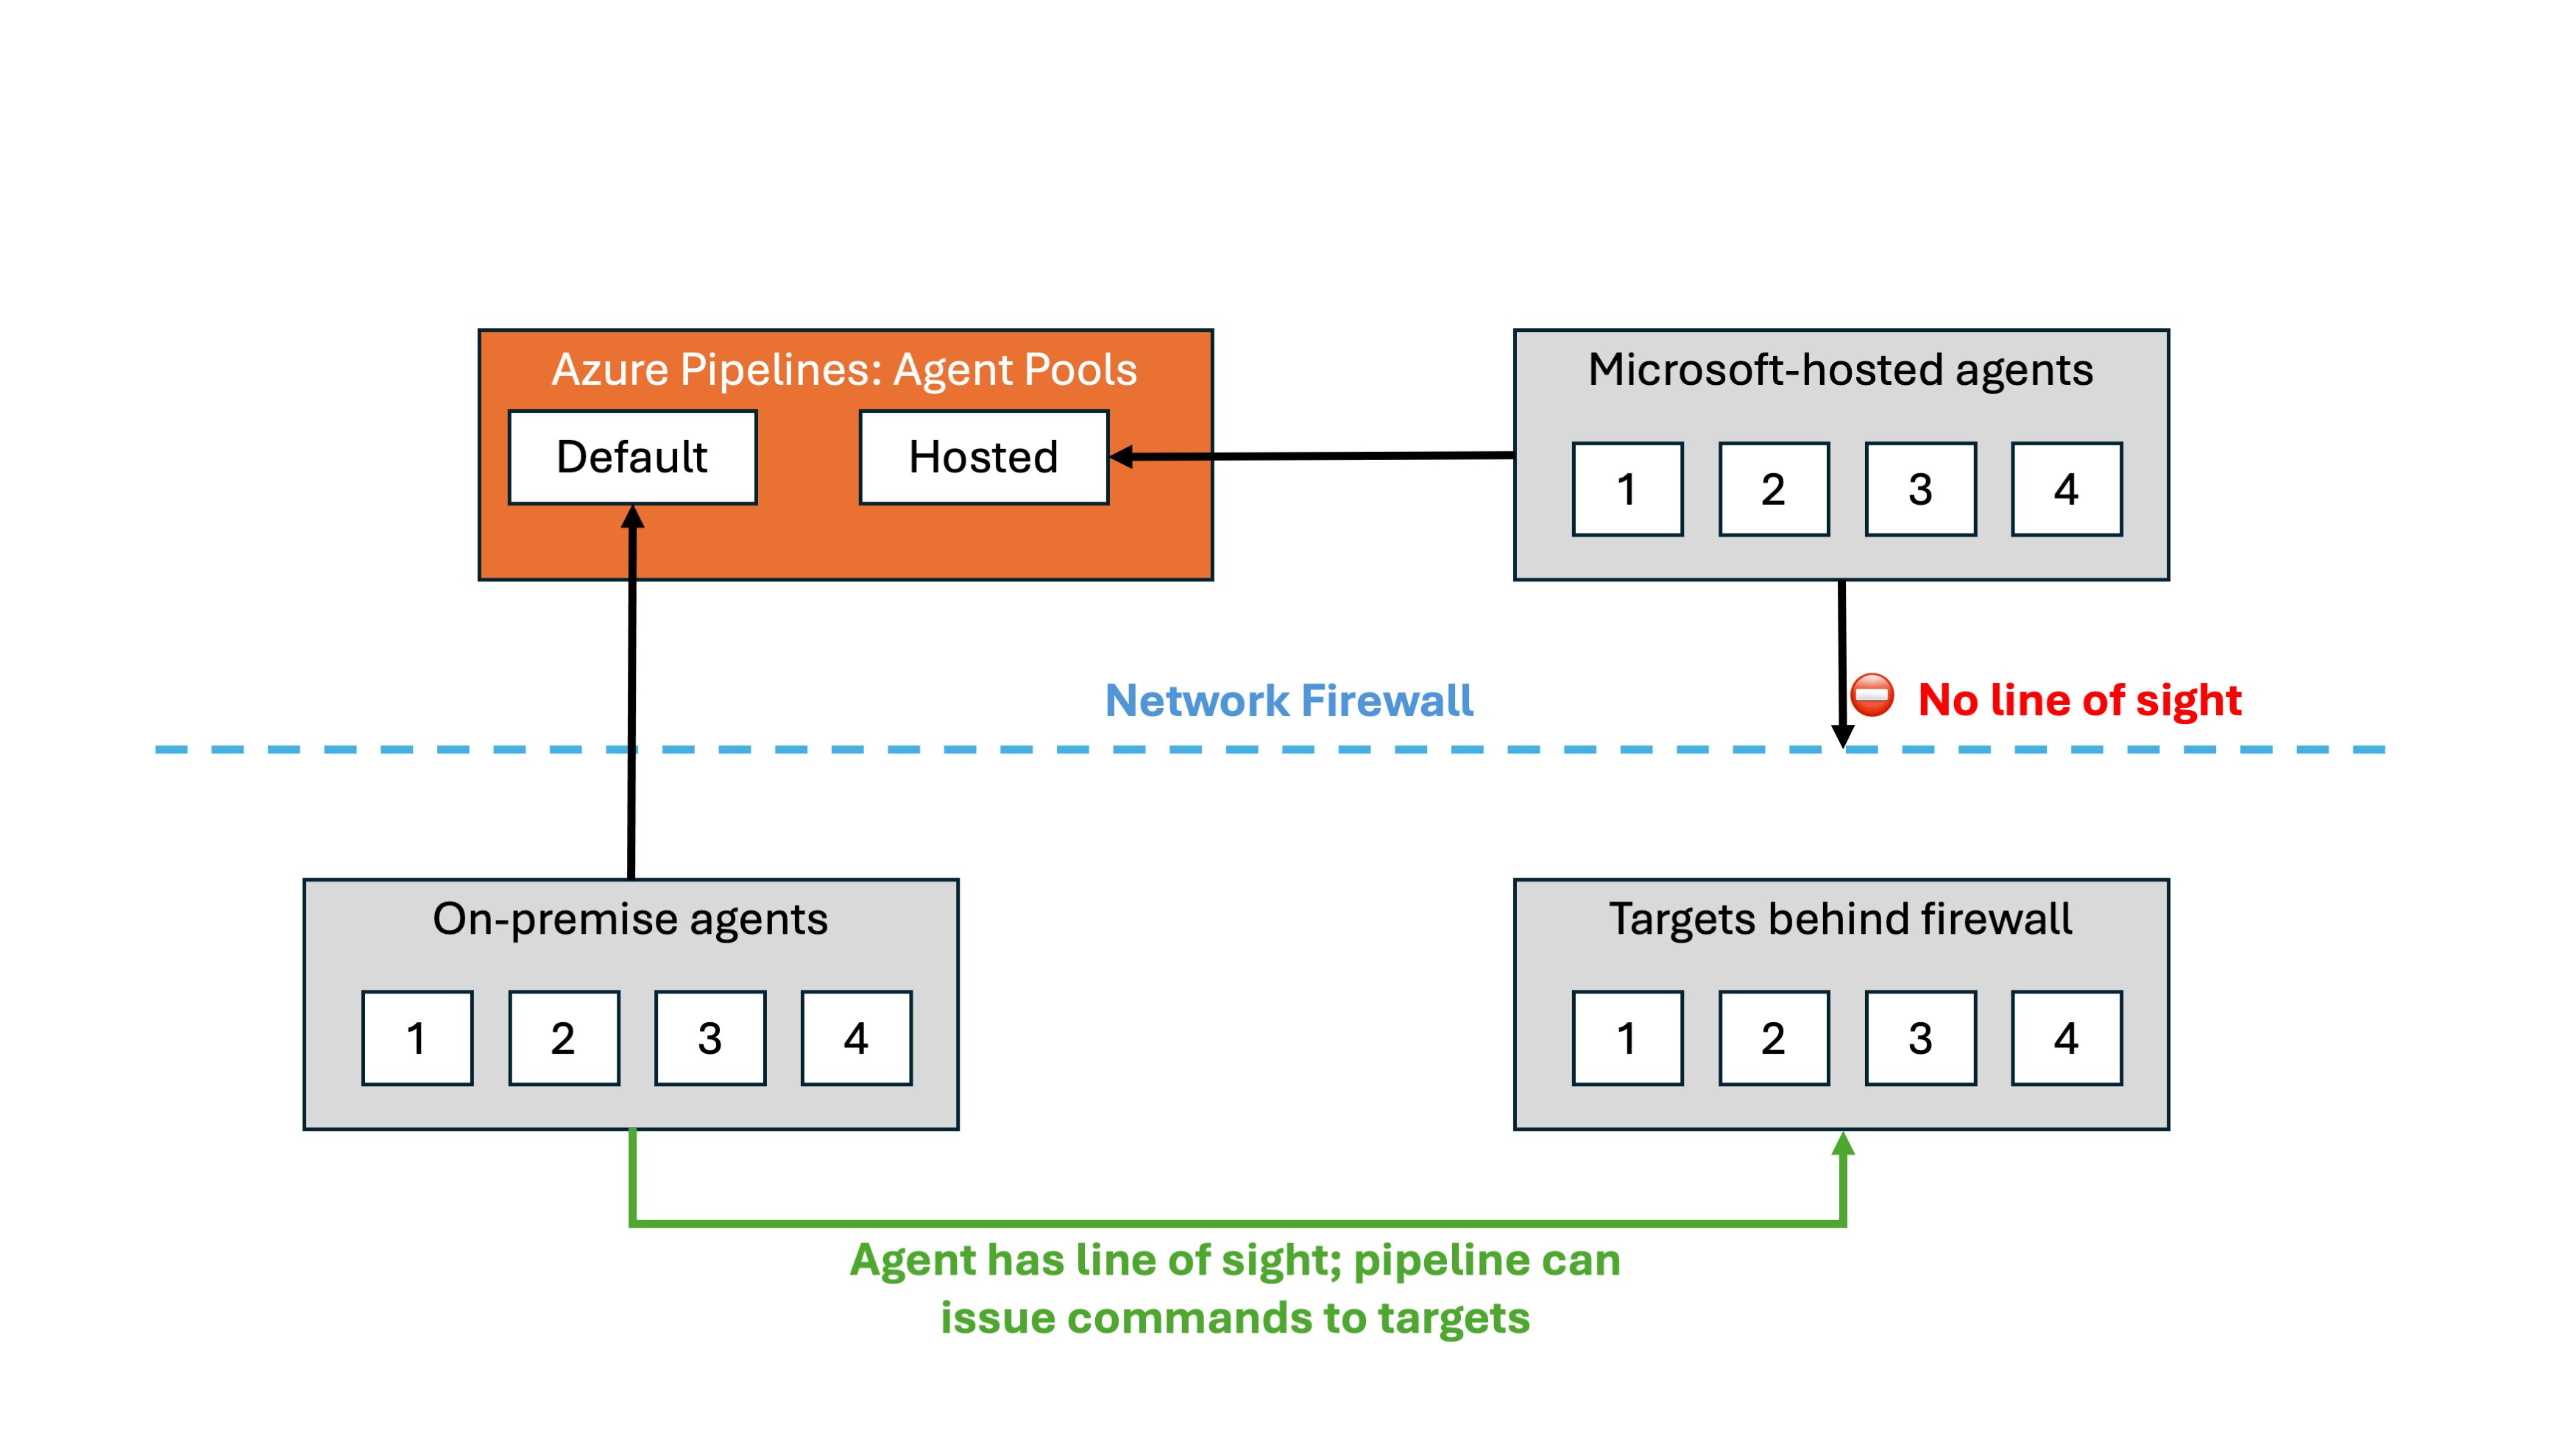
Microsoft-hosted agents are ideal when you’re confident that the agent can access the target from a networking perspective or if you need to run a specific pipeline in a sandboxed environment. For example, let’s say you have a publicly available Azure Functions app, you should be able to deploy your application binary directly to it. However, since Microsoft-hosted agents are managed by Microsoft and operate in a separate network, you may need to take additional steps to ensure they can reach resources on your internal network. It’s crucial to be cautious with this approach, as opening your firewall to a region-wide IP exposes your network setup to potential probing by any Azure DevOps users in that region. This is typically a no-go for large enterprises, with good reason.
💡 It’s worth noting that network considerations aren’t the only reasons to opt for a self-hosted agent. Sometimes, you might need a machine with a GPU available during pipeline runs.
Many enterprises choose self-hosted agents for their finer control over networking security and compliance requirements. Setting up self-hosted agents isn’t particularly difficult, and it offers better control over network traffic. However, this is also where many challenges can arise, often due to firewall settings getting in the way.
There are several options available for self-hosting Azure Pipelines:
- Azure Virtual Machine Scale Sets (VMSS)
- Only supports Linux and Windows agents.
- Only supported in Azure Public Cloud offerings, not National Cloud offerings.
- Any OS that runs Linux, Windows or macOS
- The agent can run on either ARM64 or x64 architectures.
- Alpine, and by extension MUSL libc, is also supported.
Using Azure Virtual Machine Scale Sets allows you to point to a specific scale set in your Azure tenant and assign it to an Azure DevOps agent pool. Since it’s a VMSS, you likely deployed it in a particular subnet on an Azure Virtual Network, allowing you to open firewall ports from the scale set subnet to various destinations.
A potential downside of this approach is the need to build and maintain a virtual machine image with all the necessary tools pre-installed. This requires creating a pipeline that outputs a new VM image periodically.
⚠️ Due to licensing concerns, images used for Microsoft-hosted agents are not available in the Azure Marketplace. However, you can build the images yourself Linux or Windows images and push them to an Azure Compute Gallery. These images contain various software toolsets (GitHub Actions Runner Images) and are built using Hashicorp’s Packer. If you know how to use Terraform and are familiar with Hashicorp Configuration Language, wrapping your head around Packer shouldn’t be too difficult.
Alternatively, you could choose a base image like Ubuntu2204 and execute startup scripts on the scale set agent machines before running each pipeline job. While a prebuilt image may offer faster startup times, storing multiple image versions may incur additional costs. On the other hand, using startup scripts to pull in tools from a remote server upon VM startup might lead to throttling issues, unless you have a tools cache on an Azure File Share. Maintaining the File Share may also prove to be a challenge. You will have to identify and consider the tradeoffs carefully and think about how they align with your enterprise’s CI/CD usage.
Running Pipelines Agent Inside a Container?
Every now and then, I’m asked whether it’s possible to run the Azure Pipelines Agent in a container. The answer is “yes”, but it requires careful consideration and you must implement appropriate guardrails. Remember that containers share a kernel and can potentially impact other running processes.
For example, if you expose your host’s Docker socket to a containerized Azure Pipelines agent process and allow it to build container images (Docker-in-Docker scenario), and then execute docker rm -v -f $(docker ps -qa) in your build pipeline, you could inadvertently terminate all other running Docker containers on the host. Sure, it can be a funny prank to pull on your colleagues, but it will most likely wear off relatively quickly.
If you can you should try to keep things simple and on a small scale, this way you shouldn’t encounter many problems. If your budget allows it, consider using specialized container images per business department, which can help keep these images small, rootless, and containing only the necessary software for the pipeline to function. Combining this with a container image scanning solution provides an additional layer of security.
💡 “Can’t we simply build the Microsoft-hosted images as a container image? I love how convient they are!”
Yes, you can, but it’s more complex than it seems as you will need an init process (
systemd,tiny-init, etc..) to manage this type of container. There are other considerations, and this approach merits its own blog post. Running Azure Pipelines in a containerized environment can result in faster pipeline runtimes, but it may increase container image sizes, complexity, and overall management overhead. At some point, you may question whether it’s more efficient to spin up a new VM from a prebuilt image instead.
For now, let’s keep things straightforward and run the agent in a small container image containing only a subset of some of the more essential tools.
PAT or Workload Identity?
When self-hosting Azure Pipeline agents without using Virtual Machine Scale Sets, you typically need to store a PAT securely. While running the setup script interactively is feasible for onboarding a few machines, in larger environments, it’s common to utilize a secrets vault like Azure Key Vault to store and fetch the PAT automatically. Authentication against Azure Key Vault usually involves using a managed identity or another mechanism. This approach is widely used and can be quite robust, if you ensure you have the proper role based access control active. However, this approach carries inherent risks. If the secret leaks, it can lead to significant trouble. Moreover, you’re responsible for rotating the PAT when necessary.
💡 Version 2 of the Azure Pipelines agent “uses the PAT token only during the initial configuration of the agent; if the PAT expires or needs to be renewed, no further changes are required by the agent.” I could not find a similar statement for version 3. See the docs for the v2 agent
Fortunately, Azure DevOps now supports authentication through service principals and managed identities. I decided to explore hosting the Azure Pipelines Agent for Linux in a pod on Azure Kubernetes Service and leveraging the Entra Workload Identity feature. This approach enables obtaining an Entra ID access token for the Azure DevOps API without the need to manage secrets. With access to the API, it becomes feasible to register the containerized agent to a specific agent pool in Azure DevOps and utilize it to run an Azure DevOps Pipeline.
For Azure Pipeline agents running inside Kubernetes Pods, it would be ideal if we could avoid using personal access tokens to register agents with the Azure DevOps agent pool. This is where workload identity can help!
What is Workload Identity?
If you’ve worked with Azure before, you might be familiar with managed identities—the recommended way to authenticate as an Azure resource (such as an Azure VM, VMSS, App Service, Function App, etc.) against Entra ID to obtain an access token for Entra ID protected resources. While they offer great security benefits, they come with some trade-offs. Managed identities limit you to executing scripts only when connected to the Azure-hosted virtual machine, scale set, function app, etc. Alternatively, you can use a service principal (aka app registration) to obtain access tokens for Entra-protected resources, but this involves storing the client ID and secret/certificate, which can be error-prone and risky from a security standpoint.
This is where workload identity federation comes into play. It lets you use user-assigned identities or Applications to authenticate software workloads to Entra ID, even when they’re running outside of Azure, without the need to manage secrets.
Entra ID Workload ID Premium allows you to apply conditional access policies and continuous access evaluation to workload identities. This helps you detect and remediate compromised workload identities effectively. Given the ever-increasing security requirements and global regulations, it shouldn’t be a surprise that adopting this solution will be a straightforward decision for most enterprises.
📖 If you want to learn more about how workload identity works behind the scenes, feel free to check out my blog post “SPIFFE and Entra Workload Identity Federation”.
The process involves configuring a trust relationship between your user-assigned managed identity or app registration in Microsoft Entra ID and the external IdP of the platform you wish to trust. Tokens issued by that platform can then be used to authenticate with the Microsoft identity platform and call APIs in the Microsoft ecosystem.
Considerations and gotchas
However, there are a few gotchas related to Workload ID that you should be aware of:
- A maximum of 20 federated identity credentials can be added to an application or user-assigned managed identity.
- It’s worth noting that there is a discussion underway about relaxing these restrictions.
- It takes a few seconds for the federated identity credential to be propagated after being initially added.
- Virtual nodes add-on, based on the open-source project Virtual Kubelet, isn’t supported.
- Creation of federated identity credentials is not supported on user-assigned managed identities in some regions.
- Microsoft identity platform stores only the first 100 signing keys when they’re downloaded from the external IdP’s OIDC endpoint.
Make sure you have a look at the full list of considerations.
Entra Workload ID for Azure Kubernetes Service
In order for us to use Workload Identity federation for apps running in Kubernetes we would have to build quite a bit of logic to get this all to work nicely, but fortunately a team over at Microsoft has already done the work for us.
It’s important to note the distinction between Microsoft Entra Workload ID and the deprecated Microsoft Entra pod-managed identity. Despite their similar names, they operate differently. The former requires only a few labels and annotations, while the latter involves installing custom resource definitions.
Microsoft Entra Workload ID (Azure AD Workload Identity) for AKS is an open-source project compatible with any Kubernetes cluster, whether hosted in Azure or elsewhere. It works for both Linux and Windows workloads. Simply configure a trust relationship between your user-assigned managed identity or service principal (app registration) in Microsoft Entra ID and the Kubernetes cluster.
Here’s how that works: The Kubernetes cluster serves as a token issuer, while Entra ID leverages OpenID Connect (OIDC) to discover public signing keys and verify the authenticity of the Kubernetes service account token. Subsequently, it exchanges the token for an EID (AAD) token. Your app can then use the Entra ID token to access Azure cloud resources via Azure Identity SDKs or the Microsoft Authentication Library (MSAL).
Microsoft Entra Workload ID for AKS, uses Service Account Token Volume Projection, to enable pods to use a Kubernetes identity. A Kubernetes token is issued and OIDC federation enables Kubernetes applications to access Azure resources securely with Microsoft Entra ID, based on annotated service accounts.
For self-managed clusters, an administrator must manually publish the cluster’s service account issuer URL, adhering to the OpenID specification. For those using a managed Kubernetes solution, like Azure Kubernetes Service, this is now built-in to the AKS experience as it can be enabled using a feature flag for new and existing clusters, once activated you will not be able to revert your decision.
⚠️ Workload identity unfortunately does not work in completely disconnected environments. The Entra ID token is valid for 24 hours, so the workload needs to be connected to the network at least once every 24 hours to refresh the token.
Register Azure Pipelines agent pod with Azure DevOps Agent pool
Let’s walk through the process step by step; at the end we should be able to kick off Azure Pipeline and have them run on AKS, all while we’re taking advantage of Entra Workload Identity Federation.
💡 You can replace these steps with your IAC tool of choice.
We begin by defining a few variables, nothing too complicated.
export SUBSCRIPTION="$(az account show --query id --output tsv)"
export RESOURCE_GROUP="myResourceGroup"
export LOCATION="eastus"
export AKS_CLUSTER_NAME="myAKSCluster"

az group create --name "${RESOURCE_GROUP}" --location "${LOCATION}"
Workload ID enabled Kubernetes cluster
For this demonstration, I’m going to go with a Standard_D2_v5 node. Adjust the specifications according to your budgetary constraints and workload requirements. Microsoft-hosted agents on Azure use VMs with a 2-core CPU, 7 GB of RAM, and 14 GB of SSD disk space. Consider this when sizing your nodes and building your Kubernetes Pod specs or Helm charts.
--enable-workload-identity: Enables Microsoft Entra Workload ID, allowing pods to use a Kubernetes identity.--enable-oidc-issuer: Enables the OIDC Issuer which allows Microsoft Entra ID (or other cloud provider identity platforms) to discover the API server’s public signing keys.
export AKS_VERSION="$(az aks get-versions --location $LOCATION -o tsv --query "values[0].version")"

az aks get-versions --location $LOCATION -o table
# KubernetesVersion    Upgrades
# -------------------  ----------------------
# 1.29.4               None available
# 1.29.2               1.29.4
# 1.28.9               1.29.2, 1.29.4
# 1.28.5               1.28.9, 1.29.2, 1.29.4
# 1.27.9               1.28.5, 1.28.9
# 1.27.7               1.27.9, 1.28.5, 1.28.9

az aks create --resource-group "${RESOURCE_GROUP}" \
              --name "${AKS_CLUSTER_NAME}" \
              --kubernetes-version "${AKS_VERSION}" \
               --os-sku Ubuntu \
               --node-vm-size Standard_D4_v5 \
               --node-count 1 \
               --enable-oidc-issuer \
               --enable-workload-identity \
               --generate-ssh-keys
Enabling OIDC Issuer on your AKS cluster allows platforms like Microsoft Entra ID to discover the API server’s public signing keys. These keys are automatically rotated by “the service” periodically.
💡 If you need to rotate the key immediately, manual rotation is possible. The tokens issued by the OIDC provider have a maximum lifetime of one day. Run the az aks oidc-issuer command.
Next, we must establish a trust relationship between a user-assigned managed identity in Microsoft Entra ID and a Kubernetes workload. Alternatively, you could also use an Entra ID Application and configure the workload identity federation extension this way.
export USER_ASSIGNED_IDENTITY_NAME="myIdentity"

az identity create --resource-group "${RESOURCE_GROUP}" \
  --name "${USER_ASSIGNED_IDENTITY_NAME}" \
  --location "${LOCATION}" \
  --subscription "${SUBSCRIPTION}"

export USER_ASSIGNED_CLIENT_ID="$(az identity show --resource-group "${RESOURCE_GROUP}" --name "${USER_ASSIGNED_IDENTITY_NAME}" --query 'clientId' -o tsv)"
Microsoft Entra Workload ID supports the following mappings related to a service account:
- One-to-one, where a service account references a Microsoft Entra object.
- Many-to-one, where multiple service accounts reference the same Microsoft Entra object.
- One-to-many, where a service account references multiple Microsoft Entra objects by changing the client ID annotation.
The azure.workload.identity/client-id annotation in your service account represents the default identity’s client ID used by an Azure Identity library during authentication. If you’d like to use a different identity, specify the client ID when creating the Azure Identity library’s credential object.
export SERVICE_ACCOUNT_NAMESPACE="default"
export SERVICE_ACCOUNT_NAME="workload-identity-sa"

az aks get-credentials --name "${AKS_CLUSTER_NAME}" --resource-group "${RESOURCE_GROUP}"

cat <<EOF | kubectl apply -f -
apiVersion: v1
kind: ServiceAccount
metadata:
  annotations:
    azure.workload.identity/client-id: "${USER_ASSIGNED_CLIENT_ID}"
  name: "${SERVICE_ACCOUNT_NAME}"
  namespace: "${SERVICE_ACCOUNT_NAMESPACE}"
EOF
Now we set up the federated credential sub-resource in Azure and link it to the user-assigned managed identity or Application. The combination of issuer and subject, which must be unique among the 20 federated credentials linked to the UAMI or Application. The subject also combines specific values, which must match the Kubernetes service account setup. To access Entra ID, we’ll use api://AzureADTokenExchange as the value for our audience.
export FEDERATED_IDENTITY_CREDENTIAL_NAME="myFedIdentity"
export AKS_OIDC_ISSUER="$(az aks show --name "${AKS_CLUSTER_NAME}" --resource-group "${RESOURCE_GROUP}" --query "oidcIssuerProfile.issuerUrl" -o tsv)"

az identity federated-credential create --name ${FEDERATED_IDENTITY_CREDENTIAL_NAME} \
  --identity-name "${USER_ASSIGNED_IDENTITY_NAME}" \
  --resource-group "${RESOURCE_GROUP}" \
  --issuer "${AKS_OIDC_ISSUER}" \
  --subject system:serviceaccount:"${SERVICE_ACCOUNT_NAMESPACE}":"${SERVICE_ACCOUNT_NAME}" \
  --audience "api://AzureADTokenExchange"
We create a simple configmap called azdevops that we will inject into the container’s process as environment variables. If you’re going to assign multiple host pools to the same cluster you’re probably going to want to come up with a better naming convention than what I’m proposing.
export AZP_ORGANIZATION="DevOpsOrg"
export AZP_URL="https://dev.azure.com/${AZP_ORGANIZATION}"
export AZP_POOL="aks-linux-pool"

kubectl create configmap azdevops \
  --from-literal=AZP_URL="${AZP_URL}" \
  --from-literal=AZP_POOL="${AZP_POOL}"
And to round things off for now, we’ll also deploy an Azure Container Registry so we can host our container image.We’ll also make it so that our Kubelet identity is able to pull images out of the container registry.
export AKS_KUBELETIDENTITY_OBJECT_ID="$(az aks show --name "${AKS_CLUSTER_NAME}" --resource-group "${RESOURCE_GROUP}" --query "identityProfile.kubeletidentity.objectId" -o tsv)"
export ACR_NAME="mysweetregistry"

az acr create --name "${ACR_NAME}" --resource-group "${RESOURCE_GROUP}" --sku "Standard"
export ACR_RESOURCE_ID="$(az acr show --name "${ACR_NAME}" --query "id" -o tsv)"

az role assignment create --role "Acrpull" \
--assignee-principal-type "ServicePrincipal" \
--assignee-object-id "${AKS_KUBELETIDENTITY_OBJECT_ID}" \
--scope "${ACR_RESOURCE_ID}"
Creating an ADO agent pool
Ensure your Kubernetes cluster is operational, and that the user-assigned managed identity is available. We’ll then assign the UAMI a basic Azure DevOps license by creating a “user entitlement”. While you can do this through the UI, we’ll use the CLI here. Let’s start by installing the CLI, which is an extension to the Azure cross-platform CLI, az.
az extension add --name azure-devops
az extension show --name azure-devops
Login in to Azure DevOps via the CLI extension can be done in several ways:
- Login with your Azure user credentials.
- Using
az login
- Using
- Login with your Azure DevOps user’s PAT.
- Using
az devops login --organization
- Using
🔥 The Azure DevOps extension does not currently support authenticating with Managed Identities.
az devops configure --defaults organization=${AZP_URL}
az login

# Alternatively
az devops login --organization ${AZP_URL}
Unfortunately, there are no commands in the az devops CLI tool to manipulate Azure DevOps user entitlements directly. However, similar to using az rest, you can invoke REST API commands for Azure DevOps from within your CLI session using az devops invoke. This is particularly useful if the commands are not available. That being said..I have to mention that even with this command, I still bumped into one issue that blocked my progress because of a bug in the code.
To determine the correct area and route for invoking the REST API docs, we can explore the available options using the Azure DevOps CLI. Here’s how:
az devops invoke -o table
# Area                          MaxVersion    MinVersion    ReleasedVersion    ResourceName                   ResourceVersion    RouteTemplate
# ----------------------------  ------------  ------------  -----------------  -----------------------------  -----------------  -------------------------------------
# acs                           7.2           0.0           7.1                WRAPv0.9                       1                  {resource}
# ...
# ...
# MemberEntitlementManagement   7.2           7.1           0.0                ServicePrincipalEntitlements   1                  _apis/{resource}/{servicePrincipalId}
# ...
# ...
This command provides an overview of all available options, including the area, route, and other relevant information. Once we identify the appropriate area and route for our API call, we can proceed with constructing the REST API request accordingly and create the user entitlement for our Service Principal.
export USER_ASSIGNED_OBJECT_ID="$(az identity show --resource-group "${RESOURCE_GROUP}" --name "${USER_ASSIGNED_IDENTITY_NAME}" --query 'principalId' -o tsv)"

cat << EOF > serviceprincipalentitlements.json
{
    "accessLevel": {
        "accountLicenseType": "express"
    },
    "projectEntitlements": [],
    "servicePrincipal": {
        "displayName": "${USER_ASSIGNED_IDENTITY_NAME}",
        "originId": "${USER_ASSIGNED_OBJECT_ID}",
        "origin": "aad",
        "subjectKind": "servicePrincipal"
    }
}
EOF

export ADO_USER_ID="$(az devops invoke \
     --http-method POST \
     --organization "${AZP_URL}" \
     --area MemberEntitlementManagement \
     --resource ServicePrincipalEntitlements\
     --api-version 7.2-preview \
     --in-file serviceprincipalentitlements.json \
     --query "operationResult.result.id" \
     --output tsv)"
The autoProvision setting ensures that all projects have access to this agent pool.
⚠️ The “recommendations to secure shared infrastructure in Azure Pipelines” docs page states that Microsoft recommends having separate agent pools for each project.
cat << EOF > pool.json
{
    "name": "${AZP_POOL}",
    "autoProvision": true
}
EOF

export AZP_AGENT_POOL_ID="$(az devops invoke \
     --http-method POST \
     --organization "${AZP_URL}" \
     --area distributedtask \
     --resource pools \
     --api-version 7.1 \
     --in-file pool.json \
     --query "id" \
     --output tsv)"
The result for this is a JSON response, look like this:
{
  "agentCloudId": null,
  "autoProvision": true,
  "autoSize": true,
  "autoUpdate": true,
  "continuation_token": null,
  "createdBy": {},
  "createdOn": "2024-05-28T11:42:22.387Z",
  "id": 255,
  "isHosted": false,
  "isLegacy": false,
  "name": "aks-linux-pool",
  "options": "none",
  "owner": {},
  "poolType": "automation",
  "properties": {},
  "scope": "00000000-1111-1111-0000-000000000000",
  "size": 0,
  "targetSize": null
}
We then assign the administrator role to the newly created ADO user. You can assign users to various security roles, such as Reader, Service Account, or Administrator. Each role has specific permissions and responsibilities within the organization or project.
Here’s a table that summarizes the available roles at organization or collection-level, and their descriptions:
| Role | Description |
|---|---|
| Reader | Can view the pool. Useful for monitoring build and deployment jobs in the pool. |
| Service Account | Can use the pool to create an agent in a project. |
| Administrator | Can un/register agents from the pool, manage membership, view and create pools. Can use the agent pool when creating an agent in a project. The user that created the pool is automatically added to this role. |
cat << EOF > roleassignments.json
[
    {
        "userId": "${ADO_USER_ID}",
        "roleName": "Administrator"
    }
]
EOF

az devops invoke \
     --http-method PUT \
     --organization "${AZP_URL}" \
     --area securityroles \
     --resource roleassignments \
     --route-parameters scopeId="distributedtask.agentpoolrole" resourceId="${AZP_AGENT_POOL_ID}" \
     --api-version 7.2-preview \
     --in-file roleassignments.json
It seems there’s a bug preventing the command from executing correctly when using this specific --area and --resource, but a workaround has been suggested here. For the time being, you can perform this action using the Azure DevOps REST API or via the web interface, in the newly created agent pool’s security settings.
PUT /{{AZP_ORGANIZATION}}/_apis/securityroles/scopes/distributedtask.agentpoolrole/roleassignments/resources/{{AZP_AGENT_POOL_ID}}?api-version=7.2-preview.1 HTTP/1.1
Host: dev.azure.com
Authorization: Basic username:PAT
Content-Type: application/json

[
    {
        "userId": "{{ADO_USER_ID}}",
        "roleName": "Administrator"
    }
]
The response you receive after adding a user to the security role contains:
{
  "continuation_token": null,
  "count": 1,
  "value": [
    {
      "access": "assigned",
      "accessDisplayName": "Assigned",
      "identity": {
        "displayName": "myIdentity",
        "id": "12345678-0000-0000-0000-000000000000",
        "uniqueName": "myIdentity"
      },
      "role": {
        "allowPermissions": 27,
        "denyPermissions": 0,
        "description": "Administrator can administer, manage, view and use agent pools.",
        "displayName": "Administrator",
        "identifier": "distributedtask.agentpoolrole.Administrator",
        "name": "Administrator",
        "scope": "distributedtask.agentpoolrole"
      }
    }
  ]
}
Container image with Azure Pipelines Agent
Fortunately the start.sh script that Microsoft provides as part of the documenation for setting up the pipeline agent inside a Docker container, does not need to be modified much. All we really need to do is read from a specific path and use the SVID token to get an access token from Entra ID, for the Azure DevOps API. When we do this, we simply have to follow the client credentials auth flow. The scope value should be set to 499b84ac-1321-427f-aa17-267ca6975798/.default, as this is the GUID that represents the Azure DevOps REST API.
The Entra Workload Identity extension’s webhook injects the following environment variables, which we will use to construct our HTTP post request to the Entra ID v2 token endpoint:
AZURE_CLIENT_IDwith the clientID set in the service account annotationAZURE_TENANT_IDwith the tenantID set in the service account annotation.- If not defined, then the
tenantIDprovided viaazure-wi-webhook-configfor the webhook will be used.
- If not defined, then the
AZURE_FEDERATED_TOKEN_FILEis the service account token pathAZURE_AUTHORITY_HOSTis the Entra ID authority hostname
The Mutating Admission Webhook projects a signed service account token to a predefined path (/var/run/secrets/azure/tokens/azure-identity-token) and injects authentication-related environment variables to our pods based on an annotated service account.
#!/bin/bash
set -e

if [ -z "${AZP_URL}" ]; then
  echo 1>&2 "error: missing AZP_URL environment variable"
  exit 1
fi

IDENTITY_TOKEN=$(cat $AZURE_FEDERATED_TOKEN_FILE)
TOKEN_RESPONSE=$(curl -s  --location --request GET "$AZURE_AUTHORITY_HOST/$AZURE_TENANT_ID/oauth2/v2.0/token" \
  --form 'grant_type="client_credentials"' \
  --form 'client_id="'$AZURE_CLIENT_ID'"' \
  --form 'scope="499b84ac-1321-427f-aa17-267ca6975798/.default"' \
  --form 'client_assertion_type="urn:ietf:params:oauth:client-assertion-type:jwt-bearer"' \
  --form 'client_assertion="'$IDENTITY_TOKEN'"' )
AZP_TOKEN=$(echo "$TOKEN_RESPONSE" | jq -r '.access_token')

if [ -z "${AZP_TOKEN_FILE}" ]; then
  if [ -z "${AZP_TOKEN}" ]; then
    echo 1>&2 "error: missing AZP_TOKEN environment variable"
    exit 1
  fi

  AZP_TOKEN_FILE="/azp/.token"
  echo -n "${AZP_TOKEN}" > "${AZP_TOKEN_FILE}"
fi

unset AZP_TOKEN

if [ -n "${AZP_WORK}" ]; then
  mkdir -p "${AZP_WORK}"
fi

cleanup() {
  trap "" EXIT

  if [ -e ./config.sh ]; then
    print_header "Cleanup. Removing Azure Pipelines agent..."

    # If the agent has some running jobs, the configuration removal process will fail.
    # So, give it some time to finish the job.
    while true; do
      ./config.sh remove --unattended --auth "PAT" --token $(cat "${AZP_TOKEN_FILE}") && break
      echo "Retrying in 30 seconds..."
      sleep 30
    done
  fi
}

print_header() {
  lightcyan="\033[1;36m"
  nocolor="\033[0m"
  echo -e "\n${lightcyan}$1${nocolor}\n"
}

# Let the agent ignore the token env variables
export VSO_AGENT_IGNORE="AZP_TOKEN,AZP_TOKEN_FILE"

print_header "1. Determining matching Azure Pipelines agent..."

AZP_AGENT_PACKAGES=$(curl -LsS \
    -u user:$(cat "${AZP_TOKEN_FILE}") \
    -H "Accept:application/json;" \
    "${AZP_URL}/_apis/distributedtask/packages/agent?platform=${TARGETARCH}&top=1")

AZP_AGENT_PACKAGE_LATEST_URL=$(echo "${AZP_AGENT_PACKAGES}" | jq -r ".value[0].downloadUrl")

if [ -z "${AZP_AGENT_PACKAGE_LATEST_URL}" -o "${AZP_AGENT_PACKAGE_LATEST_URL}" == "null" ]; then
  echo 1>&2 "error: could not determine a matching Azure Pipelines agent"
  echo 1>&2 "check that account "${AZP_URL}" is correct and the token is valid for that account"
  exit 1
fi

print_header "2. Downloading and extracting Azure Pipelines agent..."

curl -LsS "${AZP_AGENT_PACKAGE_LATEST_URL}" | tar -xz & wait $!

source ./env.sh

trap "cleanup; exit 0" EXIT
trap "cleanup; exit 130" INT
trap "cleanup; exit 143" TERM

print_header "3. Configuring Azure Pipelines agent..."

./config.sh --unattended \
  --agent "${AZP_AGENT_NAME:-$(hostname)}" \
  --url "${AZP_URL}" \
  --auth "PAT" \
  --token $(cat "${AZP_TOKEN_FILE}") \
  --pool "${AZP_POOL:-Default}" \
  --work "${AZP_WORK:-_work}" \
  --replace \
  --acceptTeeEula & wait $!

print_header "4. Running Azure Pipelines agent..."

chmod +x ./run.sh

# To be aware of TERM and INT signals call ./run.sh
# Running it with the --once flag at the end will shut down the agent after the build is executed
./run.sh "$@" & wait $!
The workflow described in the Azure DevOps documentation remains intact, so the Dockerfile remains unchanged… It goes without saying that you will ultimately want to change this container image definition to suit your specific requirements.
FROM ubuntu:22.04

RUN apt update -y && apt upgrade -y && apt install curl git jq libicu70 -y

# Also can be "linux-arm", "linux-arm64".
ENV TARGETARCH="linux-x64"

WORKDIR /azp/

COPY ./start.sh ./
RUN chmod +x ./start.sh

# Create agent user and set up home directory
RUN useradd -m -d /home/agent agent
RUN chown -R agent:agent /azp /home/agent

USER agent
# Another option is to run the agent as root.
# ENV AGENT_ALLOW_RUNASROOT="true"

ENTRYPOINT [ "./start.sh", "--once" ]
Build the container image using your preferred tool; here I use podman. Once the build is complete, push the image to your container registry.
az acr login -n $ACR_NAME
podman build --tag "${ACR_NAME}.azurecr.io/azdevopsagent:workloadidentity" --file Dockerfile .
podman push "${ACR_NAME}.azurecr.io/azdevopsagent:workloadidentity"
After you enable the feature for your AKS cluster, applications can begin using workload identity, it’s required to add the label azure.workload.identity/use: "true" to the pod spec. You should also reference the service account name, in this case serviceAccountName: workload-identity-sa.
As for pod limits, keep in mind that Microsoft-hosted agents on Azure use VMs with a 2-core CPU, 7 GB of RAM, and 14 GB of SSD disk space. For demonstration purposes, we will reduce the resource limits.
cat <<EOF | kubectl apply -f -
---
apiVersion: apps/v1
kind: Deployment
metadata:
  name: azdevops-deployment
  labels:
    app: azdevopsagent
spec:
  replicas: 1
  selector:
    matchLabels:
      app: azdevopsagent
  template:
    metadata:
      labels:
        azure.workload.identity/use: "true"
        app: azdevopsagent
    spec:
      serviceAccountName: workload-identity-sa
      containers:
        - name: azuredevopsagent
          image: "${ACR_NAME}.azurecr.io/azdevopsagent:workloadidentity"
          imagePullPolicy: Always
          env:
            - name: AZP_URL
              valueFrom:
                configMapKeyRef:
                  name: azdevops
                  key: AZP_URL
            - name: AZP_POOL
              valueFrom:
                configMapKeyRef:
                  name: azdevops
                  key: AZP_POOL
          resources:
            limits:
              memory: 512Mi
              cpu: 500m
EOF
Now the container logs should greet you with the Azure Pipelines banner and a message that it was able to connect to the Azure DevOps service.
1. Determining matching Azure Pipelines agent...


2. Downloading and extracting Azure Pipelines agent...


3. Configuring Azure Pipelines agent...


  ___                      ______ _            _ _
 / _ \                     | ___ (_)          | (_)
/ /_\ \_____   _ _ __ ___  | |_/ /_ _ __   ___| |_ _ __   ___  ___
|  _  |_  / | | | '__/ _ \ |  __/| | '_ \ / _ \ | | '_ \ / _ \/ __|
| | | |/ /| |_| | | |  __/ | |   | | |_) |  __/ | | | | |  __/\__ \
\_| |_/___|\__,_|_|  \___| \_|   |_| .__/ \___|_|_|_| |_|\___||___/
                                   | |
        agent v3.239.1             |_|          (commit 7feec17)


>> End User License Agreements:

Building sources from a TFVC repository requires accepting the Team Explorer Everywhere End User License Agreement.
This step is not required for building sources from Git repositories.

A copy of the Team Explorer Everywhere license agreement can be found at:
  /azp/license.html


>> Connect:

Connecting to server ...

>> Register Agent:

Scanning for tool capabilities.
Connecting to the server.
Successfully added the agent
Testing agent connection.
2024-06-01 07:15:52Z: Settings Saved.

4. Running Azure Pipelines agent...

Scanning for tool capabilities.
Connecting to the server.
2024-06-01 07:16:02Z: Listening for Jobs
Next up we can simply fire up a Azure DevOps pipeline and making sure that the value for the pool property is set to aks-linux-pool.
trigger:
- main

pool: "aks-linux-pool"

steps:
- script: echo Hello, world!
  displayName: 'Run a one-line script'

- script: |
    echo Add other tasks to build, test, and deploy your project.
    echo See https://aka.ms/yaml
  displayName: 'Run a multi-line script'
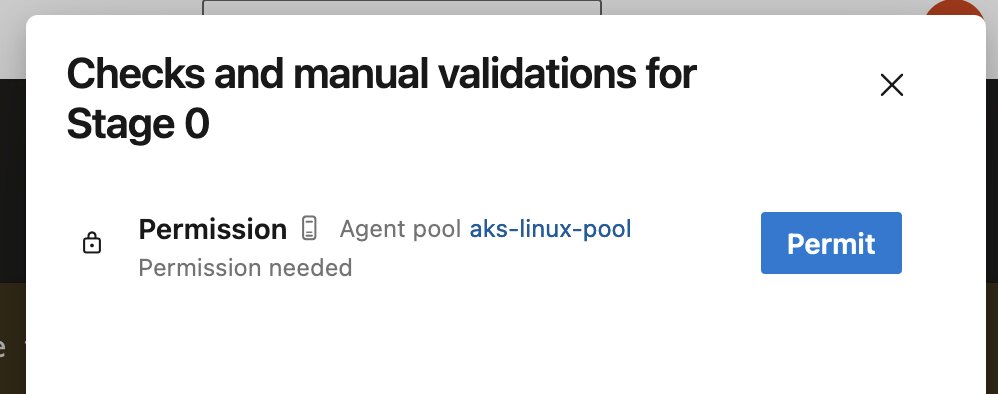
When you run the pipeline, you might be prompted to grant permissions for it to execute on the agent pool. Go ahead and grant those permissions.
In the logs, you should see that the pipeline is getting executed as expected.
2024-06-01 07:18:34Z: Running job: Job
2024-06-01 07:18:51Z: Job Job completed with result: Succeeded

Cleanup. Removing Azure Pipelines agent...

Removing agent from the server
Connecting to server ...
Succeeded: Removing agent from the server
Removing .credentials
Succeeded: Removing .credentials
Removing .agent
Succeeded: Removing .agent

Stream closed EOF for default/azdevops-deployment-6f599954c7-cz7j4 (azuredevopsagent)
That’s pretty sweet! 😎 I have also tested a more complex pipeline that uses service connections, Azure CLI and PowerShell tasks and they all work just fine. The service connections themselves were also with identity federation, but I should stress that they are in not related to the workload identity federation that we just set up for our Kubernetes cluster. These service connections can be viewed as “just another workload” whose tokens are issued by a completely different issuer.
- Azure Kubernetes Service issuer:
https://<region>.oic.prod-aks.azure.com - Service connections issuer:
https://vstoken.dev.azure.com/<organization-id>
Issues
I encountered a few issues when trying to set this up:
- (Conflict) Issuer and subject combination already exists for this Managed Identity.
- Ensure that the combination of Issuer and subject is unique on the MI.
- VS403283: Could not add user ‘b50230e4-1526-4dd1-9a1f-befd8b061d5f’ at this time."
- A simple retry will typically fix this issue.
az devops invoke: “–area is not present in current organization”.- Happens because of validation logic in the
invoke.pyscript. - For automation purposes; falling back to the REST API seems like the best idea.
- Happens because of validation logic in the
The requested resource requires user authentication: https://dev.azure.com/some-other-org/.- You can always check whether there’s something off with your Azure DevOps CLI config by checking the configuration file. I used
az devops configure --listand checked that my defaultorganisationwas set to the correct value.
- You can always check whether there’s something off with your Azure DevOps CLI config by checking the configuration file. I used
Going further with KEDA
Now that we have pods running until they’re terminated. With our Dockerfile’s ENTRYPOINT arguments set to --once, the Azure Pipeline agent runs a pipeline, shuts down, and the pod is destroyed. Since our deployment is configured to always have one pod active, increasing the replication count to 10, for instance, would ensure that we always have 10 agents on standby.
⚠️ Keep in mind that there are limits to the maximum number of parallel jobs you can trigger. For the latest information, consult the documentation.
Wouldn’t it be fantastic if we could dynamically spawn Azure Pipeline agents? Fortunately, we can achieve precisely this using the KEDA project. KEDA, or Kubernetes Event-driven Autoscaler, is designed to activate Kubernetes deployments (i.e., from zero pods to a single pod) and subsequently scale to more pods based on events from various sources. With KEDA, scaling applications based on agent pool queues for Azure Pipelines becomes achievable using the azure-pipelines scaler and the azure-workload authentication provider.
# You have the option of using a different managed identity or application
# For demonstration purposes, let's reuse the user-assigned managed identity we created
helm install keda kedacore/keda --namespace keda \
  --create-namespace \
  --set podIdentity.azureWorkload.enabled=true \
  --set podIdentity.azureWorkload.clientId="${USER_ASSIGNED_CLIENT_ID}"
For KEDA to monitor the number of triggered pipeline runs, it needs to obtain an Entra ID access token. Therefore, we need to create a new federated credential. Note that the value for subject has changed to system:serviceaccount:keda:keda-operator because the operator uses a different service account in a different namespace.
az identity federated-credential create --name "keda-operator" \
  --identity-name "${USER_ASSIGNED_IDENTITY_NAME}" \
  --resource-group "${RESOURCE_GROUP}" \
  --issuer "${AKS_OIDC_ISSUER}" \
  --subject "system:serviceaccount:keda:keda-operator" \
  --audience "api://AzureADTokenExchange"
We can verify that the KEDA operator is using workload identity by examining the pod YAML in the keda namespace, where we can see that the necessary values have been injected.
apiVersion: v1
kind: Pod
metadata:
  creationTimestamp: "2024-06-01T11:07:35Z"
  generateName: keda-operator-74c4c59c6b-
  labels:
    #  ...
    azure.workload.identity/use: "true"
    #  ...
  name: keda-operator-74c4c59c6b-crlsf
  namespace: keda
spec:
  automountServiceAccountToken: true
  containers:
  - env:
    #  ...
    - name: AZURE_CLIENT_ID
      value: c603ec05-b0dd-4c79-aa45-32b0e0a96cf7
    - name: AZURE_TENANT_ID
      value: b33ef96a-c997-4e73-acf5-863f53417ae9
    - name: AZURE_FEDERATED_TOKEN_FILE
      value: /var/run/secrets/azure/tokens/azure-identity-token
    - name: AZURE_AUTHORITY_HOST
      value: https://login.microsoftonline.com/
    #  ...
Each TriggerAuthentication is defined within a specific namespace and can only be used by a ScaledObject in the same namespace. To authenticate using the azure-workload provider, specify it in the TriggerAuthentication definition.
cat <<EOF | kubectl apply -f -
---
apiVersion: keda.sh/v1alpha1
kind: TriggerAuthentication
metadata:
  name: pipeline-trigger-auth
  namespace: default
spec:
  podIdentity:
    provider: azure-workload
EOF
We can configure podIdentity.provider like so:
podIdentity:
  provider: azure-workload                # Optional. Default: none
  identityId: <identity-id>               # Optional. Default: ClientId from annotation on service-account.
  identityTenantId: <tenant-id>           # Optional. Default: TenantId from annotation on service-account.
  identityAuthorityHost: <authority-host> # Optional. Default: AZURE_AUTHORITY_HOST environment variable which is injected by azure-wi-webhook-controller-manager.
We can reference the TriggerAuthentication in the ScaledObject resource using spec.triggers[*].authenticationRef.name.
cat <<EOF | kubectl apply -f -
---
apiVersion: keda.sh/v1alpha1
kind: ScaledObject
metadata:
  name: azure-pipelines-scaledobject
  namespace: default
spec:
  scaleTargetRef:
    name: azdevops-deployment
  minReplicaCount: 1
  maxReplicaCount: 5
  triggers:
  - type: azure-pipelines
    metadata:
      poolName: "${AZP_POOL}"
      organizationURLFromEnv: "AZP_URL"
    authenticationRef:
      name: pipeline-trigger-auth
EOF
To avoid granting too many permissions to KEDA’s identity, you can use overrides to assign specific identities to each workload. This ensures that each workload only accesses the resources it needs, rather than over-permissioning a single identity. For example, you might configure separate identities for Workload A, Workload B, and Workload C, each with access to their respective ServiceBus instances. This minimizes risks and adheres to the principle of least privilege.
What about private AKS clusters?
Even in the case of a private AKS cluster, enabling the OIDC issuer worked smoothly. Both the OIDC Issuer URL and the discovery document, along with the JWK Set document, seamlessly function. Although the AKS documentation does not explicitly state this, based on the response I received when accessing the public key information, it appears likely that the key material is hosted on a Microsoft-managed Storage Account, accessible through a web server proxy.
HTTP/1.1 200 OK
Server: nginx/1.18.0  👀
Date: Thu, 26 May 2024 23:57:18 GMT
Content-Type: application/json
Content-Length: 1720
Connection: keep-alive
Content-MD5: DrzvtGuKJtmZ8ffsQC0pAg==
Last-Modified: Thu, 26 May 2024 23:56:54 GMT
ETag: 0x8DC7603DCF2C375
x-ms-request-id: 644ad21c-f01e-002a-01ec-a72e7c000000
x-ms-version: 2009-09-19
x-ms-lease-status: unlocked
x-ms-blob-type: BlockBlob
Closing thoughs
It’s important to minimize the blast radius of this pipeline process by ensuring that the user-assigned managed identity has only the necessary permissions and by containing the agent pool within a single business unit or project, if your budget permits it.
You might be inclined to think that workload identity is the ultimate solution for authenticating Azure resources. While it is a significant advancement, keep in mind that these tokens are still susceptible to being captured and utilized. Fortunately you can combat this with Entra ID Workload ID Premium, you can also use conditional access policies and continuous access evaluation.
Let me know your thoughts if I missed or skipped something! 😄
Related posts
- Windows Containers: Azure Pipeline Agents with Entra Workload ID in Azure Kubernetes Service
- Azure Confidential Computing: CoCo - Confidential Containers
- Azure Confidential Inferencing with Oblivious HTTP
- Azure Linux OS Guard on Azure Kubernetes Service
- Making Sense of AI
- Azure Confidential Computing: Confidential GPUs and AI
- Azure Confidential Computing: Confidential Temp Disk Encryption
- Azure Confidential Computing: Secure Key Release - Part 2
- Azure Confidential Computing: Microsoft Azure Attestation
- Azure Confidential Computing: Azure RBAC for Secure Key Release
- Azure Confidential Computing: Verifying Microsoft Azure Attestation JWT tokens
- Azure Confidential Computing: Secure Key Release
- Azure Confidential Computing: Confidential VMs
- Azure Confidential Computing: IaaS
- Azure Confidential Computing