Kubernetes in a Microsoft World - Part 3
In this post
In May 2019 my colleague Micha Wets and I met for Azure Saturday 2019 at the Microsoft HQ in Munich to talk about Kubernetes in a Microsoft World. We discussed what such a world would look like for someone who is primarily running a Microsoft-based technology stack. And in more detail, we showed the audience what we’ve noticed amongst our own customers, innovations in Windows Server Containers and how Kubernetes works with Windows-based worker nodes.
Even though some time has passed and this post might seem rather irrelevant at first glance, I frequently come across system- and software engineers that have not yet had the pleasure of getting their hands dirty with this technology. More of often than not they have heard of the benefits that containers can bring to the table; which most of the people I’ve spoken to will link to performance (though this not always the case). Hopefully this blog post can solidify your own understanding of containers, Kubernetes and how it all fits.
The Demo
Micha and I are do consulting work at a firm called ASPEX which is a relatively small, about 25 people, hosting and Azure consulting company. We were able to set up a system that tracks whether or not a desk, at the office, is in use. We did this by making an IoT button, using a low-cost Wi-Fi microchip with a full TCP/IP stack and microcontroller. Whenever you press the button in will send out an http request to a specific URL and it will basically toggle a value inside of a SQL Server record. Nearly perfect for figuring out which desks are taken and which ones are not, where we have to assume that everyone will play fairly and press the button when they leave the office.
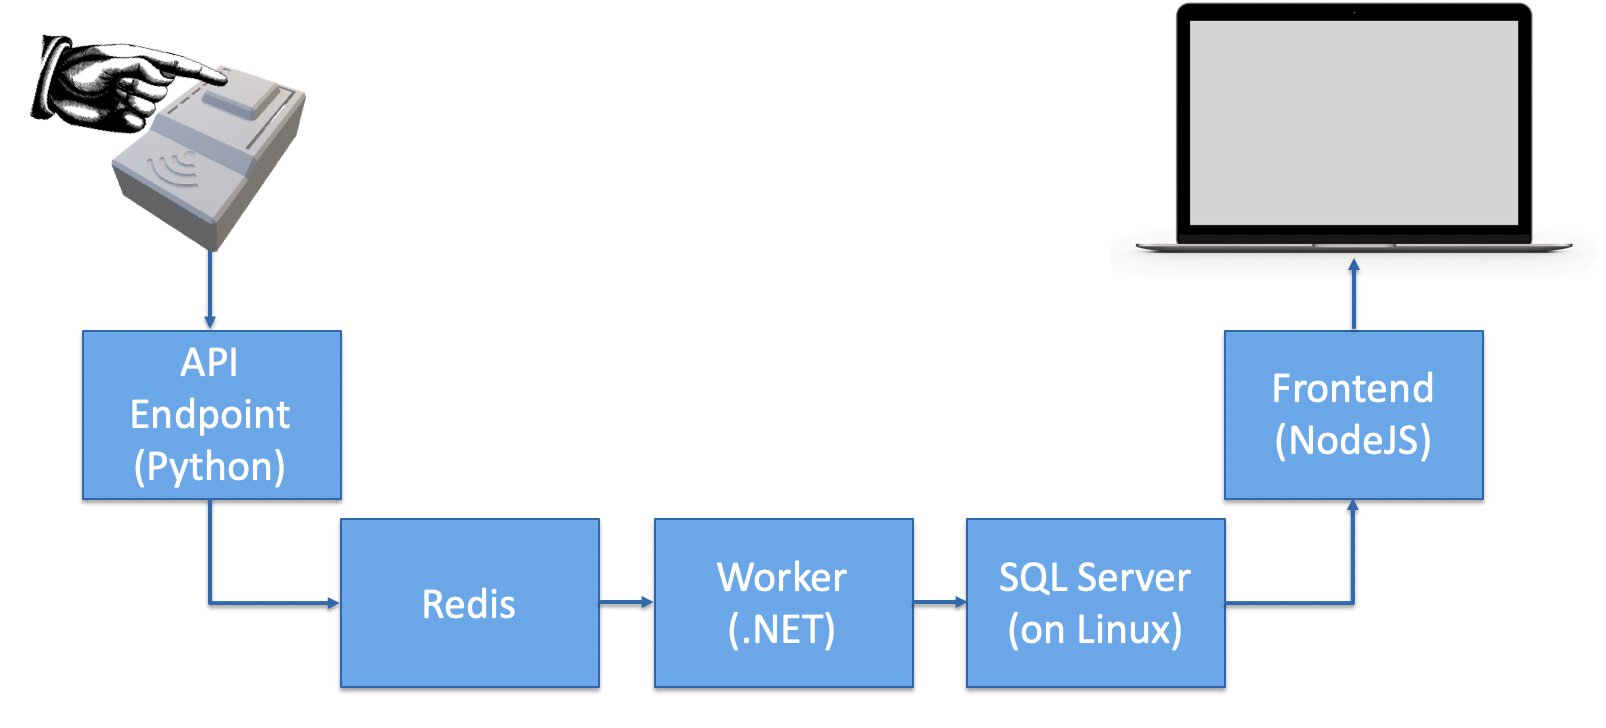
We also set out to host the entire application stack on Kubernetes and because we wanted to adhere to the Docker demo standards we wrote every application in a different programming language just to drive home the point that containers do not care about what you throw at them.
The end result should be something along these lines.
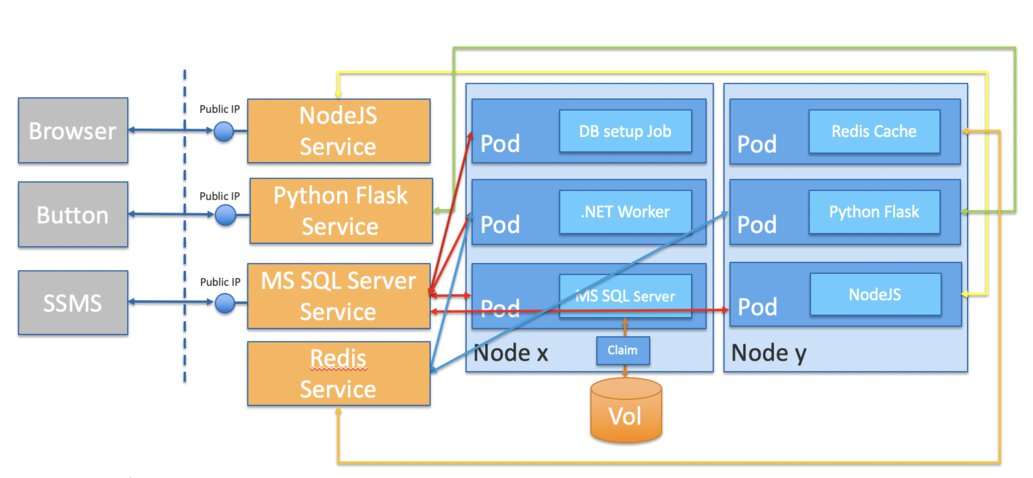
Some things to point out:
- The DB setup job is a Kubernetes Job resource, it creates one or more Pods and ensures that a specified number of them successfully terminate. It is especially useful when you’re trying to perform a database migration, which is what we did.
- We deliberately opted to not use StatefulSets in order to keep things simple for audience members who were new to Kubernetes.
- I probably also do not need to tell you to never expose your database system to the public internet except, perhaps, when you’re trying to demo some things.
Secrets setup
We used four secrets in order to let our pods communicate in a way you would expect. We will pass these values into our containers as environment variables, our application code will attempt to read specific values from environment variables inside of our containers.
apiVersion: v1
kind: Secret
metadata:
  name: desks
type: Opaque
data:
  mssql-sa-password: TXlDMG05bCZ4UEBzc3cwcmQx
  mssqlserver-user-password: TXlDMG05bCZ4UEBzc3cwcmRYWVo=
  btnWorker-SqlServerConnectionString: U2VydmVyPXRjcDptc3NxbHNlcnZlci1zZXJ2aWNlLDE0MzM7SW5pdGlhbCBDYXRhbG9nPURlc2tzREI7VXNlciBJRD1kZXNrc1VzZXI7UGFzc3dvcmQ9TXlDMG05bCZ4UEBzc3cwcmRYWVoK
  btnWorker-RedisConnectionString: cmVkaXMtc2VydmljZSxzc2w9ZmFsc2U=
The yaml above is similar this kubectl command:
kubectl create secret generic desks \
    --from-literal=mssql-sa-password="MyC0m9l&xP@ssw0rd1" \
    --from-literal=mssqlserver-user-password="MyC0m9l&xP@ssw0rdXYZ"\
    --from-literal=btnWorker-SqlServerConnectionString="Server=tcp:mssqlserver-service,1433;Initial Catalog=DesksDB;User ID=desksUser;Password=MyC0m9l&xP@ssw0rdXYZ" \
    --from-literal=btnWorker-RedisConnectionString="redis-service,ssl=false"
Obviously we only want to grant specific workloads access to specific secrets. For instance, our Python container will only have access to the Redis connection string whereas the .NET worker will have access to both the Redis and SQL Server connection strings.
Stateless Application Deployment
We have several different deployments, one for each application, and will zoom in on the browser frontend endpoint that was written in Node. Inside of said application we have the following code set up to connect to our SQL Server. I’ve omitted some chunks of code to improve the readability but you really want to focus on the highlighted bits in particular.
| |
We need to ensure that our application is able to get those values from Kubernetes, if they are not present then the application will simply throw a big fat exception your way. We’ve opted to pass in some secrets as environment variables and other as string values to highlight the different ways you can configure your apps through your spec files.
apiVersion: apps/v1
kind: Deployment
metadata:
  labels:
    app: btnfrontend
  name: btnfrontend
spec:
  replicas: 3
  selector:
    matchLabels:
      app: btnfrontend
  template:
    metadata:
      labels:
        app: btnfrontend
      name: btnfrontend
    spec:
      terminationGracePeriodSeconds: 10
      strategy:
        type: RollingUpdate
        rollingUpdate:
          maxUnavailable: 25%
          maxSurge: 1
      containers:
        - name: btnfrontend
          image: thatcontainerregistry.azurecr.io/iotbtn/btnfrontend:1.0
          imagePullPolicy: Always
          env:
            - name: MSSQL_PASSWORD
              valueFrom:
                secretKeyRef:
                  name: desks
                  key: mssqlserver-user-password
            - name: MSSQL_USER
              value: desksUser
            - name: MSSQL_SERVER
              value: mssqlserver-service
            - name: MSSQL_DB
              value: DesksDB
          ports:
            - name: btnfrontend
              containerPort: 4000
          resources:
            requests:
              cpu: "0.2"
              memory: "100Mi"
            limits:
              cpu: "0.5"
              memory: "300Mi"
          livenessProbe:
            httpGet:
              path: /
              port: btnfrontend
            initialDelaySeconds: 3
            periodSeconds: 3
          readinessProbe:
            httpGet:
              path: /
              port: btnfrontend
            initialDelaySeconds: 5
            periodSeconds: 5
We’d like Kubernetes to ensure that we have a minimum of three pods (replicas) running at all times and in case we want to terminate either one of those we will give the application ten seconds. Next up we’re telling Kubernetes to always pull the image from our Azure Container Registry.
We want to ensure that we use a rolling update strategy to downgrade or update our Pods to a different version. The maxSurge field is an optional field that specifies the maximum number of Pods that can be created over the desired number of Pods. Take this into consideration when you’re doing your capacity planning! Performing the actual update is as easy as changing the tag of the image and issuing the following command:
kubectl apply -f ./deployments/deployment-frontend.yaml
kubectl rollout status deployment.v1.apps/btnfrontend
You will get something along the lines of:
Waiting for rollout to finish: 2 out of 3 new replicas have been updated...
deployment.v1.apps/btnfrontend successfully rolled out
Let’s carry on with walking through the YAML..
Once we get to the env property we can start to fill in the blanks that our application is missing. We will ensure that Kubernetes creates a MSSQL_PASSWORD environment variable and pulls the value for key mssqlserver-user-password in from the desks secret bundle.
We’ve also included some basic resource limits as well as a liveness and readiness probe. If you’re wondering which one gets fired first, just remember that a pod needs to be ALIVE before its application can be READY. The docs say the following about the liveness and readiness probe:
livenessProbe: Indicates whether the Container is running. If the liveness probe fails, the kubelet kills the Container, and the Container is subjected to its restart policy. If a Container does not provide a liveness probe, the default state is Success.
readinessProbe: Indicates whether the Container is ready to service requests. If the readiness probe fails, the endpoints controller removes the Pod’s IP address from the endpoints of all Services that match the Pod. The default state of readiness before the initial delay is Failure. If a Container does not provide a readiness probe, the default state is Success.
There is also a startup probe, which indicates whether the application within a container is started. In case a startup probe is provided, it disables other probes, until its test succeeds.
Service setup
Since we want to expose our frontend pods to the outside world we can use a service with the LoadBalancer type. Since we were using AKS this actually sets up a new , at the time a basic tier, Azure Load Balancer with a public IP.
| |
Since our the frontend application uses WebSockets (through socket.io) we also set the session affinity to ClientIP, this causes our clients to end up at the same Pod for subsequent requests based off the same client IP.
Volume Setup
In order to make it so our SQL Server Pod uses a persistent volume you can go with static or dynamic provisioning, though we opted for the latter so let’s take a look at how this is done. As we discussed earlier we start off by creating a storage class. Since we used AKS for our demos we went ahead and provisioned a premium tier Managed Disk.
| |
Then we simply use the storage class in a persistent volume claim to request a specific type of volume, afterwards we use the PVC to tell our pod to hook itself up to that specific volume.
| |
There we are, now we can use the PVC and hook it up to our SQL Server. But perhaps you’re wondering if this means we can keep on provisioning storage ad infinitum and you would be correct to assume so. Let’s make it so our cluster users don’t go overboard.
| |
You can limit the total sum of storage resources that can be requested in a given namespace. In addition, you can limit consumption of storage resources based on associated storage-class. I will continue to let the Kubernetes docs speak for itself in regards to the highlighted lines 7 to 10.
| Resource Name | Describe |
|---|---|
| requests.storage | Across all persistent volume claims, the sum of storage requests cannot exceed this value. |
| persistentvolumeclaims | The total number of persistent volume claims that can exist in the namespace. |
| <storage-class-name> .storageclass.storage.k8s.io/requests.storage | Across all persistent volume claims associated with the storage-class-name, the sum of storage requests cannot exceed this value. |
| <storage-class-name> .storageclass.storage.k8s.io/persistentvolumeclaims | Across all persistent volume claims associated with the storage-class-name, the total number of persistent volume claims that can exist in the namespace. |
SQL Server Deployment
It’s also worth having a closer look at our SQL Server deloypment. Again I must preface this that if you want to use SQL Server in production you might wan to look at StatefulSets or perhaps the more recently announced SQL Server 2019 HA Operator for Kubernetes. The operator bundles Microsoft’s best practices surround SQL Server Always On Availability Groups and makes it so you can easily set this up on a Kubernetes cluster.
At any rate.. here is the YAML we used, perfect for explaining PVs, PVCs, SCs:
apiVersion: apps/v1
kind: Deployment
metadata:
  labels:
    app: mssqlserver
  name: mssqlserver
spec:
  replicas: 1 # One pod at all times for dev/test purposes
  strategy:
    type: Recreate # In case of an update,
                   # throw the entire deployment out the window.
  selector:
    matchLabels:
      app: mssqlserver
  template:
    metadata:
      labels:
        app: mssqlserver
      name: mssqlserver
    spec:
      terminationGracePeriodSeconds: 1800
      containers:
        - name: mssql
          image: microsoft/mssql-server-linux
          imagePullPolicy: IfNotPresent
          env:
            - name: SA_PASSWORD
              valueFrom:
                secretKeyRef:
                  name: desks
                  key: mssql-sa-password #️ ⚠️ SA password ⚠️
            - name: ACCEPT_EULA
              value: "Y"
            - name: MSSQL_PID
              value: Developer  #For Prod: set the appropriate edition
                                #(Enterprise, Standard, or Express)
          ports:
            - name: mssqlserver
              containerPort: 1433
          resources:
            requests:
              cpu: "0.5"
              memory: 1G
            limits:
              cpu: 1
              memory: 1.5G
          volumeMounts:
            - name: managedssd-sql
              mountPath: /var/opt/mssql
      volumes:
        - name: managedssd-sql
          persistentVolumeClaim:
            claimName: dd-managed-ssd-8g
By referencing the dd-managed-ssd-8g persistent volume claim Kubernetes will provision the requested volume and in case your pod dies, it will still be there. If you do not want this kind of behavior you have the option of changing your recycling policy.
You can verify that the disk exists in Azure by issuing the following command in the Azure CLI:
az login
# Device login prompt
az account set --subscription "The subscription that holds your AKS cluster"
az disk list --resource-group "The resource group that holds your AKS resources" --output table
Where is the Microsoft Part?
Good question.. Luckily all the basic concepts that I explained are also, for the most part, applicable to Windows worker nodes. Take a look at a deployment YAML file for deploying Windows Pods.
| |
The important bit here is that you use the "beta.kubernetes.io/os": windows node selector, this tells Kubernetes that the pod must be deployed on a Windows node.
And then there is, of course, a service YAML file.
apiVersion: v1
kind: Service
metadata:
  name: aspnetwindows
spec:
  type: LoadBalancer
  ports:
  - protocol: TCP
    port: 80
  selector:
    app: aspnetwindows
You might think that this is pretty basic and you would be correct. All this will do is run an ASP.NET sample app and expose it to the outside world via a service through port 80. This is, if you think about it, all you need to get your legacy applications up and running on Kubernetes. If you were to replace the sample app image with your own legacy app’s image that’s based off Windows Server 2019, you are good to go.
Limitations
Even though there’s a lot of things that are similar to how Kubernetes works with Linux, you should not assume that everything will just work. There are plenty of limitations that you should be aware of, some of which you can view on the Kubernetes docs.
Active Directory with Kubernetes
In a Microsoft world we might have some form of Active Directory authentication, whether it’s to authorize your application’s users or to allow your IIS application to talk to your SQL Server. This is where the gMSA support kicks in.
gMSA support is currently in beta, which means that you should use it for non-business-critical situations because of potential for incompatible changes in subsequent releases of Kubernetes.
Final remarks
There is still a bit to go before you would be able completely replace your traditional Windows Server machines with a containerized setup. The good thing is that containerization, as with all cloud adoption issues, does not require an all or nothing approach. You can always opt to containerize some applications and have other still running in their current environment.
Microsoft is continously working on additional features for Azure Kubernetes Service, as well as Windows Containers. Here are some of the things that were on on the AKS roadmap back in May 2019 and some features, to the best of my knowledge, have been marked as GA :
Azure Application Gateway (v2) Ingress ControllerCluster auto-scalerAvailability Zones- Windows nodes
- Node auto-repair
- Cluster auto-upgrade
- Low prio node pools
- Pod identity
- Key Vault FlexVolume for Kubernetes
And with that said I hope Kubernetes becomes just a little less daunting for you, in your Microsoft world.
- Tags |
- Azure
- Kubernetes
Related posts
- Kubernetes in a Microsoft World - Part 2
- Kubernetes in a Microsoft World - Part 1
- Azure Linux OS Guard on Azure Kubernetes Service
- Windows Containers: Azure Pipeline Agents with Entra Workload ID in Azure Kubernetes Service
- Register Azure Pipeline Agents using Entra Workload ID on Azure Kubernetes Service
- Azure Confidential Computing: CoCo - Confidential Containers
- Local OpenShift 4 with Azure App Services on Azure Arc
- Open Policy Agent
- Azure Red Hat OpenShift 4