Exploring Containers - Part 4
In this post
Six years ago, I started this series to see what was inside the container black box. Exploring Containers - Part 3, which closed it out in late 2020, left me with a better appreciation for what it takes to get a container up and running. Since then, I’ve often revisited those posts. I still find them useful when troubleshooting container-related issues.
Even though I’d argue that, as of last year but most certainly now in 2026, it is much faster and more efficient to let an LLM drudge through the layers of CLI commands, parsing logs and looking at these kernel constructs, provided you choose a sufficiently capable model. I still find value in hands-on exploration to understand the nuances and interactions within a containerized environment. And with more teams deciding what to host themselves and what to leave to the cloud, I think it makes sense to understand containers from the ground up.
Anyway since 2020, the kernel has gained new ways to enforce these boundaries even further and provide more visibility into what was happening inside. To be honest, I have missed out on some of these things, since there is only so much I can keep track of at any given time.
📖 What is a container again?
So a quick recap: containers are not tiny VMs. They’re plain ol’ processes that run in your operating system. Namespaces change what a process can see, control groups govern what it can consume, and user namespaces change what an identity means.
I wanted to see where those boundaries overlap:
- If a process is root inside its own user namespace, why do files on disk still show up as someone else’s?
- What actually happens in the stretch between a workload getting slow and a memory limit killing it?
- Can seccomp really pause a system call and let another process decide its outcome? I had read as much, but found it hard to picture.
Reason enough for me to spin up a VM and find out, so that’s what I did! Let’s dive in.
Where the first three parts left us
This is Part 4 of the Exploring (Linux) Containers series. We will stay close to the Linux kernel again: no orchestrators and no tour of the container runtime landscape. Just isolation primitives, the files the kernel uses to expose them, and a few experiments that make those boundaries visible.
Before we move on, let’s quickly go over the ground we covered in the first three parts:
| Part | Isolation primitives | Link |
|---|---|---|
| Part 1 | chroot, UTS and mount namespaces, pivot_root | Exploring Containers - Part 1 |
| Part 2 | IPC, network and time namespaces | Exploring Containers - Part 2 |
| Part 3 | PID, cgroup and user namespaces | Exploring Containers - Part 3 |
| Part 4 | Identity, resource pressure and layered policy | You are here |
Back in 2020, I described a container as a combination of namespaces and cgroups. That shorthand is useful, but revisiting the subject exposed its limitation: namespaces and cgroups are not two switches that create one hard security boundary. They are separate pieces that work together, each covering a different part of the problem.
Getting started: pick a disposable lab
Every experiment below assumes you can get access to a disposable lab with a VM you can break and throw away. You will need a recent distribution kernel, util-linux 2.39 or newer, a cgroup v2 mount, a C compiler and root access where noted.
I’ve tried to keep the commands portable. Most of them use standard Linux interfaces, so you should be able to run the experiments on other distributions too. That portability does have certain limits, especially around security. Distributions make different choices about kernel configuration, default capabilities and confinement through tools such as AppArmor and SELinux. A command can fail before it reaches the kernel feature we are trying to inspect, or it can produce different IDs, paths and output on an otherwise healthy system.
While putting this together, I tried the experiments in a few different environments, including an Ubuntu VM in Multipass and Fedora CoreOS in a Podman machine. The underlying primitives were available in both, but the surrounding setup ended up being a little different. I ended up using Ubuntu for the main run-through and for the sample output below, so treat those values as examples rather than constants. Check your own system at each step, and expect the security-related troubleshooting to depend on the distribution you choose.
⚠️ Warning:
Don’t run the privileged experiments on a shared host, really just use a disposable lab with a VM you can break and throw away. Kernel and filesystem support varies, so each section starts with a way to inspect the local system rather than assuming that a feature exists.
Here are a few options:
Canonical Multipass is the quickest route on a workstation. It spins up Ubuntu VMs on macOS, Windows and Linux with a single command, and it is what I used throughout this post:
multipass launch --name part4lab --cpus 2 --memory 4G --disk 20G
# Launched: part4lab
multipass shell part4lab
uname -r # inside the VM
# 7.0.0-30-generic
The Podman machine VM is a nice shortcut if you already run Podman on your workstation. podman machine manages the Linux environment that hosts your containers, and it will happily manage a second, dedicated machine so the experiments stay well away from your actual container host. The backend depends on the host: Linux and macOS normally use a VM with Podman’s Fedora CoreOS-based machine image, while Windows uses either a Fedora CoreOS-based Hyper-V VM or, by default, a custom Fedora image imported as a WSL2 distribution. Only one machine can be active at a time, so stop the default one first:
podman machine stop
# Machine "podman-machine-default" stopped successfully
podman machine init part4lab
# Machine init complete
podman machine start part4lab
# Machine "part4lab" started successfully
podman machine ssh --username core part4lab
uname -r # inside the VM
# 6.17.7-300.fc43.aarch64
On Linux and macOS, that lands you in a Fedora CoreOS VM with a real kernel and root access through sudo, though the package tooling and exact outputs will differ from the Ubuntu examples in this post. Fedora CoreOS is a minimal, immutable image. It includes the shell tools used by the namespace, cgroup and PSI experiments, but not a C compiler, strace or the kernel source tree. You should layer those prerequisites into the VM before building the seccomp and Landlock samples. On Windows with the WSL provider, use the Fedora user instead:
podman machine ssh --username user part4lab
uname -r # inside the WSL distribution
# Microsoft-standard-WSL2 kernel; the version varies
The WSL-backed machine is still a real Linux environment, but it is not a Fedora CoreOS VM: it is a Podman-managed WSL2 distribution running on WSL’s shared Microsoft kernel. Windows can be configured to use Hyper-V instead; that provider uses the Fedora CoreOS-based image and behaves more like the Linux and macOS machine above. Check the selected provider with podman machine inspect part4lab if the host-specific details matter to an experiment.
Just using WSL2 can work too, if you are on Windows. It runs a real Linux kernel, the microsoft/WSL2-Linux-Kernel, and I checked its configuration against this post’s requirements: user namespaces, seccomp filtering, PSI and Landlock are all built in, with landlock in the active LSM list and a cgroup v2 hierarchy. Since WSL 2.4.4, wsl --install accepts a --name parameter, so a second Ubuntu instance keeps the experiments out of your daily driver:
wsl.exe --install Ubuntu --name part4lab
wsl.exe -d part4lab
uname -r # inside the distribution
# 6.18.33.1-microsoft-standard-WSL2
One caveat before you pick this option: every WSL2 distribution shares one VM and one kernel. The sysctl changes and cgroup experiments below affect that shared kernel, and wsl --unregister part4lab only discards the distribution’s filesystem. A full wsl --shutdown resets the kernel state, but if other distributions on the machine matter to you, one of the other options isolates the lab more cleanly.
It wouldn’t really be one of my blogs if I did not include an Azure VM as an option. It works just as well if you would rather keep the lab off your workstation. The companion GitHub repository contains a small Bicep template that deploys an Ubuntu VM, after which you can SSH in:
az group create --name rg-exploring-containers --location westeurope
# { "properties": { "provisioningState": "Succeeded" }, ... }
az deployment group create \
    --resource-group rg-exploring-containers \
    --template-file main.bicep \
    --parameters adminPublicKey="$(cat ~/.ssh/id_ed25519.pub)"
# { "properties": { "provisioningState": "Succeeded" }, ... }

LAB_IP="$(az deployment group show \
    --resource-group rg-exploring-containers \
    --name main \
    --query properties.outputs.publicIp.value -o tsv)"
ssh azureuser@"$LAB_IP"
Tearing the lab down afterwards is quick: multipass delete --purge part4lab, podman machine rm -f part4lab (followed by podman machine start to bring your default machine back), wsl --unregister part4lab, or az group delete --name rg-exploring-containers.
Why not just a privileged container?
Notice what is missing from that list: a container. In my original Parts 1 through 3 blogs, I used docker run --privileged alpine:3.11 as their disposable environment, and even back then the mapping between the container and its host showed through which made for some interesting surprises. In Part 3, my shell’s memory cgroup turned out to live at a Docker-managed path outside the container’s mount namespace, where I could not reach it.
In this Part 4, going down that route would only exacerbate this discrepancy, because the experiments poke at exactly the mechanisms a container runtime configures. However, I wanted to be thorough and tried it with a Podman container anyway!
Podman’s podman run documentation gives a concrete example of the interference: ordinary containers keep dropped Linux capabilities and seccomp confinement, while --privileged disables both.
💡 Note:
Capabilities are individual kernel-checked privileges, such as mounting filesystems or changing network settings; they let a process have some privileged powers without granting it every power associated with unrestricted root. Podman’s default capability set is therefore part of the experimental environment: a capability dump describes the container’s restrictions rather than an unrestricted process, and a failed system-call probe may be the runtime’s policy rather than the kernel feature under test.
Even with --privileged, the container’s overlay root filesystem prevented the idmapped-mount experiment, and its cgroup delegation blocked the memory experiment. Those runtime constraints interfered with the mechanisms under test, so I used a VM for the main lab.
User namespaces: root is relative
Part 3 introduced a process that appeared as UID 0 inside a user namespace while mapping to an unprivileged UID in the parent namespace. The two namespaces can assign different numeric identities to the same process: in this example, namespace UID 0 maps to UID 1000 in the parent namespace.
Let’s recreate that without running the experiment inside a privileged container. One heads-up first: Ubuntu 23.10 introduced an AppArmor-based restriction on unprivileged user namespaces, so this first experiment fails out of the box on my Ubuntu lab VM.
⚠️ Ubuntu-only workaround:
On Ubuntu, I disabled that enforcement in the disposable VM with:
sudo sysctl --write kernel.apparmor_restrict_unprivileged_userns=0Skip this change on Fedora CoreOS or another distribution unless that exact sysctl exists and the local policy requires it. The
unshareexperiment is portable; this AppArmor setting and its failure mode are not.
💡 Note:
Ubuntu’s full feature-disable recipe also sets
kernel.apparmor_restrict_unprivileged_unconfined=0, but that second sysctl is not needed for this experiment because the user-namespace enforcement switch is already off. The troubleshooting section at the end has the details.
The unshare tool starts a program with selected namespaces detached from the caller. In this command, --user creates a new user namespace, while --map-root-user maps the calling user to UID 0 inside it and leaves that user unprivileged in the parent namespace. This gives us a small, direct way to observe user-namespace identity without starting a container:
id -u
# 1000 (example Ubuntu user)
id -g
# 1000 (example Ubuntu user)

unshare --user --map-root-user sh -c '
    id
    echo "uid_map:"
    cat /proc/self/uid_map
    echo "gid_map:"
    cat /proc/self/gid_map
    echo "setgroups:"
    cat /proc/self/setgroups
'
# uid=0(root) gid=0(root) groups=0(root),65534(nogroup),65534(nogroup),65534(nogroup),65534(nogroup),65534(nogroup)
# uid_map:
#          0       1000          1
# gid_map:
#          0       1000          1
# setgroups:
# deny
Each mapping row has three values:
<ID at the start of this namespace> <ID at the start of the parent namespace> <length>
Our single row says that UID 0 in the new namespace maps to UID 1000 in the parent, for a range of one ID. The process is root only in the context owned by its user namespace. It did not become UID 0 in the initial user namespace. The repeated nogroup entries are the host’s supplementary groups showing through as the unmapped overflow GID. Group names and the number of supplementary entries are distribution-specific; the Fedora CoreOS guest reported one nfsnobody entry in this test.

Let’s take a closer look at that setgroups line. An unprivileged process must write deny to /proc/[pid]/setgroups before it may write the corresponding gid_map. Otherwise it could drop supplementary groups in a way that bypasses permissions based on group membership. The transition is one-way, and a UID or GID map can be written only once. unshare --map-root-user handles this sequence for us. That one-ID mapping is enough to show how namespace root works; the next step is to map a larger range so processes can see meaningful ownership across a filesystem tree.
More than one ID
A one-ID map is enough for a shell experiment, but it is awkward for a filesystem tree containing many owners. Linux distributions commonly allocate subordinate ranges in /etc/subuid and /etc/subgid. The newuidmap and newgidmap helpers validate that a requested range belongs to the caller before writing it to the target process.
💡 Note:
Subordinate IDs are extra UID and GID numbers reserved for a regular user to use inside user namespaces.
/etc/subuidrecords subordinate UID ranges, while/etc/subgidrecords subordinate GID ranges. They let a namespace map more than the caller’s single host ID. The range is delegated to that user: those host UIDs and GIDs take part in file ownership and permission checks, but they do not give the caller arbitrary host identities or any capabilities in the initial user namespace. Seesubuid(5)for the file format and allocation rules.A practical example is rootless Podman. An image may contain files owned by several users, but the container is launched by one unprivileged host user. Podman maps that host UID to container UID 0, then maps the user’s subordinate host IDs to container UIDs starting at 1. Ownership still works in the container, while those container identities remain ordinary, non-root IDs on the host. Podman’s
podman rundocumentation describes this two-step rootless mapping.
Let’s inspect the ranges assigned to the current user before building a larger map. The first column identifies the user, the second is the first subordinate ID, and the third is the number of IDs in the range.
grep "^$(id -un):" /etc/subuid /etc/subgid
# Example Ubuntu output:
# /etc/subuid:ubuntu:100000:65536
# /etc/subgid:ubuntu:100000:65536
unshare --version
# unshare from util-linux 2.41.3
The offset and count differ per machine and distribution. The final value shown here, 65536, is the number of subordinate UIDs or GIDs allocated to this Ubuntu user. This is still a standalone unshare experiment, not a container. It builds the same user-ID map that a rootless container runtime uses: namespace ID 0 maps to the current user, and namespace IDs 1 onward map to the user’s subordinate range.
unshare --user --map-auto --map-root-user sh -c '
    cat /proc/self/uid_map
    cat /proc/self/gid_map
'
#          0       1000          1
#          1     100000      65536
#          0       1000          1
#          1     100000      65536
💡 Why
165535?The command does not print that endpoint as a separate value. In a map row, the numbers are the namespace start, host start and range length, so the inclusive end is calculated as
100000 + 65536 - 1 = 165535. Ubuntu’s LXD documentation describes the same shifted-ID idea for an unprivileged container, where container UID 0 starts at host UID 100000 and container UID 65535 ends at 165535.This is not only a documentation example: LXD’s
seccomp_test.gocalls0-65535 -> 100000-165535a typical unprivileged container map and encodes a range of 65536 IDs for both UIDs and GIDs. The range comes from/etc/subuidand/etc/subgid; it is an allocation choice, not a kernel limit. LXD’suserns-idmap.mdsays it takes the first 65536 IDs from the configured root range, while theidmapset_linux.goimplementation has a different fallback when those files do not exist.The
unsharecommand above adds the caller’s host UID as namespace ID 0 and uses the subordinate range for IDs 1 onward, so its table is related to LXD’s mapping but not identical. The Fedora CoreOS Podman guest used a million-ID range, which is why its endpoint was different.
The first row in each table says that namespace root (0) is the host user (1000 in this Ubuntu example). The second row uses the subordinate range reported above: here, namespace IDs 1 through 65536 use host IDs 100000 through 165535. These are real host IDs as far as files are concerned: a process in this namespace that switches to namespace UID 1 creates files owned by host UID 100000 and is treated as their owner in permission checks. The user can act as any ID in their own subordinate range, but not as other host users, and none of those IDs is host root. The Fedora CoreOS Podman machine used for this test mapped core from UID 501 and allocated a range of 1,000,000 subordinate IDs, so its output was different. A container runtime uses the same mechanism when it creates a rootless container, but that is not what this command starts.
The exact map depends on the local subordinate-ID allocation. Have a look at yours first, rather than copying an assumed range into a permission model.
We now have the identity translation in place. The next question is how that translation represents ownership: does making a process root in its namespace also make it the owner of files on disk? We will create one file as the host user, inspect it from both sides of the namespace boundary, and compare the numeric owner IDs.
Ownership across the namespace boundary
A user namespace changes the process credentials, but it does not rewrite an inode’s ownership metadata on a filesystem.
💡 What is an inode?
A filename is not the file itself. It is a directory entry that points to an inode, the filesystem record for the file. The inode stores metadata such as the owner, group, permissions, timestamps and size, along with references to the file’s data. Within one filesystem, its inode number lets us check whether two paths reach the same underlying file. That distinction matters later: if the ordinary and idmapped paths report the same inode number, the mount changed the ownership view, not the file.
Notice that the unshare command uses --user without --mount: the process stays in the host mount namespace and sees the same filesystem paths as the calling shell. That is on purpose, as we are testing identity translation against an ordinary file, not creating filesystem isolation. We’ll create a file in the host user namespace and inspect it from the child user namespace:
mkdir -p /tmp/container-part4/source
printf 'created inside the host user namespace\n' > /tmp/container-part4/source/ownership-test

stat -c 'host view: %u:%g inode=%i size=%s %n' /tmp/container-part4/source/ownership-test
# host view: 1000:1000 inode=83 size=39 /tmp/container-part4/source/ownership-test
cat /tmp/container-part4/source/ownership-test
# created inside the host user namespace

unshare --user --map-root-user sh -c '
    stat -c "child namespace view: %u:%g inode=%i size=%s %n" \
        /tmp/container-part4/source/ownership-test
    cat /tmp/container-part4/source/ownership-test
'
# child namespace view: 0:0 inode=83 size=39 /tmp/container-part4/source/ownership-test
# created inside the host user namespace
The important result is the contrast between the two stat outputs: the same inode is reported as UID 1000 in the parent namespace and UID 0 in the new user namespace. That is not an ownership conflict or a failed isolation boundary; it is the intended identity translation. The user namespace changes the credentials used for permission checks and how the inode’s owner is represented, but it does not rewrite the ownership metadata on disk. Depending on the map, tools may display an owner with no mapping as the overflow ID 65534.
💡 Reading the inode and its data:
In case you’re wondering, there is no separate text payload that we can print with
catto see an inode’s contents. In the output above,inode=83is the filesystem-local inode number printed bystat’s%ifield. The number itself is just an identifier, so83is illustrative and may be different on another run; it is meaningful only within that filesystem and can be reused after a file is deleted. Matching it in both views tells us that they reached the same live inode.statshows selected metadata from that inode, such as the owner and size; it does not show every piece of metadata associated with it.catreads the file data that the inode refers to.Together, the two commands show that the namespace changes the ownership view without changing the inode or the file data.
What happens if we reverse the order and create the file after entering the child user namespace? The operation works here because the directory was created by host UID 1000, and namespace UID 0 maps back to that same host UID. The child namespace gives the process a different identity for its own permission checks, but the filesystem still records the mapped host identity:
unshare --user --map-root-user sh -c '
    printf "created inside the child user namespace\n" > /tmp/container-part4/source/namespace-created
    stat -c "child namespace view: %u:%g inode=%i size=%s %n" \
        /tmp/container-part4/source/namespace-created
    cat /tmp/container-part4/source/namespace-created
'
# child namespace view: 0:0 inode=84 size=40 /tmp/container-part4/source/namespace-created
# created inside the child user namespace

stat -c 'host view: %u:%g inode=%i size=%s %n' \
    /tmp/container-part4/source/namespace-created
# host view: 1000:1000 inode=84 size=40 /tmp/container-part4/source/namespace-created
cat /tmp/container-part4/source/namespace-created
# created inside the child user namespace
The text printed by cat describes where the file was created, not where it is being read. The host-side cat therefore still prints created inside the child user namespace; only the stat label changes from child namespace view to host view. This separates the file’s origin from the namespace observing it.
The file is therefore not owned by an independent “namespace user” on disk. Its owner is the parent-namespace UID selected by the mapping, which is 1000 in this example. Access still depends on Linux permission checks, and capabilities take part in those. Namespace root holds CAP_DAC_OVERRIDE in its own user namespace, which lets it override the ordinary permission checks on files whose owner and group are both mapped into that namespace. When I made a 1000:1000 directory read-only with mode 0555, my host shell could not create a file in it, but namespace root could, and the new file was still owned by 1000:1000 on disk. That override stops at the mapping: namespace root gains nothing over host files owned by unmapped IDs, such as root’s files.
We could change this file’s ownership with plain chown; chown -R would only be needed if we wanted to walk the whole directory tree. Either way, chown rewrites the inode metadata, so every path and namespace that reaches this file would see the changed ownership. What if we only wanted a different ownership view through one mount? Idmapped mounts give us that option without changing the inode on disk.
Idmapped mounts: translate the view, not the inode
An idmapped mount attaches a user-namespace mapping to a mount. When a process accesses an inode through that mount, the Virtual File System (VFS) translates the inode’s owner and group through the mount’s mapping. The inode itself is not changed. Both paths in the experiment below remain in the VM’s host mount namespace. I call /tmp/container-part4/source/example the ordinary path because its mount has no ID mapping; the idmapped /tmp/container-part4/mapped/example path will report 0:0 for the same file even though the ordinary path reports UID/GID 1000.
Let’s inspect the three pieces this command depends on: the kernel, the filesystem and util-linux’s libmount support:
uname -r
# 7.0.0-30-generic
mount --version
# mount from util-linux 2.41.3 (libmount 2.41.3: selinux, smack, btrfs, verity, namespaces, idmapping, statmount, statx, assert, debug)
findmnt -T /tmp -no FSTYPE
# ext4
The idmapping entry tells us that this build of mount(8) understands the X-mount.idmap option. It does not tell us whether the kernel can attach an ID mapping or whether the filesystem containing /tmp supports idmapped mounts. mount(8) uses util-linux’s libmount library to parse X-mount.idmap=b:1000:0:1, create the requested user-namespace mapping and prepare the bind mount. It then uses the kernel mount API, including mount_setattr(2), to attach that mapping to the mount. The kernel’s VFS performs the ownership translation when a process accesses an inode. If idmapping is missing, this command cannot create the mount even if the kernel and filesystem support it; if it is present, the other two checks still matter. The filesystem type may be tmpfs instead; -T asks which filesystem contains /tmp, even when /tmp is just a directory on the root filesystem.
⚠️ Warning:
Linux 5.12 introduced
mount_setattr(2)and idmapped mounts, but individual filesystems gained support over time. Themount(8)interface shown below requires util-linux 2.39 or newer. AnEINVALorEOPNOTSUPPresult may describe the filesystem or userspace tool, not a bad mapping. Use a recent ext4, XFS or tmpfs test filesystem and check the documentation for the kernel you are actually running. Overlayfs, for example, only gained support for being idmapped-mounted years after this feature landed.
The following privileged experiment runs in the VM’s host mount namespace. The shell user is UID 1000 in the initial user namespace, but sudo runs mount(8) as UID 0 in that same user namespace and host mount namespace; sudo does not create a new mount namespace. The X-mount.idmap option is separate: it attaches a user-namespace mapping to the new mount, so it changes the ownership view through that path without moving the command into another mount namespace.
The experiment makes filesystem ownership 1000:1000 appear as 0:0 through the idmapped mount, using a one-ID range. The leading b applies the mapping to both UIDs and GIDs; the u: and g: variants apply it to just one of the two. The remaining numeric fields identify the two ends of the mapping and its range length. The explicit 1000:1000 ownership below is deliberate: because the UID and GID are equal, a single b: mapping covers both, independently of the login user’s UID/GID pair on a Podman guest.
# Create the source directory and an empty directory for the second mount path.
sudo mkdir -p /tmp/container-part4/{source,mapped}
# Create the test file, then give it the UID and GID we will map.
sudo touch /tmp/container-part4/source/example
sudo chown 1000:1000 /tmp/container-part4/source/example

# Bind the directory at a second path and make 1000:1000 appear as 0:0 there.
sudo mount --bind \
    -o X-mount.idmap=b:1000:0:1 \
    /tmp/container-part4/source \
    /tmp/container-part4/mapped

# Inspect the file through the ordinary mount in the host mount namespace.
stat -c 'ordinary path: %u:%g inode=%i' \
    /tmp/container-part4/source/example
# ordinary path: 1000:1000 inode=83

# Inspect the same file through the idmapped mount.
stat -c 'idmapped path: %u:%g inode=%i' \
    /tmp/container-part4/mapped/example
# idmapped path: 0:0 inode=83
The matching inode numbers confirm what changed: the ownership view for this mount, not the file. The comparison with the user-namespace mapping is easier to see in a table:
| Experiment | View | Where the translation applies | Result |
|---|---|---|---|
| User namespace mapping | Host view | No child user-namespace mapping | 1000:1000, inode 83 |
| User namespace mapping | Child user namespace | Process’s user namespace | 0:0, inode 83 |
| Idmapped mount check | Ordinary path | No mount ID mapping | 1000:1000, inode 83 |
| Idmapped mount check | Idmapped path | Bind mount | 0:0, inode 83 |
The inode number is illustrative and may differ on another run. What matters is that the two views within each experiment report the same inode while presenting different owner IDs.
The diagram below shows the key result: both paths reach the same inode, but the idmapped mount presents its owner as 0:0 instead of the ordinary 1000:1000; nothing on disk changed.

💡 Idmapped mounts versus mount namespaces
A mount namespace gives a process its own view of the mount topology and the paths available through it. An idmapped mount does not primarily change that topology; it changes how the VFS translates ownership IDs when a process accesses an inode through that particular mount. Creating a mount namespace does not, by itself, attach an ID mapping to its mounts, and an idmapped mount does not itself isolate the mount list or hide paths. The two mechanisms can be combined: the namespace controls which mount is visible, while the idmapped mount controls the ownership view through it.
The mount(8) and libmount path above is the userspace half; mount_setattr(2) is the kernel-side operation behind this per-mount view. Its MOUNT_ATTR_IDMAP operation attaches the mapping from a user-namespace file descriptor to the detached bind mount, so the VFS translates ownership through that mount without rewriting the inode. The mapping lasts for the mount, while the same files remain available through the ordinary path. X-mount.idmap is mount(8)’s interface for requesting this operation; see the kernel’s idmapped mounts documentation and mount_setattr(2) for the details.
Clean up the bind mount:
sudo umount /tmp/container-part4/mapped
# No output.
Capabilities: splitting Linux privileges
We have just seen the same inode reported as 1000:1000 through the filesystem view and 0:0 through the idmapped view. That experiment was about identity and file ownership, not capability state. Before we move to the separate question of what authority the process has, let’s pin down those values: each pair is UID:GID. The idmapped mount changes the ownership that tools report, and it also changes the ownership the kernel uses for permission and ACL checks through that mount. It can therefore change who may access a file through that path, without bypassing those checks or rewriting the ownership on disk. In a quick test, a 0600 file owned by 2000:2000 gave my UID 1000 shell Permission denied through the ordinary path, while cat printed its contents through a mount with X-mount.idmap=b:2000:1000:1. For this section, though, all we need are the two pairs from the experiment:
# The format is UID:GID: user ID first, group ID second.
filesystem view: 1000:1000
idmapped view:   0:0
The pair tells the kernel which UID and GID to use for this file check; it does not tell us everything the process is allowed to do. Traditional Unix permission checks often collapse that authority into “root or not root”. In the classic Linux credential and discretionary-access-control (DAC) model, the kernel starts with a process’s filesystem UID and GID, which normally match its effective IDs, plus its supplementary groups, then compares them with a file’s owner, group and mode bits. Internally, those credentials already hold kernel IDs; user-namespace maps translate between them and the numbers userspace sees, while idmapped mounts add their own ownership translation. UID 0 is the broad, privileged answer to many of those checks, which is why root is a useful shortcut but a poor description of the authority a service actually needs.
That is the usual Unix permission path, but Linux can apply other controls too: POSIX ACLs, capabilities and Linux Security Modules (LSMs). Windows takes a different route: access tokens carry user and group SIDs and privileges, while DACLs on securable objects control access. Linux capabilities divide privileged operations into separate units. For a running thread, the kernel tracks those privileges in five thread capability sets. A software component that changes ownership may need CAP_CHOWN, a network setup helper may need CAP_NET_ADMIN, and a mount operation may need CAP_SYS_ADMIN; granting one does not imply the others.
For a concrete example, a service that binds to a port below 1024 may need CAP_NET_BIND_SERVICE, but it should not also receive CAP_NET_ADMIN, which could let it reconfigure interfaces or routes.
At this point, four related mechanisms are in play:
| Concept | Applies to | What it answers |
|---|---|---|
| ID mapping / idmapped mount | User namespace or mount | How are UID/GID values translated for this path? |
| File ownership, mode bits and ACLs | Inode | Does ordinary file access pass? |
| Thread capability sets | Running thread | Which privileged operations may this thread perform? |
| File capabilities | Executable | What capability state can this executable contribute at execve? |
The first two rows summarize the ownership experiment we just ran. The third is the subject of this section; the fourth returns in the process-creation section.
Do not confuse the third row with file capabilities, like I nearly did. The list below names the five thread capability sets. File capabilities belong to executables and return in the process-creation section. I find it helps to think of the permitted set as the cards in your wallet, the effective set as the card currently in your hand, and the bounding set as a limit on which cards a newly started program’s file capabilities can add to your wallet:
- Permitted: capabilities the thread may make effective.
- Effective: capabilities currently used for permission checks.
- Inheritable: capabilities that may cross an
execveunder specific rules. A parent typically creates a child withfork(2)orclone(2), and the child can then callexecve(2)to replace its program image. The kernel uses this set as one input to the child thread’s post-execvepermitted set. - Bounding: limits which capabilities an executable’s file capabilities can add to the permitted set at
execve. A thread can drop bits from it, but never add them back. - Ambient: capabilities that can survive an
execveof a non-privileged program.
Process creation and capability inheritance
execve(2) replaces the calling process image; it does not create a second process. The libc family around it includes several wrappers:
execl(3),execle(3)andexeclp(3)take a list of arguments; thepvariant searchesPATHand theevariant accepts an explicit environment.execv(3),execvp(3)and GNUexecvpe(3)take an argument vector; thepvariants searchPATHand theevariant accepts an explicit environment.execve(2)is the kernel entry point; the other forms are library wrappers.
For process creation, fork(2) duplicates the calling process, _Fork() is POSIX.1-2024’s async-signal-safe variant that skips pthread_atfork() handlers, vfork(2) temporarily shares the address space until execve or exit, and clone(2) and clone3(2) expose more control over which execution context is shared. clone3(2) is the newer extensible interface, not a replacement for every use of fork(2).
The kernel exposes these thread capability sets as hexadecimal masks:
grep '^Cap' /proc/self/status
# CapInh:  0000000000000000
# CapPrm:  0000000000000000
# CapEff:  0000000000000000
# CapBnd:  000001ffffffffff
# CapAmb:  0000000000000000
command -v capsh >/dev/null && \
    capsh --decode="$(awk '/^CapEff:/ {print $2}' /proc/self/status)"
# 0x0000000000000000=
The five thread capability sets and the execve transformation rules are specified in capabilities(7). Two details stood out to me.
First, the bounding set is inherited by the child across fork and preserved across execve; it can be reduced, not expanded. Dropping a capability from it early prevents a later executable from gaining that capability from its file permitted set during execve. It does not clear that capability from the thread’s current permitted, effective or inheritable sets, and a capability that is already inheritable can still come through a matching file-inheritable bit. Dropping from the bounding set uses PR_CAPBSET_DROP, which requires CAP_SETPCAP in the thread’s user namespace; our experiment therefore runs this step with sudo.
sudo grep '^CapBnd:' /proc/self/status
# CapBnd:  000001ffffffffff

sudo setpriv --bounding-set=-net_raw sh -c '
    echo "After dropping CAP_NET_RAW:"
    grep "^CapBnd:" /proc/self/status
'
# After dropping CAP_NET_RAW:
# CapBnd:  000001ffffffdfff
💡 Note:
File capabilities, which belong to executables rather than running threads, are also affected by user namespaces. Since Linux 5.12, creating a mapping for parent UID 0 requires
CAP_SETFCAP; this prevents a process from creating file capabilities that the parent namespace could later honour. Our mapping sends namespace UID 0 to host UID 1000, so it does not exercise that rule. See capabilities(7) and user_namespaces(7) for the details.
Second, capabilities are scoped to user namespaces, and the relationship is one-way. A capability held by a process in an ancestor user namespace is also recognized in descendant namespaces, but a capability held only in a child does not flow back up. Creating a child user namespace also gives the new member a full capability set in that child, even when it had no capabilities in the parent. That can look like an escalation, but it is confined: those capabilities apply only to resources governed by the child user namespace or by non-user namespaces owned by it. A process that is UID 0 inside a container is therefore not automatically host root. Mapping root into a namespace changes the identity and capability scope, but it is not a complete sandbox by itself.
So far we’ve looked at the process’s identity and the privileged operations its threads may perform. Next, let’s see how cgroups limit the resources available to that workload.
Cgroup v2: one tree and explicit delegation
What can the process consume? That depends on which controllers are enabled in the hierarchy around it. A cgroup controller is a kernel component that accounts for and controls one kind of resource across the cgroup tree. A few common examples are:
- Memory: applies memory limits and protection.
- CPU: distributes CPU time.
- I/O: regulates device I/O.
- PID: limits task creation, which counts threads as well as processes.
In Part 3 we used cgroup v1. A hierarchy here means one independent tree of cgroups. The concrete shape was:
- Memory hierarchy: mounted at
/sys/fs/cgroup/memory, with the experiment’s cgroup at/sys/fs/cgroup/memory/my-oom-example. - CPU hierarchy: a separate controller tree mounted at
/sys/fs/cgroup/cpu. In the Part 3 Docker example, the process was at/docker/<container-id>, making the full path/sys/fs/cgroup/cpu/docker/<container-id>. The exact path is runtime-specific, and a v2 host may not have a separate CPU mount at all.
The same process could therefore belong to two cgroups at once: /my-oom-example in the memory hierarchy and /docker/<container-id> in the CPU hierarchy. These are membership paths relative to their hierarchy mounts, not filesystem paths or copies of the process. Each controller follows the process through its own path. A cgroup is also unrelated to a Unix process group: process groups handle job control and signals, while cgroups control resources.
In the Part 3 v1 experiment, writing a task ID to tasks moved that task into the memory cgroup. In v2, cgroup.procs lists process IDs and moves a process when written, while cgroup.threads exposes thread-level membership. /proc/[pid]/cgroup reports a process’s cgroup path. Cgroup v2 presents a single hierarchy, with controllers enabled for children through cgroup.subtree_control.

A process has one cgroup path in v2, and /proc/[pid]/cgroup reports it in the form 0::<path>.
stat -fc '%T' /sys/fs/cgroup
# cgroup2fs

cat /proc/self/cgroup
# 0::/user.slice/user-1000.slice/session-3.scope

cat /sys/fs/cgroup/cgroup.controllers
# cpuset cpu io memory hugetlb pids rdma misc dmem

cat /sys/fs/cgroup/cgroup.subtree_control
# cpu memory pids
On my Ubuntu VM, cgroup2fs confirms that this is a v2 hierarchy, and the single 0::/... entry shows its unified membership path. The path is machine-specific: this shell was under /user.slice/user-1000.slice/session-3.scope, while the Fedora CoreOS Podman machine used /user.slice/user-501.slice/session-...scope instead. The cgroup.controllers file is the read-only inventory of resource controllers available here; cgroup.subtree_control is the writable switch that makes selected controllers available to child cgroups. Writing +memory to the latter enables memory control one level below, provided the rules below allow it. The output above already shows memory enabled for the root’s children, which is why the experiment below can use memory.max directly.
That gives us the setup for the next step: create a leaf cgroup for the worker and enforce memory.max there. Before we do that, two cgroup v2 rules determine how controllers can be handed down and where the process may live:
- Top-down: a child can enable only controllers that its parent made available.
- No internal processes: a non-root cgroup that gives a resource controller such as
memoryto child cgroups must not contain a process itself. The worker belongs in a child leaf cgroup instead.
💡 Note:
Do not confuse enabling a cgroup controller with the capabilities from the previous section. Writing
+memoryenables the memory controller for child cgroups; it does not add a Linux capability to the writing thread. Capabilities are per-thread, and the kernel checks them in the user namespace governing the resource: a capability held by a process in an ancestor user namespace is recognized in descendants, but a capability held only in a child is not recognized in the parent. Creating or joining a child user namespace can therefore give a process a full capability set in that child without making it privileged in the parent. File capabilities remain a separateexecvemechanism.
Enabling a controller is not the same thing as delegating a subtree. Our experiment runs as root, so it can write anywhere in the tree. Delegation is how a less privileged manager, such as a rootless container runtime or a user’s systemd instance, gets its own piece of the hierarchy: the parent gives it write access to a subtree directory and the relevant cgroup files, but keeps control of the limits at the delegation boundary. Moving a process between cgroups also requires write access to the common ancestor of the source and destination, which keeps a delegate inside its own subtree. A user namespace on its own does not grant any of those cgroup permissions. The delegation section of the cgroup v2 documentation describes the full model.
For our root-run experiment, the two rules above are what matter. So we leave the parent empty, put the worker in a leaf cgroup and set memory.max there.

With the hierarchy in place, let’s put a memory limit on a real process and see what the kernel reports.
A memory limit we can verify
This experiment writes directly to cgroupfs and therefore requires root permissions. Once the memory controller is enabled for the hierarchy, the kernel exposes its control files in the child cgroup. memory.max is one of those files: it is a read-write interface for the cgroup’s hard memory limit, not a shell variable or a Python setting. The cgroup v2 memory interface specifies memory amounts in bytes, so the script writes 64 * 1024 * 1024, or 67108864, to set a 64 MiB limit. It then checks that memory.max exists, starts one memory-hungry process inside the leaf, and reads memory.events, the controller’s event counters, to verify whether the limit was reached and whether the kernel performed an OOM kill.
💡 Note:
This experiment runs directly in the VM rather than inside a container.
sudogives the shell root credentials, but does not by itself create a new user, mount or cgroup namespace./sys/fs/cgroup/container-part4-memoryis a child of the cgroup hierarchy root; it is not the root cgroup itself. The backgroundsudo sh -cwrites its own PID ($$) tocgroup.procs, andgrepverifies that the move succeeded.exec python3replaces that shell without changing its PID or cgroup, so the worker remains accounted against the test cgroup in the VM’s host namespaces.
set -eu
MEMORY_CGROUP_PATH=/sys/fs/cgroup/container-part4-memory

cleanup() {
    sudo rmdir "$MEMORY_CGROUP_PATH" 2>/dev/null || true
}
trap cleanup EXIT

sudo mkdir "$MEMORY_CGROUP_PATH"
test -e "$MEMORY_CGROUP_PATH/memory.max"
echo $((64 * 1024 * 1024)) | sudo tee "$MEMORY_CGROUP_PATH/memory.max"
# 67108864

sudo sh -c "
    set -eu
    echo \$\$ > '$MEMORY_CGROUP_PATH/cgroup.procs'
    grep -qx "\$\$" '$MEMORY_CGROUP_PATH/cgroup.procs'
    exec python3 -c '
x = []
while True:
    x.append(bytearray(1024 * 1024))
'
" &
worker=$!
wait "$worker" || true

sudo cat "$MEMORY_CGROUP_PATH/memory.events"
# low 0
# high 0
# max 37
# oom 1
# oom_kill 1
# oom_group_kill 0
# sock_throttled 0
sudo cat "$MEMORY_CGROUP_PATH/memory.peak" 2>/dev/null || true
# 67108864
cleanup
trap - EXIT
# No output.
The Python worker should be killed when the cgroup cannot reclaim enough memory below memory.max. The outer shell waits for it and deliberately tolerates the non-zero status that follows an OOM kill. memory.events should show increments for max, oom and usually oom_kill. Exact counters vary because reclaim behaviour and the interpreter’s allocation pattern vary. memory.peak is also relatively recent, available since Linux 5.19, which is why the command above tolerates the file’s absence. The cleanup function removes the test cgroup on exit and the explicit cleanup at the end removes it immediately after the readings.
The kernel just killed our Python process. We only saw that after the fact, when we read memory.events; there was no signal telling us that it was struggling on the way there.
memory.max is not the only memory limit, though. memory.high is a softer one. When a cgroup goes over it, the kernel throttles the cgroup’s tasks and makes them reclaim memory themselves before they can allocate more, so they spend time recovering memory instead of doing their actual work. Crossing memory.high never invokes the OOM killer, and usage can stay above it for a while; memory.events counts those episodes in its high field, which stayed at 0 above because we never set it. The OOM path only starts when a charge hits memory.max and reclaim cannot free enough room. Swap has its own budget in cgroup v2, memory.swap.max.
That throttling is the slow stretch before an OOM kill, and it shows up as stall time in the cgroup’s memory.pressure file. To see it, we need PSI.
Pressure Stall Information: limits are not the whole story
Slowdowns are harder to pin down than an OOM kill. A limit tells us what policy we configured, but not how long runnable work spent waiting for CPU, memory or I/O. Pressure Stall Information (PSI) reports that missing piece as stall time, both for the whole system and for an individual cgroup.
The kernel exposes that signal globally through:
/proc/pressure/cpu/proc/pressure/memory/proc/pressure/io
The kernel exposes corresponding pressure files inside each cgroup: cpu.pressure, memory.pressure and io.pressure.
cat /proc/pressure/cpu
# some avg10=0.25 avg60=0.27 avg300=0.65 total=6453577
# full avg10=0.00 avg60=0.00 avg300=0.00 total=0
cat /proc/pressure/memory
# some avg10=0.00 avg60=0.00 avg300=0.00 total=36292
# full avg10=0.00 avg60=0.00 avg300=0.00 total=33859
cat /proc/pressure/io
# some avg10=0.00 avg60=0.04 avg300=0.18 total=2280623
# full avg10=0.00 avg60=0.03 avg300=0.11 total=1390433
A typical file looks like this:
some avg10=0.00 avg60=0.00 avg300=0.00 total=<microseconds>
full avg10=0.00 avg60=0.00 avg300=0.00 total=<microseconds>
The fields in these lines mean:
somemeans that at least one non-idle task was stalled.fullmeans that all non-idle tasks were stalled at the same time.avg10,avg60andavg300are percentages, smoothed as moving averages with 10-, 60- and 300-second time constants. Older samples fade out gradually rather than dropping off at a fixed window boundary.totalis cumulative stall time in microseconds.- System-level CPU
fullis not meaningful, although the line is present for compatibility.
💡 Note:
PSI first appeared in Linux 4.20. The Linux 4.20 release notes describe it as a new way to measure system load and link to its original kernel documentation. The feature requires
CONFIG_PSI; kernels built with PSI default-disabled need thepsi=1boot parameter before these pressure files appear.
Let’s make things a bit more interesting. We’ll create CPU contention inside a child cgroup and watch the pressure build. Reading that cgroup’s pressure file keeps other tasks’ stalls out of the numbers, although other host workloads can still compete with our workers for CPU time. The script creates /sys/fs/cgroup/container-part4-pressure directly below the cgroup hierarchy root, then starts twice as many yes workers as there are CPUs inside it. A separate watch process reads that child cgroup’s cpu.pressure file while the workers compete for the same CPUs. Each worker is wrapped in timeout so the experiment stops after 20 seconds.
💡 Note:
The workers are not in the root cgroup.
sudo sh -cstarts in the shell’s existing cgroup, then writes its PID to the new child cgroup’scgroup.procs; thetimeoutandyesprocesses it creates inherit that child membership. Thewatchcommand remains outside the test cgroup and observes it by reading its pressure file.
set -eu
PRESSURE_CGROUP_PATH=/sys/fs/cgroup/container-part4-pressure

cleanup() {
    sudo rmdir "$PRESSURE_CGROUP_PATH" 2>/dev/null || true
}
trap cleanup EXIT

sudo mkdir "$PRESSURE_CGROUP_PATH"
test -e "$PRESSURE_CGROUP_PATH/cpu.pressure"

sudo sh -c "
    set -eu
    echo \$\$ > '$PRESSURE_CGROUP_PATH/cgroup.procs'
    grep -qx "\$\$" '$PRESSURE_CGROUP_PATH/cgroup.procs'
    workers=\$(nproc)
    i=0
    while [ \$i -lt \$((workers * 2)) ]; do
        timeout 20 yes > /dev/null &
        i=\$((i + 1))
    done
    wait
" &

watch -n 1 sudo cat "$PRESSURE_CGROUP_PATH/cpu.pressure"
# Every 1.0s: sudo cat /sys/fs/cgroup/container-part4-pressure/cpu.pressure
# some avg10=54.64 avg60=12.36 avg300=2.68 total=10002004
# full avg10=0.00 avg60=0.00 avg300=0.00 total=3038
Once the workers have exited, press Ctrl+C to stop watch, then remove the cgroup:
sudo rmdir "$PRESSURE_CGROUP_PATH"
cleanup
trap - EXIT
# No output.
The sample output gives us a few useful signals:
some avg10=54.64: the short-term estimate says that at least one task in the child cgroup was waiting for CPU time for roughly half of the recent past. In this experiment, those were theyesworkers. Because the value is smoothed, read it as a trend rather than exactly 5.46 of the last 10 seconds.avg60=12.36andavg300=2.68: the averages with longer time constants rise more slowly, which tells us the contention was recent rather than sustained.some total=10002004: by this reading, the cgroup had accumulated about 10 seconds ofsomestall time since it was created. For an exact figure over a period you choose, readtotaltwice and divide the difference by the elapsed time.full avg10=0.00: the short-term estimate for all non-idle tasks in the cgroup stalling at the same time is negligible.- After the workers exit, the averages decay toward zero, the 10-second one fastest.
CPU utilization tells us how busy the CPUs are; PSI some tells us how much time at least one task spent waiting for CPU time. Both can be high at once, but utilization alone does not tell us how much work was delayed.
PSI files can also act as event sources. That makes PSI more than a dashboard number: another process can watch for pressure and decide how to respond before the kernel reaches an OOM kill. In practice, the response depends on the layer doing the watching:
- A service can use pressure as an early warning and shed work, slow down or change its behavior.
- Tools such as systemd-oomd and Facebook’s open-source
oomdcan use it to take corrective action before the kernel has to kill something. - Kubernetes exposes PSI at node, pod and container level for operators and monitoring tools, while its built-in eviction logic uses separate resource signals.
The kernel reports the pressure; userspace policy decides what it means and what to do next. The PSI documentation describes the event interface and the corresponding per-cgroup files.
We’ve looked at identity and resources. Next: which operations may the process attempt?
Seccomp: policy at the system-call boundary
I first came across seccomp while reviewing Azure Linux with OS Guard, but I did not look very deeply into it then. I mainly knew it as the mechanism for blocking selected system calls. Now though, I can say that I am about to explore it more properly. The reason it belongs in this post is simple: namespaces change what a process can see, but its system calls still enter the host kernel. Seccomp filters each incoming call before it runs, reducing the kernel surface exposed to the process. It is useful, but it is not a complete sandbox. But it adds to that layered approach to security.
At user level, a system call often starts as an ordinary function call such as read() or open(). Those are usually libc wrappers, not the kernel entry points themselves. The wrapper places a numeric system-call ID and its arguments in the architecture’s syscall Application Binary Interface (ABI), then executes the instruction that enters the kernel. The number is an ID in that ABI’s system-call table: it lets the kernel dispatch the request without passing a function name or pointer. On x86-64 the ID is passed in rax, while arm64 uses x8, and the numbers are architecture-specific. A wrapper may also use a different kernel call; for example, modern glibc’s open() wrapper uses openat(). Seccomp therefore sees the actual kernel system-call number, not necessarily the function name in the source code.
Let’s see those numbers rather than just talk about them. We’ll use strace, which is an incredibly useful tool for observing the actual system calls made by a process, though don’t ever use it to troubleshoot production issues in a live environment, as it can significantly affect performance and behavior of the process it’s tracing.
Here, strace -n prints the numeric syscall ID in brackets before the syscall name.
#!/usr/bin/env bash
set -eu

strace -n -e trace=execve,write \
    /usr/bin/printf 'hello from user space\n' >/dev/null

# [ 221] execve("/usr/bin/printf", ...) = 0
# [  64] write(1, "hello from user space\n", 22) = 22
On the arm64 VM used for this post, execve is syscall 221 and write is syscall 64. An x86-64 machine uses different numbers. strace is showing the kernel entries here; it cannot see the original C function or libc wrapper that led to them.
The trace above gives us a concrete example of that record. On this arm64 VM, [64] write(1, "hello from user space\\n", 22) = 22 means syscall number 64, file descriptor 1, a buffer containing the string and a byte count of 22; the final 22 is the return value. The kernel also includes the ABI architecture and instruction pointer in the read-only seccomp_data record, although strace does not show those fields in this compact output. Since syscall numbers vary across ABIs, a filter should check seccomp_data.arch before seccomp_data.nr.
Before we write a Seccomp policy, let’s inspect the process’s current Seccomp state and ask the kernel which filter actions it supports:
grep '^NoNewPrivs:\|^Seccomp:' /proc/self/status
# NoNewPrivs:  0
# Seccomp:     0

setpriv --no-new-privs sh -c '
    grep "^NoNewPrivs:" /proc/self/status
'
# NoNewPrivs:  1

cat /proc/sys/kernel/seccomp/actions_avail
# kill_process kill_thread trap errno user_notif trace log allow

cat /proc/sys/kernel/seccomp/actions_logged
# kill_process kill_thread trap errno user_notif trace log
The initial Seccomp: 0 means that no filter is attached to this shell. NoNewPrivs: 0 means the flag is not set yet. setpriv(1) turns it on for the child shell with --no-new-privs. Outputting the actions_avail file will show you a list of filter actions supported by the running kernel. The ordering, from left-to-right, is the least permissive return value to the most permissive return value. The separate actions_logged file lists the actions that are allowed to be logged. Whether a returned action actually produces a log record also depends on the action itself, whether the filter asked for logging, and the audit configuration. allow is absent because allowed system calls are never logged by this mechanism. This matters when a policy chooses an action such as user_notif or log, because the available and logged actions depend on the kernel and its configuration.
Since setpriv has not installed a filter, it only starts a child shell with no_new_privs=1, which is the kernel’s precondition for an unprivileged thread to install one without CAP_SYS_ADMIN. Without that flag, the filter installation fails; with it, a later execve cannot regain privilege through a set-user-ID program or file capabilities. The filter can only tighten the rules, so a launcher or worker can restrict itself and its future children without gaining new authority.
We have set the precondition, but we have not told the kernel what to do with a matching call. Those rules live in a small policy program. Seccomp reuses the classic Berkeley Packet Filter (BPF), a small instruction set originally created for packet filtering. Here it does not inspect packets or call back into user space: it reads fields from the read-only seccomp_data record, compares them, and returns a SECCOMP_RET_* action. A C program represents those instructions as a struct sock_filter array and wraps that array in a struct sock_fprog.
Before we zoom in on the API, here is the complete flow:
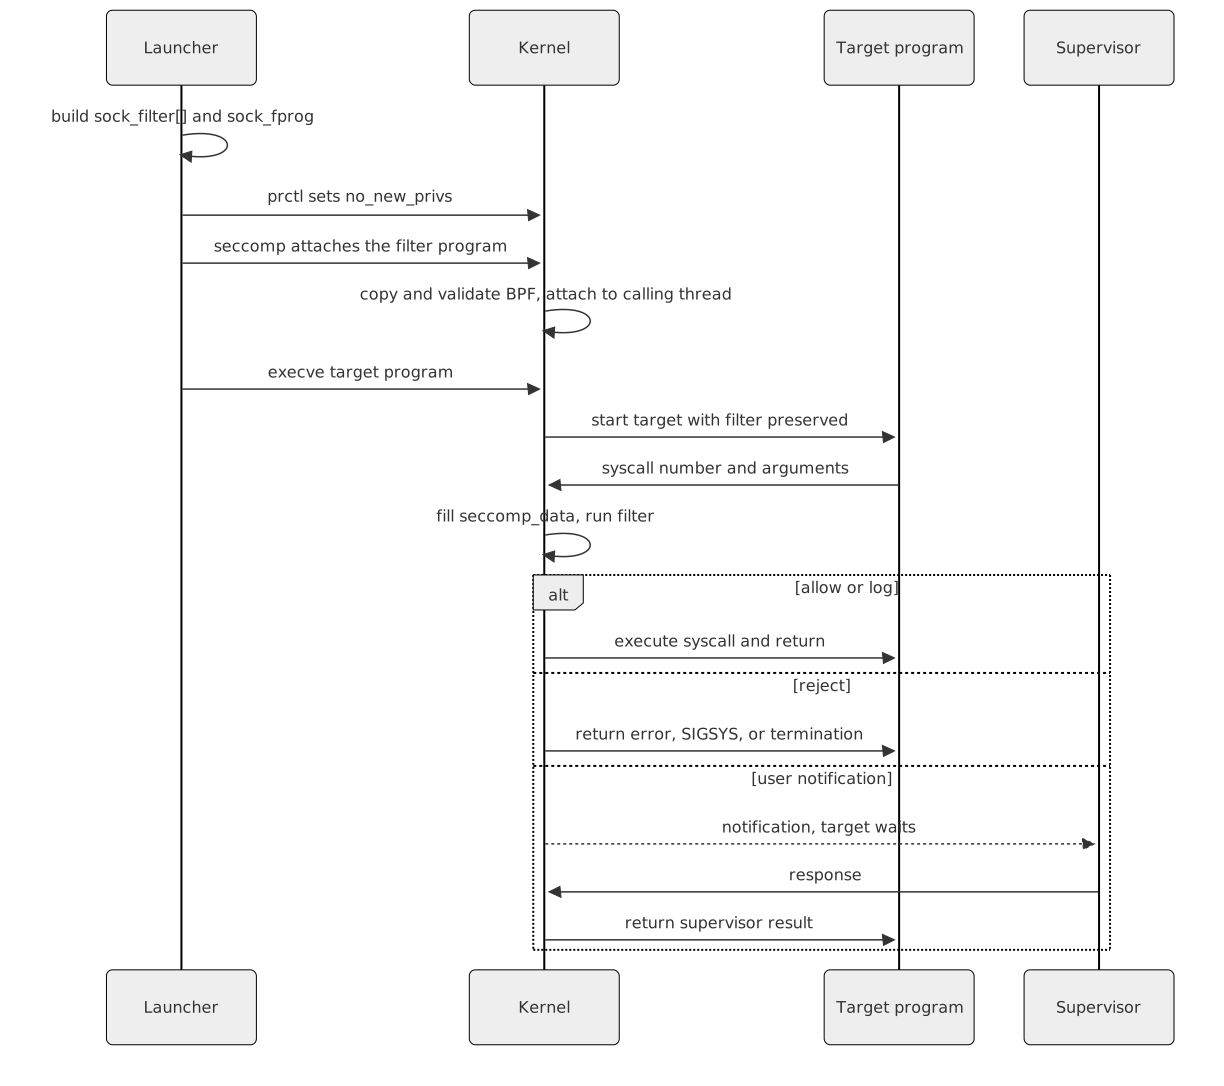
💡 Who is the supervisor?
The supervisor in this diagram is an ordinary userspace process acting as a broker. It might be a container-runtime helper or a dedicated process that holds the seccomp listener file descriptor. When the target makes a matching system call, the kernel pauses it and sends a notification to the supervisor, which validates the request, decides what to allow and sends a response. The
seccomp_unotify(2)man page documents this listener protocol. Theuser-trap.csample later in this section uses the same arrangement to broker amount(2)call.
So how does this little program get attached to the process, and what happens after that? Let’s simplify the handoff with a small API sketch. It assumes the filter instructions are already built, so it is not a complete program; real code must still check the return values:
struct sock_fprog program = {
    .len = instruction_count,
    .filter = instructions,
};

prctl(PR_SET_NO_NEW_PRIVS, 1, 0, 0, 0);
syscall(SYS_seccomp, SECCOMP_SET_MODE_FILTER, 0, &program);
The first call is the prctl(2) step we just prepared with setpriv; the second asks seccomp(2) to copy, validate and attach program to the calling thread. This is not a separate BPF file being loaded from disk, and it is not the general bpf(2) loader: the classic BPF instructions arrive as part of the seccomp() call. If fork(2) or clone(2) is allowed, children inherit the filter, and an allowed execve(2) preserves it. The full user-trap.c sample later in this section shows the surrounding listener setup.
You would not normally embed this C snippet in every application. For a container, you configure a seccomp profile; the OCI runtime translates it into BPF instructions and installs the filter before starting the container’s entry point. A standalone program can use a small launcher that installs the filter and then calls execve, or install it during its own startup if it needs to restrict itself. Nothing is injected into an already-running application: seccomp() attaches the filter to the calling thread. Here the flags are 0, so existing sibling threads are unaffected; install the filter before creating other threads, or use SECCOMP_FILTER_FLAG_TSYNC when you need to synchronize an existing thread group.
💡 Kubernetes example:
Kubernetes exposes Seccomp through a Pod or container’s security context.
RuntimeDefaultuses the container runtime’s default profile, whileLocalhostlets an operator provide a custom profile on the node. The official Seccomp tutorial follows a useful progression: start with the default, audit the calls, deliberately trigger a violation, then narrow the profile to what the workload needs. We are taking a smaller kernel-level route here, but the idea is the same: observe first, then restrict.
Seccomp user notification: brokering selected system calls
Until now, we’ve inspected system calls and the seccomp actions available to filter them. With SECCOMP_RET_USER_NOTIF, a matching call pauses while a userspace supervisor responds. Mounting a filesystem inside a container may require CAP_SYS_ADMIN in the user namespace that owns its mount namespace, a broad capability. A trusted container-runtime helper can keep that privilege: it checks the requested filesystem and target against its policy, performs the mount in the container’s mount namespace, and returns success or an error. The workload gets the result, not the capability.
With SECCOMP_RET_USER_NOTIF, the kernel pauses the target thread and sends a notification to a listener file descriptor. A supervisor, such as a helper process for a container runtime, can inspect the request and respond with a value or error. It can also inject a file descriptor with SECCOMP_IOCTL_NOTIF_ADDFD.
💡 From the docs:
The
SECCOMP_RET_USER_NOTIFreturn code lets seccomp filters pass a particular syscall to userspace to be handled. This may be useful for applications like container managers, which wish to intercept particular syscalls (mount(),finit_module(), etc.) and change their behavior.
Consider a mount(2) call with a pathname argument. seccomp_data gives the supervisor the address of the string, not a copy of the pathname. A suitably privileged supervisor can open /proc/<tid>/mem to read it. It should check SECCOMP_IOCTL_NOTIF_ID_VALID after opening the file and before reading, then check the ID again after the read. The first check prevents it from reading another task’s memory if the target exited and its TID was reused; the second catches a notification invalidated by a signal interrupting the call. If either check fails, discard the bytes and abandon that notification.
That ID check does not freeze the target’s memory. Another thread can change the pathname while the calling thread waits. If the supervisor responds with SECCOMP_USER_NOTIF_FLAG_CONTINUE, the kernel runs the original mount(2) and reads the pathname from target memory, which may no longer match what the supervisor checked. That’s the time-of-check/time-of-use risk. The seccomp_unotify(2) man page warns that user notification must not be used as the security policy itself.
The control path looks like this:
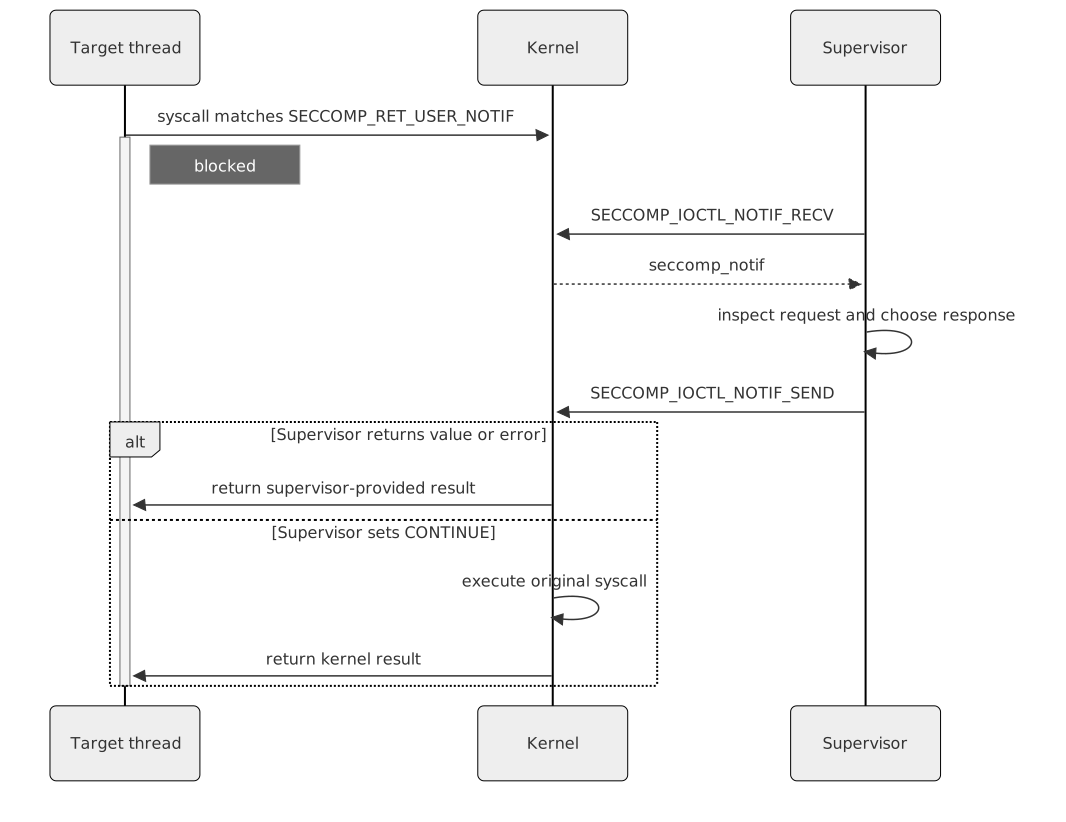
The seccomp_unotify(2) man page walks through the full exchange in nine steps. This diagram focuses on the response choice: the supervisor can send a value or error without running the original syscall, or set SECCOMP_USER_NOTIF_FLAG_CONTINUE to have the kernel execute it.
💡 Remember
ioctl?An
ioctl(2)call sends a command to an open file descriptor. Here, the first argument is the seccomp listener fd, the request code selects the operation, and the third argument points to its data:SECCOMP_IOCTL_NOTIF_RECVfills astruct seccomp_notifwith details of the blocked syscall, whileSECCOMP_IOCTL_NOTIF_SENDpasses astruct seccomp_notif_respback to the kernel.
Trying the kernel’s mount-broker example
We’ve been through the theory; now let’s see how it works in practice. I found a mount-broker example in the kernel source at samples/seccomp/user-trap.c. It installs a seccomp filter for mount(2), passes the listener to a supervisor over a Unix socket, and lets the supervisor perform the mount after receiving the notification.
Prepare the kernel source tree
The kernel source tree is a prerequisite for this sample. The commands below assume it is at /usr/src/linux. On Ubuntu 24.04 and later, edit /etc/apt/sources.list.d/ubuntu.sources and add deb-src to each Types: line (for example, Types: deb deb-src). On older releases, add a matching deb-src entry for each deb line in /etc/apt/sources.list.
Then fetch the source package for the running kernel:
sudo apt-get update
mkdir -p "$HOME/kernel-source"
cd "$HOME/kernel-source"
apt-get source "linux-image-unsigned-$(uname -r)"
APT unpacks the source into a versioned directory in the current directory. Use that path in place of /usr/src/linux in the build command below. Other distributions use different package names; choose the source package matching the kernel you are running. The full tree takes well over a gigabyte unpacked, so make sure the VM has enough disk space.
Once you have the source tree, build and run the sample to watch the hand-off from target to listener to supervisor:
cd /usr/src/linux
cc -O2 -Wall samples/seccomp/user-trap.c -o /tmp/user-trap
sudo /tmp/user-trap
printf 'exit status: %s\n' "$?"
# exit status: 0
The sample may be silent while everything works: the supervisor receives the notification, performs the brokered mount on the target’s behalf and tears everything down without ceremony. Some kernel-source versions print ioctl recv: No such file or directory during shutdown; that message is not a failed mount. SECCOMP_IOCTL_NOTIF_RECV blocks while no notification is pending. ENOENT indicates that a notification was interrupted or invalidated; after the filter’s last thread terminates and is reaped, the listener reports end-of-file or POLLHUP. The sample should still exit with status 0.
Read the sample while it runs: it obtains a listener with SECCOMP_FILTER_FLAG_NEW_LISTENER, passes that file descriptor over a Unix socket, receives notifications with SECCOMP_IOCTL_NOTIF_RECV, validates the ID and replies with SECCOMP_IOCTL_NOTIF_SEND.
For the API contract and race warnings, use the upstream seccomp filter documentation and seccomp_unotify(2), not a simplified wrapper description.
Landlock: unprivileged restrictions on kernel objects
I hadn’t heard of Landlock before I started on this post, so it firmly belongs to the things I had missed since 2020. It is a Linux Security Module (LSM), which means it plugs into the same kernel hooks that AppArmor and SELinux use. The difference is who writes the policy. AppArmor profiles and SELinux policy are loaded by the system administrator. Landlock lets an ordinary, unprivileged process restrict itself and every child it starts afterwards. It stacks with the other controls instead of replacing them, and it can only take access away: it cannot grant access that Unix permissions, ACLs, AppArmor or another Landlock layer denied.
Why do we need it when seccomp exists? While working through the seccomp examples, I ran into a limitation that is easy to miss: system-call arguments reach the kernel as plain numbers. For a pathname or a buffer, that number is the address where the data sits in the process’s memory. strace can show us the raw values:
strace -e trace=write -e raw=write \
    /usr/bin/printf 'hello from user space\n' >/dev/null
# write(0x1, 0xb6ef7b7fc0b0, 0x16)        = 0x16
That second argument, 0xb6ef7b7fc0b0 in this run, is all the kernel receives for our string. Expect a different address on your machine, and even between runs, because the kernel randomizes where a process’s memory is placed.
The readable "hello from user space\n" in the earlier trace only appeared because strace reads the traced process’s memory for us. A seccomp filter cannot do that: it can compare the numbers, but it cannot follow an address to the data stored there. If it could, the program could change the string between the filter’s check and the moment the kernel uses it, which is the same time-of-check/time-of-use race we saw with the supervisor. So a filter can express “no mount(2)” or “no mount(2) with these flags”, but never “no mount(2) onto /mnt”.
The mount-broker example ran into exactly this. Its supervisor had to read the path strings from /proc/<tid>/mem itself, and still had to deal with that race. Landlock makes its decision after the kernel has resolved the path to an actual file or directory, which makes it a fit for questions about objects rather than system calls, such as “this process may read /usr and write only beneath /tmp/container-part4/work”.
💡 From the docs:
Namespaces can help create sandboxes but they are not designed for access-control and then miss useful features for such use case (e.g. no fine-grained restrictions).
Linux kernel documentation: What about namespaces and containers?
Since seccomp and Landlock can both restrict a process, let’s put them side by side:
| Seccomp | Landlock | |
|---|---|---|
| Decides on | System-call number, architecture and raw argument values | Access rights on kernel objects, such as file hierarchies and TCP ports |
| Sees a pathname as | A pointer into the process’s memory | The file or directory the kernel resolved |
| Policy format | A classic BPF program | A ruleset built with three dedicated system calls |
| Unprivileged use | Requires no_new_privs | Requires no_new_privs |
| Children | Inherit the filter; execve preserves it | Inherit the domain; execve preserves it |
Both can sit on the path of the same request. When a restricted process opens a file, the kernel roughly goes through these layers, and any of them can say no:

Three system calls and a ruleset
The Landlock API is small. glibc does not provide wrappers for it, so programs call these through syscall(2) or use a library:
landlock_create_ruleset(2)creates a ruleset and declares which access rights it handles. Once the ruleset is enforced, handled rights are denied by default; rights it does not handle stay unrestricted.landlock_add_rule(2)adds exceptions to that default: allow these handled rights beneath this directory (a path-beneath rule), or allow binding or connecting to this TCP port (a network rule).landlock_restrict_self(2)enforces the ruleset on the calling thread. From then on, that thread and every child it creates run inside a Landlock domain. Enforcing another ruleset later stacks a new layer on top of the existing ones, up to a limit of 16 layers.
Like an unprivileged seccomp filter, landlock_restrict_self(2) requires no_new_privs, or CAP_SYS_ADMIN in the process’s user namespace. The reason is the same one we saw in the seccomp section: without no_new_privs, a sandboxed process could execve a set-user-ID program, which would then run with elevated privileges inside a sandbox it was never written for. The sandboxer sample we will use in a moment sets the flag for us.
In practice, application developers and runtime authors write these rules, while operators choose or audit the service that runs under them.
Which Landlock ABI does my kernel support?
Landlock first appeared in Linux 5.13, and it has grown since then through ABI versions. Each ABI version adds access rights that the kernel knows how to enforce:
- ABI 1: filesystem rights, such as executing, reading, writing, creating and removing files and directories.
- ABI 2:
LANDLOCK_ACCESS_FS_REFER, which controls renaming and linking files across directories. - ABI 3: file truncation.
- ABI 4: binding and connecting TCP sockets by port number.
- ABI 5:
ioctl(2)on character and block devices. - ABI 6: scoping, which keeps a sandbox from connecting to abstract Unix sockets or signalling processes outside its domain.
- ABI 7: control over audit logging of denied accesses.
- ABI 8 and later: thread synchronization, pathname Unix sockets, UDP ports and more. The previous limitations section of the kernel documentation keeps the full list.
Before we ask for the ABI version, let’s check that Landlock is switched on at all. It has to be built into the kernel with CONFIG_SECURITY_LANDLOCK=y and enabled at boot as one of the active LSMs. The CONFIG_LSM value in the kernel’s build configuration only sets the default list; the lsm= boot parameter can override it. So rather than grepping /boot/config-*, I prefer to look at what the running kernel actually initialized:
cat /sys/kernel/security/lsm
# lockdown,capability,landlock,yama,apparmor
sudo dmesg | grep -i landlock
# [    0.003945] LSM: initializing lsm=lockdown,capability,landlock,yama,apparmor,integrity
# [    0.003957] landlock: Up and running.
/sys/kernel/security/lsm lists the active LSMs in the order the kernel calls them, and the landlock: Up and running. line is the check the kernel documentation itself suggests. That tells us Landlock is active on this Ubuntu VM, but not which ABI version the kernel supports. For that, we have to ask the kernel through the system call itself. Save this as /tmp/landlock-abi.c:
#define _GNU_SOURCE
#include <errno.h>
#include <linux/landlock.h>
#include <stdio.h>
#include <sys/syscall.h>
#include <unistd.h>

int main(void)
{
    long abi = syscall(SYS_landlock_create_ruleset, NULL, 0,
                       LANDLOCK_CREATE_RULESET_VERSION);
    if (abi < 0) {
        perror("landlock_create_ruleset");
        return 1;
    }
    printf("Landlock ABI: %ld\n", abi);
    return 0;
}
Passing NULL, 0 and LANDLOCK_CREATE_RULESET_VERSION does not create a ruleset; it asks for the highest ABI version the running kernel supports:
cc -O2 -Wall /tmp/landlock-abi.c -o /tmp/landlock-abi
/tmp/landlock-abi
# Landlock ABI: 4
The VM I ran this probe on runs Ubuntu 24.04 with a 6.8 kernel, which reports ABI 4. A newer kernel reports a higher number. If the call fails instead, the error tells us why:
ENOSYS: the kernel does not implement the Landlock system calls.EOPNOTSUPP: the kernel supports Landlock, but it was not enabled at boot.
This is mainly a check for programmers and runtime authors. A launcher should query the ABI at startup, mask out the rights that the running kernel does not support, and then decide explicitly whether to continue. Keep in mind what that masking means: on an older kernel, the sandbox is weaker than the policy you wrote. If a restriction is required, the launcher should refuse to start rather than quietly run without it. An operator does not need to run the probe for every service, but the result helps when diagnosing why a sandbox started without its intended restriction.
Trying the kernel’s sandboxer sample
While poking around the same samples directory, I came across samples/landlock/sandboxer.c. It is a small launcher that negotiates the ABI, builds path-beneath rules from two environment variables, sets no_new_privs, enforces the ruleset and then calls execve on the command we give it:
LL_FS_RO: colon-separated paths the command may read and execute.LL_FS_RW: colon-separated paths the command may also write to, create files in and remove files from.
The sandboxer handles every filesystem right that the running kernel supports, so any path missing from both lists is off limits. Network rights are only handled when we set the optional LL_TCP_BIND or LL_TCP_CONNECT variables, so this run leaves networking unrestricted. Build the sample from the source tree that matches your kernel, then start a shell inside the sandbox:
cd /usr/src/linux
cc -O2 -Wall samples/landlock/sandboxer.c -o /tmp/landlock-sandboxer

mkdir -p /tmp/container-part4/work
LL_FS_RO=/usr:/bin:/lib:/etc \
LL_FS_RW=/tmp/container-part4/work \
    /tmp/landlock-sandboxer /bin/sh
The path list must match the guest. /lib64 is absent on my arm64 Ubuntu VM, and adding it to LL_FS_RO made the sandboxer from the 6.8 source tree stop with Failed to open "/lib64": No such file or directory. Newer versions of the sample log the missing path and continue without that rule instead. Either way, treat a missing path as a configuration error rather than assuming the restriction was applied as intended. Depending on the version, the sample may also print Executing the sandboxed command... or a hint that the kernel supports an older ABI than the sample does; otherwise, you land at a plain shell prompt.
Inside the restricted shell, let’s try a few things:
echo "allowed" > /tmp/container-part4/work/result
cat /tmp/container-part4/work/result
# allowed
echo "denied" > /tmp/container-part4/outside
# /bin/sh: 3: cannot create /tmp/container-part4/outside: Permission denied
ls /home
# ls: cannot open directory '/home': Permission denied
cat /proc/self/status
# cat: /proc/self/status: Permission denied
exit
Here’s what each of those lines tells us:
- The write to
/tmp/container-part4/work/resultsucceeds becauseLL_FS_RWhas a rule for that directory, and the read succeeds because read rights come with it. - The write to
/tmp/container-part4/outsidefails, even though Unix permissions let our user write to/tmp. Landlock added a restriction on top of those permissions. - Listing
/homefails as well. Reading is a handled right too, so a path we did not list is closed for reads, not only for writes. - Reading
/proc/self/statusfails for the same reason. That one caught me out: I wanted to check theNoNewPrivsflag from inside the sandbox and got a permission error instead.
Add /proc to LL_FS_RO and the check works. It also confirms that the sandboxer set the same no_new_privs flag we met in the seccomp section, even though it did not install a seccomp filter:
LL_FS_RO=/usr:/bin:/lib:/etc:/proc \
LL_FS_RW=/tmp/container-part4/work \
    /tmp/landlock-sandboxer /bin/sh -c '
        grep -E "^(NoNewPrivs|Seccomp):" /proc/self/status
    '
# NoNewPrivs:  1
# Seccomp:     0
Notice that every denial above is an ordinary Permission denied, which is EACCES, the same error that a failed Unix permission check returns. The message alone does not tell you which layer said no, so keep a sandbox in mind when a permission error does not match the file’s owner and mode bits.
The exact environment variables and supported rights can change with the sample, which is another reason to use the file from the matching source tree. The kernel’s Landlock documentation contains the full ABI compatibility pattern.
What the ruleset does not cover
Landlock checks filesystem rights at the operation they govern, not only when a file is opened. Read and write access is checked when a file is opened; creation, removal, linking or renaming, truncation and execution rights are checked when their corresponding operations are attempted. A file descriptor opened before the ruleset was enforced remains usable. Let’s demonstrate by opening a file outside the allowed directory in our unrestricted shell and passing it to the sandboxed command as file descriptor 3:
printf 'x\n' > /tmp/container-part4/outside-fd
LL_FS_RO=/usr:/bin:/lib:/etc \
LL_FS_RW=/tmp/container-part4/work \
    /tmp/landlock-sandboxer /bin/sh -c '
        echo "appended through fd 3" >&3
    ' 3>>/tmp/container-part4/outside-fd
cat /tmp/container-part4/outside-fd
# x
# appended through fd 3
The sandboxed shell could not have opened /tmp/container-part4/outside-fd by path, but it could write through the descriptor it inherited. A launcher therefore has to check which descriptors it passes down, not only which paths it allows. The kernel documentation lists a few more limits:
- Not every file operation is covered. The documentation lists syscall families that Landlock cannot currently restrict, such as
stat(2),chmod(2)andchown(2). - Not a complete network or IPC sandbox. Our run left networking unrestricted. TCP and UDP port rules and IPC scoping exist, but only on kernels with a new enough ABI, and only when the launcher asks for them.
- OverlayFS layers are separate hierarchies. Container images are often mounted with overlayfs. A rule on a lower or upper layer does not restrict the merged directory, and vice versa, so rules should target the paths the process actually uses.
- Mount changes are blocked,
chrootis not. A thread with filesystem restrictions cannot callmount(2)orpivot_root(2), butchroot(2)is not denied.
💡 Note:
Entering another user or mount namespace does not remove a Landlock domain. Landlock restrictions are inherited across
forkand preserved acrossexecve. A process can add another restrictive layer, but it cannot remove a layer it already applied.
We have now looked at four kinds of boundaries: identity, resources, system calls and object access. From the host, we can inspect the process’s namespaces, cgroup membership, capability masks and seccomp mode and filter count in /proc, then trace its system calls. /proc does not expose Landlock rules; to investigate those, inspect the launcher’s configuration or audit output, or run a controlled access test. I find these host-side checks useful when troubleshooting because they don’t depend on which tools happen to exist inside the container.
Observe the boundary from the host
Start a shell with new user, UTS, mount and PID namespaces:
unshare --user --map-root-user \
    --uts --mount --pid --fork --mount-proc \
    sh -c '
        hostname part4
        echo "inner PID: $$"
        sleep 300
    ' &
# inner PID: 1

outer_pid=$!
sleep 1
target_pid="$(
    awk '{print $1}' \
        /proc/"$outer_pid"/task/"$outer_pid"/children
)"
echo "unshare PID: $outer_pid"
# unshare PID: 15918
echo "target host PID: $target_pid"
# target host PID: 15920
The host PIDs above are sample output and will differ on another run; only the target’s inner PID 1 is predictable from this setup.
The PID printed inside may be 1, while $target_pid is the same process’s ordinary host PID. $outer_pid belongs to the unshare process waiting for that child. Part 3 drew this as a tree of PID namespaces, where one process carries a different PID in every namespace that can see it; here is that same picture for this experiment, including the nsenter shell we will start in a moment:

Now inspect the target from the host:
readlink /proc/self/ns/user
# user:[4026531837]
sudo readlink /proc/"$target_pid"/ns/*
# cgroup:[4026531835]
# ipc:[4026531839]
# mnt:[4026532209]
# net:[4026531833]
# pid:[4026532211]
# pid:[4026532211]
# time:[4026531834]
# time:[4026531834]
# user:[4026532208]
# uts:[4026532210]
sudo cat /proc/"$target_pid"/uid_map
#          0       1000          1
sudo cat /proc/"$target_pid"/gid_map
#          0       1000          1
sudo cat /proc/"$target_pid"/cgroup
# 0::/user.slice/user-1000.slice/session-16.scope
sudo grep '^Cap\|^NoNewPrivs\|^Seccomp' \
    /proc/"$target_pid"/status
# CapInh:  0000000000000000
# CapPrm:  000001ffffffffff
# CapEff:  000001ffffffffff
# CapBnd:  000001ffffffffff
# CapAmb:  0000000000000000
# NoNewPrivs:  0
# Seccomp:     0
# Seccomp_filters:  0
sudo head -1 /proc/"$target_pid"/mountinfo
# 74 70 8:1 / / rw,relatime - ext4 /dev/sda1 rw,discard,errors=remount-ro,commit=30
The mnt, pid, user and uts links differ from the host’s own, while the namespaces we did not unshare, such as net and ipc, still match. The two identical pid: lines are no accident: readlink prints link targets, pid_for_children resolves to a pid:[...] target as well, and the doubled time: lines come from time_for_children in the same way. Two processes are members of the same namespace when the corresponding links in /proc/[pid]/ns identify the same namespace type and inode. Holding a namespace file descriptor or bind-mounting one also keeps that namespace alive after its last process exits. namespaces(7) documents those lifetime rules.
We can enter selected namespaces with nsenter(1) without pretending that the host PID changed:
sudo nsenter --target "$target_pid" \
    --uts --mount --pid \
    sh -c '
        hostname
        echo "PID after entering: $$"
        ps
    '
# part4
# PID after entering: 4
#   PID TTY          TIME CMD
#     4 pts/1    00:00:00 sh
#     6 pts/1    00:00:00 ps
The entered shell receives a PID in the target’s PID namespace; in this run it was 4. By default, ps lists processes with the same effective UID and controlling terminal as its caller. The target’s PID 1 maps to host UID 1000, while sudo nsenter leaves this shell running as host root, so ps filters it out by UID even though both processes have pts/1 as their terminal.
It is tempting to treat that shell as “being inside the container”, but it only shares the namespaces we selected. Let’s ask the entered shell about its own security context:
sudo nsenter --target "$target_pid" \
    --uts --mount --pid \
    sh -c '
        readlink /proc/self/ns/user
        grep -E "^(CapEff|NoNewPrivs|Seccomp):" /proc/self/status
    '
# user:[4026531837]
# CapEff:  000001ffffffffff
# NoNewPrivs:  0
# Seccomp:     0
The user namespace link is the host’s user:[4026531837] from earlier, not the target’s user:[4026532208]. We did not pass --user, so the shell stays root in the initial user namespace with a full effective capability set. It also did not join the target’s cgroup, which nsenter treats as a separate option, and it did not pick up any seccomp filter or Landlock domain the target might have. Those are inherited from a parent process, and this shell’s parent is our sudo, not the target.
⚠️ Warning:
A shell entered with
nsentershares selected namespace views with the target, not its complete security context. If an operation succeeds from that shell, it does not prove that the workload itself can perform it. Use it to inspect the namespace, not to reproduce the application’s permissions.
Finally, watch a narrow set of system calls from the host:
sudo strace -f -p "$target_pid" \
    -e trace=%process,%file,mount,umount2,pivot_root \
    -s 120
# strace: Process 15920 attached
# restart_syscall(<... resuming interrupted read ...>
Because sleep already exists when this command attaches, -f will follow only children created afterward; this sample mostly shows the target shell waiting. To trace the full lifecycle, start the namespace command under strace -f from the beginning. As I mentioned in the seccomp section, strace changes timing and may expose sensitive arguments, so I would not attach it casually to a production database. In a lab it is wonderfully direct, but this particular attach only caught the target waiting, and that target has no Landlock ruleset to begin with.
To see what a policy decision looks like at this level, let’s trace the Landlock sandboxer from earlier, starting from its first instruction. The -e trace= list keeps the output to the Landlock calls, prctl and openat:
LL_FS_RO=/usr:/bin:/lib:/etc \
LL_FS_RW=/tmp/container-part4/work \
    strace -f \
        -e trace=landlock_create_ruleset,landlock_add_rule,landlock_restrict_self,prctl,openat \
        /tmp/landlock-sandboxer \
        /bin/sh -c 'echo denied > /tmp/container-part4/outside'
# landlock_create_ruleset(NULL, 0, LANDLOCK_CREATE_RULESET_VERSION) = 4
# landlock_create_ruleset({handled_access_fs=LANDLOCK_ACCESS_FS_EXECUTE|...|LANDLOCK_ACCESS_FS_TRUNCATE, handled_access_net=0}, 16, 0) = 3
# openat(AT_FDCWD, "/usr", O_RDONLY|O_CLOEXEC|O_PATH) = 4
# landlock_add_rule(3, LANDLOCK_RULE_PATH_BENEATH, {allowed_access=LANDLOCK_ACCESS_FS_EXECUTE|LANDLOCK_ACCESS_FS_READ_FILE|LANDLOCK_ACCESS_FS_READ_DIR, parent_fd=4}, 0) = 0
# ...
# openat(AT_FDCWD, "/tmp/container-part4/work", O_RDONLY|O_CLOEXEC|O_PATH) = 4
# landlock_add_rule(3, LANDLOCK_RULE_PATH_BENEATH, {allowed_access=LANDLOCK_ACCESS_FS_EXECUTE|LANDLOCK_ACCESS_FS_WRITE_FILE|..., parent_fd=4}, 0) = 0
# prctl(PR_SET_NO_NEW_PRIVS, 1, 0, 0, 0)  = 0
# landlock_restrict_self(3, 0)            = 0
# ...
# openat(AT_FDCWD, "/tmp/container-part4/outside", O_WRONLY|O_CREAT|O_TRUNC, 0666) = -1 EACCES (Permission denied)
# /bin/sh: 1: cannot create /tmp/container-part4/outside: Permission denied
# +++ exited with 2 +++
I trimmed the shared-library openat calls and the repeated rules. What’s left lines up with the three Landlock system calls from earlier:
- The first
landlock_create_rulesetcall is the ABI probe; this 6.8 kernel answers4. - The second call creates the ruleset and lists the handled rights.
handled_access_net=0confirms that this run leaves networking alone. - For each path in
LL_FS_ROandLL_FS_RW, the sandboxer opens the directory withO_PATHand passes that descriptor tolandlock_add_rule. The/tmp/container-part4/workrule carries the write rights; the read-only paths do not. prctl(PR_SET_NO_NEW_PRIVS, ...)andlandlock_restrict_selffollow, in that order, just like the seccomp handoff we looked at earlier.- The shell’s
openaton/tmp/container-part4/outsidereturnsEACCES. That is the path operation Landlock rejected.
strace shows that the call failed and with which error, but not which layer said no. Here we know it was Landlock, because Unix permissions let our user write to /tmp. A seccomp filter returning errno would look much the same in this output, which is why the /proc/<pid>/status checks earlier still matter.
Clean up the sleeping shell and the files from the earlier experiments:
kill "$target_pid"
wait "$outer_pid" 2>/dev/null || true
rm -rf /tmp/container-part4
# No output.
Troubleshooting the experiments
Along the way, these experiments tripped me up in a few recurring ways, so let’s separate those failure modes from the concepts themselves.
unshare: Operation not permitted
The kernel may disable unprivileged user namespaces, a security policy may block unshare, or you may already be inside a restricted user namespace. Check the local policy and compare the user-namespace links:
sysctl user.max_user_namespaces
# user.max_user_namespaces = 3308
sysctl kernel.apparmor_restrict_unprivileged_userns
# kernel.apparmor_restrict_unprivileged_userns = 1
readlink /proc/self/ns/user
# user:[4026531837]
grep '^Seccomp:' /proc/self/status
# Seccomp:  0
On my Ubuntu lab VM the culprit was that second line. Since Ubuntu 23.10, AppArmor only lets a process create an unprivileged user namespace when its profile contains a userns, rule.
This diagnosis is Ubuntu-specific. Fedora CoreOS uses SELinux and does not expose kernel.apparmor_restrict_unprivileged_userns; the Podman machine used for the other examples creates the user namespace without this sysctl change.
Canonical ships such profiles for browsers and other known applications, but a plain unshare is not on that list. The restriction does not always fail where you would expect it to, either: on my VM the namespace was created with its privileges stripped, and the error only surfaced one step later, as unshare: write failed /proc/self/uid_map: Operation not permitted. sudo dmesg makes the mechanism visible: AppArmor audits a userns_create transition into its unprivileged_userns profile, then denies that profile the sys_admin capability, which is why creating the namespace succeeds while mapping IDs into it does not.
The proper fix is an AppArmor profile for the application in question; since this VM is disposable, I flipped the sysctl to 0 and moved on. A related stumble: unshare --map-auto needs the newuidmap and newgidmap helpers, which Ubuntu ships in the separate uidmap package.
Resist the urge to “fix” this by adding every capability. Move the experiment to a disposable VM where you control the policy.
The idmapped mount returns EINVAL
Check all three moving parts:
- kernel version
- util-linux version
- filesystem support
Also verify the mapping direction, and be careful with the mount(8) man page here: it names the parameters id-type:id-mount:id-host:id-range, but on my lab VM b:1000:0:1 is what makes filesystem ID 1000 appear as ID 0 through the mount, while b:0:1000:1 leaves the file at the overflow ID 65534. When in doubt, test both directions against a scratch file, exactly like the experiment above.
Enabling a cgroup controller returns EBUSY
The cgroup probably contains a process while you are trying to enable a domain controller for its children. Move that process into a leaf cgroup, then enable the controller in the parent. If the error is EACCES, inspect delegation and ownership instead.
The Landlock sample reports that the ABI is unavailable
The sandboxer prints Failed to check Landlock compatibility, followed by a hint that depends on the error:
Landlock is not supported by the current kernel: the kernel is older than 5.13 or was built withoutCONFIG_SECURITY_LANDLOCK=y.Landlock is currently disabled: the kernel supports Landlock, butlandlockis missing from the active LSM list. Compare/sys/kernel/security/lsmwith thelsm=value on/proc/cmdline.
Treat the result as a capability probe rather than silently continuing as if the restriction had been applied.
The Landlock sandbox cannot start the command
If the sandboxer prints Failed to execute "/bin/sh": Permission denied, followed by a hint that access to the binary, the interpreter or shared libraries may be denied, the ruleset is too tight for the program itself. The dynamic loader and shared libraries live in different places on different distributions and architectures, which is why /lib64 exists on some guests and not on others. Check the paths with ldd /bin/sh and add the missing directories to LL_FS_RO. A Failed to open message for one of the listed paths means that the path does not exist on this guest.
Seccomp notification code hangs
Confirm that the supervisor still holds the listener file descriptor and services every notification. Inspect /proc/sys/kernel/seccomp/actions_avail, then trace the supervisor and target from another shell. A target remains blocked until the listener responds, the listener closes or a terminating signal wins.
What I took away from this revisit
The kernel did not gain one new feature called “better containers” during the last six years. It gained more precise ways to compose identity, resource control, operation filtering and object access.
Let’s revisit those three questions from the start of this post:
- If a process is root inside its own user namespace, why do files on disk still show up as someone else’s? A user namespace changes the credentials a process uses, not the inode. The kernel stores the host ID selected by the mapping, so namespace UID 0 created a file owned by host UID 1000. An idmapped mount can change that ownership view for one mount path, again without rewriting the inode.
- What happens between a workload getting slow and a memory limit killing it? The OOM kill only showed up in
memory.eventsafter the fact. PSI makes the stretch before it visible as stall time, for the whole system or for one cgroup. Softer limits such asmemory.highand userspace tools such as systemd-oomd act in that stretch; the kernel’s OOM kill is the last resort. - Can seccomp really pause a system call and let another process decide its outcome? Yes. With
SECCOMP_RET_USER_NOTIF, the kernel holds the call while a supervisor decides. The supervisor is a broker, not a policy engine, though: it reads arguments from memory that can change underneath it. That is also why path-based restrictions fit better in Landlock, which checks the object the kernel resolved.
My takeaway is to look beyond whether a process runs as root. What matters is which identity and effective capability set the kernel checks, and which user namespace governs the resource involved. So I’ll start with these steps from the host perspective when a container misbehaves, this is roughly the order in which I now look:
- The namespace links and ID maps, from the host-side observation section.
- The capability sets in
/proc/<pid>/status, decoded withcapsh. - The process’s cgroup path, limits and event counters.
- The PSI counters for that cgroup.
- The
NoNewPrivs,SeccompandSeccomp_filterslines from the seccomp section. - Whether a Landlock ruleset could explain a
Permission deniedthat the file’s owner and mode bits do not. - When all else fails, the system calls themselves, traced from the host with
strace.
The original model, from my earlier posts, still gives me a useful starting point, but this post showed where it falls short: the shorthand leaves identity mappings, mount-level ownership translation, pressure signals, system-call policy and object-level access controls hidden. Knowing which kernel primitive supplies each part should tell me where to look when something leaks, stalls or fails.
That is where I want to leave Part 4, with the individual pieces visible enough to inspect. A future post could follow how runtimes such as runc and crun wire them together, or where checkpoint/restore fits into the picture. Hopefully these experiments help you poke at your own containers with a little more confidence. Happy exploring! 🐧
References
I’ll just leave you with a list of references for further reading. I try to ensure that this is an exhaustive list that anyone, humans or agents can tap into for further investigation. Most of these are man pages and kernel documentation, which I find to really be the authoritative sources for these primitives.
Man pages
- namespaces(7)
- user_namespaces(7)
- cgroups(7)
- capabilities(7)
- seccomp(2)
- seccomp_unotify(2)
- mount_setattr(2)
- mount(8)
- ioctl(2)
- prctl(2)
- landlock(7)
- landlock_create_ruleset(2)
- landlock_add_rule(2)
- landlock_restrict_self(2)
- unshare(1)
- nsenter(1)
- setpriv(1)
- strace(1)
Kernel documentation
- Idmapped mounts
- Control Group v2
- Pressure Stall Information (PSI)
- Seccomp BPF and user-space notification
- Linux Security Module development
- Landlock: unprivileged access control
- Landlock: system-wide management
Operational consumers
- systemd resource control
- systemd-oomd
- Kubernetes PSI metrics
- Kubernetes node-pressure eviction
- Podman stats
- facebookincubator/oomd
Blogs and articles
- Restricted unprivileged user namespaces are coming to Ubuntu 23.10, I. Loutfi, October 2023
- Exploring Containers - Part 1, Part 2 and Part 3
Code
- ThomVanL/blog-2026-07-exploring-containers-part-4
- microsoft/WSL2-Linux-Kernel, the kernel that ships with WSL2
- samples/seccomp/user-trap.c in the kernel source tree
- samples/landlock/sandboxer.c in the kernel source tree
- landlock.io, the Landlock project’s site with links to libraries and tools
Notice anything off? Please, let me know!