Microsoft Entra Privileged Identity Management (for Azure Resources) Revisited
In this post
Five years seems like an eternity, but that’s how long it’s been since I last wrote and spoke about Privileged Identity Management. Since then, there has been a name change and a bit of a portfolio shuffle in Microsoft’s Azure AD offerings, so much so that it has been rebranded for quite some time now. To be completely honest, I still catch myself calling it Azure AD PIM from time to time. 🙂
But nonetheless, nowadays, it’s called Microsoft Entra, and the service I’ll be looking at is Entra ID Privileged Identity Management. More specifically, I’ll be looking at “PIM for Azure resources”.
What is Entra PIM?
Let’s say I’m a user who needs to read a BLOB in a particular storage account. However, my company has an enterprise security policy that limits my access to read-only permissions in the Azure portal. The good news is that I am allowed to request additional permissions, provided that my request is approved by someone (who must be notified via email) and logged somewhere. Ideally, these permissions are temporary and should be removed after a some time has passed.
💡 Note
Organizations want to minimize the number of people with access to secure information or resources, as this reduces both the risk of a malicious actor gaining access and the chance of an authorized user inadvertently impacting a sensitive resource.
Building a system like this from scratch is quite an undertaking, so let’s assume our fictional IT team at our fictional enterpise has opted to use Entra PIM. It allows us to request specific Azure roles at a defined scope and for a limited period of time, even if our current permissions are lower.
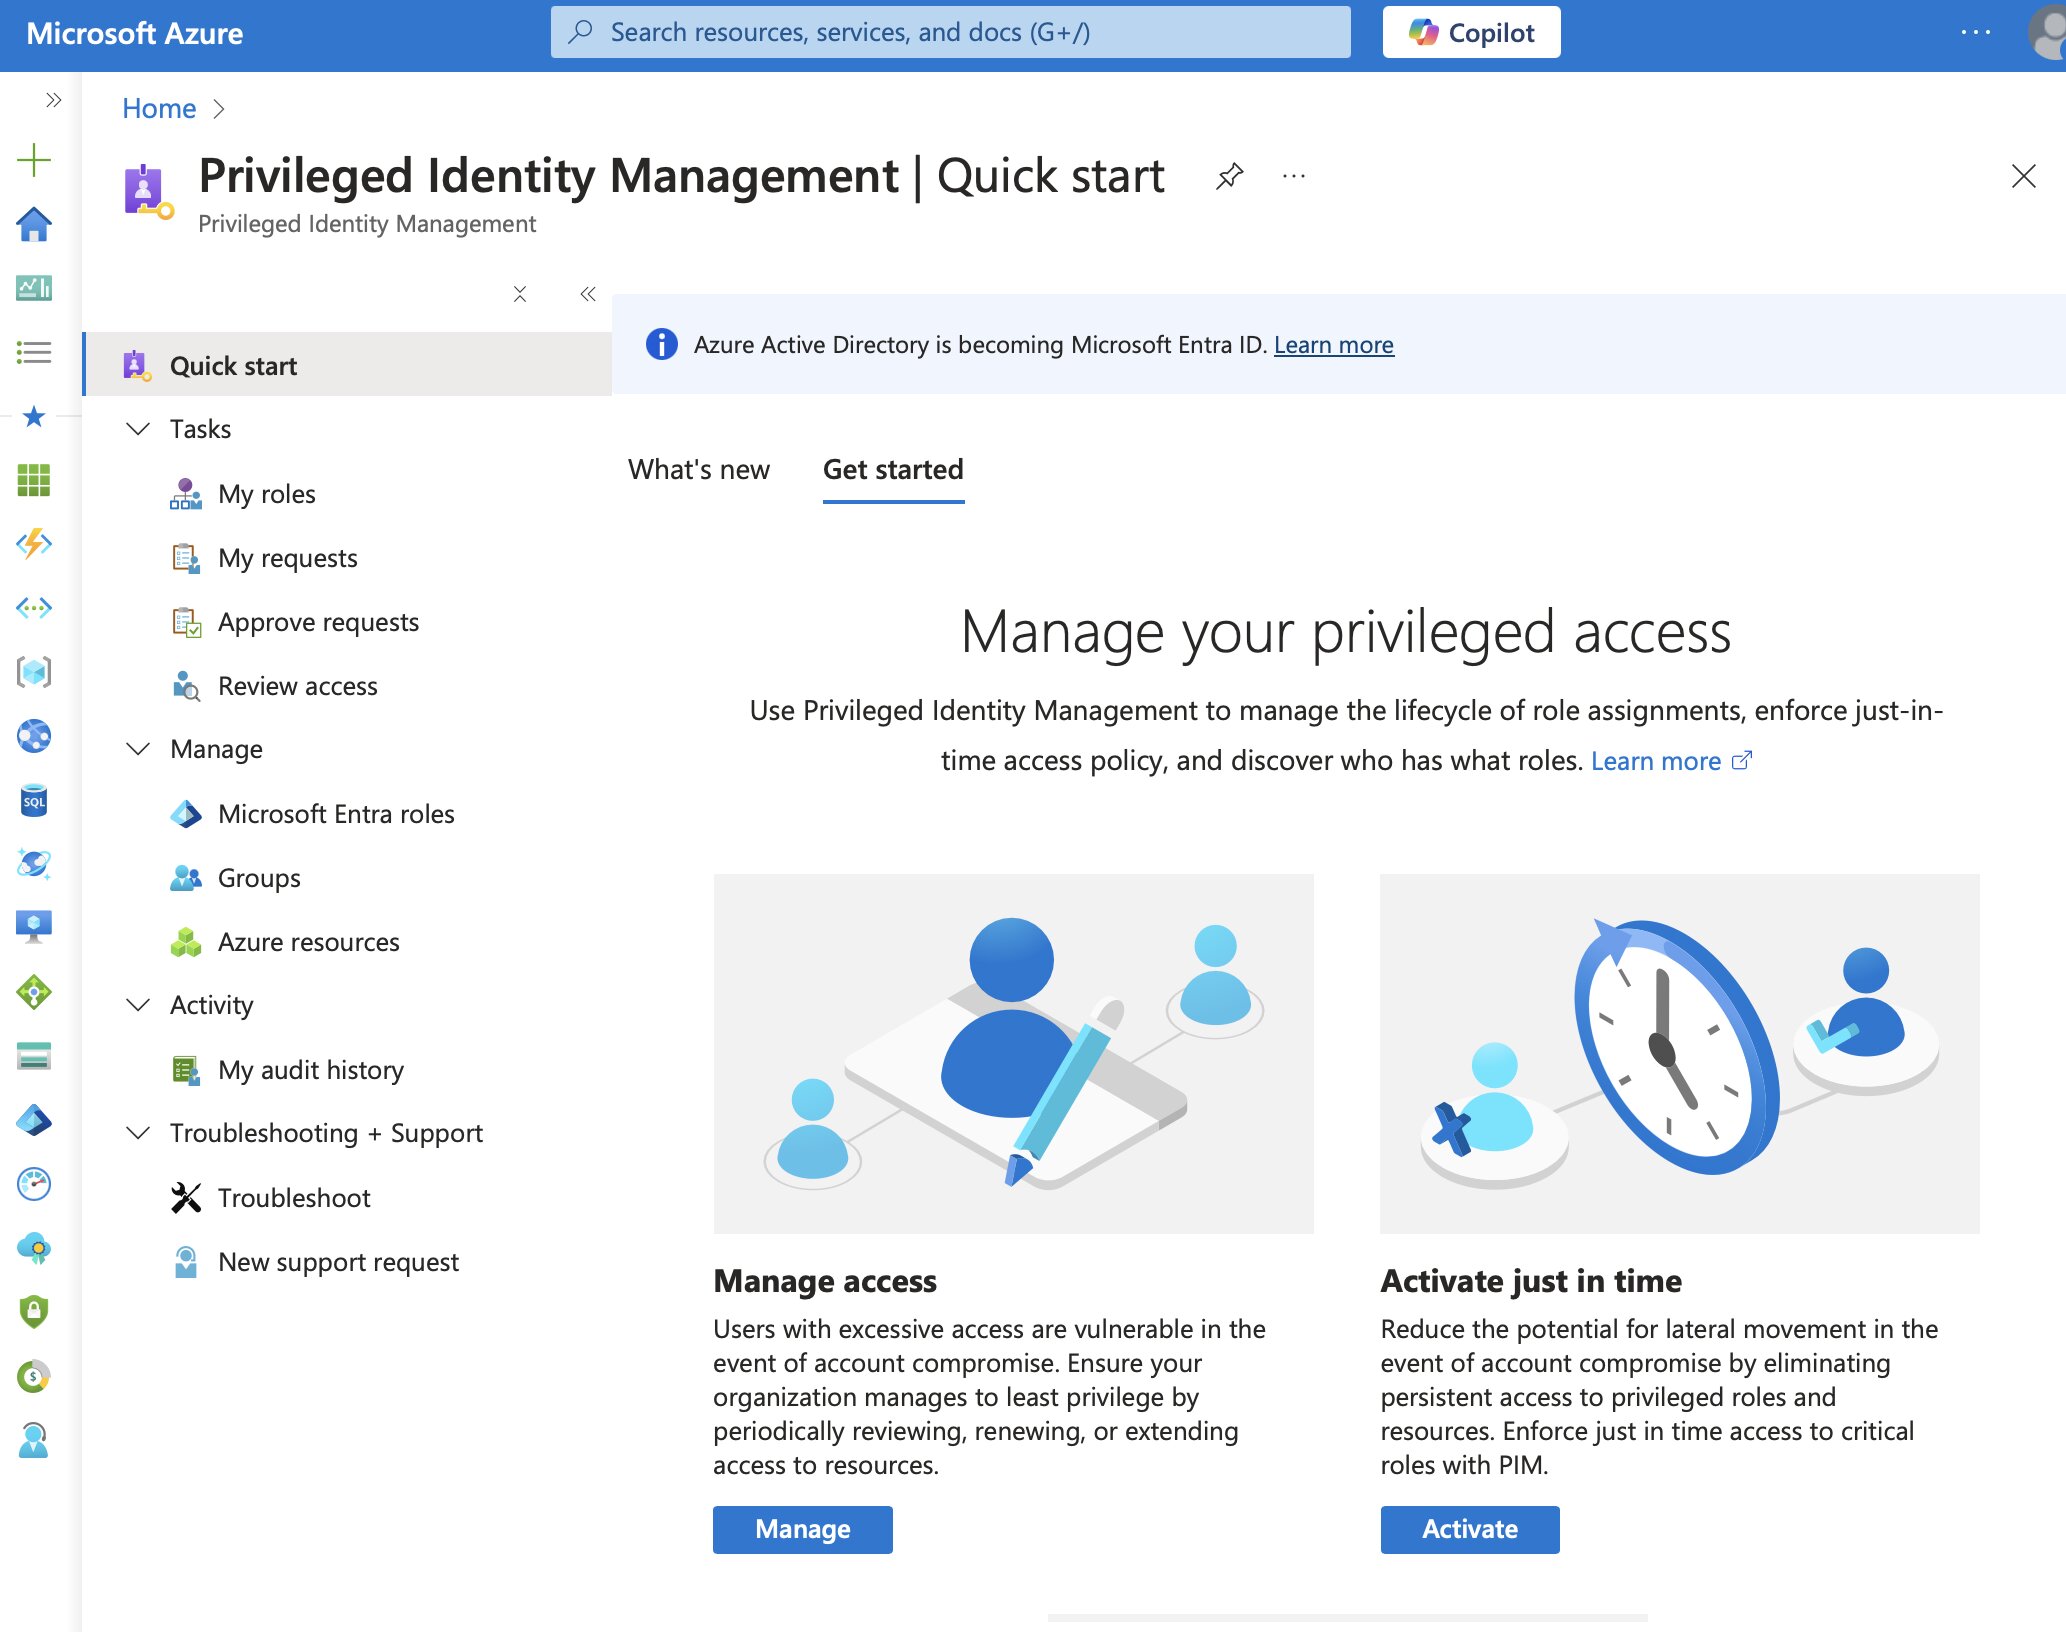
PIM provides a straightforward user interface that is accessible directly from the Azure portal.
That said, users will still need to perform privileged operations in things like Microsoft Entra ID, Azure, Microsoft 365, or even certain SaaS apps. Fortunately though, PIM allows organizations to easily manage those users’ just-in-time privileged access, while also providing some sort of oversight of what they do with that access.
Privileged Identity Management helps mitigate risks associated with excessive, unnecessary, or misused access permissions. It supports both time-based and approval-based role activation. Organizations can enforce justification requirements, multi-factor authentication (MFA), and access reviews for users requesting elevated permissions. PIM also provides notifications, audit logs, and access reviews, helping organizations maintain security and compliance.
PIM Providers
Microsoft Entra PIM includes three key providers:
I’ll focus on PIM for Azure Resources, but first, let’s go over a brief introduction to Role assignments and settings in PIM.
Role Assignments in PIM
You can create two types of role assignments in PIM. Eligible assignments allow users to opt into a specific role within a defined scope for a limited time. In contrast, active assignments function similarly to standard Azure RBAC role assignments but with the added ability to set expiration times.
- Eligible assignments
- Can be assigned to users and groups
- Cannot be assigned to service principals
- Active assignments
- Can be assigned to all principals
These assignments have defined durations:
- Permanent: The assignment has no end date or time;
- Eligible assignments cannot be permanent;
- Time-bound: The assignment has a specified end date and time.
Role Settings and PIM Policies
In PIM, role settings (also called PIM policies) define role assignment properties. These properties include:
- Multi-factor authentication (MFA) requirements;
- Approval requirements for role activation;
- Maximum duration for assignments;
- Notification settings.

Role settings apply per role and per resource, meaning:
- Role settings for one role don’t impact another role;
- Role settings for one resource don’t affect another resource;
- Higher-level role settings aren’t inherited at lower levels.
💡 Note
This applies only to how the role settings are configured and saved in PIM, not to how Azure RBAC permissions work. Azure RBAC follows a hierarchical model, where higher-level permissions, meaning at the Subscription level, are inherited by lower levels, such as resource groups. However, PIM role settings are independent of this hierarchy.
For example, you might set a maximum duration of 1 hour for Contributor permissions at the Subscription level in PIM. But, at the Resource Group level, you could configure the same role to have a maximum duration of 3 hours. The settings at the higher level don’t automatically apply to the lower level.
Azure RBAC or Entra ID PIM?
The following question might have popped into your mind; when do you use Azure RBAC and when do you use PIM? Turns out, RBAC and PIM are not mutually exclusive, you can use both at the same time.
- Azure RBAC: Use when you need to quickly assign a role to a security principal without requiring extensive auditing.
- PIM for Azure Resources: Use when you need to assign a role ith additional controls, such as activation duration, multi-factor authentication (MFA), approval workflows, notifications, and auditing.
💡 Note
To use PIM, you’ll need the correct license. You must have either Microsoft Entra ID Governance or Microsoft Entra ID P2 licenses to access PIM and all its features. For more details, check out Microsoft’s documentation on licensing.
Story Time
Micha Wets and I were assigned to a project for a customer using PIM at scale. Their workflow involved recycling Azure environments by removing and later redeploying certain resource groups. However, this process caused previously configured PIM Azure resource role assignments at those scopes to be deleted. We were asked to come up with a way to automate role assignments, set expiration dates on them, and scope them to the newly created resource groups.
This was a task that turned out to be more challenging than we first expected.
Back in late 2019, there were very few (supported) ways to interact with the backend API powering PIM. Many available tools were either closed-source, in alpha-stage, or relied on undocumented APIs.
To make things even trickier, while Azure resources have human-readable resource IDs like this:
/subscriptions/d83ee643-063a-4988-9e0b-7b3c0fbafd2e/resourceGroups/hello-world-rg
PIM maintained its own internal GUIDs for tracking roles and settings. This wouldn’t have been an issue; except that there was no way to query the API for the corresponding internal GUID based on an Azure resource ID without jumping through a few hoops first. Worse still, these GUIDs were non-deterministic, meaning that every time we redeployed a resource, PIM would generate a completely new internal GUID.
Finding a Workaround
To solve this, we proposed a creative, though admittedly a little fragile, approach… We began by intercepting the API calls being made from the Azure Portal UI to the backend API. By capturing these calls, we were able to reverse-engineer the API requests and figure out how to create new PIM assignments programmatically for an app registration at the correct scope.
We then explained to the customer that this approach could break if Microsoft changes the backend API. They were comfortable with this risk, as manually reassigning roles was more of an inconvenience than a critical blocker.
💡 Note
If you’re craving more PIM API lore, check out the PIM API history section in Microsoft’s documentation!
When the Workaround Broke
This solution worked well for four to five years; a surprisingly long time given the unofficial nature of the API calls we were using. However, eventually, the automation script started failing. The culprit turned out to be the V2 API endpoint, since it would no longer accept access tokens that were made by a service principal; in this case an app registration.
When we originally built the script, we leveraged the app-only access model from the Microsoft Identity platform. This allowed our automation script to interact with the PIM API without requiring a signed-in user. But once Microsoft locked down this access, our approach stopped working entirely.
PIM in 2025
When I was asked to take a look at the failing script, I first had to reacquaint myself with how PIM’s API worked. My primary concern was whether we could still use it in an automation setting with a managed identity. This meant the new v3 PIM API backend would need to support app permissions. Luckily, Microsoft now provides a much cleaner way to manage PIM, one that aligns far more closely with what Micha and I had hoped for back in 2019.
“PIM for Azure resource roles” has been available through the Azure Resource Manager (ARM) REST API for quite some time. This is great news, as it enables various deployment scenarios, including those using managed identities and service principals.
In Iteration 3 of PIM, every PIM provider now has its own dedicated REST API endpoint.
📖 From the docs
The “PIM APIs for Azure resource roles” are built on top of the Azure Resource Manager. You need to consent to Azure Resource Management, but you don’t need Microsoft Graph permissions. Additionally, the user or service principal calling the API must have at least the Owner or User Access Administrator role on the target resource.
Overview of tools
Let’s go through an overview of the available tools and methods for managing PIM for Azure Resources:
Via Infrastructure as Code (IaC)
| Category | Provider/Service | Resource/Link |
|---|---|---|
| Terraform | hashicorp/azurerm | azurerm_role_management_policy |
azurerm_pim_eligible_role_assignment | ||
azurerm_pim_active_role_assignment | ||
azure/azapi | azapi_resource | |
↳ Combine azapi_resource with roleAssignmentScheduleRequests | ||
↳ Combine azapi_resource with roleEligibilityScheduleRequests | ||
| Bicep / ARM | Microsoft.Authorization | roleAssignmentScheduleRequests |
roleEligibilityScheduleRequests |
Limitation: Updating role management policies is not possible via Bicep/ARM or azapi_resource.
Via Scripting Tools
| Category | Provider/Service | Resource/Link |
|---|---|---|
| PowerShell | Az.Resources | *-AzRoleManagementPolicy |
*-AzRoleEligibilityScheduleRequest | ||
*-AzRoleAssignmentScheduleRequest |
If something isn’t available natively, don’t worry! The Azure REST API will be your best bet to deal with your issue, let’s look at this next.
Via Azure CLI?
The Azure CLI (az) currently lacks commands to specifically target PIM. However, you can still leverage the REST API via az rest to perform CRUD operations on PIM resources.
The best part is that az rest will automatically use the access token of the currently authenticated user or service principal. This is pretty cool because it eliminating the need to manually handle authentication tokens.
💡 Note
Hey, can I call the Azure REST API from PowerShell as well?
Yes! Just use
Invoke-AzRestMethod.
Via REST API
I often find that when infrastructure-as-code (IaC) tools or scripting languages fall short, the Azure Resource Manager (ARM) REST API serves as the ultimate fallback. Microsoft’s documentation now offers detailed guidance on managing PIM using the REST API and even covers a few scenarios, such as role assignments to approval workflows and alert handling. Super useful and, I think, not at all difficult to understand.
| Category | Provider/Service | Scenario |
|---|---|---|
| REST API | Microsoft.Authorization | Manage Role Management Policies |
| Manage Eligible Role Assignments | ||
| Manage Active Role Assignments | ||
| Approve/Deny PIM Role Requests | ||
| Monitor & Remediate PIM Alerts |
Bicep: Creating an Eligible Azure Role Assignment
While the Terraform documentation provides good examples of how to deploy Azure PIM roles, I couldn’t find a solid example for Bicep, ARM, or azure/azapi… So let’s fix that.
We’ll begin by creating an eligible Azure role assignment. This will allow the deployer (whoever is logged) to request the “Arc VMware Contributor” role for the resource group pim-rg through the PIM portal.
param principalId string = az.deployer().objectId

@description('This is the built-in "Arc VMware Contributor" role.')
resource arcVmwareVmContributorRoleDefinition 'Microsoft.Authorization/roleDefinitions@2022-04-01' existing = {
  scope: subscription()
  name: 'b748a06d-6150-4f8a-aaa9-ce3940cd96cb'
}

resource roleEligibilityScheduleRequest 'Microsoft.Authorization/roleEligibilityScheduleRequests@2022-04-01-preview' = {
  name: guid(resourceGroup().id, arcVmwareVmContributorRoleDefinition.id, principalId)
  properties: {
    principalId: principalId
    requestType: 'AdminAssign'
    roleDefinitionId: arcVmwareVmContributorRoleDefinition.id
    scheduleInfo: {
      startDateTime: '2025-01-28T00:00:00Z'
      expiration: {
        duration: '8:00:00'
        type: 'AfterDuration'
        endDateTime: '2026-01-28T00:00:00Z'
      }
    }
  }
}
💡 Note
Microsoft has guidance on referencing built-in role definitions from Bicep. When creating a resource that references a built-in role definition, you need to specify a fully qualified resource ID. Built-in role definition IDs are subscription-scoped resources, so the best practice is to use an
existingresource to refer to the role and access its fully qualified resource ID using the.idproperty.
Now, we just need to deploy it to the appropriate scope:
az deployment group create  --resource-group "pim-rg" \
                            --name "pimtest" \
                            --template-file azuredeploy.bicep
This results in the following eligible role assignment in PIM:
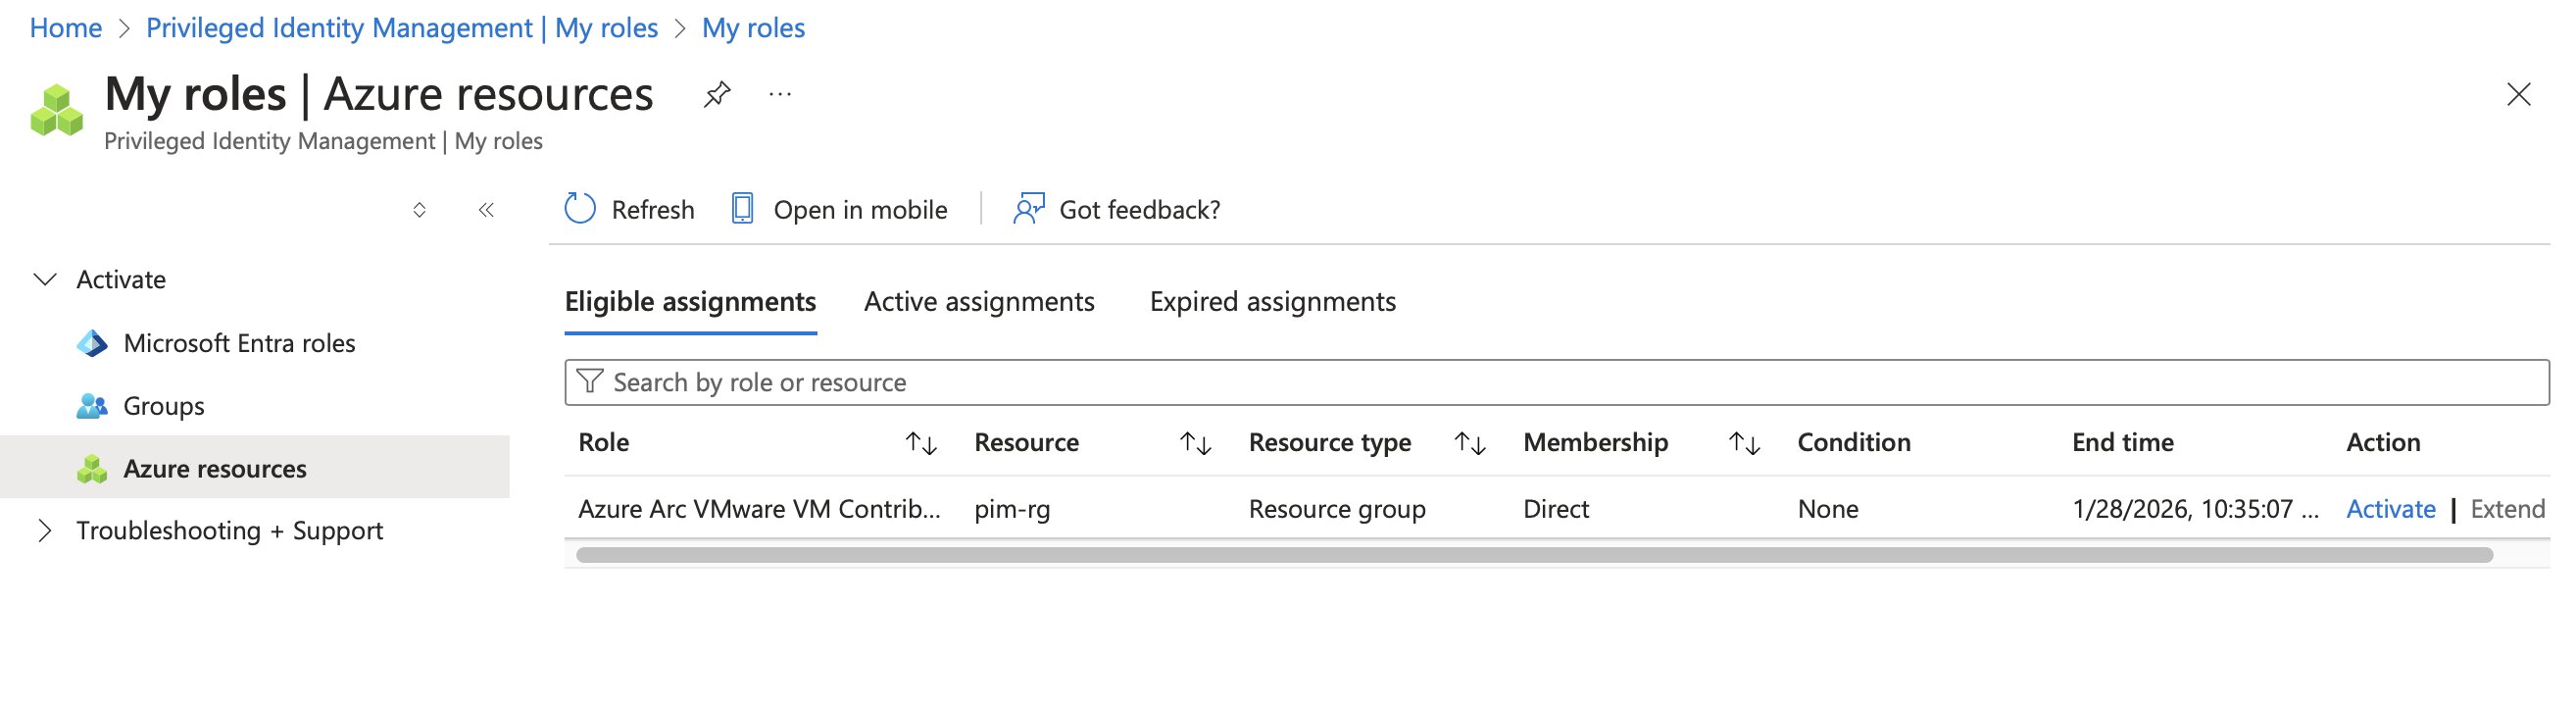
Exactly what I was looking for!
⚠ Warning
Any service principal with
OwnerorUser Access Administratorpermissions can create PIM assignments at a specific scope. Consider using Azure Policy to restrict or monitor these deployments to prevent unintended privilege escalations.
Take a Step into ABAC
Azure attribute-based access control (ABAC) allows you to set fine-grained access controls, which also apply to roles when activated through PIM! A role assignment condition is an additional check that refines permissions granted by a role definition and role assignment.
💡 Note
You don’t need PIM to generate the ABAC syntax—regular Azure RBAC works just fine.
Let’s test this with an example. Suppose we want a principal—whether an Entra user, group, or service principal—to create role assignments but only for specific roles. We can use ABAC to limit which role definitions they are allowed to assign. In this case, we will allow a user to assign only the following roles:
- AcrDelete
- AcrImageSigner
- AcrPull
- AcrPush
Diving straight into Azure ABAC’s syntax can be overwhelming at first (it certainly was for me). Fortunately, the Azure portal provides a wizard-like experience for configuring ABAC settings, which we can then export and use in a Bicep template.
Getting the condition
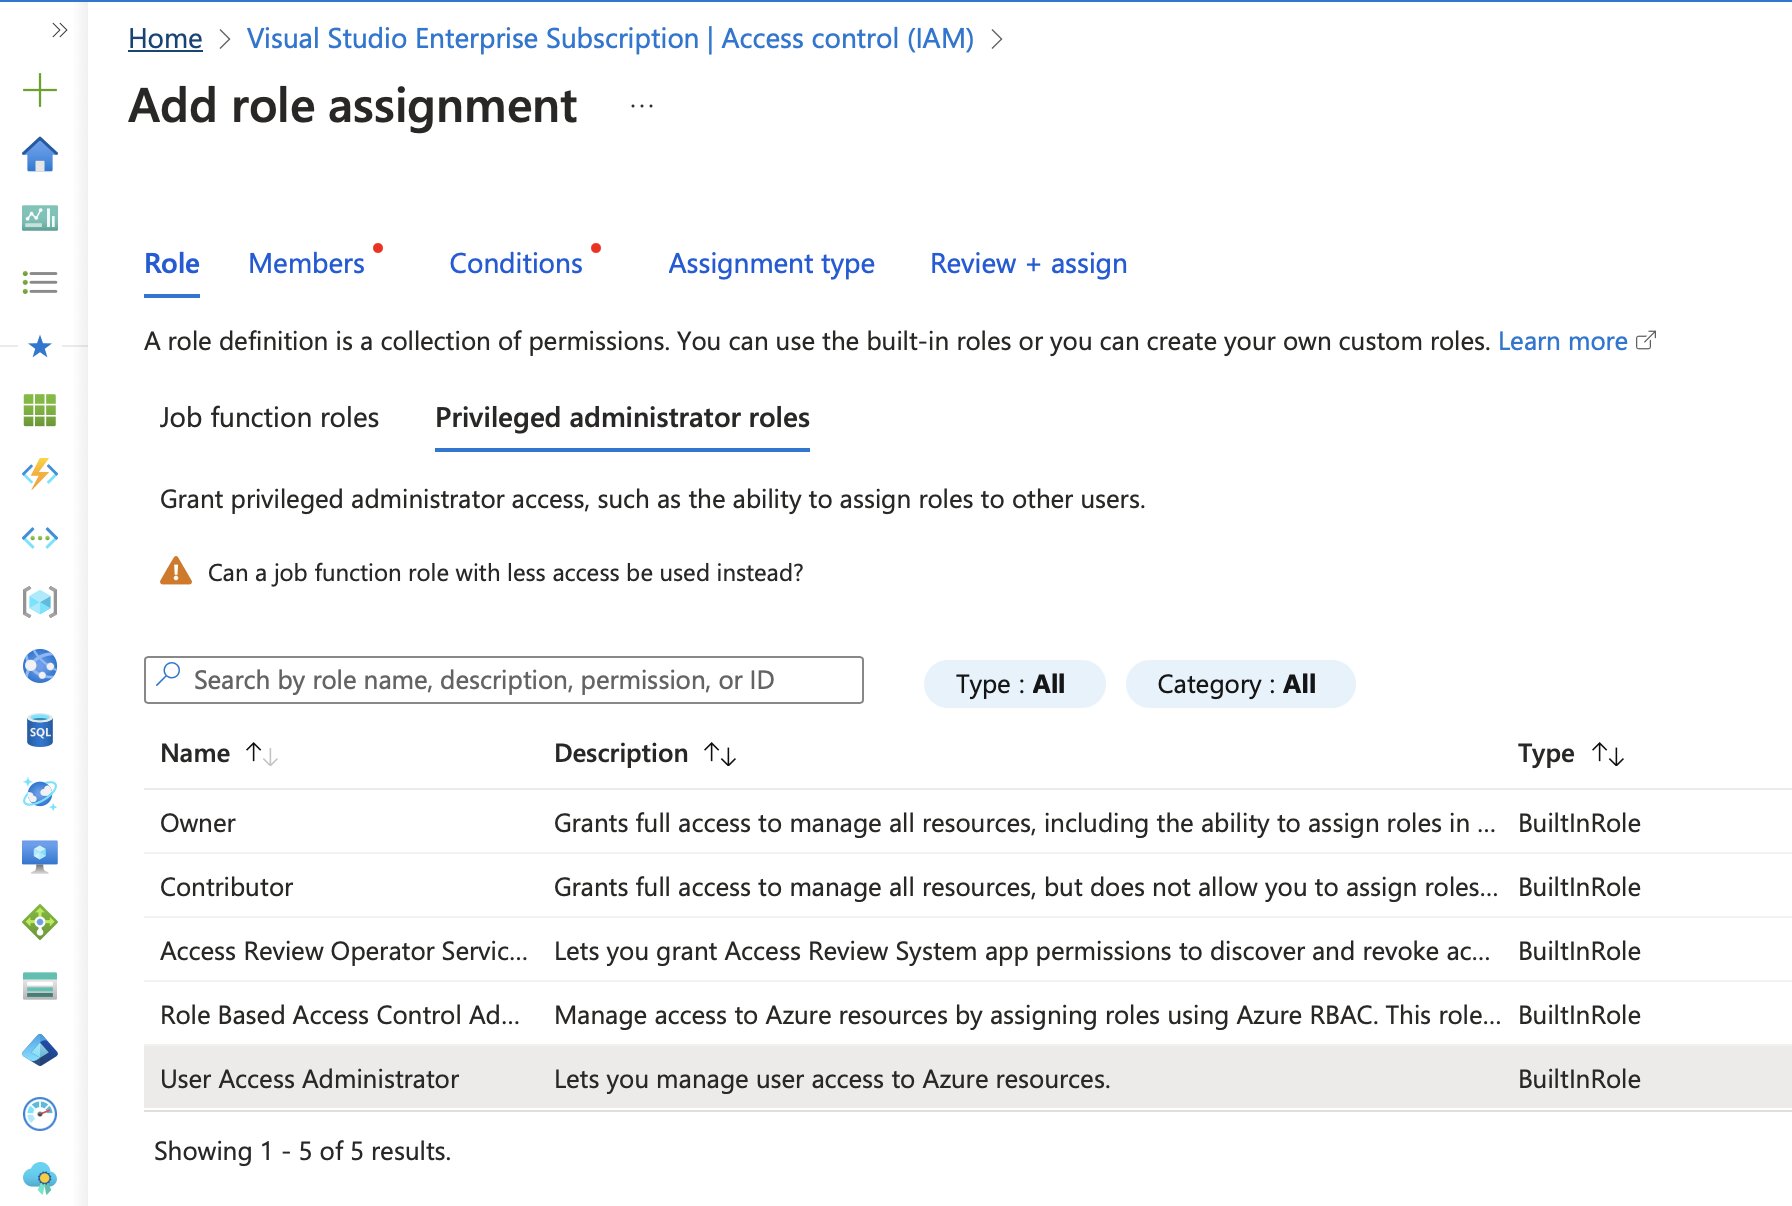
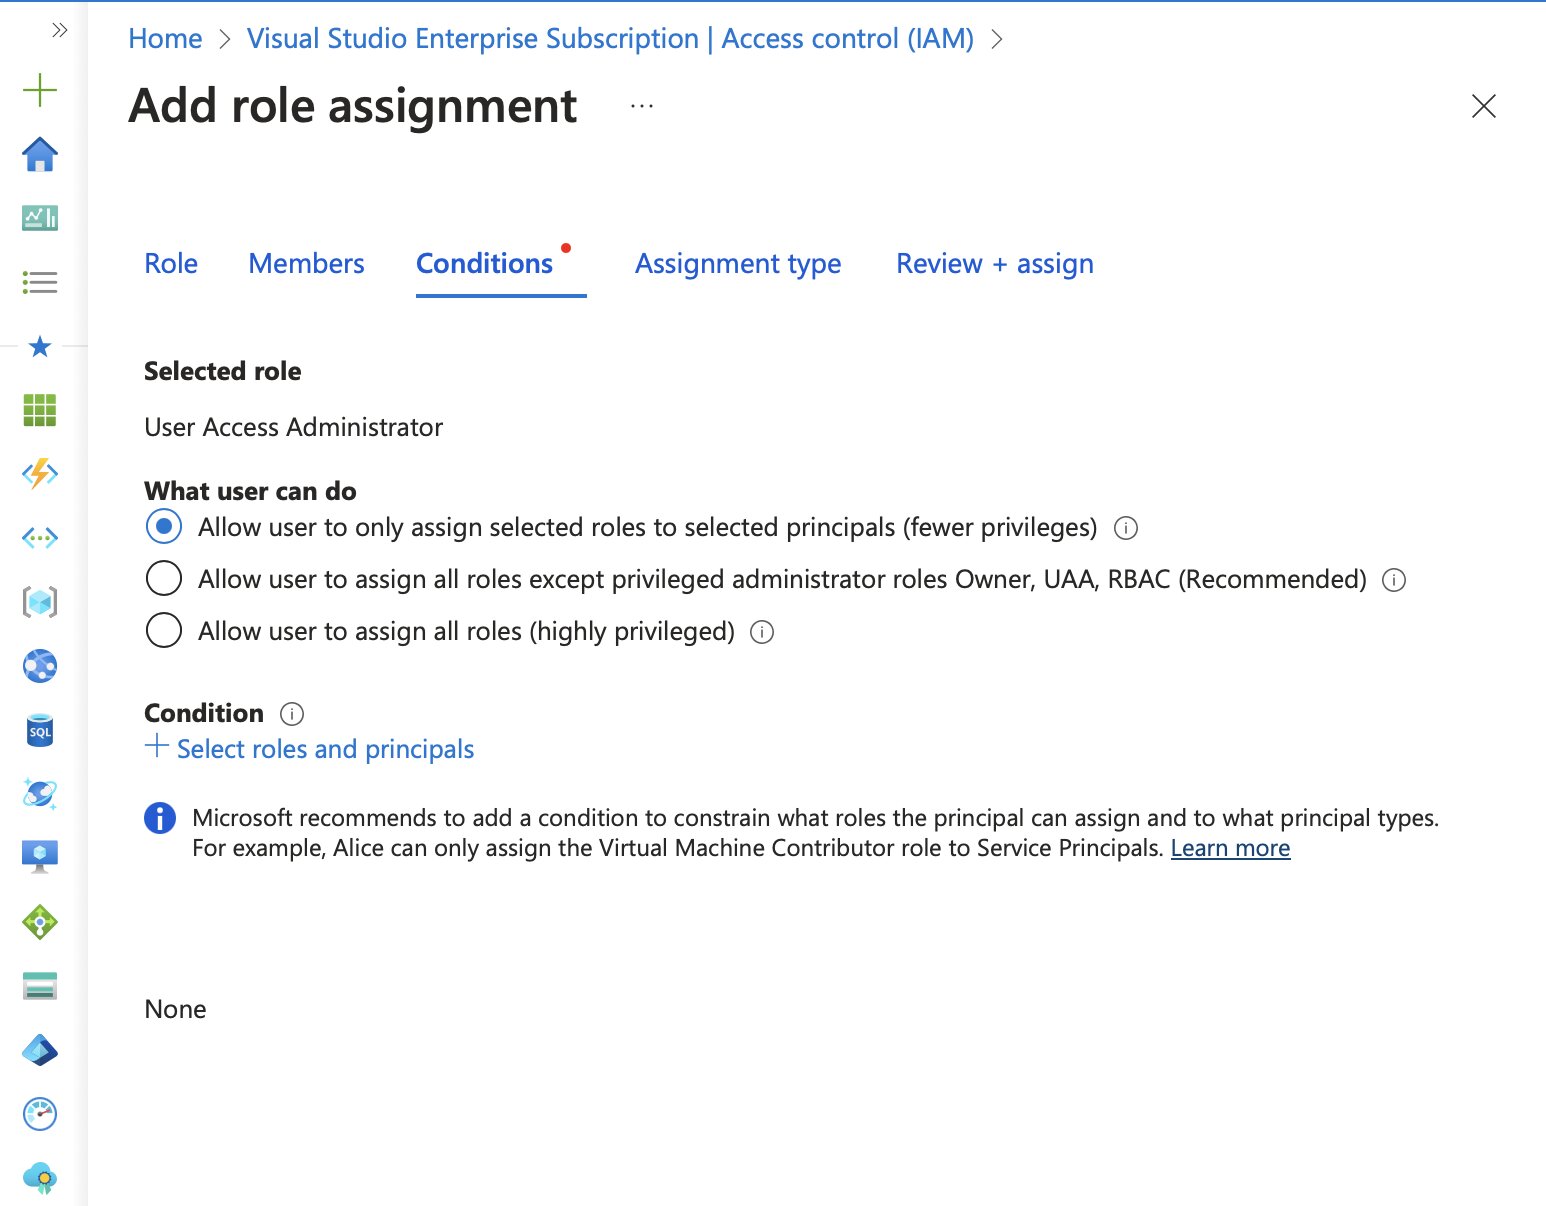
In the Access Control (IAM) settings of a subscription, the Add role assignment option provides a way to apply ABAC conditions. To do this, User Access Administrator permissions are required, so make sure you’re logged in with a user that has these permissions.

Under the Role tab, selecting the Privileged Administrator Roles sub-tab allows for choosing User Access Administrator.
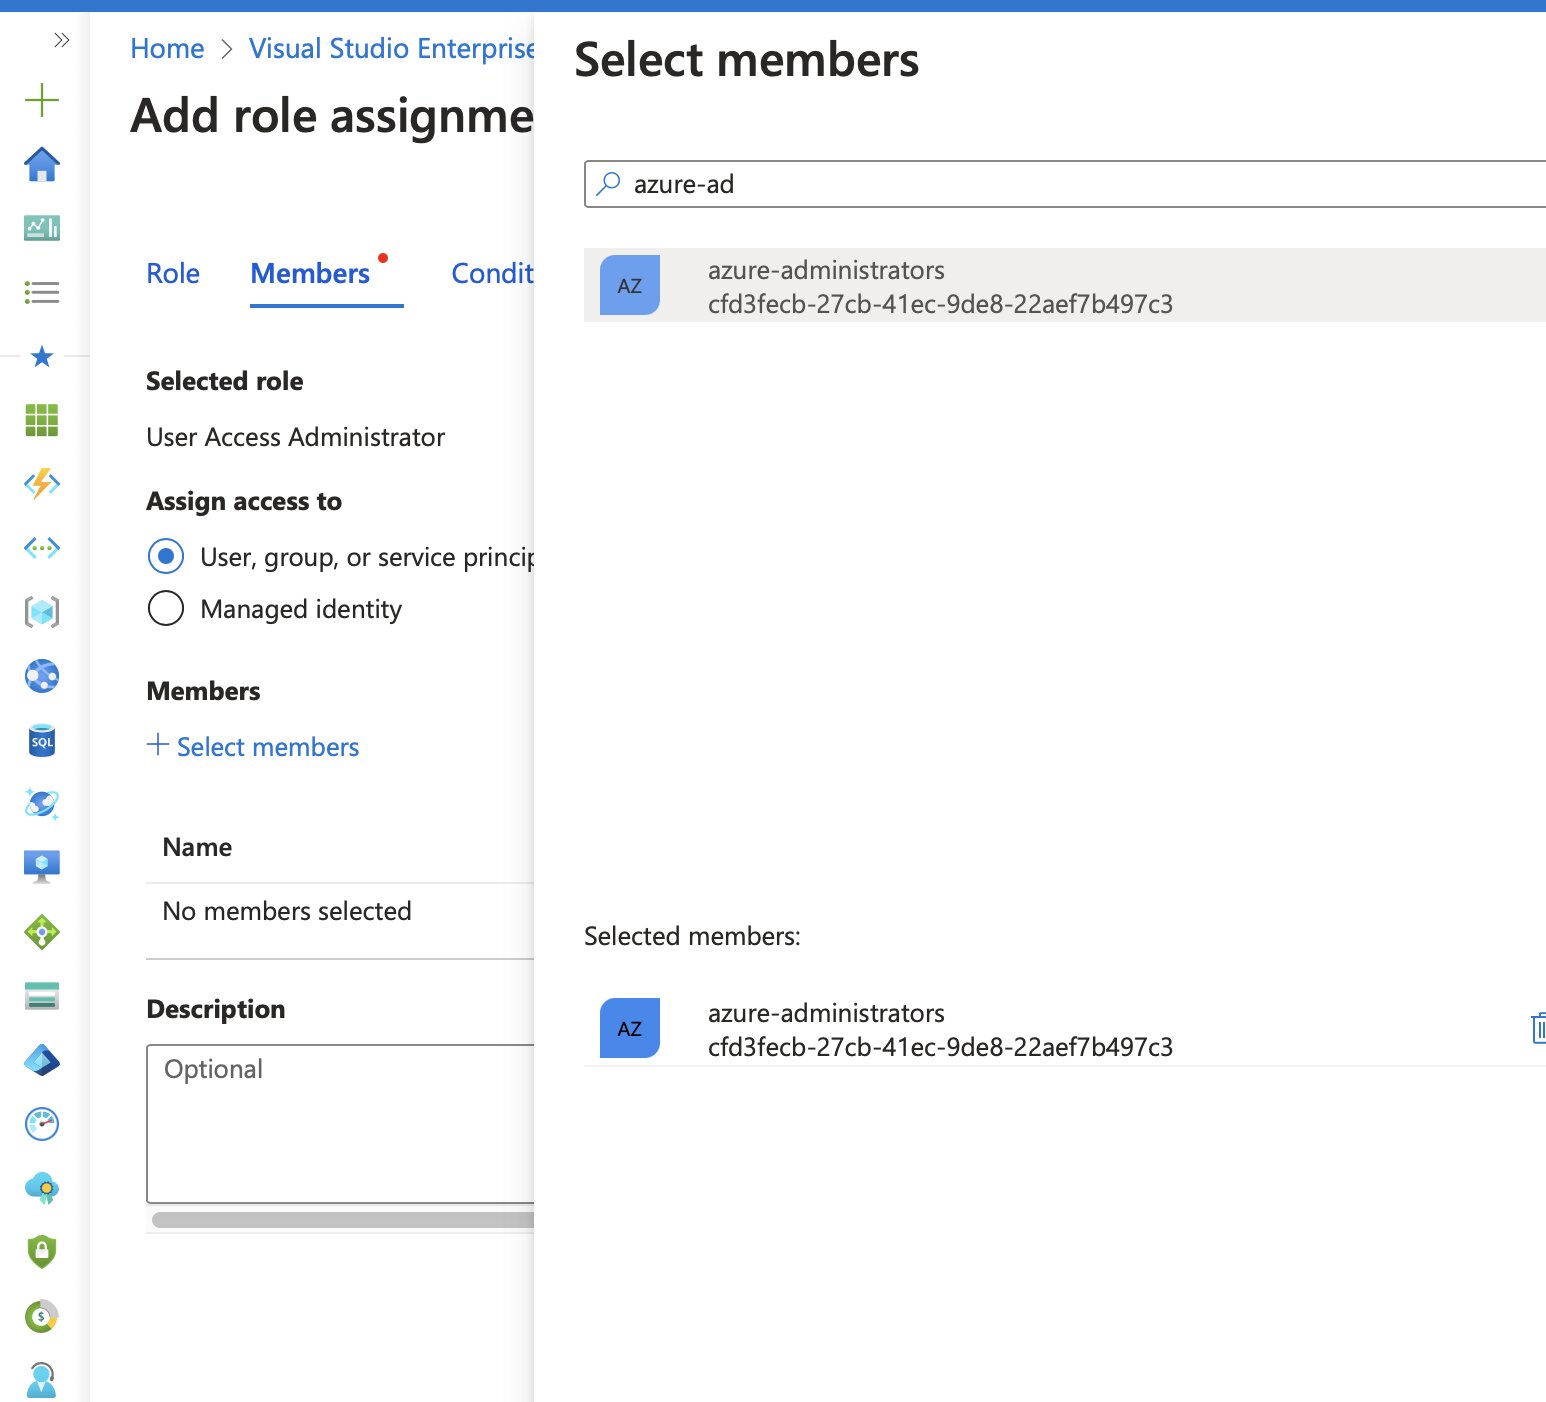
For this example, the role is assigned to a group called azure-administrators.
In the Conditions tab, several options appear for limiting role assignment permissions:
- Allow assigning only selected roles to selected principals
- Allow assigning all roles except privileged administrator roles like Owner, UAA, or RBAC
- Allow assigning all roles
We’ll pick the first option, since we want to select specific roles. We’re not too worried about principals, but if you want you could select those too!
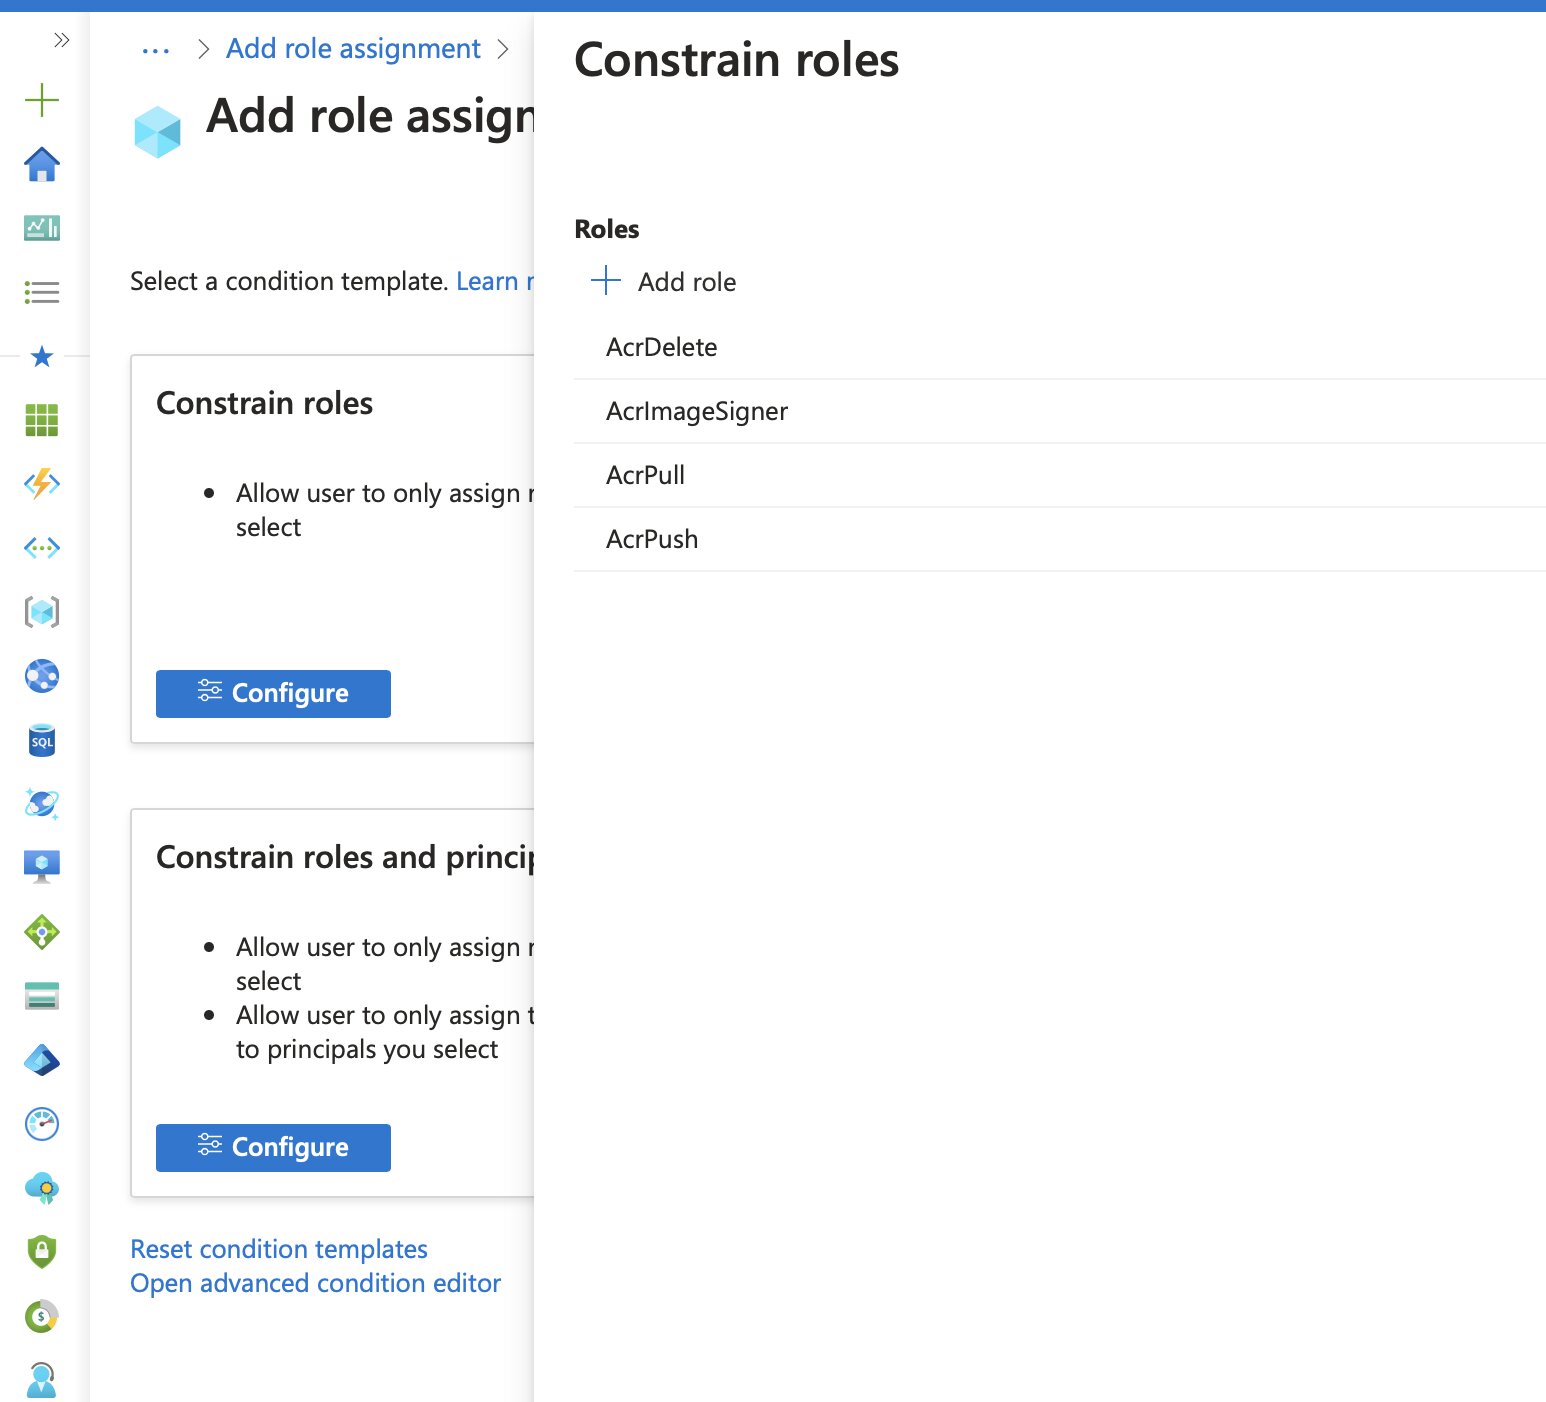
In the Add role assignment condition window, selecting the Constrain roles option allows specific roles to be added. I’ve already mentioned the roles I’d be using, but here they are listed again:
- AcrDelete
- AcrImageSigner
- AcrPull
- AcrPush
To reiterate… With this configuration, members of the azure-administrators group can create eligible assignments for other users, but only if one of these four roles is included in the request.

After selecting the roles, clicking Save add the roles to the list.
To extract the ABAC condition syntax, you simply select Open advanced condition editor.
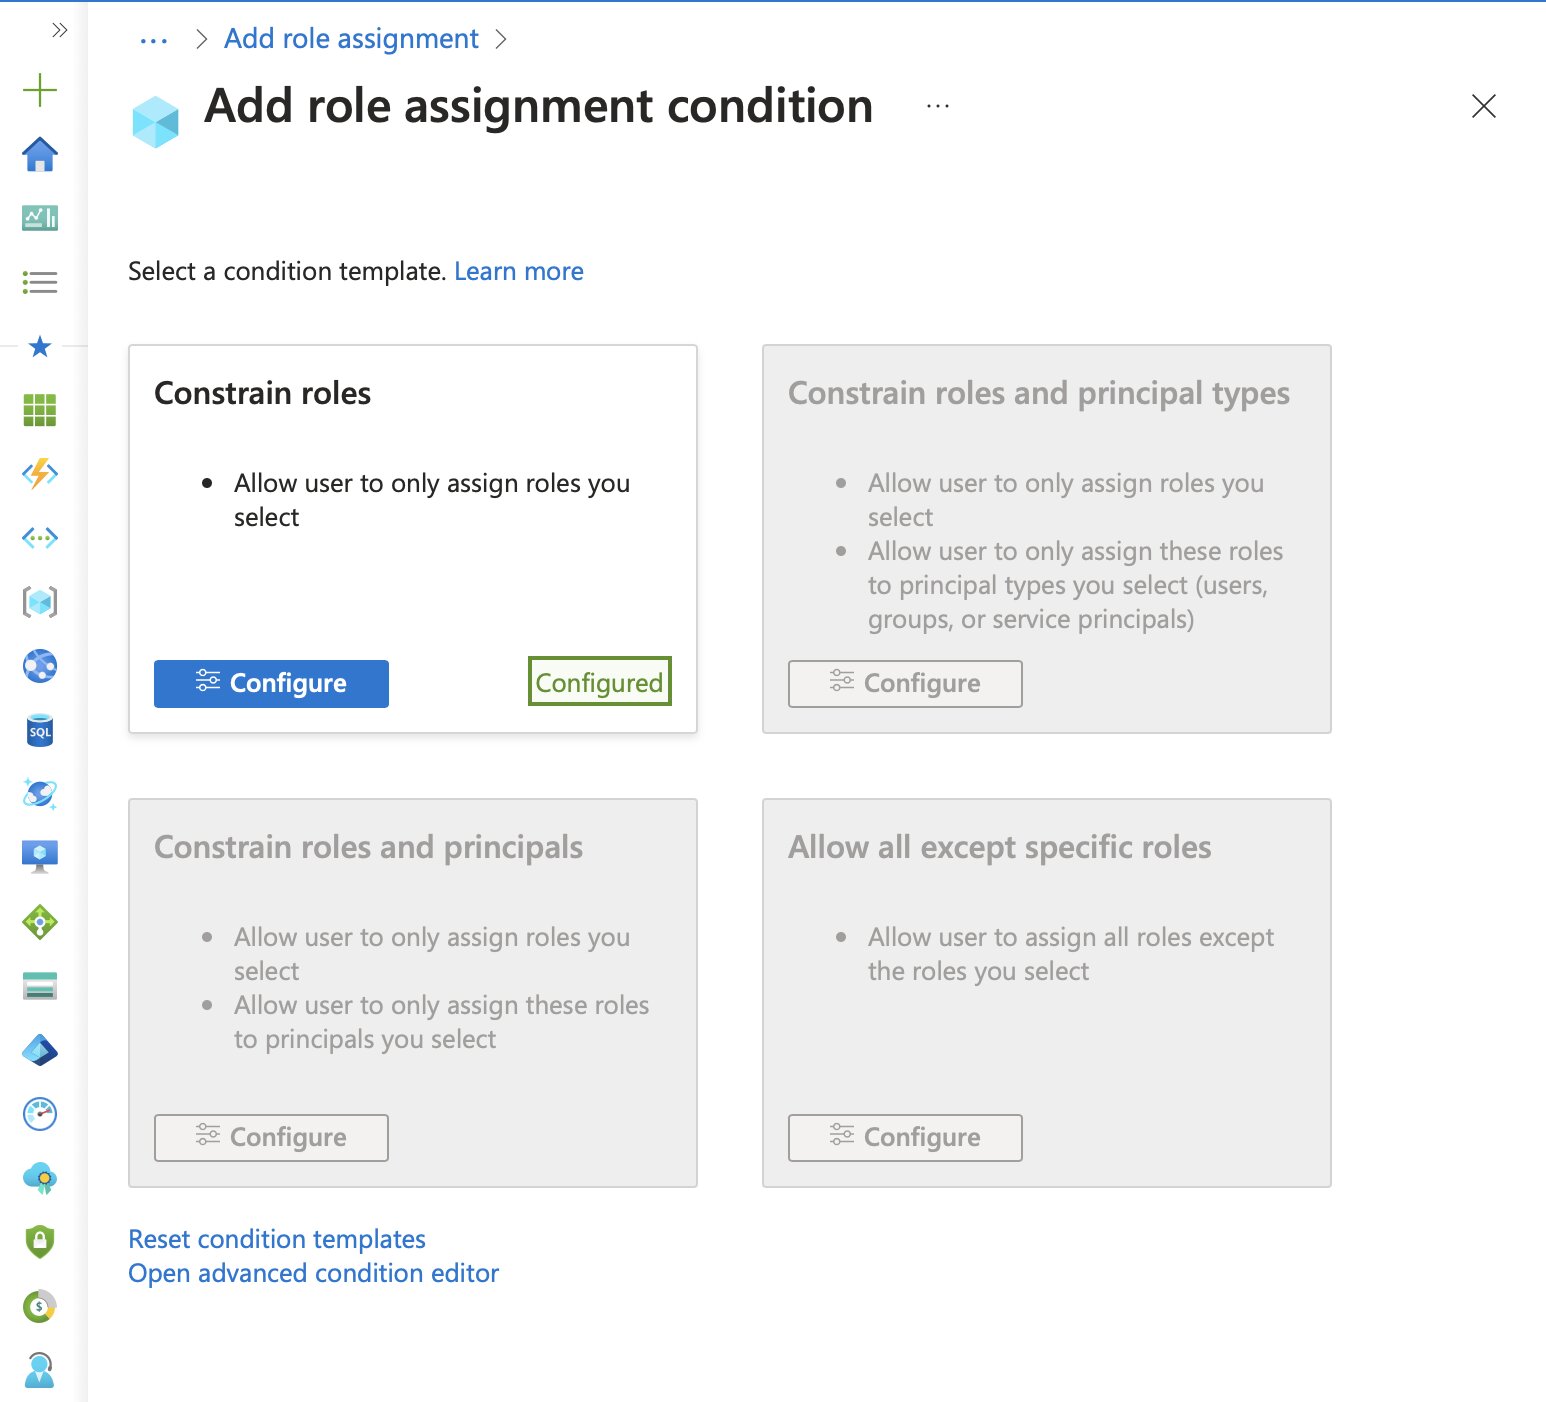
Switching from the visual editor to the code editor will reveal the ABAC syntax, which you can then use in Bicep, Terraform or other IaC tools.

You can now create (or save) the role assignment as you normally would. We’ll add it to Bicep in a moment.
Testing the Configuration
With ABAC in place we can now activate this eligible assignment and test out those restrictions. Make sure you’re logged in as one of the users from that azure-administrators group.
In Privileged Identity Management, under My Roles > Azure Resources, activating the assignment should be possible, and the Conditions column provides access to the ABAC settings.
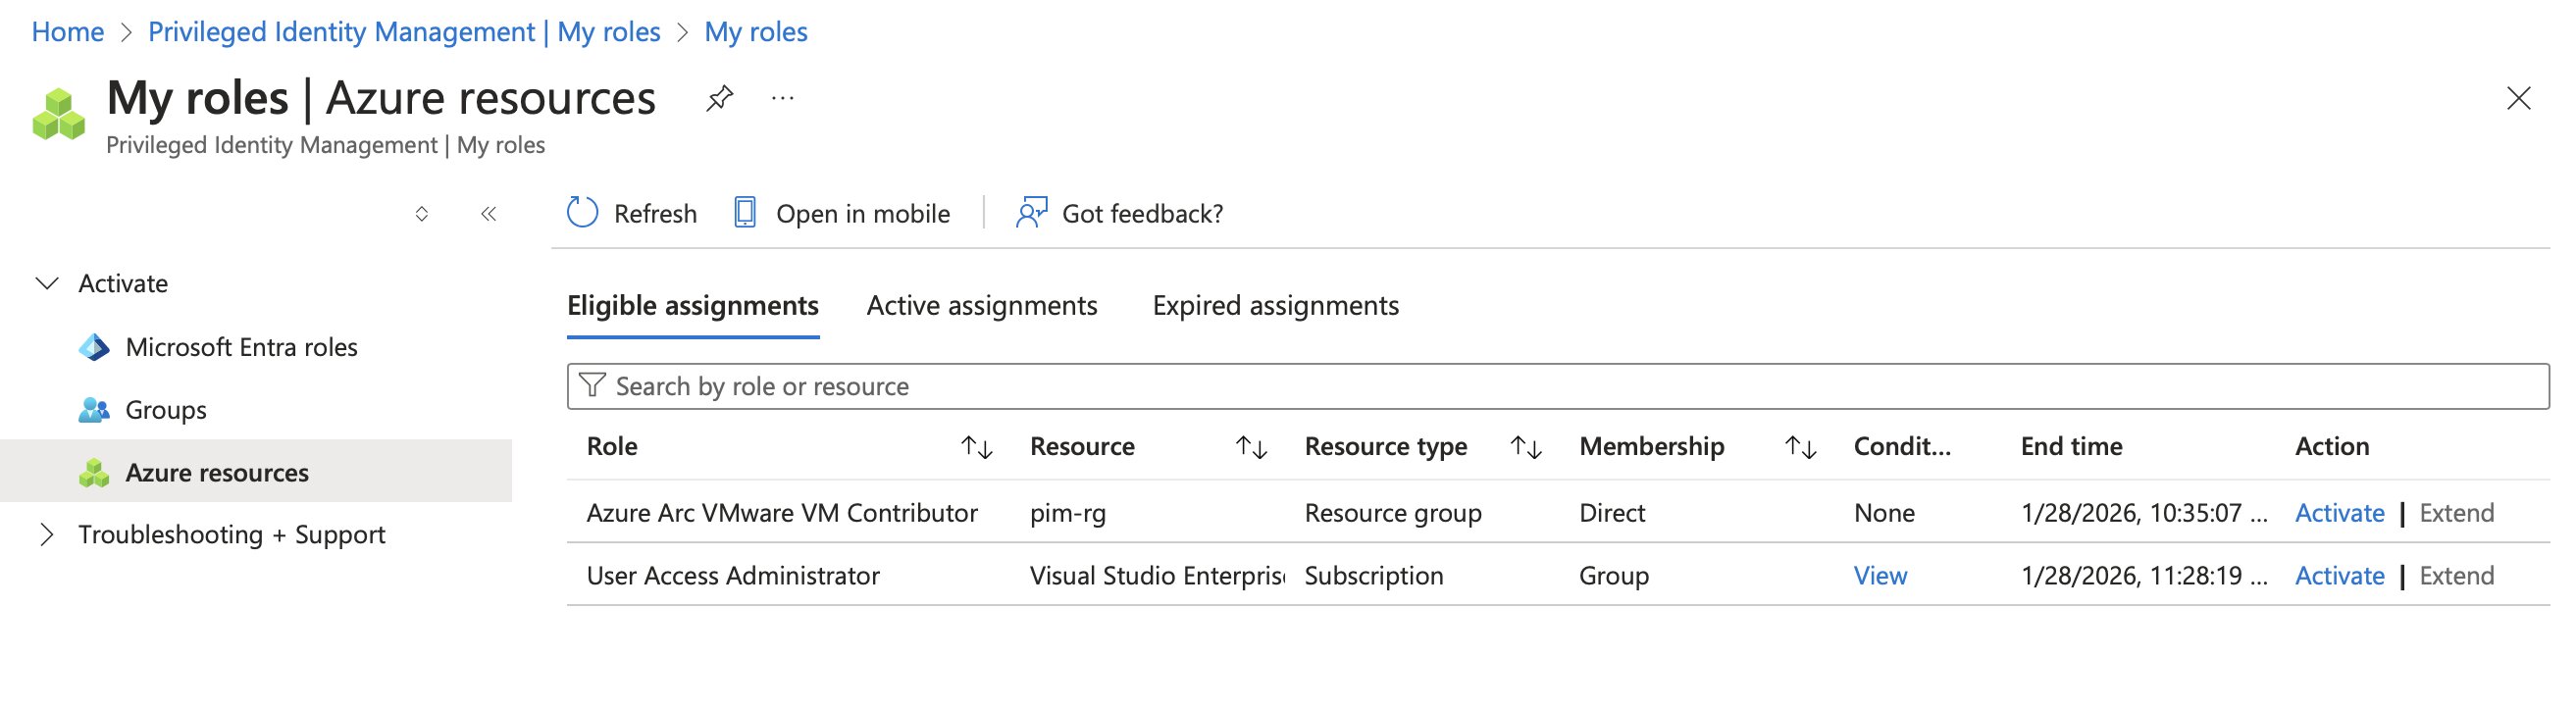
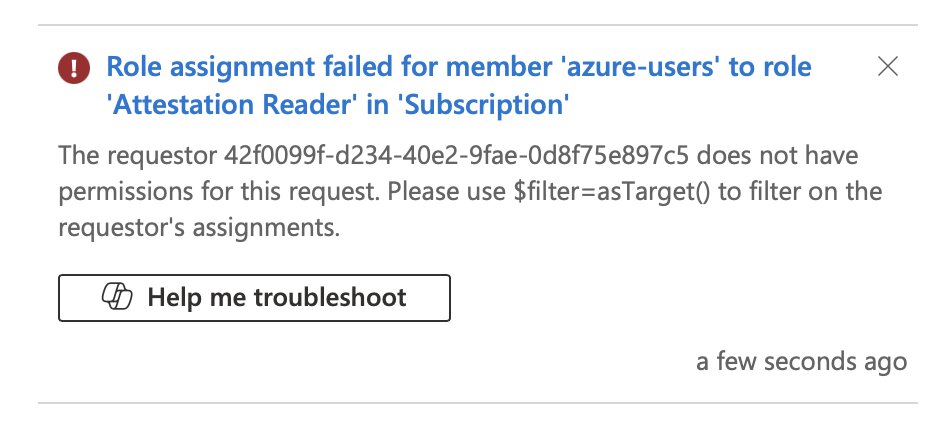
Attempting to assign an unauthorized role, such as Attestation Reader, should fail.
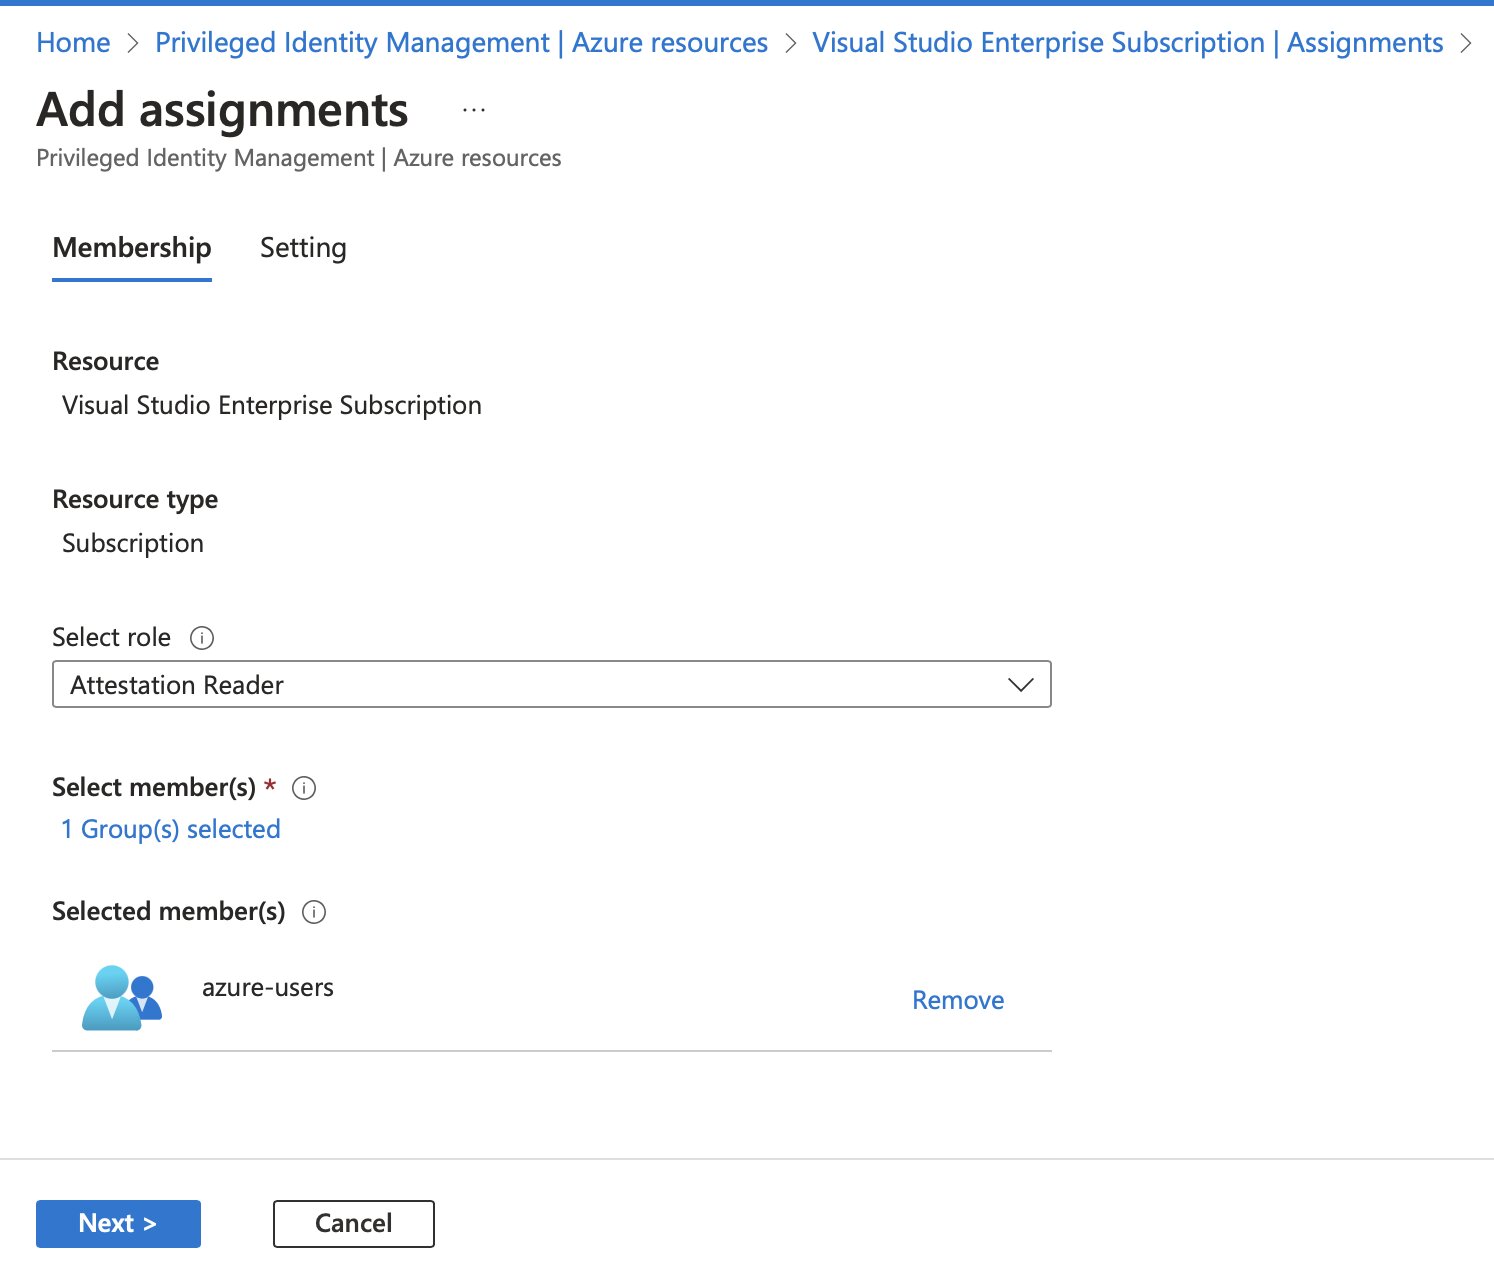
And sure enough… Creating the eligible role assignment failed.
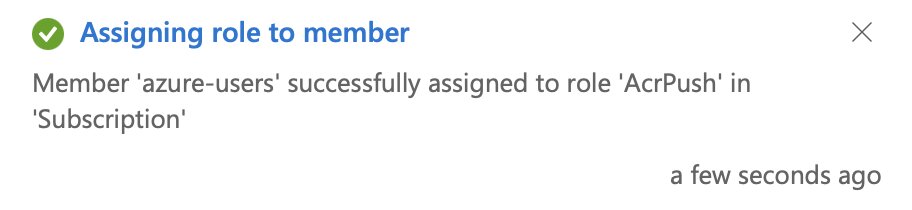
Assigning one of the allowed roles, such as AcrPush, should work without any issues.
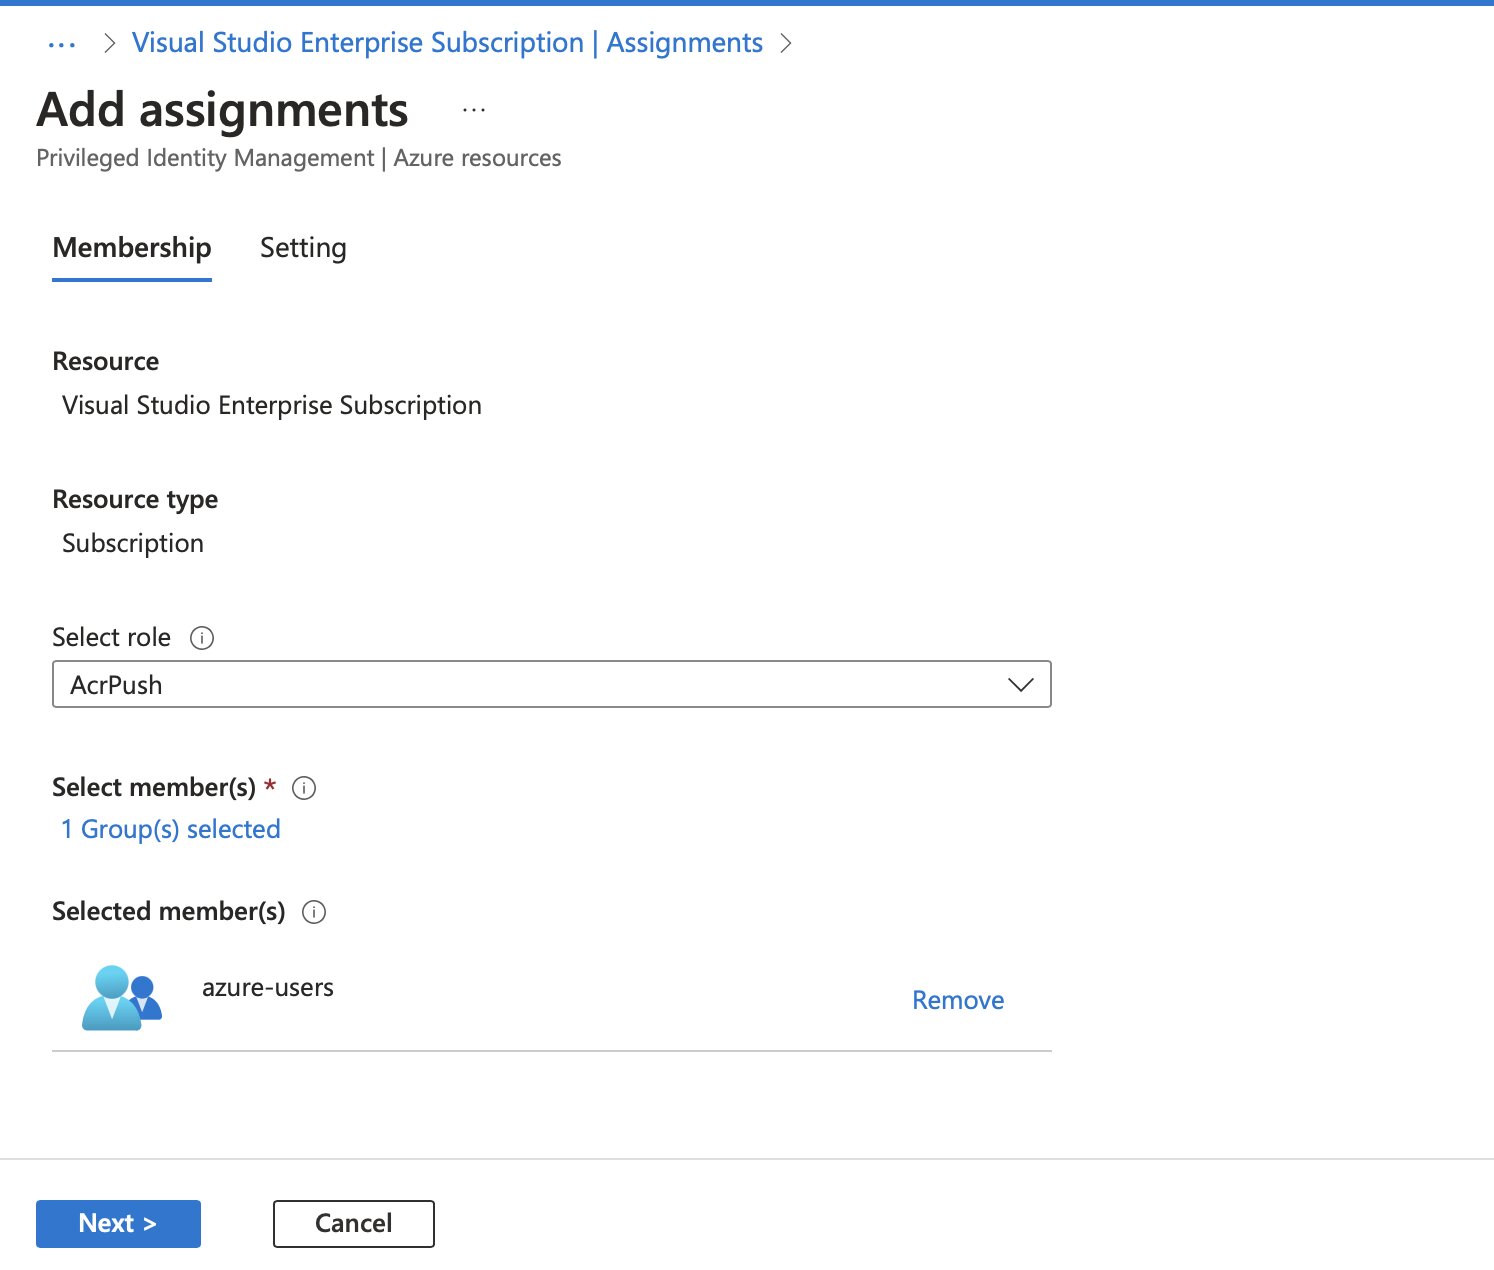
And sure enough… It works!
ABAC, Bicep and PIM
The same configuration can be implemented in Bicep by adding ABAC rules to the condition property on a Microsoft.Authorization/roleEligibilityScheduleRequests resource.
💡 Note
ABAC is not exclusive to PIM—it’s part of Azure RBAC. I would argue that this approach can also be used to limit the scope of User Access Administrator or Role-Based Access Control Administrator permissions, which can be useful in automation scenarios where strict role assignment controls are needed.
For demonstration purposes, the example below assigns the User Access Administrator role. Be cautious when deploying this, as it grants significant permissions. The deployment allows the logged-in user or service principal to hold the role but restricts them to assigning only those four specifc Acr* roles.
param principalId string = az.deployer().objectId

@description('This is the built-in "User Access Administrator" role.')
resource userAccessAdministratorRoleDefinition 'Microsoft.Authorization/roleDefinitions@2022-04-01' existing = {
  scope: subscription()
  name: '18d7d88d-d35e-4fb5-a5c3-7773c20a72d9'
}

resource roleEligibilityScheduleRequest 'Microsoft.Authorization/roleEligibilityScheduleRequests@2022-04-01-preview' = {
  name: guid(resourceGroup().id, userAccessAdministratorRoleDefinition.id, principalId)
  properties: {
    principalId: principalId
    requestType: 'AdminAssign'
    roleDefinitionId: userAccessAdministratorRoleDefinition.id
    conditionVersion: '2.0'
    condition: '(( !(ActionMatches{\'Microsoft.Authorization/roleAssignments/write\'})) OR ( @Request[Microsoft.Authorization/roleAssignments:RoleDefinitionId] ForAnyOfAnyValues:GuidEquals {c2f4ef07-c644-48eb-af81-4b1b4947fb11, 6cef56e8-d556-48e5-a04f-b8e64114680f, 7f951dda-4ed3-4680-a7ca-43fe172d538d, 8311e382-0749-4cb8-b61a-304f252e45ec}))AND(( !(ActionMatches{\'Microsoft.Authorization/roleAssignments/delete\'}))OR ( @Resource[Microsoft.Authorization/roleAssignments:RoleDefinitionId] ForAnyOfAnyValues:GuidEquals {c2f4ef07-c644-48eb-af81-4b1b4947fb11, 6cef56e8-d556-48e5-a04f-b8e64114680f, 7f951dda-4ed3-4680-a7ca-43fe172d538d, 8311e382-0749-4cb8-b61a-304f252e45ec}))'
    justification: 'Creating role assignment from Bicep'
    scheduleInfo: {
      startDateTime: '2025-01-20T00:00:00Z'
      expiration: {
        type: 'AfterDuration'
        endDateTime: '2026-01-19T00:00:00Z'
      }
    }
  }
}
In Retrospect
That customer case wasn’t the last time I used PIM. Since then, I’ve recommended it to customers whenever it felt appropriate.
I usually follow the mantra “automate everything”, but I’ve become more cautious when it comes to automating user access control. It’s essential to find the right balance. PIM exists to provide enterprises with control and visibility over privileged access, and sometimes, the best approach is to have a conversation about who should have access and why.
PIM isn’t limited to Azure resources. Entra PIM for Groups also enables temporary elevation into Entra ID groups, making it useful beyond just role assignments in Azure.
Related posts
- Azure Purview
- Azure Resource Locks
- Open Policy Agent
- Azure Policies & Azure AD PIM breakdown - Part 2
- Azure Policies & Azure AD PIM breakdown - Part 1
- Exploring AI CPU-Inferencing with Azure Cobalt 100
- SPIFFE and Entra Workload Identity Federation
- Azure Chaos Studio and PowerShell
- Azure Chaos Studio - Public Preview
- Local OpenShift 4 with Azure App Services on Azure Arc
- Verifying Azure AD tenant availability
- Azure Red Hat OpenShift 4
- Chaos Engineering on Azure