SPIFFE and Entra Workload Identity Federation
In this post
While working on my previous blog about Confidential Containers on Azure Kubernetes Service, I followed a setup guide to get a demo running. One of the steps involved setting up something called the Entra Workload ID for Azure Kubernetes Service. Until then, I had only heard about its now-deprecated predecessor, Azure Active Directory Pod identities.
Despite having some experience with Workload Identity Federation while setting up dynamic credentials for HCP Terraform, I realized my understanding of its functionality was lacking. To fix that, I went on a brief exploration to better grasp the interplay of all the different components. I ended up looking at some standards, pulled out some old PowerShell tricks I had still lying around, and implemented a simple self-signed solution for issuing SVID tokens. The result was that I got a better understanding of Entra Workload ID and SPIFFE.
💡 The premise of Workload Identity Federation is to authenticate software workloads to Entra ID, even when running outside of Azure, without the need to maintain those pesky secrets or certificates.
Many of the leading cloud providers already support workload identity federation. This makes it easier to integrate with Entra Workload Identity into existing infrastructure. For example, you can set up a workload on GCP and have it authenticate with Entra ID seamlessly. This interoperability ensures that regardless of the cloud platform you use, you can leverage the security benefits of SPIFFE and Entra Workload Identity to protect your applications and data.
Types of Entra ID Security Principals
Workload ID federation is a neat extension to app registrations (and also user-assigned managed identities) that allows us to acquire access tokens to resources that are protected by Entra ID. So let’s take a brief moment to look at the different types of security principals that we have in Entra ID. In effect, it allows us to access resources as a user or application.
A security principal is an object that represents a user, application, or managed identity that is requesting access to Azure resources. There are three types:
- User Principals
- An individual who has a profile in Entra ID.
- Commonly as an account you and I would use.
- Service Principals
- Application
- A security identity used by applications or services to access specific Azure resources.
- You can think of it as a user identity (username and password or certificate) for an application. Typically the client ID is kept in a configuration file, while the secret or certificate is kept somewhere secure.
- You maintain and rotate the secret and/or certificates.
- An application is used to create one or more service principals.
- Managed identity - An identity in Entra ID that is managed by the service.
- There is no additional management needed; its certificates are managed for you by the service.
- Application
Managed Identities
Managed identities (MI) are the preferred method for allowing applications to connect to resources that support Microsoft Entra authentication. They are typically recommended over other mechanisms, such as Applications. Managed identities are designed to reduce operational complexities because they are automatically managed by Entra ID, eliminating the need for ops teams to store and rotate credential secrets.
💡 Even though managed identities are designed to prevent credential theft attacks, you still need to be mindful of the roles you assign to them.
Managed identities come in two types:
- System-assigned MI
- Tied to the lifecycle of an Azure resource, such as an Azure VM or Azure App Service.
- User-assigned MI
- Has its own lifecycle and allows you to associate multiple Azure resources with it.
Using a managed identity (MI) is straightforward. With a system-assigned managed identity, you simply navigate to the respective resource and activate the feature. If you’re using an infrastructure-as-code (IaC) tool, you typically set a specific property on your resource to true to enable this functionality. Subsequently, you need to assign the appropriate permissions to the managed identity principal. Afterward, from your MI-enabled resource, you can trigger a request to a predefined endpoint to acquire an access token for the desired resource. For example, within an MI-enabled virtual machine, you can accomplish this with a PowerShell script. In this scenario, you initiate a request to the Instance Metadata Service, which provides an access token.
# The endpoint (169.254.169.254) will be different if you're running this from inside an Azure App Service or Azure Function App.
$response = Invoke-WebRequest -Uri "http://169.254.169.254/metadata/identity/oauth2/token?api-version=2018-02-01&resource=https://management.azure.com/" -Method GET -Headers @{Metadata="true"}
$content = $response.Content | ConvertFrom-Json

# Make sure the MI has "Reader" permissions on the specific resource group.
Invoke-WebRequest -Uri "https://management.azure.com/subscriptions/<SUBSCRIPTION ID>/resourceGroups/<RESOURCE GROUP>?api-version=2016-06-01" -Method GET -ContentType "application/json" -Headers @{ Authorization ="Bearer $content.access_token"}).content

# {"id":"/subscriptions/00000000-0000-0000-0000-000000000000/resourceGroups/DevTest","name":"DevTest","location":"westus","properties":{"provisioningState":"Succeeded"}}
💡 App Services, Azure Functions and Container Apps use a different endpoint. You can typically get it from the
IDENTITY_ENDPOINTenvironment variable. It’s also recommended to use theIDENTITY_HEADERto prevent server-side request forgery (SSRF) attacks.
Entraducing: Workload Identity Federation
While managed identities provide secure access to Entra-protected resources, they can limit flexibility for developers, as you can only execute scripts when connected to the Azure-hosted virtual machine, scale set, function app, etc. Using a Application (or app registration) to get access tokens is an alternative, but this requires storing and managing the client ID and secret/certificate, which is error-prone and riskier from a security standpoint.
This is where workload identity federation comes into play. You can use user-assigned identities or app registrations to authenticate software workloads to Entra ID, even when running outside of Azure, without the need to maintain secrets.
Workload identity federation works by configuring a trust relationship between your user-assigned managed identity or app registration in Microsoft Entra ID and the external IdP of the platform you wish to trust. You use tokens issued by that platform, typically called SVID tokens, to authenticate with the Microsoft identity platform and call APIs in the Microsoft ecosystem. Once the trust relationship is established, you can use the client credentials grant flow, using a client_assertion from the IdP, to get an access token from the Microsoft identity platform, passing in the identity provider’s JWT instead of creating one yourself using a stored certificate.
Workload ID Plans
Workload ID actually has two different plans on offer:
- Free
- Bundled with subscriptions to commercial online services like Azure and Power Platform
- Provides essential features such as managed identities and workload identity federation
- Premium
- Available separately through various channels including Microsoft representatives, the Open Volume License Program, and the Cloud Solution Providers program. Azure and Microsoft 365 subscribers can opt for the Premium edition online
- Priced at $3 per workload identity per month
- Offers advanced capabilities beyond the free features!
Although the premium plan has a monthly fee, which may escalate without proper governance, it offers additional security and management capabilities when utilizing Entra Workload ID.
A big motivator to jump on to the Workload ID Premium is the integration with Entra Conditional Access, this will allow you to define conditional access policies for workload identities based on specific conditions such as IP ranges. Other premium-exclusive features include access reviews for privileged roles, application authentication methods API for enforcing best practices, app health recommendations for identifying inactive workload identities, and ID protection for detecting and remediating compromised workload identities.
💡 You can also tap into Continuous Access Evalution for Worload Identities, which enables real-time enforcement of Conditional Access location and risk policies along with instant enforcement of token revocation events for workload identities. But I couldn’t determine whether it is part of the premium plan or not. (Though I will assume that it is.)
Spiffy SPIFFE Concepts
As far as I can tell, Entra Workload Identity adheres to the Secure Production Identity Framework For Everyone (SPIFFE) project. SPIFFE is a graduated CNCF project that defines a framework and set of standards for identifying and securing communications between application services.
Reading through the SPIFFE documentation was a very pleasant experience; everything is clearly explained. Although the documentation is excellent, I’ve decided to write down some of the key concepts that make up the Secure Production Identity Framework for Everyone. This will help us understand what we’re doing in Entra ID.
💡 It’s worth mentioning that SPIFFE has an additional fascinating use case, apart from workload authentication: mTLS. Mutual Transport Layer Security (mTLS) is a robust technology that utilizes asymmetric cryptography to verify the identities of both the sender and receiver of a message. It also ensures that the message remains confidential and unaltered during transmission, even in potentially untrusted network environments.
The Workload
A workload refers to a specific piece of software deployed with a particular configuration to achieve a single purpose. It can consist of multiple running instances of the software, all performing the same task. Here are a couple of examples:
- A web server running a Python web application
- An instance of a MySQL database
- A collection of independently deployed systems that work together, such as a web application that uses a database service
For SPIFFE’s purposes, a workload may often be more fine-grained than a physical or virtual node, often as fine-grained as individual processes on the node. This is crucial for workloads hosted in a container orchestrator, where several workloads may coexist (yet be isolated from each other) on a single node. A workload may also span many nodes, such as an elastically scaled web server running on many machines simultaneously.
💡 A workload will vary depending on the context; for SPIFFE’s purposes, it is assumed that a workload is sufficiently well isolated from other workloads such that a malicious workload cannot steal the credentials of another after they have been issued.
The SPIFFE ID
A SPIFFE ID is a string that uniquely and specifically identifies a workload. SPIFFE IDs may also be assigned to intermediate systems that a workload runs on (such as a group of virtual machines). SPIFFE IDs are a Uniform Resource Identifier (URI) that takes the following format:
spiffe://trust-domain-name/path
Valid SPIFFE IDs MUST have the scheme set to spiffe, include a non-zero trust domain name, and MUST NOT include a query or fragment component.It’s worth mentioning that the SPIFFE ID specification provides some valuable guidelines regarding naming conventions, which can be found here.
The Trust Domain
The trust domain refers to the trust root of a system. It can represent an individual, organization, environment, or department that operates its own independent SPIFFE infrastructure.
All workloads within the same trust domain receive issued identity documents that can be verified using the root keys of that trust domain. Trust domains have a one-to-many relationship with the keys that back them, meaning a single trust domain can be associated with multiple keys and key types. It is recommended to separate workloads into distinct trust domains if they are located in different physical environments or follow different security practices (e.g., development, testing, production).
🔥 While it is possible to share cryptographic keys among many trust domains, the maintainers strongly advise that each authoritative key be used in a single trust domain. Key reuse can degrade trust domain isolation, for instance, when sharing keys between staging and production environments.
The SPIFFE Verifiable Identity Document
An SVID is the document with which a workload proves its identity to a resource or caller. An SVID is considered valid if it has been signed by an authority within the SPIFFE ID’s trust domain. It encodes the SPIFFE ID in a cryptographically-verifiable document, in one of two currently supported formats:
Both types of SVID require you to also have a trust bundle with public certificates. The destination workload considers these trustworthy and uses the public certificates to validate the SVIDs. All trust bundles should be scoped to a particular trust domain; otherwise, trust domains could impersonate each other’s identities.
🔥 All private keys and corresponding public certificates for each trust domain should be short-lived, rotated frequently, and automatically.
As tokens are susceptible to replay attacks, where an attacker who obtains the token in transit can use it to impersonate a workload, it is advised to use X.509-SVIDs whenever possible. However, there may be situations where the only option is the JSON Web Token (JWT) format, for example, when your architecture has an L7 proxy or load balancer between two workloads. From what I can tell, the JWT token seems to be more widely used.
The Workload API
The SPIFFE Workload API serves as an interface facilitating the provision of information and services necessary for workloads or processes to utilize SPIFFE identities and SPIFFE-based authentication systems. It is hosted by the SPIFFE Workload Endpoint and encompasses various services or profiles.
Demo: self-signed DIY solution
To see this in action, let’s quickly try to set this up. While it’s advisable to opt for a more robust PKI (Public Key Infrastructure) solution than the self-signed approach we’ll demonstrate, this method served me well in grasping the fundamental concepts.
To keep things simple, I will stick to using Azure PowerShell. But other IAC tools will also let you set up Workload Identity Federation.
- Terraform
- Applications:
azuread_application_federated_identity_credentialfrom thehashicorp\azureadprovider.
- User-assigned managed identities, use either:
azurerm_federated_identity_credentialfrom thehashicorp\azurermprovider.azapi_resourcefromAzure\azapiand follow the documentation to provision the sub-resourceMicrosoft.ManagedIdentity/userAssignedIdentities/federatedIdentityCredentials.
- Applications:
- ARM/Bicep
- Applications (public preview):
- use resource
Microsoft.Graph/applications/[email protected]
- use resource
- User-assigned managed identities:
- Applications (public preview):
This setup creates a SPIFFE Federation relationship between our Entra ID and the simple trust domain we establish. First, we’ll create a resource group and a storage account.
$ResourceGroupName = "workload-id-federation-test-rg"
$Location = "westeurope"
$StorageAccountName = "sa{0}" -f (Get-AzContext).Subscription.Id.Replace("-", "").Substring(0, 7)
$StorageAccountContainerName = "oidc-issuer"

New-AzResourceGroup -Name $ResourceGroupName -Location $Location

$StorageAccount = New-AzStorageAccount -Name $StorageAccountName `
  -ResourceGroupName $ResourceGroupName `
  -Location $Location `
  -AllowBlobPublicAccess $true `
  -SkuName Standard_LRS

$StorageAccountContainer = $StorageAccount | New-AzStorageContainer -Name "oidc-issuer" -PublicAccess Blob
Within this account, we’ll configure an OIDC (OpenID Connect) discovery endpoint, a component that holds all metadata about our trust domain and its issuer configuration. Our local machine will serve as the external Identity Provider (IDP), a trust domain if you will, and a straightforward Azure Storage Account to host the public certificate list. The process entails crafting a JWT SPIFFE Verifiable Identity Document (JWT-SVID) and submitting it to Entra ID. Entra ID will decode the SVID, cross-reference the issuer’s location for a public certificate, and use it to verify the SVID’s signature, which we generated with our private key.
$OpenIdConfigurationFileName = "openid-configuration.json"

$OpenIdConfiguration = @{
  "issuer"                                = "https://${StorageAccountName}.blob.core.windows.net/${StorageAccountContainerName}/"
  "jwks_uri"                              = "https://${StorageAccountName}.blob.core.windows.net/${StorageAccountContainerName}/openid/v1/jwks"
  "response_types_supported"              = @("id_token")
  "subject_types_supported"               = @("public")
  "id_token_signing_alg_values_supported" = @("RS256")
}

$OpenIdConfiguration | ConvertTo-Json -Compress | Set-Content -Path $OpenIdConfigurationFileName -Force
$StorageAccount | Set-AzStorageBlobContent -File $OpenIdConfigurationFileName -Container $StorageAccountContainer.Name -Blob ".well-known/openid-configuration"
Our next step is to generate a set of keys, although we’ll only be producing one. This private key will be utilized within our trust domain, specifically by an SPIFFE Workload API, to generate valid and signed JWT SVIDs, which will be transmitted to Entra ID. We’ll generate a public X.509 certificate, which will be employed to compose a JSON Web Key Set. We’ll then upload the JWKS file to our publicly accessible storage account, enabling Entra ID to leverage it for validating the signatures on the SVIDs originating from our trust domain.
$keyFile = "key.pem"
$certFile = "certificate.pem"
$jwksFile = "jwks.json"

# Create and export a random 4096-bit RSA key to a file
$rsa = [System.Security.Cryptography.RSA]::Create(4096)
$rsa.ExportPkcs8PrivateKeyPem() | Out-File $keyFile -Force

# $rsa = [System.Security.Cryptography.RSA]::Create()
# $rsa.ImportFromPem((Get-Content "key.pem" -Raw).ToCharArray())

# Create an X509 certificate, using our RSA key file.
$certSubject = "/C=BE/ST=Antwerp/L=Antwerp/O=Thomas Van Laere, CommV./OU=IT/CN=thomasvanlaere.com"
openssl req -key $keyFile -x509 -days 2 -subj $certSubject  -out $certFile
openssl x509 -text -noout -in $certFile
The Azure AD Workload CLI (azwi) offers a valuable feature: it can convert a collection of public keys or certificates into a valid JWK Set file. If you’re interested, you can attempt to develop the logic yourself, but you’ll need to keep RFC 7517 handy.
# https://datatracker.ietf.org/doc/html/rfc7517
azwi jwks --public-keys $certFile  --output-file $jwksFile

# {
#   "keys": [
#     {
#       "use": "sig",
#       "kty": "RSA",
#       "kid": "BwPc33djUEqyxLJpaLpVBTymw7g1rLRCfU0U9zxPy-A",
#       "alg": "RS256",
#       "n": "jwp3XciGBdQJFmyStphWwJ-hj9f...pTcD0pag4BxmtNKTyQSahRsibsYC0c",
#       "e": "AQAB"
#     }
#   ]
# }
Then it simply involves uploading that file to Azure BLOB storage, ensuring it’s placed under the correct path.
$StorageAccount | Set-AzStorageBlobContent -File $jwksFile -Container $StorageAccountContainer.Name -Blob "openid/v1/jwks"
Next, we’ll proceed to create our security principal to support identity federation. I’ve gone ahead and performed this step using a Application, but the process is quite similar for user-assigned managed identities.
$Application = New-AzADApplication -DisplayName "TVL-Workload-ID-Federation-testz"

# Graph API ID
$ApiId = "00000003-0000-0000-c000-000000000000"
# Application permission; User.Read.All
$PermissionId = "df021288-bdef-4463-88db-98f22de89214"
Add-AzADAppPermission -ApplicationId $Application.AppId -ApiId $ApiId -PermissionId $PermissionId -Type Role
Let’s proceed to add federated credentials to the Application. Keep in mind that you can add a maximum of 20 federated credentials. While the Subject can be customized according to your requirements, there are certain constraints and guidelines outlined in the specification that you should adhere to. Let’s create the binding, but remember that the combination of the values of issuer and subject must be unique on the app!
💡 I will be going with a GUID, which is random in this case but ideally, this is a GUID that came from some other system that is keeping a list of which GUID maps to what system. You can then query this system if you need to get additional information.
$FederatedCredentialSubject = "spiffe://thomasvanlaere.com/{0}" -f (New-Guid)
$FederatedCredential = New-AzADAppFederatedCredential -name 'app-one' -ApplicationObjectId $Application.Id -Audience "api://AzureADTokenExchange" -Issuer $OpenIdConfiguration.issuer  -Subject $FederatedCredentialSubject
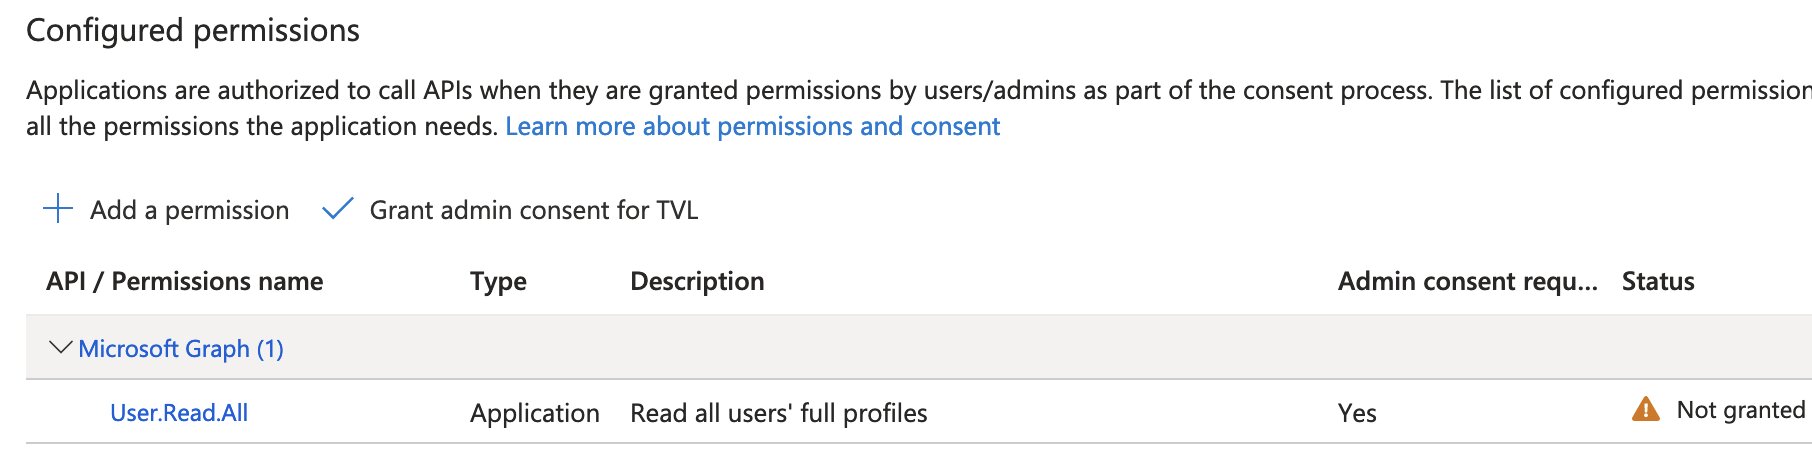
Go to the Azure portal and navigate to “App registrations”. Locate the newly created application, then go to “API permissions” and select “Grant admin consent” for the requested permissions.
Now that we have all the necessary components ready, let’s proceed to generate our SVID. We’ll utilize these PowerShell functions for working with base64 and base64url encoding of strings.
function ConvertTo-Base64UrlEncodedString {
  param (
    [Parameter(Position = 0, ParameterSetName = "text")]
    [string]$Text,
    [Parameter(Position = 0, ParameterSetName = "bytes")]
    [byte[]]$Bytes
  )
  switch ($PSCmdlet.ParameterSetName) {
    'text' {
      $bytes = [System.Text.UTF8Encoding]::UTF8.GetBytes($text)
      break
    }
  }
  [Convert]::ToBase64String($bytes).Replace('+', '-').Replace('/', '_').Split("=")[0]
}

function ConvertTo-ByteArray {
  param (
    [string]$Base64UrlEncodedData
  )
  $Base64EncodedString = ConvertTo-Base64EncodedString -Base64UrlEncodedData $Base64UrlEncodedData
  return [Convert]::FromBase64String($Base64EncodedString)
}

function ConvertTo-Base64EncodedString {
  param (
    [string]$Base64UrlEncodedData
  )
  $Base64EncodedString = $Base64UrlEncodedData.Replace('-', '+').Replace('_', '/')
  switch ($Base64EncodedString.Length % 4) {
    0 { break; }
    2 { $Base64EncodedString += '=='; break; }
    3 { $Base64EncodedString += '='; break; }
  }
  return $Base64EncodedString
}
Now, constructing the SVID JWT token isn’t overly complex. It will ultimately resemble this:
eyJ<something>.eyJ<something>.<signature>
There are a couple of sections tucked inside the resulting string, delimited by a dot (.). Since these are base64url-encoded, we can base64url-decode these individual strings! These values are actually what make up a signed JSON Web Token (JWT), more specifically these three pieces:
- A JSON Object Signing and Encryption (JOSE) header
- A JSON Web Signature (JWS) payload, a.k.a. a set of claims.
- A JWS signature
# https://github.com/spiffe/spiffe/blob/main/standards/JWT-SVID.schema

$jwksConfig = Get-Content -Path $jwksFile | ConvertFrom-Json -Depth 10

$jwsHeader = [ordered]@{
  "alg" = "RS256"
  "kid" = $jwksConfig.keys[0].kid  # Grabbing the first key id that we can find.
} | ConvertTo-Json -Compress

# Use of an aggressive value for the `exp` claim is recommended.
# Single audience JWT-SVID tokens are strongly recommended to limit the scope of replay attacks.

$jwsPayload = [ordered]@{
  "iss" = $FederatedCredential.Issuer
  "sub" = $FederatedCredential.Subject
  "aud" = "api://AzureADTokenExchange"
  "iat" = ([DateTimeOffset](Get-date)).ToUnixTimeSeconds()
  "exp" = ([DateTimeOffset](Get-date).AddMinutes(5)).ToUnixTimeSeconds()
} | ConvertTo-Json -Compress

$JwsResult = "{0}.{1}" -f (ConvertTo-Base64UrlEncodedString -Text $jwsHeader), (ConvertTo-Base64UrlEncodedString -Text $jwsPayload)
You may have noticed the use of a very particular value for the aud property.
📖 Here’s what the Microsoft Graph docs page has to say about it:
“The audience that can appear in the external token. This field is mandatory and should be set to
api://AzureADTokenExchangefor Microsoft Entra ID. It says what Microsoft identity platform should accept in the aud claim in the incoming token. This value represents Microsoft Entra ID in your external identity provider and has no fixed value across identity providers - you may need to create a new application registration in your identity provider to serve as the audience of this token.”
All that remains is to sign the SVID JWT token.
$JwsResultAsByteArr = [System.Text.UTF8Encoding]::UTF8.GetBytes($JwsResult)

$hash = [System.Security.Cryptography.SHA256]::Create().ComputeHash($JwsResultAsByteArr)

$hashAlgorithm = [System.Security.Cryptography.HashAlgorithmName]::SHA256;
$padding = [System.Security.Cryptography.RSASignaturePadding]::Pkcs1
$signedResult = $rsa.SignHash($hash, $hashAlgorithm, $padding)

$signedResultb64url = ConvertTo-Base64UrlEncodedString -Bytes $signedResult
$JwsResult += ".{0}" -f $signedResultb64url

$jwsSignatureBytes = ConvertTo-ByteArray -Base64UrlEncodedData $signedResultb64url
$rsa.VerifyHash($hash, $jwsSignatureBytes, $hashAlgorithm, $padding)
# True
If you’ve encountered the need for two Entra-protected APIs to communicate, you may be familiar with the following process. Following the steps to execute the client_credentials authentication flow for the Microsoft Identity Platform should enable us to obtain an access token for an Entra-protected resource. The Microsoft Graph seems like the most straightforward choice for us to test this with. Let’s proceed with that.
$reqTokenBody = @{
  scope                 = "https://graph.microsoft.com/.default"
  client_id             = $Application.AppId
  client_assertion      = $JwsResult
  grant_type            = "client_credentials"
  client_assertion_type = "urn:ietf:params:oauth:client-assertion-type:jwt-bearer"
}

$tenantId = (Get-AzContext).Tenant.Id
$respToken = Invoke-RestMethod "https://login.microsoftonline.com/$tenantId/oauth2/v2.0/token" -Method "POST" -ContentType "application/x-www-form-urlencoded" -Body $reqTokenBody

# {
#   "token_type": "Bearer",
#   "expires_in": 3599,
#   "ext_expires_in": 3599,
#   "access_token": "eyJ0eXAiOiJKV1QiLCJub25jZSI6..Z3dFkUjrag"
# }
Just a little refresher on the scope={resource}/.default:
📖 From the docs: Client credentials requests in your client service must include scope={resource}/.default. Here, {resource} is the web API that your app intends to call, and wishes to obtain an access token for. Issuing a client credentials request by using individual application permissions (roles) is not supported. All the app roles (application permissions) that have been granted for that web API are included in the returned access token.
💡 For even more info check the rest of that page.
And if we use this token, we can see that it can be used to retrieve a list of users.
$graphResponse = Invoke-RestMethod 'https://graph.microsoft.com/v1.0/users' -Method 'GET' -Headers @{ Authorization = "Bearer $($respToken.access_token)" }

# {
#   "@odata.context": "https://graph.microsoft.com/v1.0/$metadata#users",
#   "value": [
#     {
#       "businessPhones": "",
#       "displayName": "Some User",
#       "givenName": "Some",
#       "jobTitle": null,
#       "mail": null,
#       "mobilePhone": null,
#       "officeLocation": null,
#       "preferredLanguage": null,
#       "surname": "User",
#       "userPrincipalName": "[email protected]",
#       "id": "00000000-1111-2222-3333-000000000000"
#     }
#   ]
# }
Issues
I encountered a few small issues while I was testing this out, here is a list:
- Authorization_IdentityNotFound: The identity of the calling application could not be established.
- Fixed by: “granting admin consent” for the requested permissions, for the newly created Entra ID Application.
- AADSTS70023: External OIDC Provider token must have a lifetime of less than or equal to 1.01:00:00. Token issued at 0. Token expires on 1714568926.,
- Fixed by correctly calculating a value for
exp. - Implementers are encouraged to keep the validity period as small as is reasonably possible.
- Fixed by correctly calculating a value for
- AADSTS5002723: Invalid JWT token. No certificate SHA-1 thumbprint, certificate SHA-256 thumbprint, nor keyId specified in token header.
- Fixed by adding the
keyIdheader - Though it is not required by the SVID spec.
- Fixed by adding the
- AADSTS700024: Client assertion is not within its valid time range. Current time: 2024-05-01T11:46:25.3115522Z, assertion valid from 2024-05-01T11:23:07.0000000Z, expiry time of assertion 2024-05-01T11:28:07.0000000Z.
- This one speaks for itself; I had to use a correct time range when setting the
expandiatproperties. - Documentation.
- This one speaks for itself; I had to use a correct time range when setting the
- AADSTS700213: No matching federated identity record found for presented assertion subject “spiffe://thomasvanlaere.com/my-idf-app-one”. Please check your federated identity credential Subject, Audience and Issuer against the presented assertion.
- The value for
subjectdid not match what we have configured for our credential.
- The value for
Conclusion
Exploring this topic felt like a smart decision, especially considering its increasing prominence. I now have a fairly clear understanding of what a federated credential entails and its applications within Azure.
I still have some lingering questions about how to effectively deploy this in a, self-hosted, production environment and what level of ongoing management it would require. However, it appears that I won’t need to speculate for long. Perhaps I can explore the production-ready implementation of this framework known as SPIRE. It is an implementation of the SPIFFE APIs designed for production environments, and conducts node and workload attestation to securely issue SVIDs to workloads and verify the SVIDs of other workloads, all based on predefined conditions. Thankfully, the documentation for SPIRE is extensive, very well-crafted, and even provides a step-by-step walkthrough of how SPIRE assigns an identity to a workload, along with an overview of fundamental SPIRE concepts.
💡 There is also a cool book written by members of the SPIFFE community that also provides very cool insights and dives deep into the problems that it solves.
All in all, good stuff! 👍
Related posts
- Verifying Azure AD tenant availability
- Windows Containers: Azure Pipeline Agents with Entra Workload ID in Azure Kubernetes Service
- Register Azure Pipeline Agents using Entra Workload ID on Azure Kubernetes Service
- Microsoft Entra Privileged Identity Management (for Azure Resources) Revisited
- Azure Chaos Studio and PowerShell
- Azure Chaos Studio - Public Preview
- Azure Purview
- Azure Resource Locks
- Local OpenShift 4 with Azure App Services on Azure Arc
- Open Policy Agent
- Azure Red Hat OpenShift 4
- Chaos Engineering on Azure
- Azure Policies & Azure AD PIM breakdown - Part 2
- Azure Policies & Azure AD PIM breakdown - Part 1