Azure Chaos Studio - Public Preview
In this post
📣 Dive into the code samples from this blog on GitHub!
Sometime last year, around the end of September, I wrote about “Chaos Engineering on Azure”. In that post, I described what chaos engineering was all about and took a closer look at an open-source project called Chaos Toolkit.
A few months after publishing that post, probably around December 2020, I was taking a look at my site’s indexing status over on the Google Search Console. I noticed that my website was getting impressions from users who were originally searching for “azure chaos studio”. There were only about two or three impressions, yet they stood out to me. I decided to return the favour and search for “Azure Chaos Studio” and, perhaps somewhat unsurprisingly, Google returned no results. Though at the time, I had read somewhere that Microsoft used internal tools to perform chaos engineering and suspected that this could mean that they would release something similar to Azure customers.
Fast forward to March 2021, to the additional Microsoft Ignite event, and Mark Russinovich has a small segment where he talks about “Azure Chaos Studio”. As my fiancée could probably attest to, I got very amused when the announcement was made (in the form of gleeful, somewhat maniacal laughter erupting from my office).
Unfortunately for me, however, I was unable to get my hands on Azure Chaos Studio. I decided to keep an eye out for Chaos Studio’s public preview announcement, which came half a year later on November 2nd 2021.
Chaos Engineering 101
Before we dive headfirst into Azure Chaos Studio, allow me to give you a refresher on chaos engineering!
Chaos engineering involves experimenting on a distributed system to build confidence in its capability to withstand turbulent conditions in production.
The idea is that by proactively, cautiously and purposely breaking things in any layer of our system, we can potentially identify weaknesses in our system before they have a chance of occurring in production. By running these types of tests over and over again against our infrastructure, we can turn a potentially catastrophic event into a non-issue.
Even though the term “Chaos” might give you the impression that it involves a great deal of randomness, this is not entirely what we’re after. We aren’t looking for the piece of code that is broken either. We’re attempting to learn how the entirety of the system performs and what type of previously unknown behaviour emerges from a controlled experiment.
Why and when to use Azure Chaos Studio?
Making sure that customers can access their applications without experiencing any form of downtime is part of the end-all of application resiliency, which is the capability of an application to handle and recover from disruptions.
Keeping your customers happy is not the only reason why you’d want to consider taking a closer look at the current state of your application’s resiliency; there can also be legal, financial and life-or-death consequences that can be set in motion when your app goes down for too long.
For instance, I could be running a web application on an internet-exposed Azure virtual machine. This will often result in the VM depending on the correct configuration of a network security group (NSG), which in turn decides over what ingress or egresses traffic is allowed to proceed to the virtual machine. It would be very unfortunate if someone or something were to modify the NSG’s inbound rules, causing all incoming traffic to get blocked.
Though let us assume that this does happen! How will our application handle such a type of failure? When you think about it, a lot of things can potentially happen, even things we do not expect to happen. Here is a small, completely fictitious, and bonkers scenario of what might happen once all inbound traffic gets blocked:
We receive an incident alert via email, trigged by a URL ping test, 15 minutes too late. Secondary services that call the web application’s API implement an improperly tested retry pattern that cause other issues to occur: CPU usage spikes, memory leaks start to occur and heavy on disk-caching causes one of the drives to fill up. Our admin colleagues desperately attempted to SSH (or RDP) into the virtual machine, to no avail. At the end of a few increasingly stressful minutes, it is determined that the incident is caused by some innocuous change to the NSG’s inbound rules, introduced by someone or something. The modification to the NSG’s inbound rules were reverted, the incident was resolved and lots of lessons were undoubtedly learned.
💡 I completely agree, this is a heavy-handed example, to be sure. I can only say for myself that I’ve seen these sorts of incidents happen, and the reason they didn’t happen a second time was because we worked out ways to guard against these failures.
Now, to increase the resiliency of our application it would be useful if we had something in our arsenal that can make it trivially easy for us to introduce failures frequently. This way, we can identify weaknesses in our system earlier and build mechanisms to turn them into non-issues. If you’ve read my previous blog post on the subject of chaos engineering, you might already know that lots of great different chaos engineering tools and third-party services exist. These tools require you to manage them, which means you must control who gets access, update them, and figure out ways to monitor and log activity.
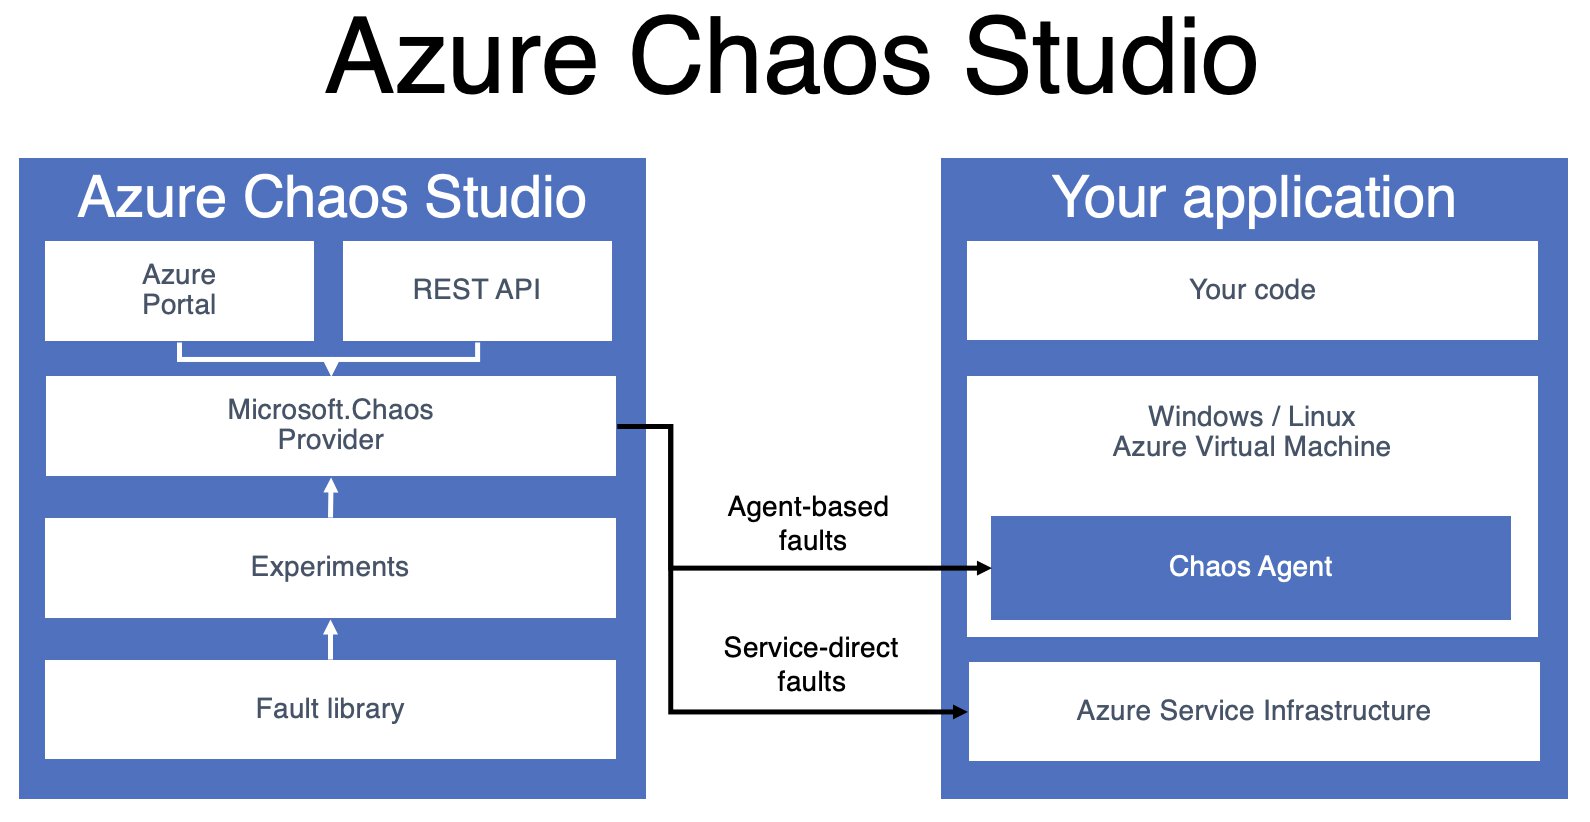
This is where Azure Chaos Studio comes in; it is a managed service that allows you to orchestrate fault injection on your Azure resources in a controlled manner and simplifies management tasks, using mechanisms that are already built-in to the Microsoft Azure platform.
What’s inside the offering?
According to Microsoft, a few of the key benefits of Azure Chaos Studio are:
- A fully-managed service
- Chaos Studio functions like any other Azure service and does not require you to perform any management or maintenance tasks.
- Integrates with other Azure services
- Azure Policy supports Chaos Studio.
- Azure Active Directory for securing access to Azure resources, via service principals and Azure RBAC.
- Chaos Studio integrates with the Azure Resource Manager, allowing you to deploy chaos experiments in the same way you deploy other resources today.
- Fault library
- These are pre-defined faults that can introduce a disruption in a system.
- Replication of real-world incidents
- Build complex chaos experiments through the UI, ARM templates or REST API to replicate incidents.
- Control
- Chaos Studio is flexible enough to allow you to cancel and roll back an injected fault.
- A resource onboarding and permissions model ensures that fault injection can only be done by “authorized users against authorized resources using authorized faults”.
- That’s a ton of authorization.
Best of all, the public preview is completely free until April 2022. This is great if you want to get a feel for what the service can bring to the table.
Chaos Studio is free to use through April 4, 2022, and thereafter usage will be charged pay-as-you-go by the target action minute.
Do keep in mind that, as with many other Azure services that are in public preview, Azure Chaos Studio currently does not come with an SLA.
Getting started with Azure Chaos Studio
Azure Chaos Studio, as with Chaos Engineering in general, centres around chaos experiments.
A chaos experiment, in the world of Azure Chaos Studio, is an Azure resource that describes the faults that should be run against one or more Azure resources. Chaos Studio supports two types of faults: service-direct faults, which run directly against an Azure resource without any additional tooling and agent-based faults that run inside of a virtual machine or a virtual machine scale set, to perform in-guest failures.
Experiments
The concept of an Azure chaos experiment isn’t overly complex and currently consists of just two (sort of) main parts:
- Selectors - the what part
- Azure resources that you target and run faults (or other actions) against.
- You can logically group target resources, for example, all VMs in a specific environment.
- Logic - the how part
- Describes how and when to run faults.
- Split into one or multiple steps that run sequentially, one after the other.
Steps contain one or multiple branches which allow you to run multiple actions in parallel. Inside of a branch you can perform activities, called actions, and do one the following:
- Faults
- Which disrupts one or more resources.
- Some faults can be injected for a fixed duration or continuously.
- Time delays
- Waits without impacting resources
- Used when you need to wait for a resource to be impacted by a preceding fault.
Fault actions come in two flavours:
- Agent-based
- Fault is executed on a target virtual machine.
- Requires the Chaos Studio agent to be installed
- Available for Windows and Linux.
- Not all faults are available to both operating systems.
- Service-direct
- Do not require an agent.
- Typically runs against an Azure resource.
There are a few different fault actions available at the moment in the “fault library”, but this library will undoubtedly expand as the work on Azure Chaos Studio continues.
So, if we put all of those things together, an experiment can end up looking something like this:
- Experiment
- Step 1
- Branch 1
- Fault 1
- Selector contosoWebVms
- Type: CPU pressure
- Parameters: …
- Duration: x minutes
- Fault 1
- Branch 2
- Fault 1
- Selector contosoWebVms
- Type: Disk I/O pressure
- Parameters
- Duration: x minutes
- Fault 1
- Branch 1
- Step 2
- Branch 1
- Fault 1
- Type: Disk I/O pressure
- Selector: contosoWebVms
- Parameters
- Duration: x minutes
- Fault 1
- Branch 2
- Fault 2
- Type: kill process
- Selector: contosoDbVms
- Parameters
- Duration: x minutes
- Fault 2
- Branch 1
- Step 1
When a fault has been injected into the system, this can allow us to verify whether or not our system’s overall availability becomes impacted. Ideally the verification process is something that we turn into a repeatable script.
⚠️ It is important to highlight that Azure Chaos Studio only orchestrates fault injection, it is up to us to create additional tests to verify that the system is still working as intended.
That being said, Azure Chaos Studio comes with a few built-in mechanisms to ensure that you cannot accidentally inject a fault into a specific resource.
“A fault can only impact a resource if the resource has been onboarded as a target and has the corresponding fault capability enabled on the resource.”
Let’s take a look at both targets and capabilities next.
Targets
A chaos target allows the Chaos Studio service to interact with the target Azure resource, it is an extension-resource of the resource that is being onboarded to Chaos Studio. For example, if I want to onboard a network security group the target:
/subscriptions/00000000-0000-0000-0000-000000000000/resourceGroups/tvl-azcs-rg/providers/Microsoft.Network/networkSecurityGroups/tvl-azcs-nsg
The extension resource will be formatted as follows:
<resource-id>/providers/Microsoft.Chaos/targets/<target-type-name>
In our case, this creates the following extension-resource ID:
/subscriptions/00000000-0000-0000-0000-000000000000/resourceGroups/tvl-azcs-rg/providers/Microsoft.Network/networkSecurityGroups/tvl-azcs-nsg/providers/Microsoft.Chaos/targets/microsoft-networksecuritygroup
What is a “target type”, you might ask? I think you can compare this to a Windows DLL that you can load and tell it to perform chaos-related tasks that are specifically related to an Azure resource (NSGs, CosmosDB, etc..) OR tasks that can be performed by the chaos studio agent running on a VM.
A more formal definition, as it is written in the documentation, states: “a target type represents the method of injecting faults against a resource. Resource types that only support service-direct faults have one target type. Resource types that support service-direct and agent-based faults have two target types: one for the service-direct faults (for example, Microsoft-VirtualMachine), and one for the agent-based faults (always Microsoft-Agent).”
💡 You might be wondering where you can find a list of available target types? Fear not, you can find all of this information through the Azure Chaos Studio REST API.
Capabilities
If a target type can be compared to a specific Windows DLL, then I suppose you could say that capabilities are similar to function methods that you can call from that DLL. Anyway, a capability enables Chaos Studio to run a particular fault action against a resource, it is unique per target type and represents the fault it enables.
When a capability is created, it is linked to a chaos target. Its format is as follows:
<resource-id>/providers/Microsoft.Chaos/targets/<target-type-name>/capabilities/<capability-name>
And again, for our particular example, that turns into the following extension-resource ID:
/subscriptions/00000000-0000-0000-0000-000000000000/resourceGroups/tvl-azcs-rg/providers/microsoft.network/networksecuritygroups/tvl-azcs-nsg/providers/Microsoft.Chaos/targets/microsoft-networksecuritygroup/capabilities/SecurityRule-1.0
💡 Perhaps you’re wondering where you can find a list of available capability types? The Azure Chaos Studio REST API has you covered, again.
Security
Azure Chaos Studio has a few ways through which it controls how and when fault inject is allowed to occur against a resource. We’ve already discussed the fact that each resource must be onboarded and have a chaos target extension-resource, with the required capabilities enabled. Let’s take a look at the two remaining ones.
First, the “Microsoft.Chaos/experiments” resource (and others) is just another Azure resource and is subject to all the governance mechanisms that are part of Azure. With Azure RBAC we can ensure that only specific security principals (users, groups and applications/service principals) can perform specific actions (typically CRUD) related to Chaos experiments. For instance, if we want to ensure that only specific users can create new targets we could create a custom role that gives us full control to “Microsoft.Chaos/targets” by adding “Microsoft.Chaos/targets/*” to the “Actions” property of a custom role definition.
💡 You could use Azure Policy to limit, change or audit which values a security principal can set on a “
Microsoft.Chaos/experiments”. A typical example would be to ensure that experiments all use a specific naming convention, though you could probably enforce more complex rules. Another possibility would be to use Azure Policy to automatically onboard specific target resources and set their capabilities by using the ‘DeployIfNotExists’ effect in conjuction with an ARM template.
Second, when using Chaos Studio you will need to know your way around Azure managed identities. Managed identities eliminate the need to manage credentials and provide an identity for applications to use when connecting to resources that support Azure Active Directory (Azure AD) authentication. When you create a “Microsoft.Chaos/experiments” resource a system-assigned managed identity is created, which is an identity in Azure AD that is tied to the lifecycle of that single resource.
By default, the experiment’s managed identity will not be allowed to access any other resource. One of the first things you will need to do after the experiment has been created, is to grant the managed identity the correct permissions to all resources that the experiment will target through the selectors.
Also, if you want to use agent-based faults you must install the Chaos Studio agent on the target virtual machine (or VM scale set) and hook it up to a user-assigned managed identity. User-assigned managed identities differ from the system-assigned identities, as they are created as another standalone Azure resource and can represent one or multiple Azure resources.
Creating an experiment
For demonstration purposes, I thought it might be a fun idea to keep things simple and replicate a part of the bonkers incident, using service-direct fault actions.
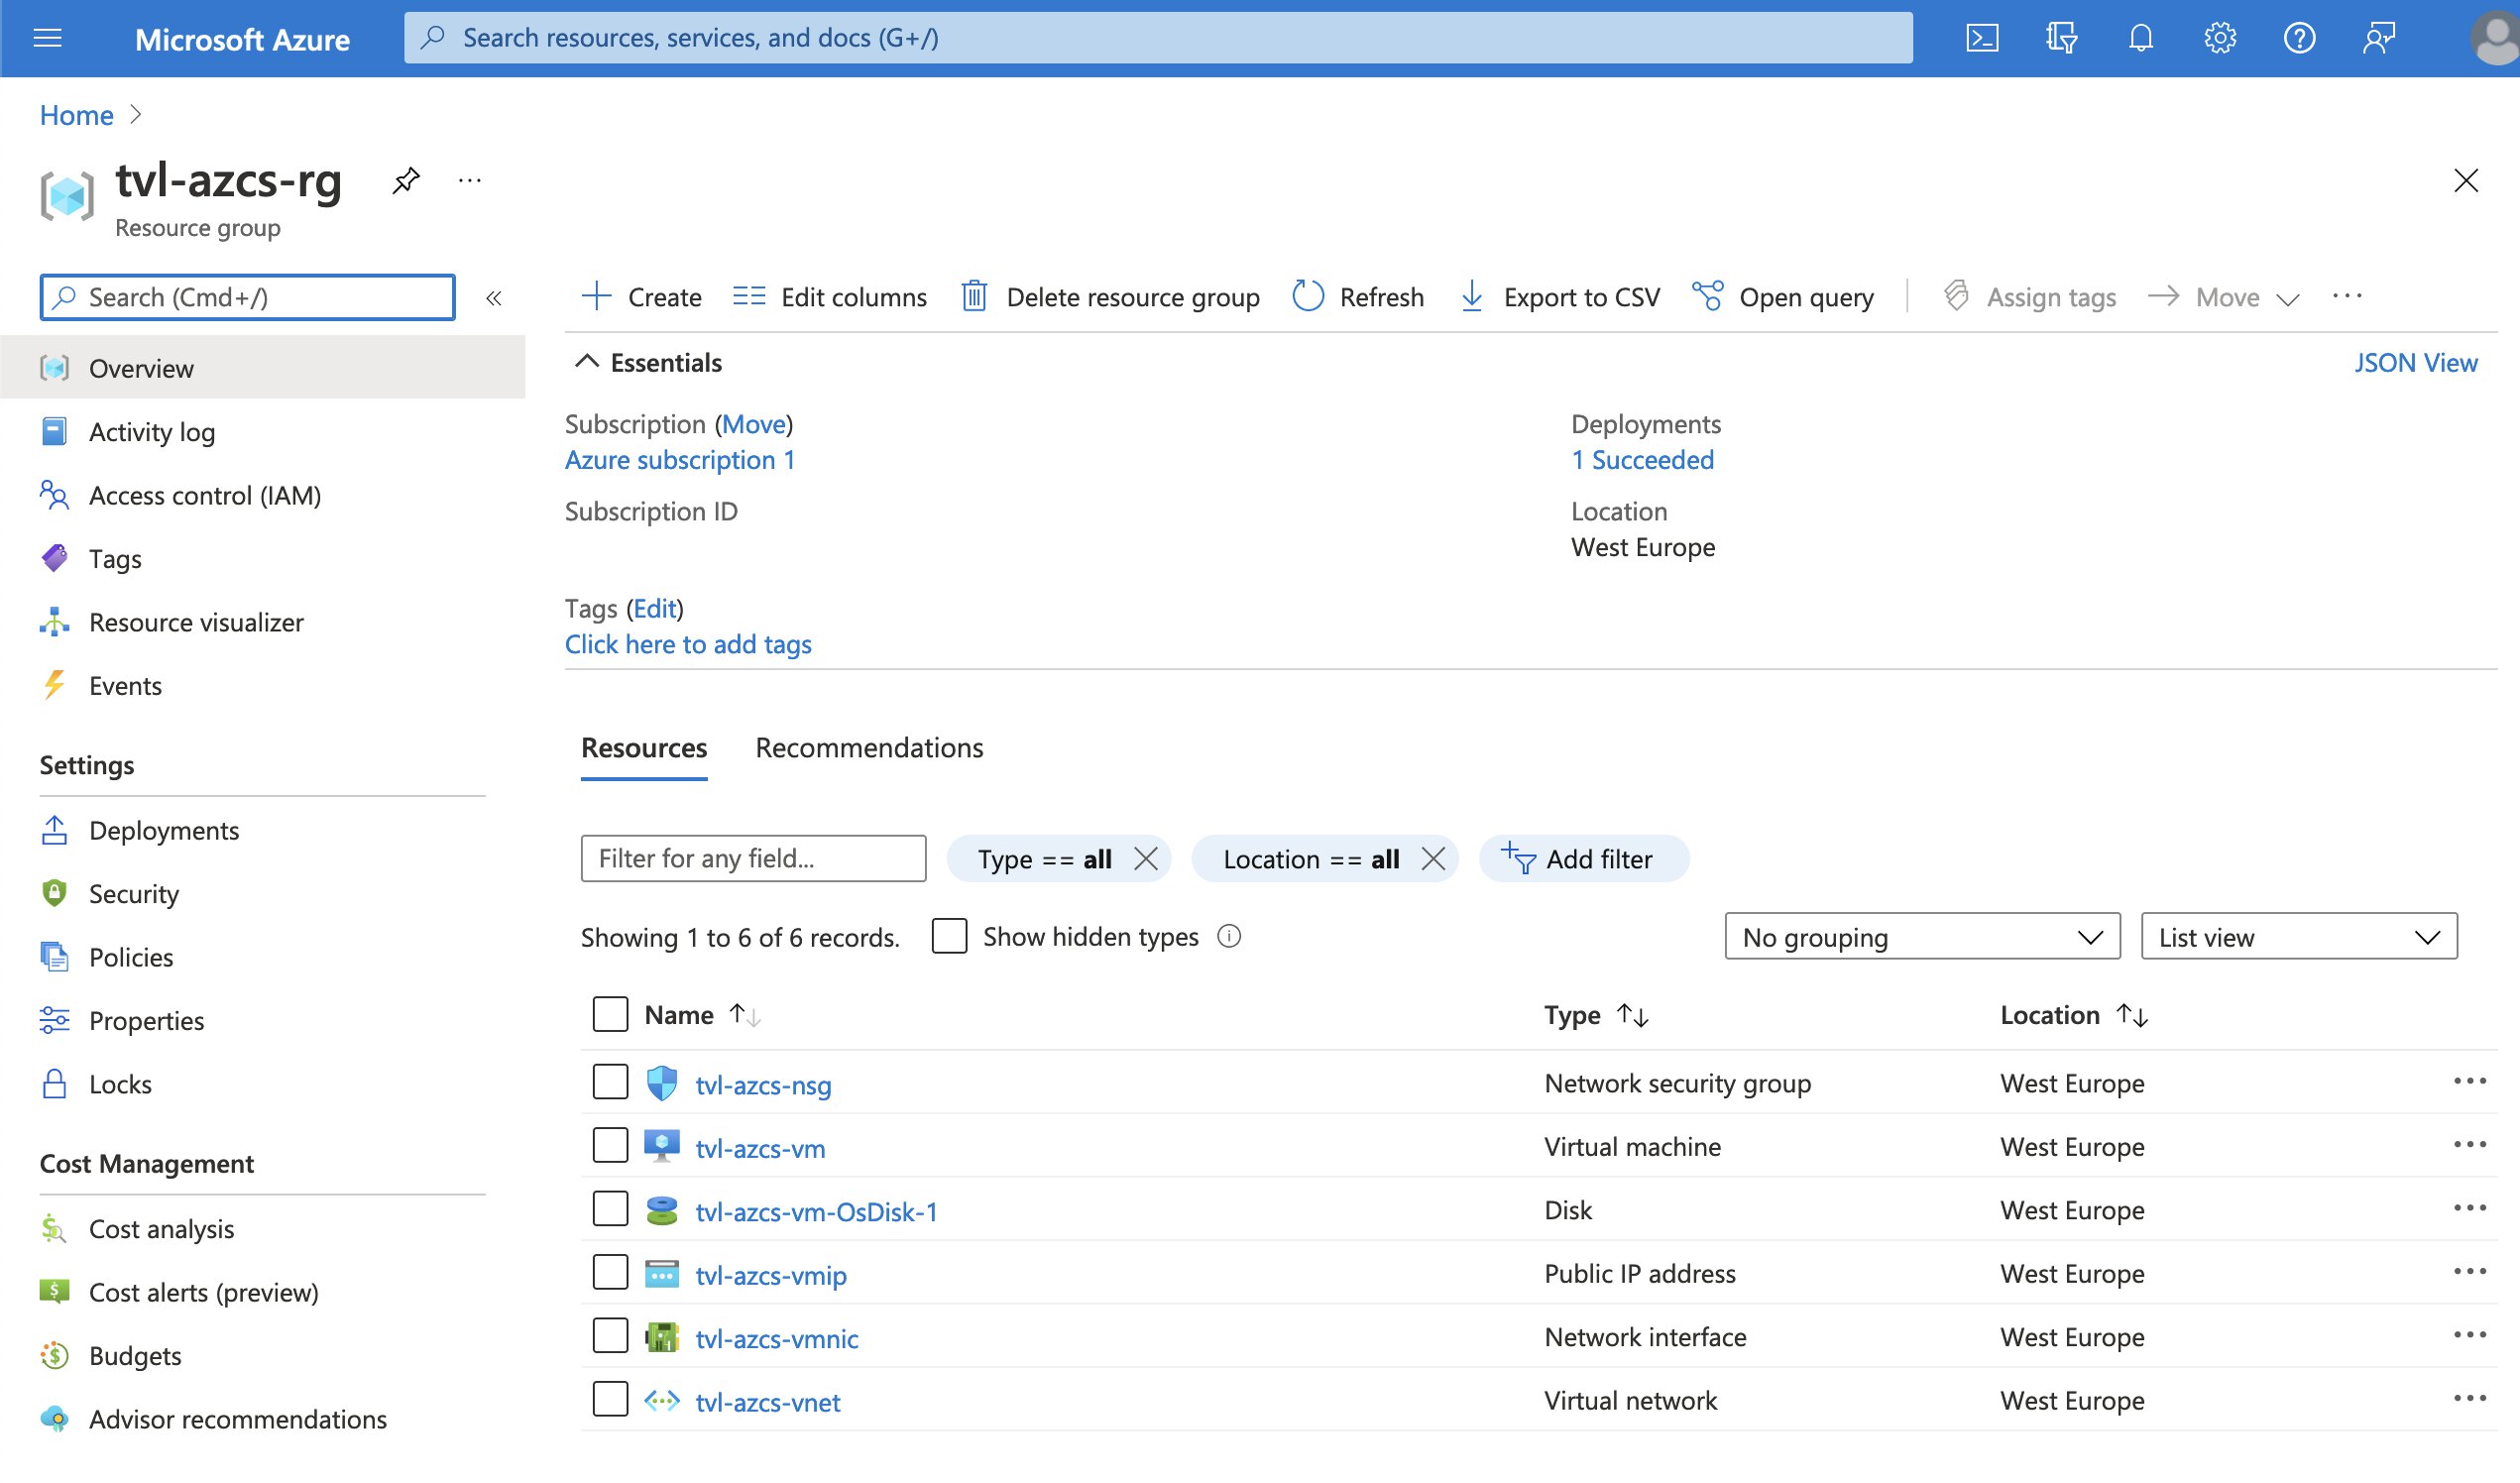
I will create a simple web server, which will be sitting in a web subnet on the virtual network, a network security group will be associated with the web subnet. Through the use of a chaos experiment, we will inject a faulty inbound rule, in the network security group, for just a few minutes. Let’s start by deploying the virtual machine and all of the other dependencies that we need to get this show on the road. In my GitHub repository, I have provided an ARM template that will do just that, you can deploy it through the portal. Once the deployment is complete, you can find a URL in the deployment outputs.
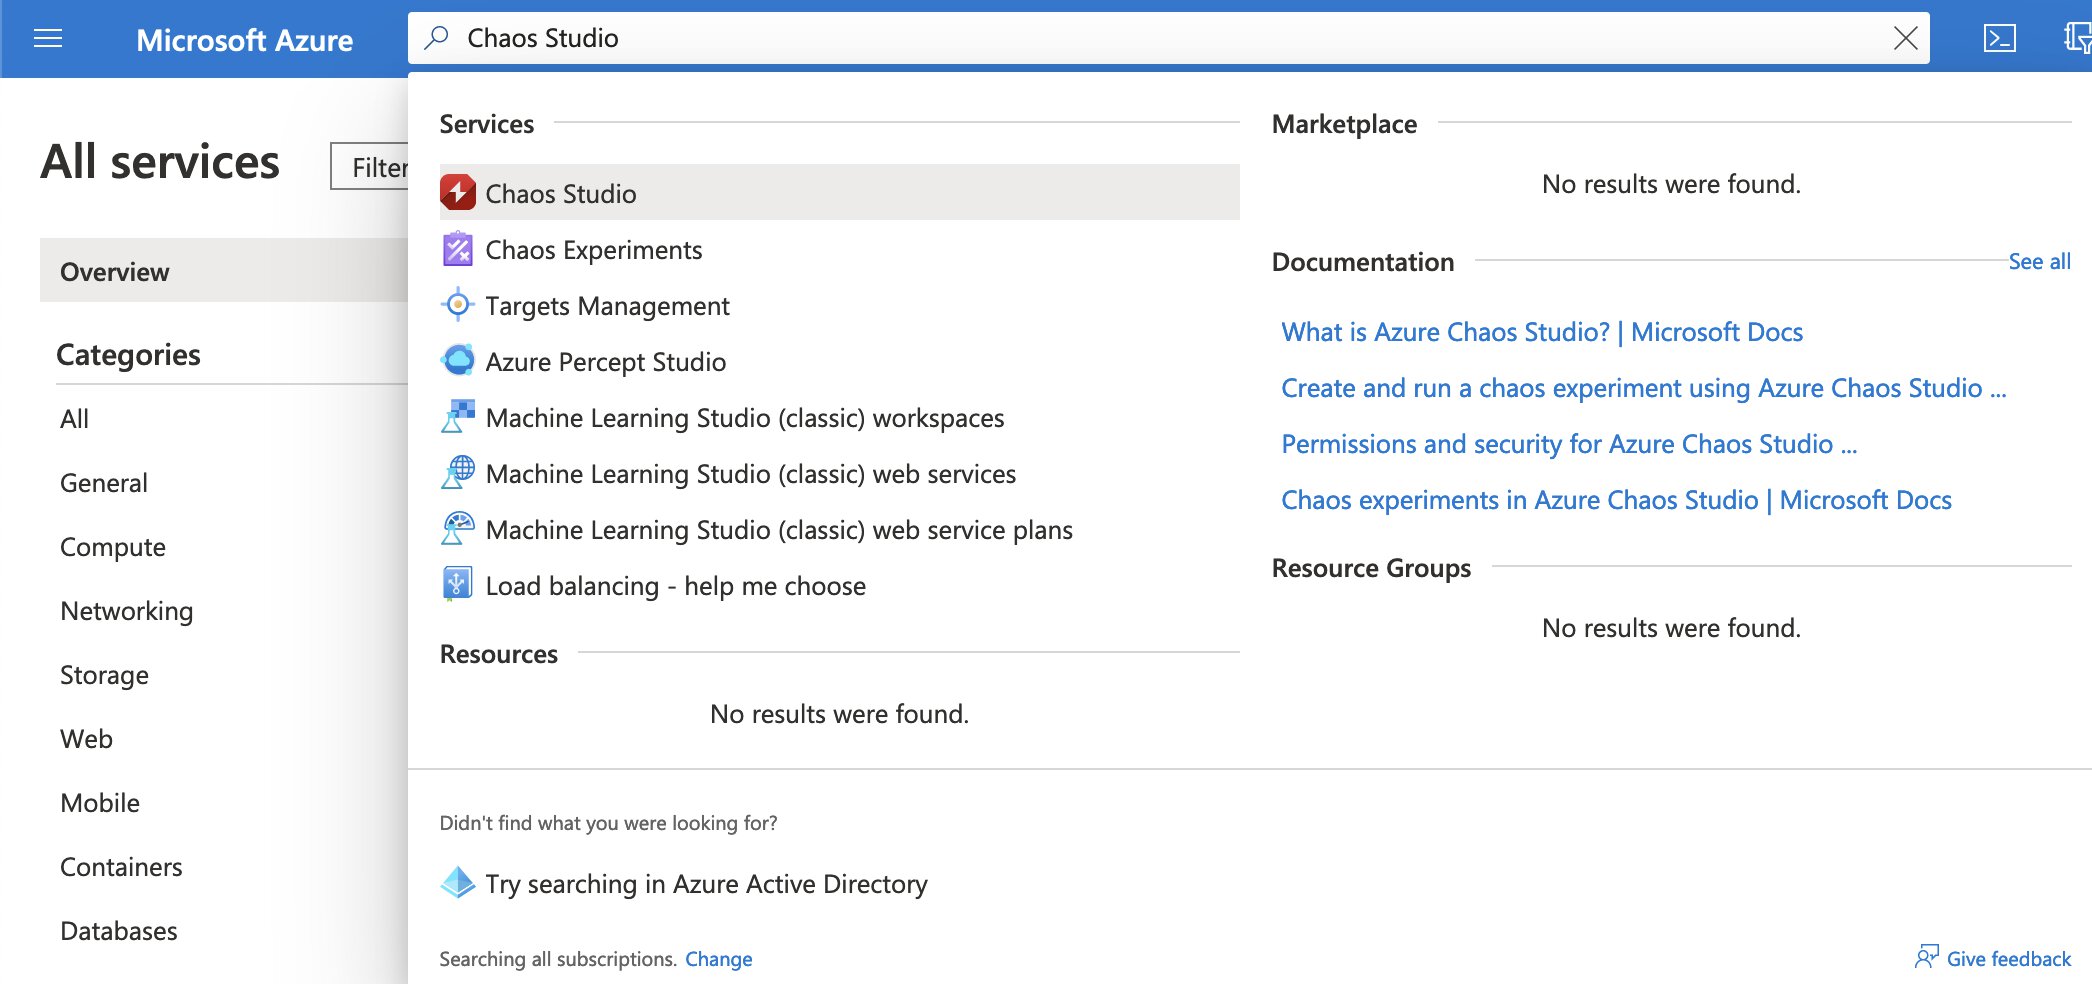
Next up, search for Chaos Studio via the search bar on top of the Azure portal or you can find it by selecting the “All services” option.
Remember, earlier I wrote that to be able to run a chaos experiment we will need to onboard the target Azure resource as a chaos target and enable the corresponding fault capability on the chaos target subresource.
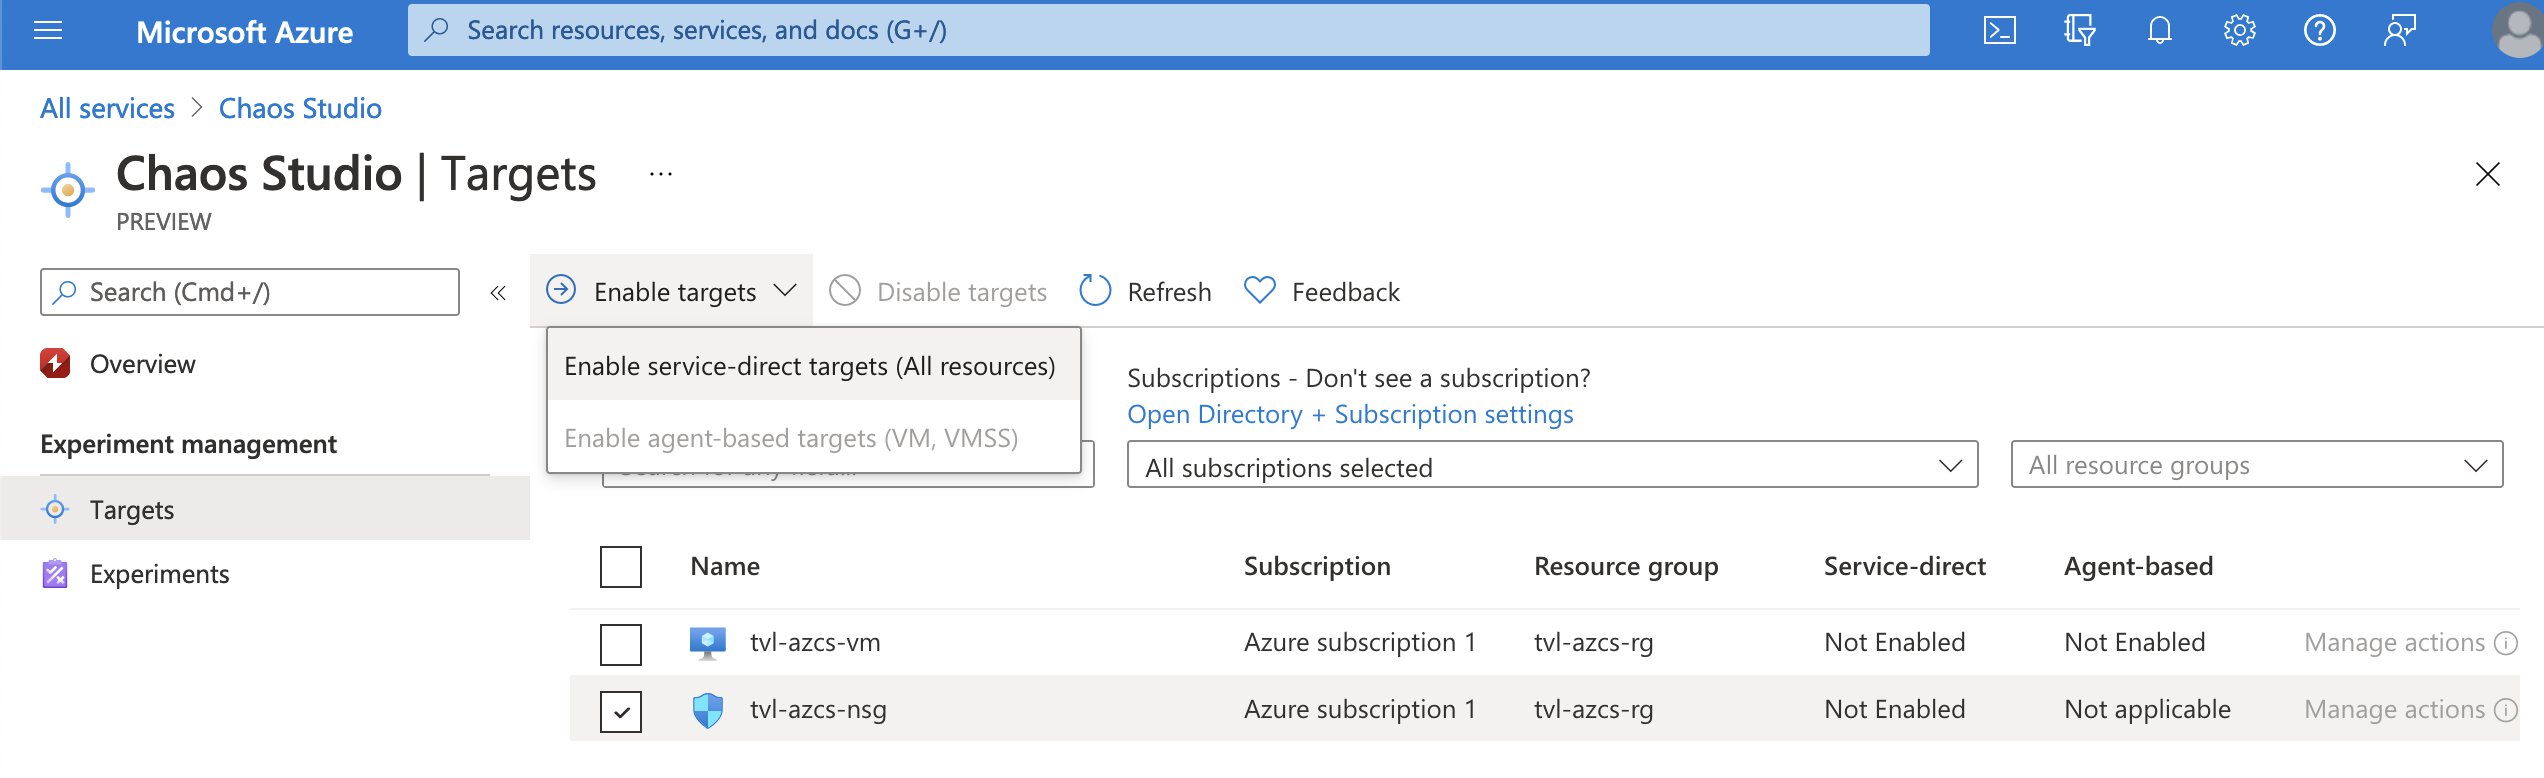
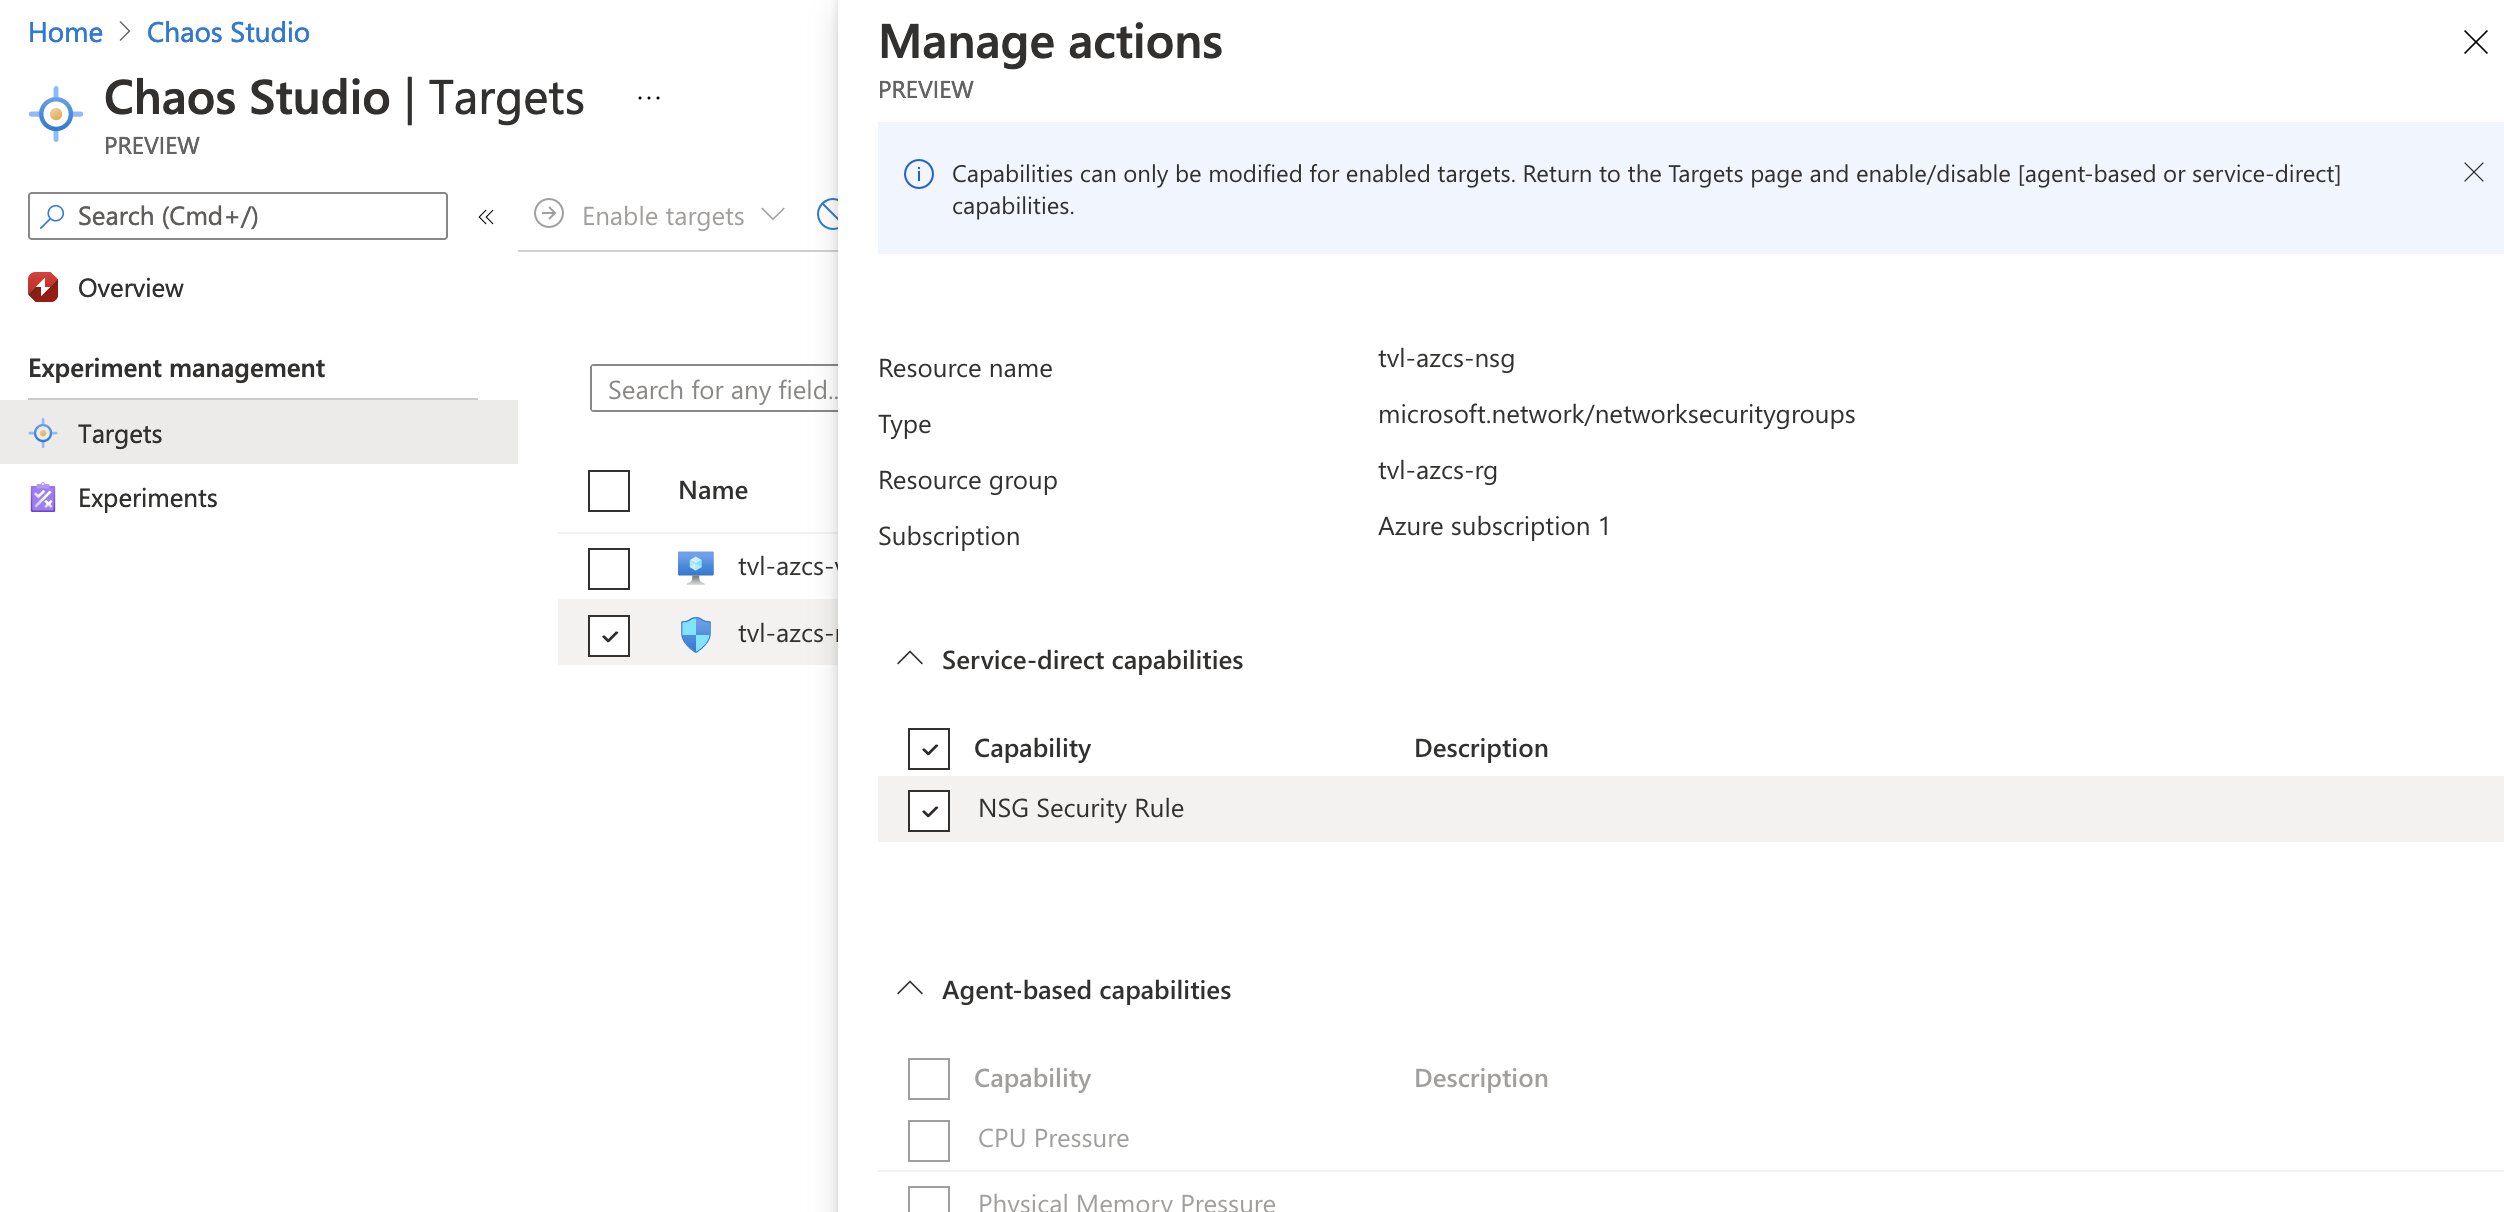
In Chaos Studio, select the “Targets” option under “Experiment management”. Now you should be able to see all of the compatible resources and their onboarding status. Select the NSG and click the “Enable targets” button, a dropdown will appear. Since the NSG only supports service-direct faults actions, that is the option we are going to select! You might get an error message at this point. Do not worry, this is part of the public preview experience, simply try enabling the target again.
If you refresh the targets list, you should see that our NSG target has service-direct set to “Enabled” and that you can now select “Manage actions”. If all went well, you should see that the NSG security rule capability has been added to the target, which is exactly what we want.
💡 By the way, remember how I wrote that creating targets and adding capabilities would cause the Azure Resource Manager to create two additional (sub)resources? Well, you will not be able to see them through the portal, even with the “show hidden types” option enabled. You can, however, see those resources via Azure PowerShell and CLI if you want to. Additionally, you could use the Azure Chaos Studio REST API.
We are now ready to create the experiment! In Chaos Studio, select the “Experiments” option under “Experiment management” and create a new experiment by selecting “Add an experiment”. Give your experiment a thoughtful name, select your preferred location and you should be able to head over to the “Experiment designer” tab. We will be creating a single step called “change NSG inbound rules”, with a single branch “Add deny web rule”.
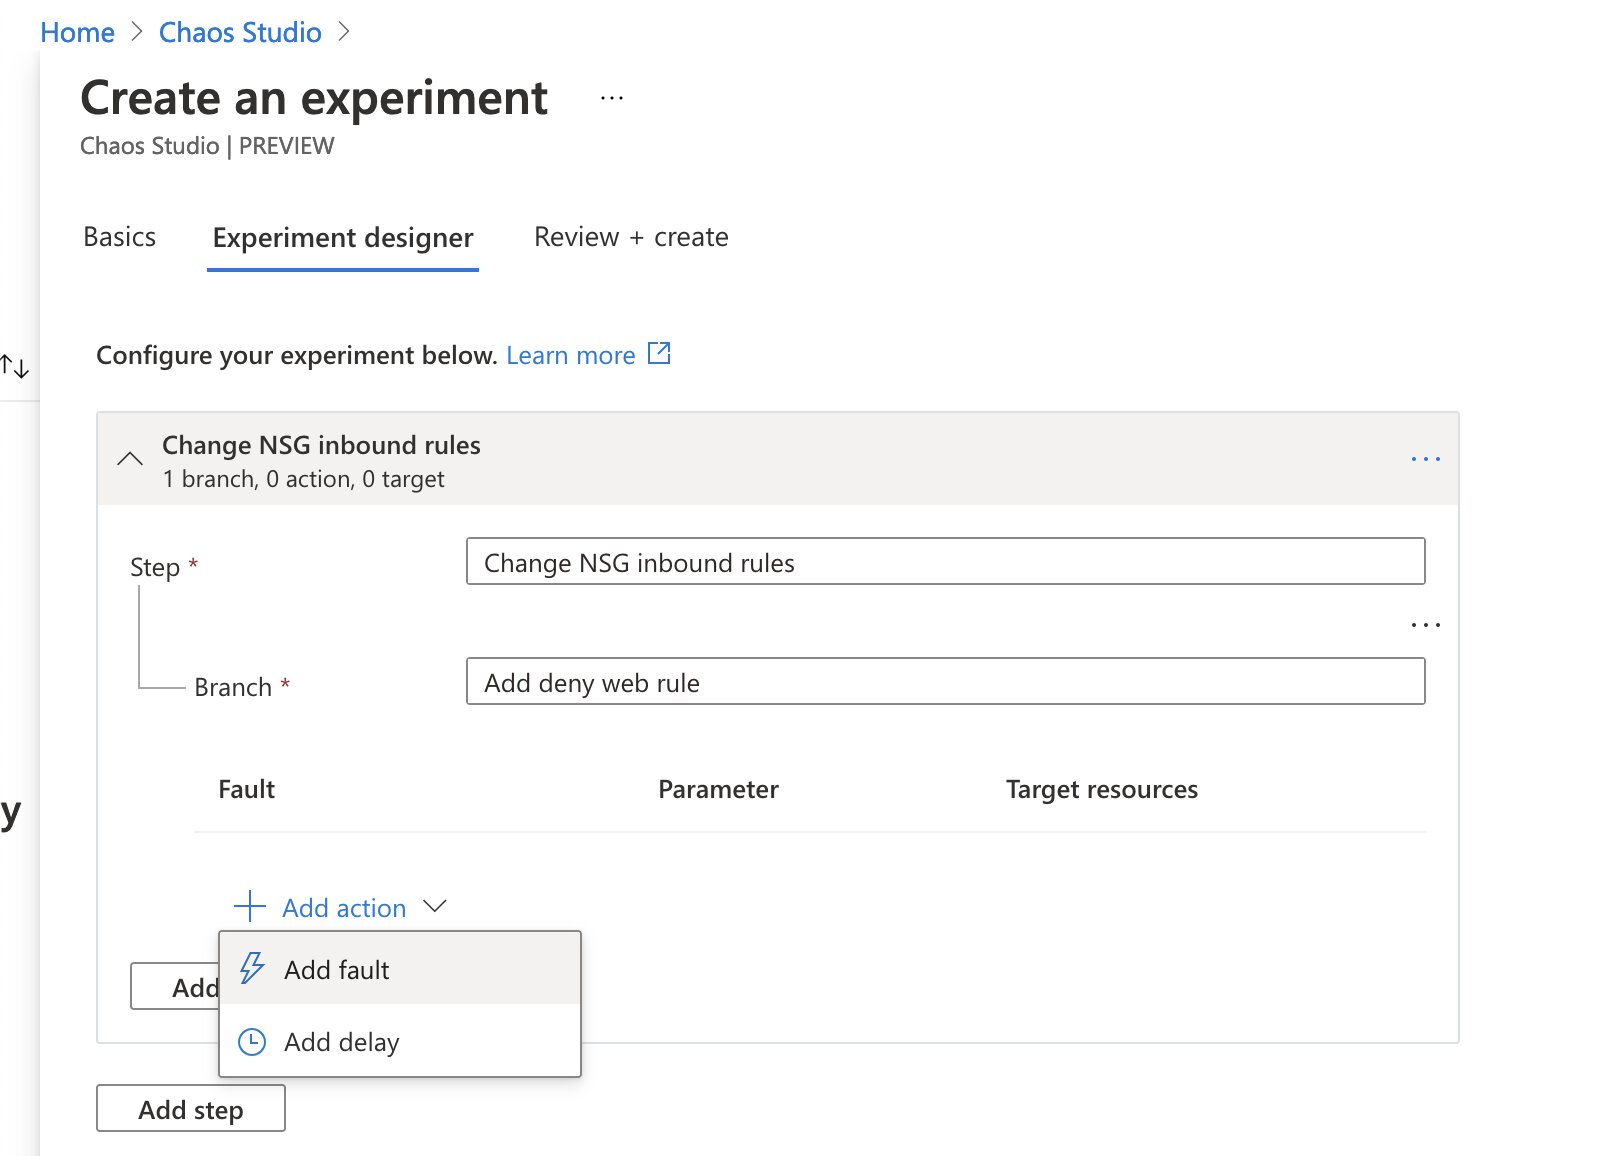
Now it’s time to add our fault action, hit the “Add action” button, select “Add fault” from the dropdown and a new menu will pop out.
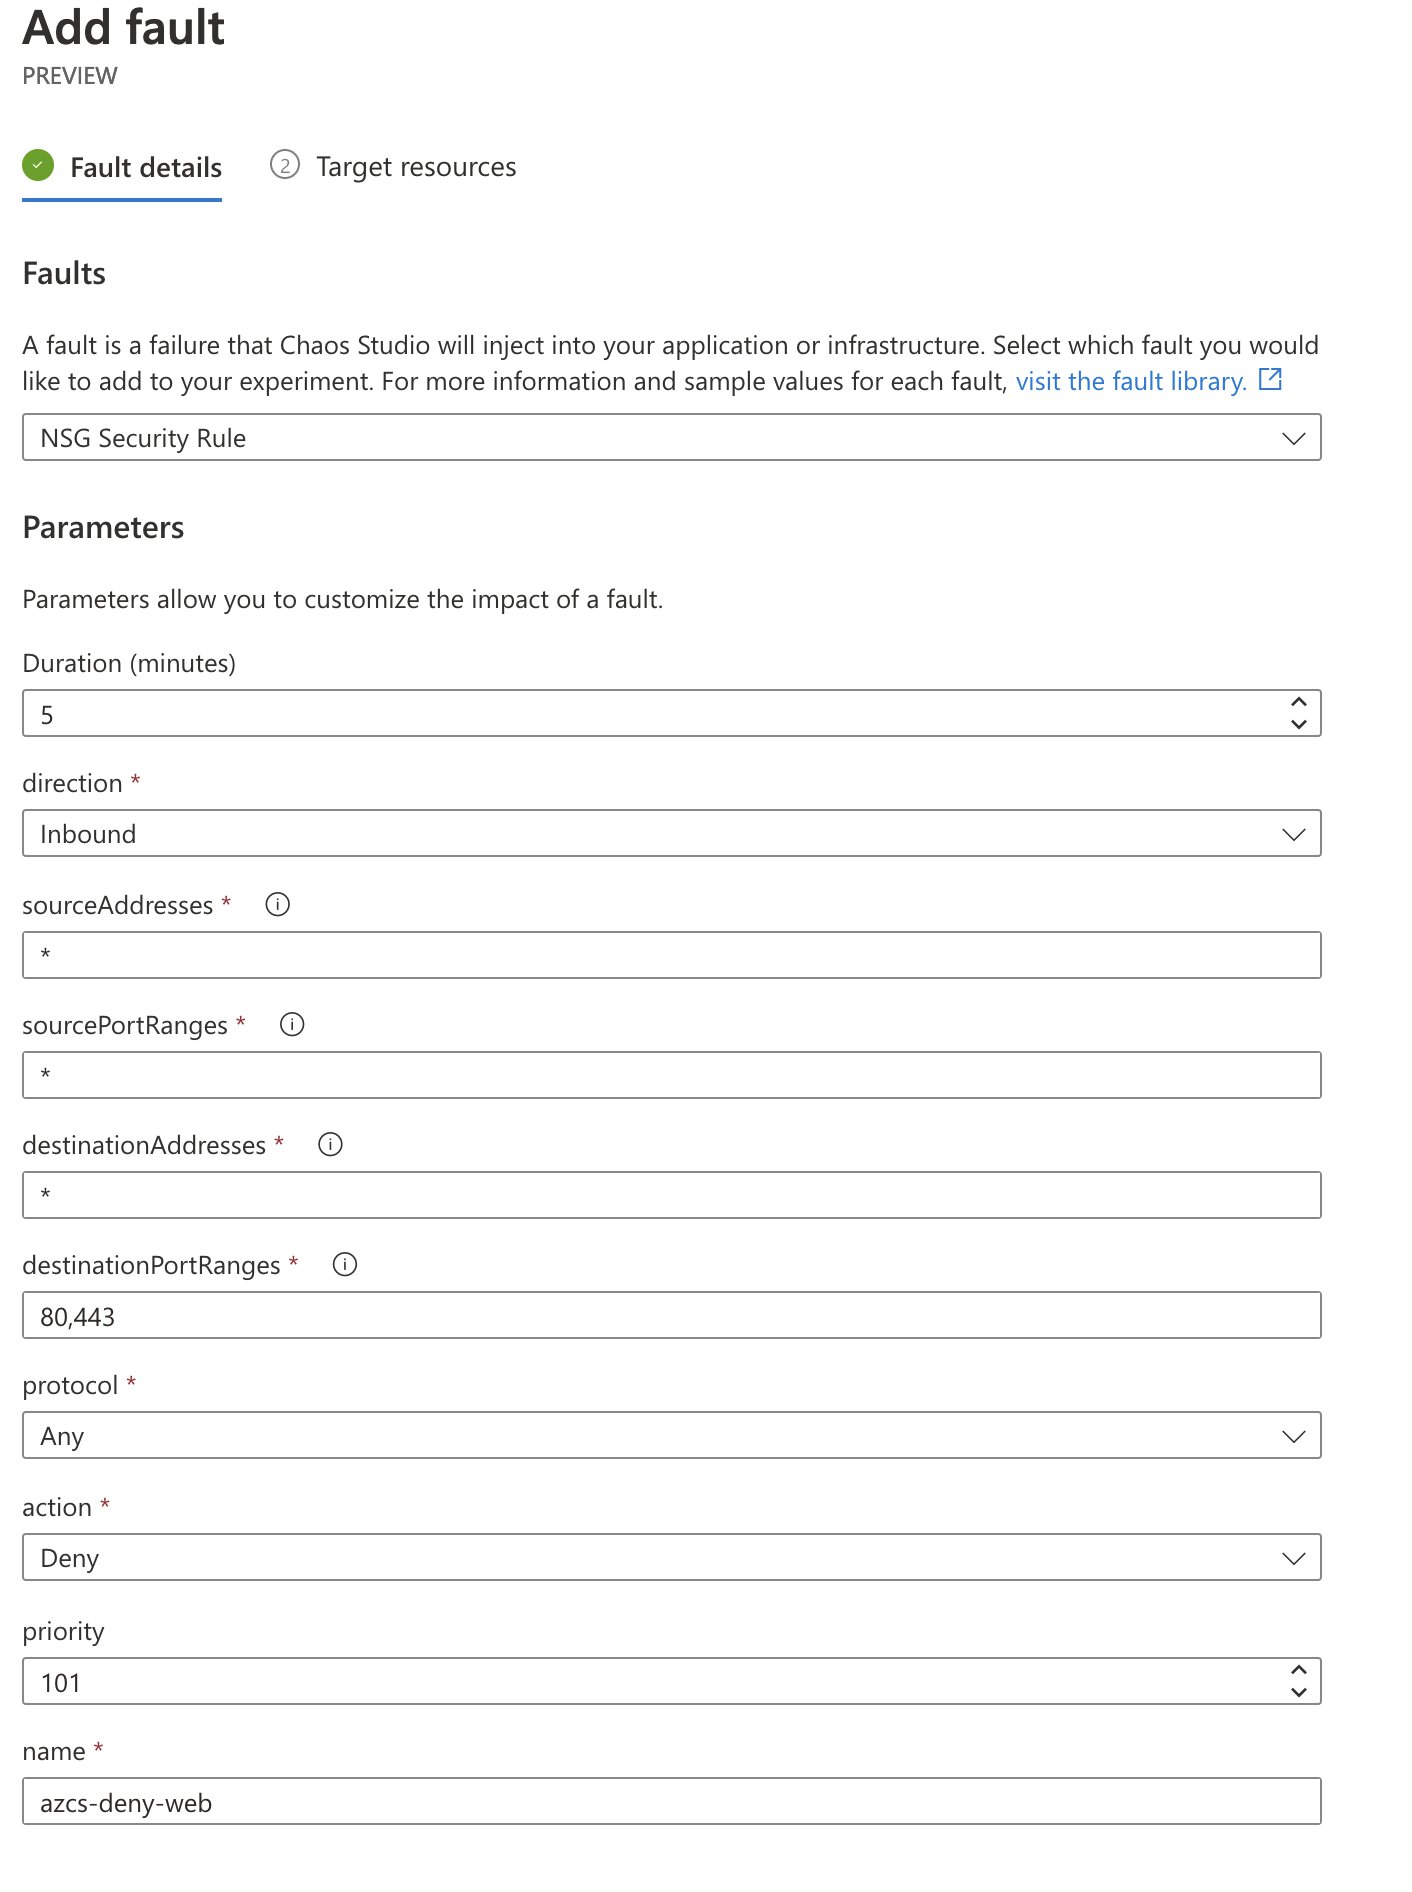
Select the “NSG Security Rule” fault. We will enter our fault action’s duration and other parameters, as well as define the selectors in this menu. I want this action to block inbound traffic, regardless of protocol, headed towards ports 80 and 443, and to do this for five minutes on the NSG target that we onboarded. This should give us ample opportunity to start the experiment, open a new browser tab and attempt to load the website.
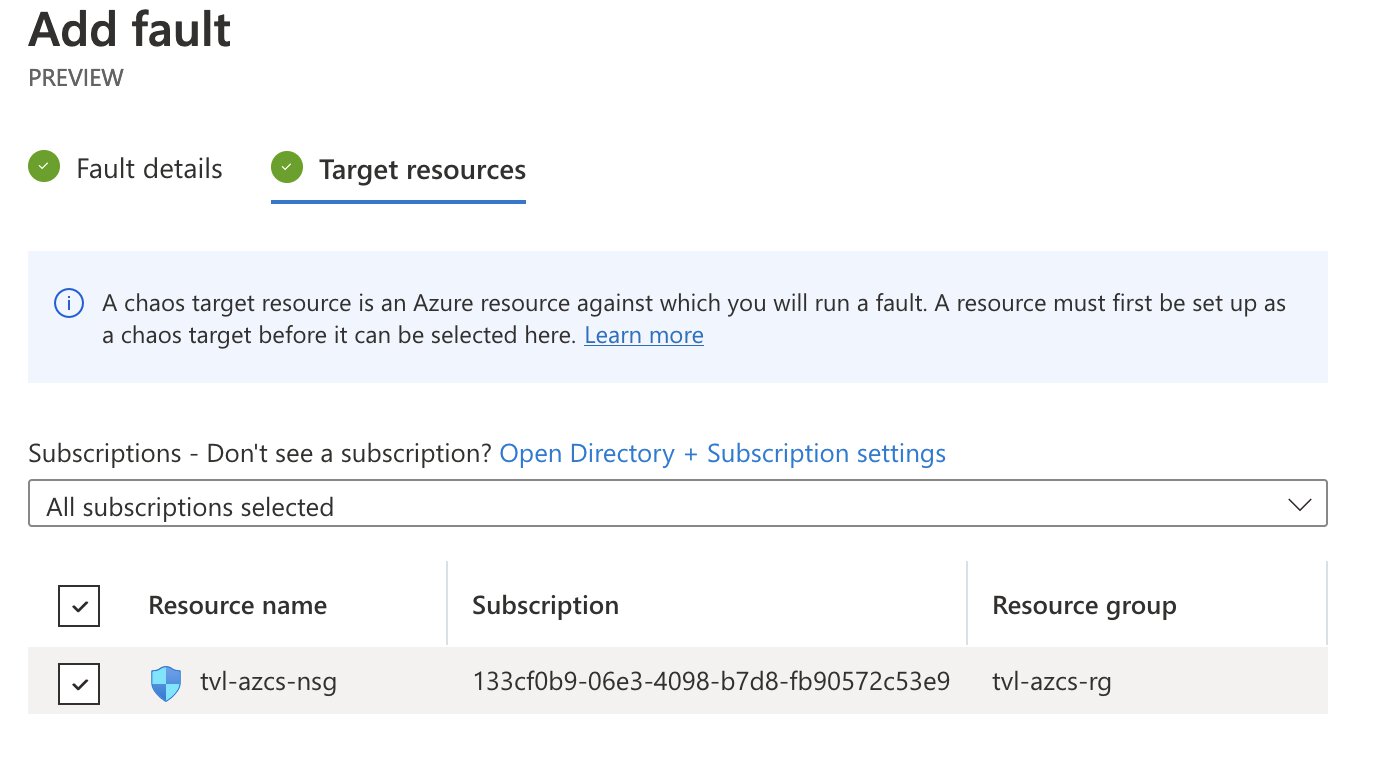
To complete this part of the process, select the target network security group.
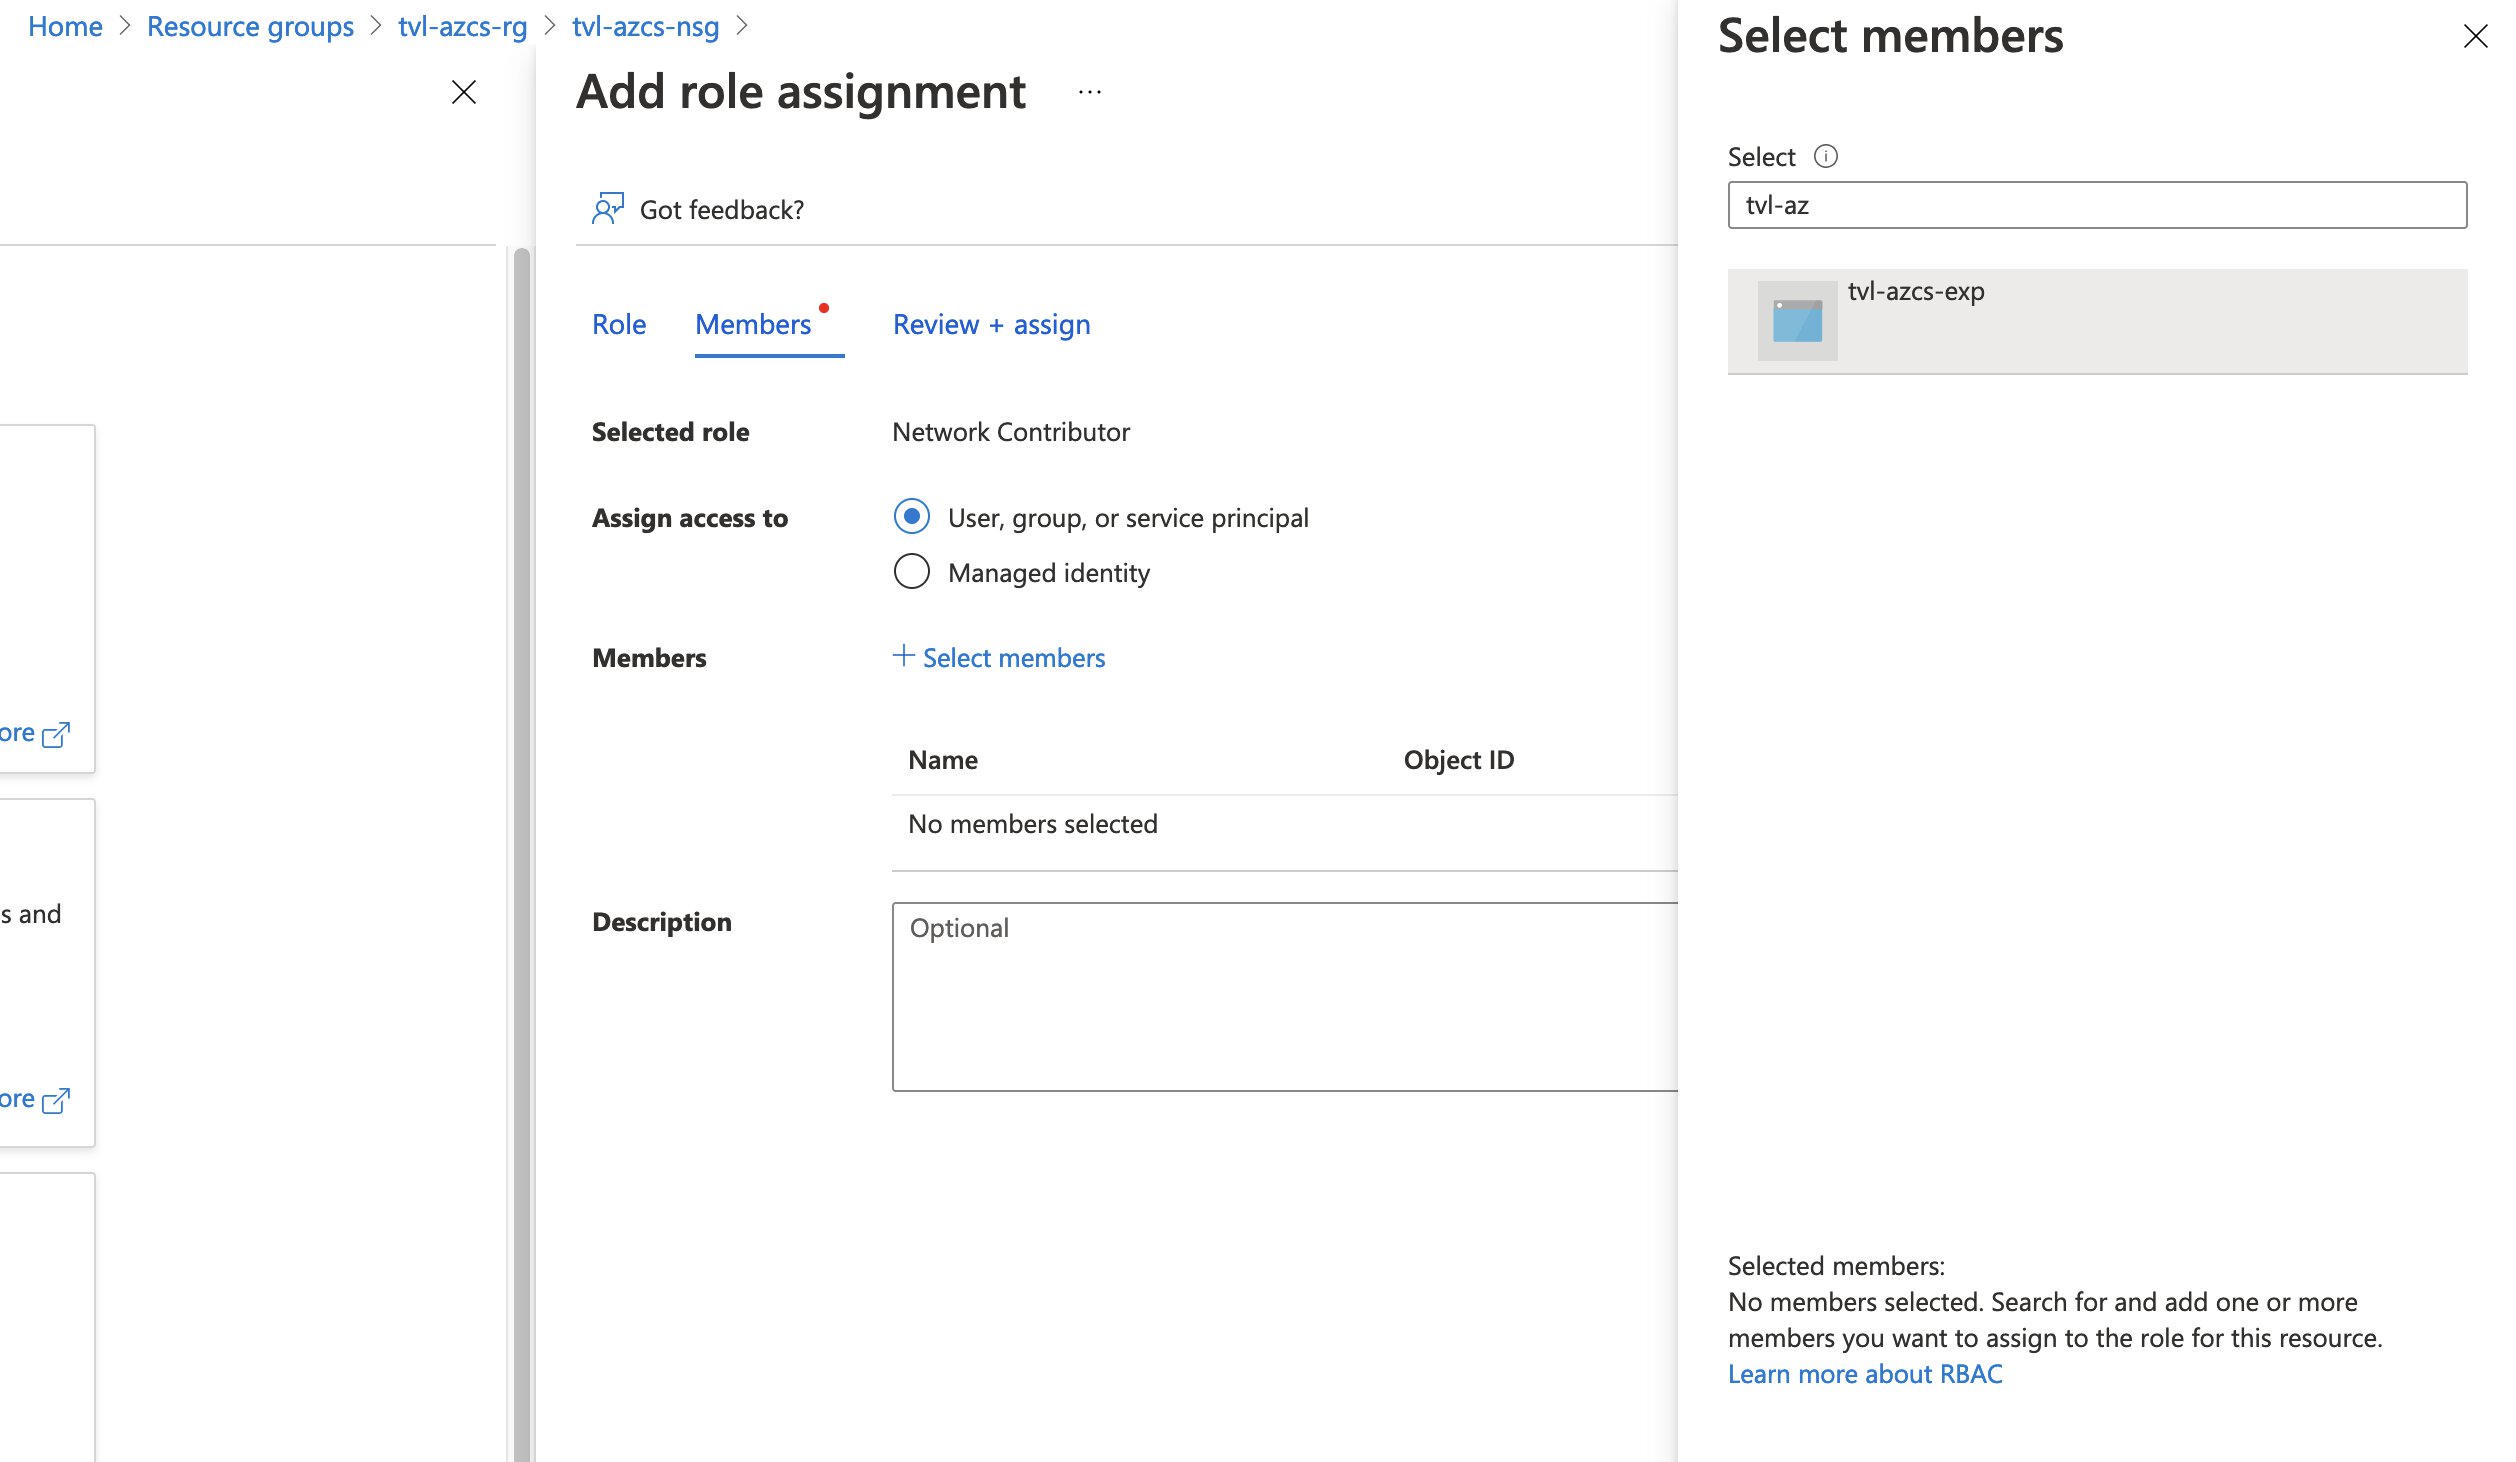
As you finalize the creation process, you may notice the following message being displayed: “Before starting your experiment, you need to assign the experiment identity to each resource targeted.”

If you remember earlier, in the security overview of this post. I wrote that one of the first things you will need to do after the experiment has been created is to grant the system-assigned managed identity the correct permissions, to all resources that the experiment will target through the selectors. So, let’s do this next. Head on over to the NSG and open up the “Access control (IAM)” and “Add” a role assignment. You can select the “Network Contributor” role and as for the members, you will need to “assign access to” a “User, group, or service principal”. Click “Select members” and a pop-out menu should appear, type the name of your experiment and you can select its service principal there!
Once you’ve created and assigned the role to the service principal, you should be ready to start the experiment! Open up the experiment again either by going to the resource itself or through Chaos Studio and hitting the “Start” button.
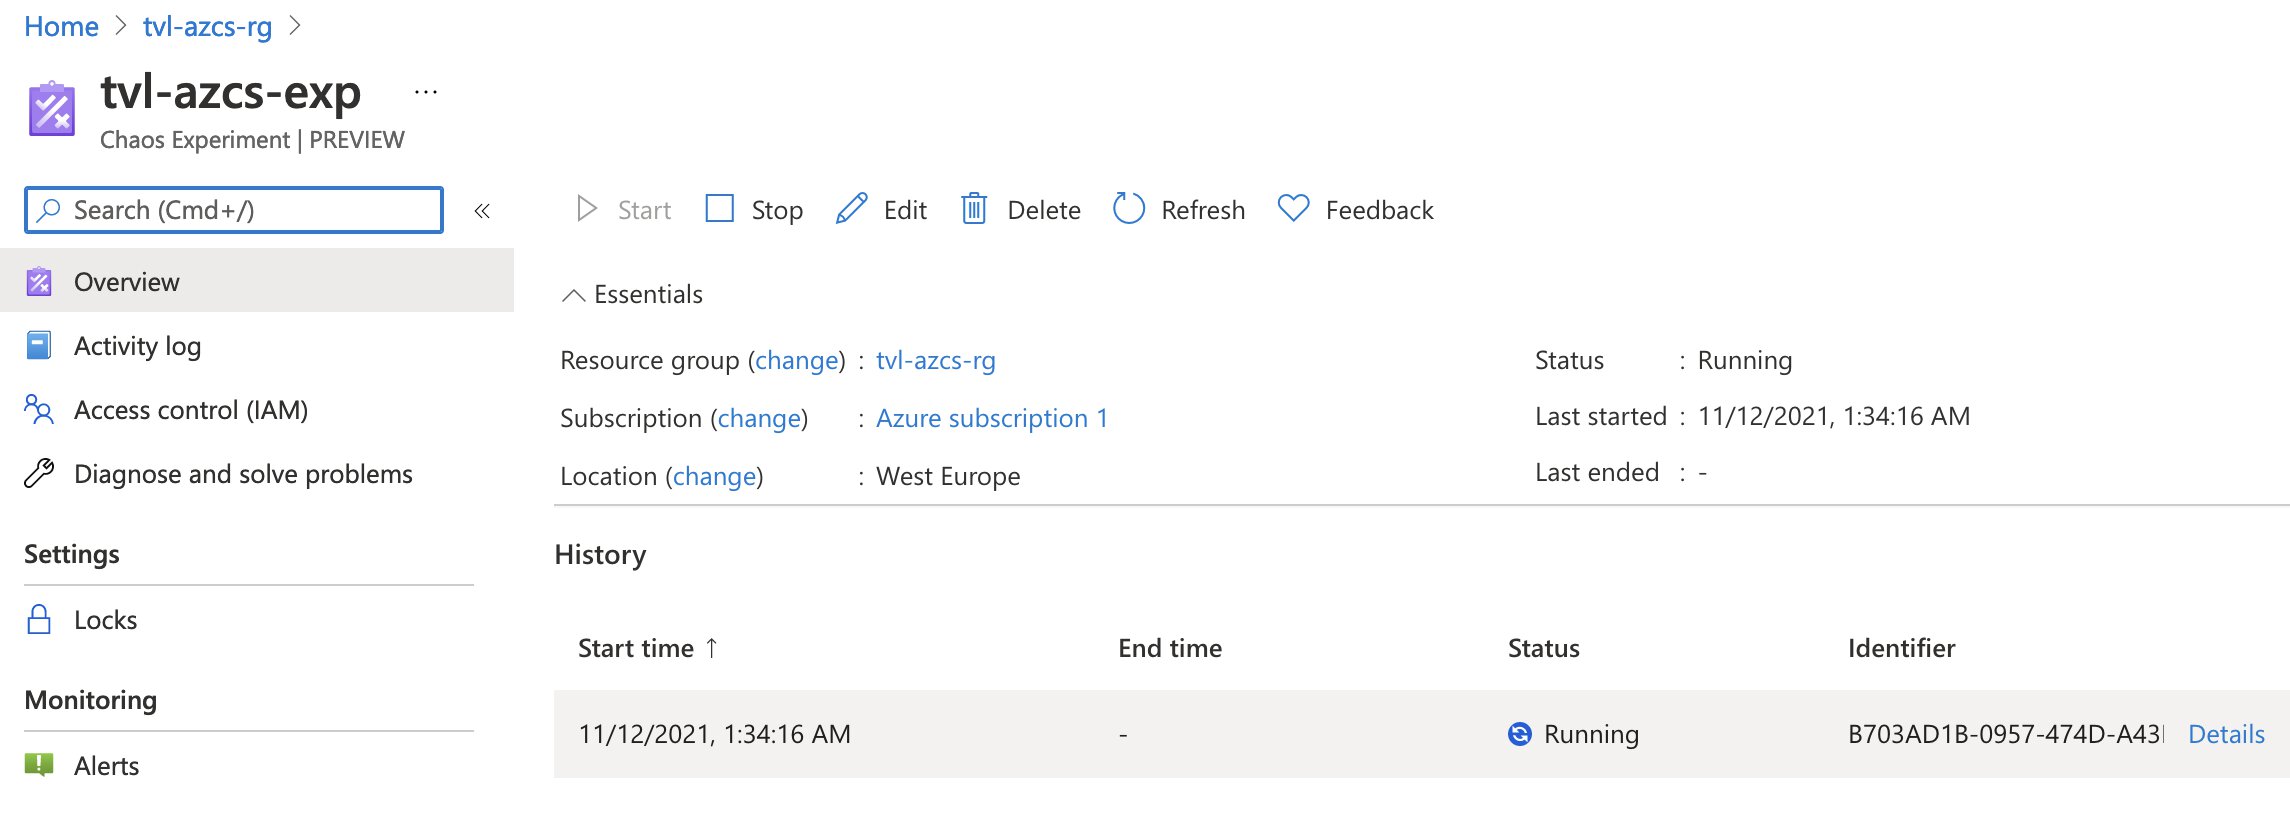
As soon as the experiment is running, you can inspect the details to find out which branches are being executed at the moment.
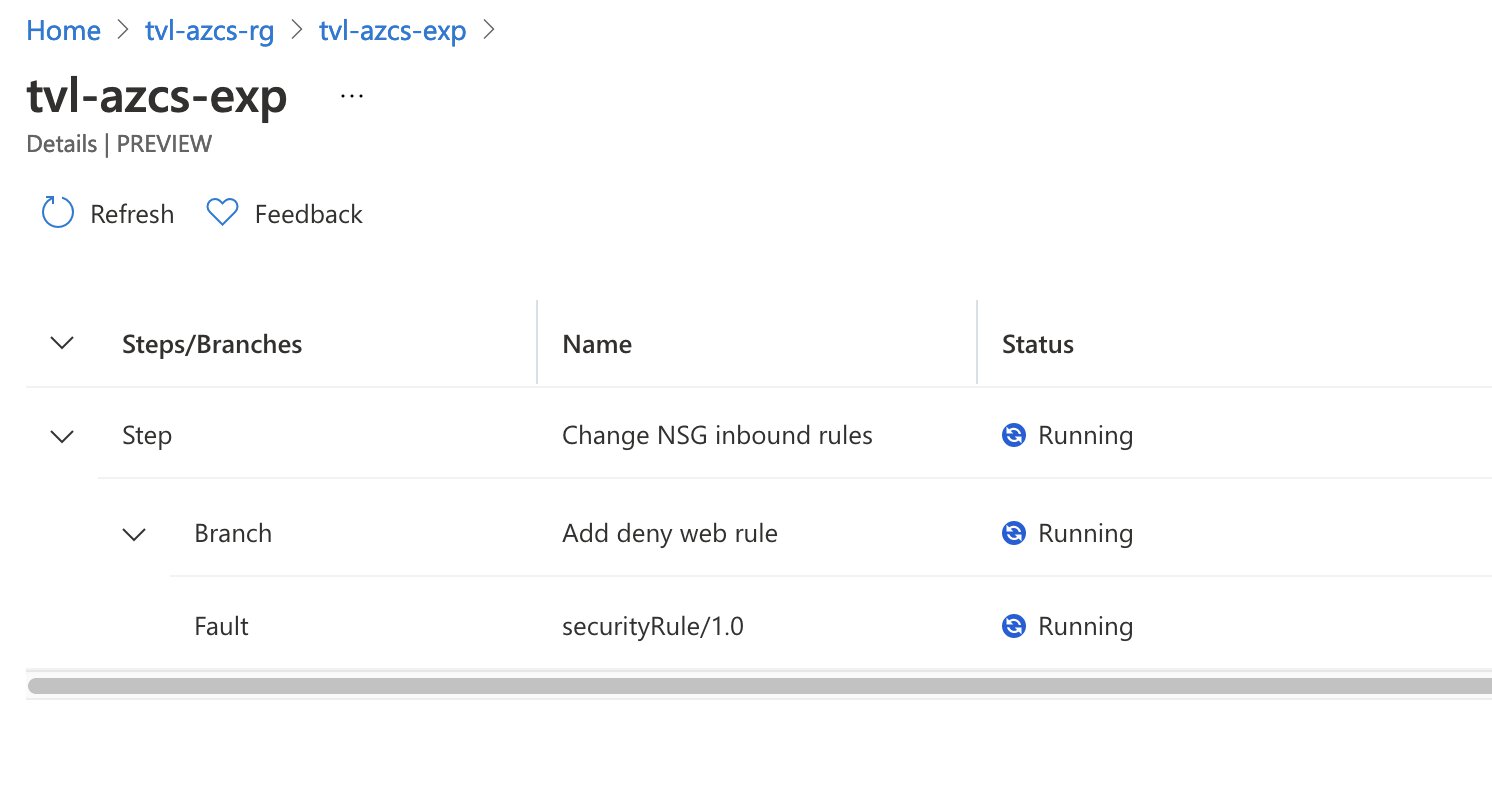
Looking at the network security group’s inbound rules reveals that a new rule has been added by the experiment. As the experiment completes, this inbound rule will be removed.
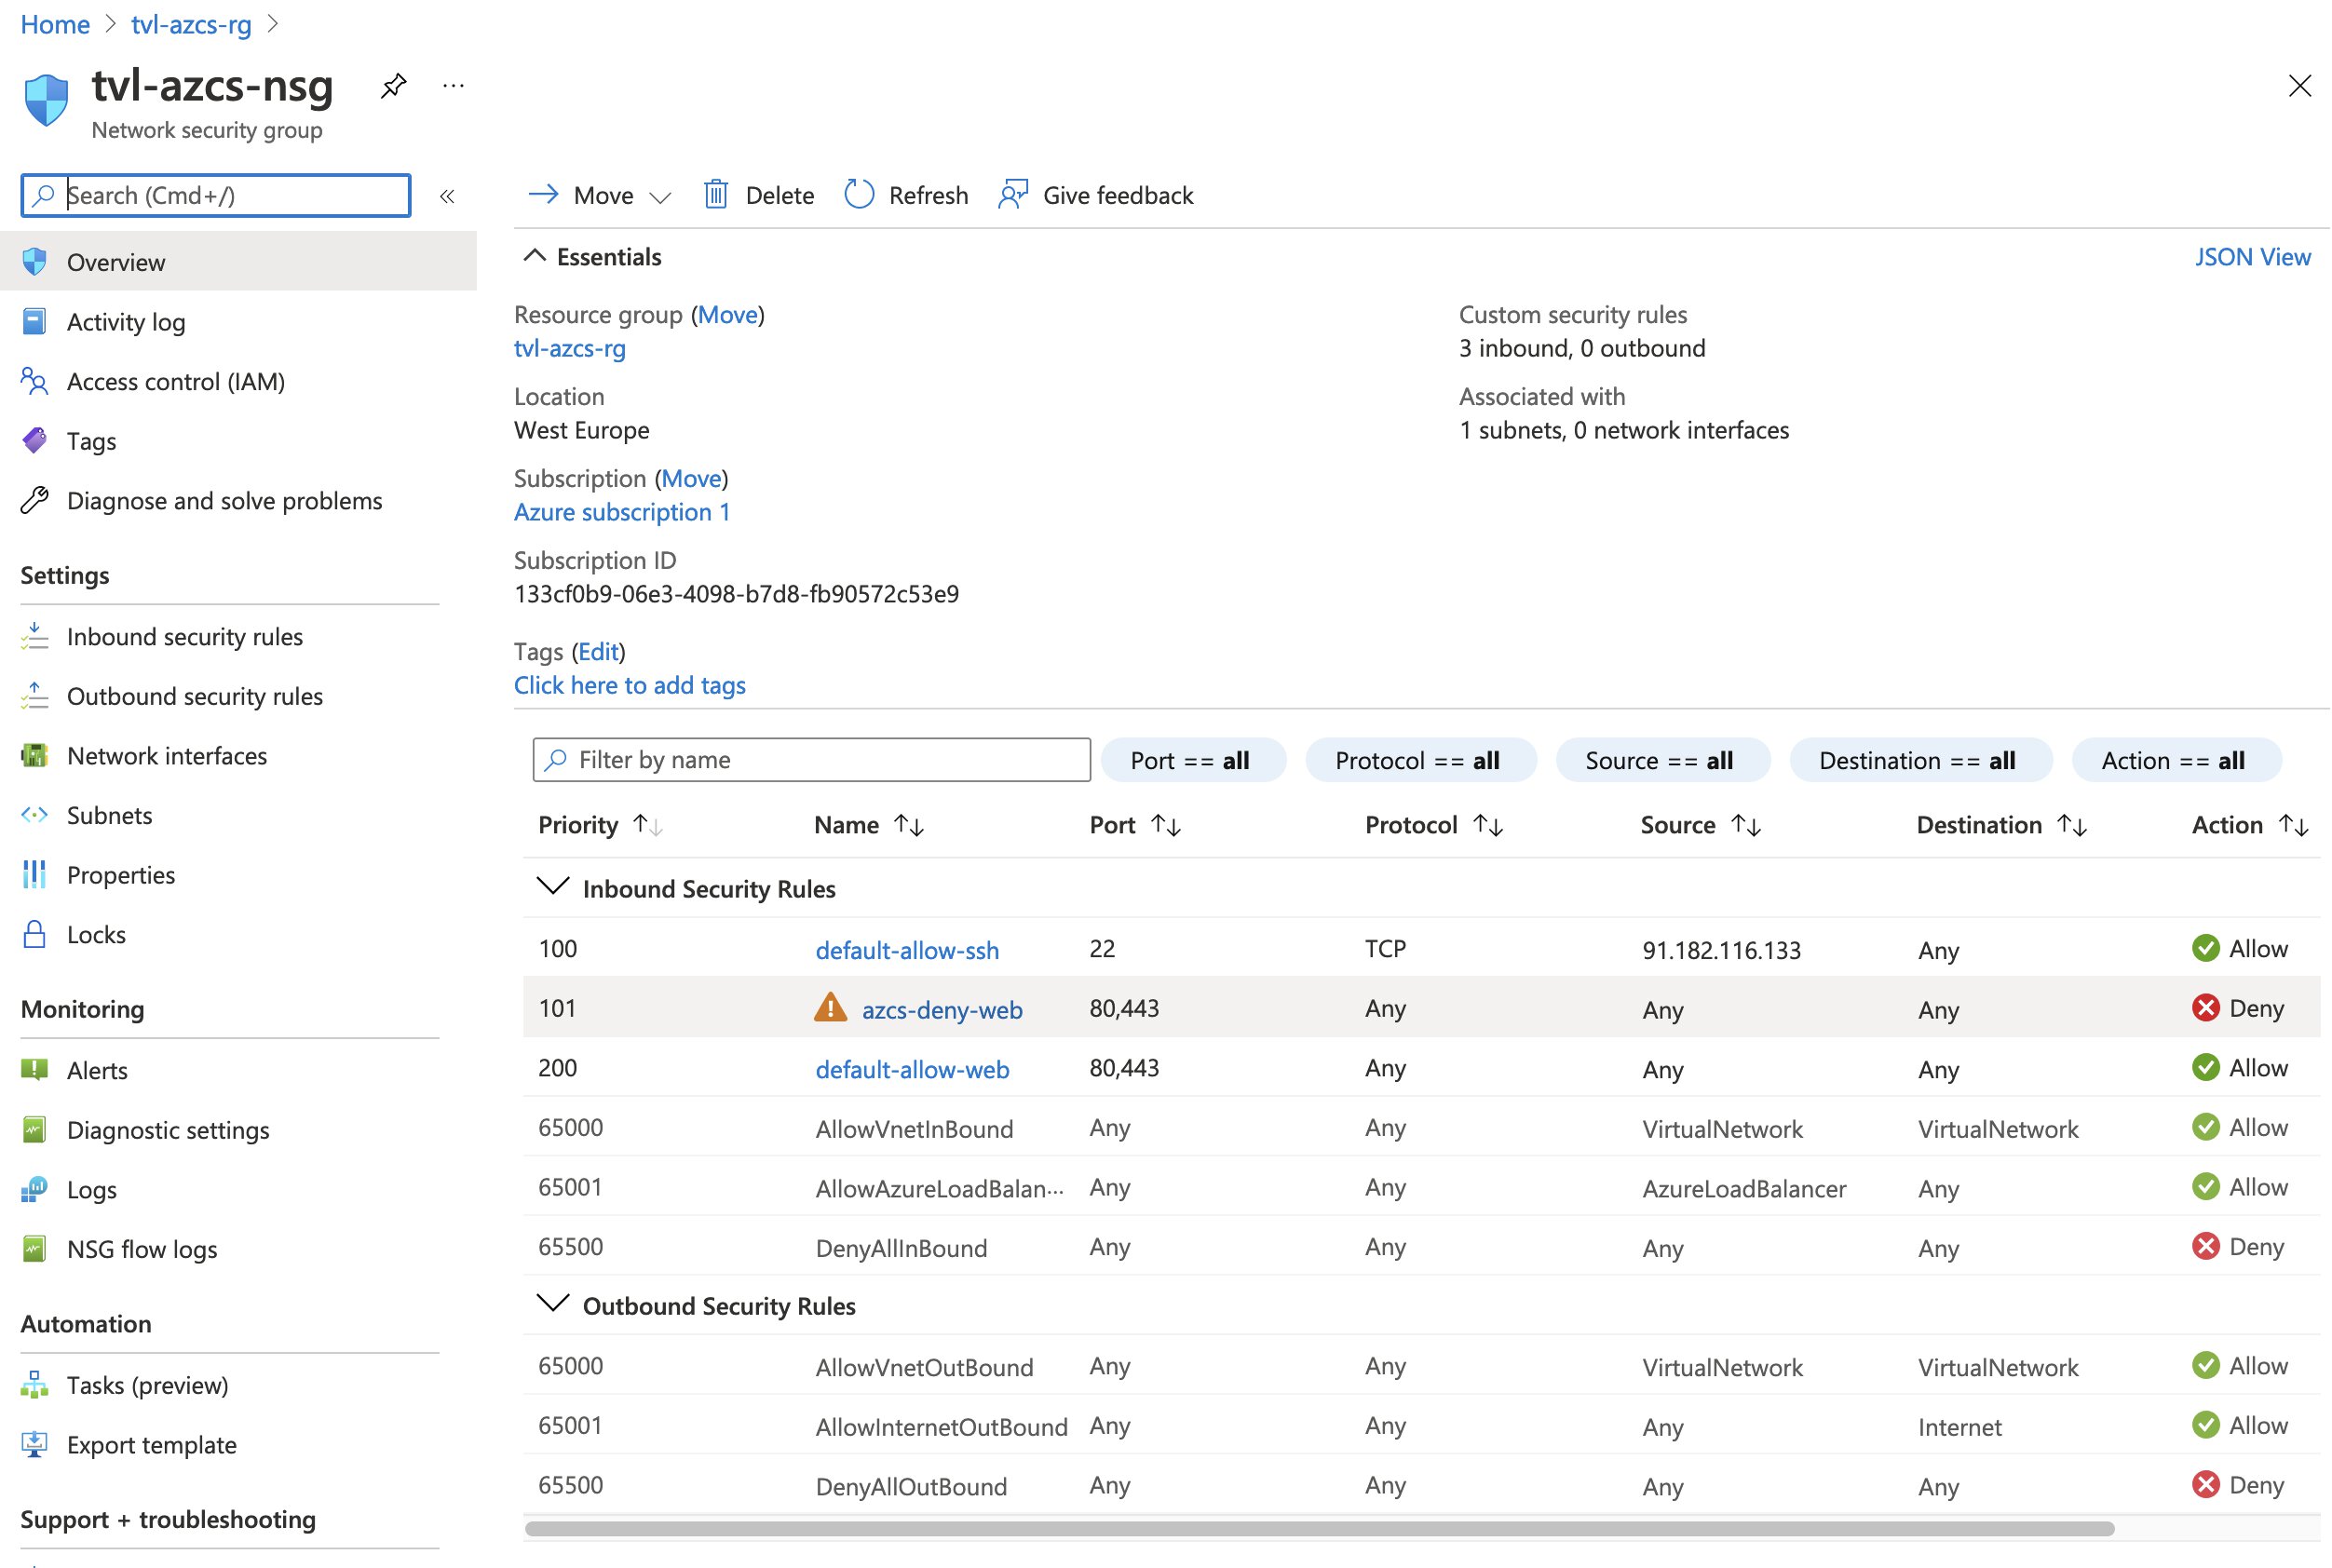
The website should also no longer be accessible, which is excellent since this is exactly what we want. We can use these conditions to detect weaknesses in our system’s design and use that knowledge to make our application more resilient!
Rubbing some DevOps on it
💡 Update November 15, 2021: Initially I was unable to deploy create targets and capabilities through ARM (or Bicep). After re-examining my choices and a little tinkering, I have found a solution.
I have included another ARM template, in the GitHub repository, that incorporates all of the previous steps into a single deployment. This can be useful should you want to onboard targets, assign capabilities and deploy chaos experiments through a DevOps pipeline.
I was under the impression that if I deployed a “Microsoft.Chaos/targets” the resource provider would create the correct extension resource. Looking back on this, I see that it is a drastically different approach to when I was using the REST API. After re-examing what I was actually trying to do I remembered that I was deploying extension resources and I had to pay attention to the number of segments in the resource type, after that there was simply the issue of ensuring that a correct name was used. Here is how you can deploy a target using ARM:
{
    "parameters": {
        //...
        "networkSecurityGroup_name": {
            "defaultValue": "tvl-azcs-nsg",
            "type": "String"
            //...
        }
    },
    "variables": {
        //...
        "networkSecurityGroupChaosTargetName": "microsoft-networksecuritygroup",
        "networkSecurityGroupChaosTargetResourceName": "[format('{0}/Microsoft.Chaos/{1}',parameters('networkSecurityGroup_name'), variables('networkSecurityGroupChaosTargetName'))]",
        // 👆 tvl-azcs-nsg/Microsoft.Chaos/microsoft-networksecuritygroup
        "networkSecurityGroupChaosTargetResourceId": "[resourceId('Microsoft.Network/networkSecurityGroups/providers/targets', parameters('networkSecurityGroup_name'),'Microsoft.Chaos',variables('networkSecurityGroupChaosTargetName'))]",

        "networkSecurityGroupChaosTargetCapabilityName": "SecurityRule-1.0",
        "networkSecurityGroupChaosTargetCapabilityResourceName": "[format('{0}/Microsoft.Chaos/{1}/{2}',parameters('networkSecurityGroup_name'), variables('networkSecurityGroupChaosTargetName'), variables('networkSecurityGroupChaosTargetCapabilityName'))]",
      // 👆 tvl-azcs-nsg/Microsoft.Chaos/microsoft-networksecuritygroup/SecurityRule-1.0
        "networkSecurityGroupChaosTargetCapabilityResourceId": "[resourceId('Microsoft.Network/networkSecurityGroups/providers/targets/capabilities', parameters('networkSecurityGroup_name'),'Microsoft.Chaos',variables('networkSecurityGroupChaosTargetName'),variables('networkSecurityGroupChaosTargetCapabilityName'))]",

        //...
    },
    "resources": [
        //...
        {
            "type": "Microsoft.Network/networkSecurityGroups/providers/targets",
            "apiVersion": "2021-09-15-preview",
            "name": "[variables('networkSecurityGroupChaosTargetResourceName')]",
            "location": "[resourceGroup().location]",
            "dependsOn": [
                "[resourceId('Microsoft.Network/networkSecurityGroups', parameters('networkSecurityGroup_name'))]"
            ],
            "properties": {}
        },
        {
            "type": "Microsoft.Network/networkSecurityGroups/providers/targets/capabilities",
            "apiVersion": "2021-09-15-preview",
            "name": "[variables('networkSecurityGroupChaosTargetCapabilityResourceName')]",
            "location": "[resourceGroup().location]",
            "dependsOn": [
                "[variables('networkSecurityGroupChaosTargetResourceId')]"
            ],
            "properties": {}
        },
        //...
    ]
}
Before switching to this approach however, whenever I tried to deploy a resource of the type “Microsoft.Chaos/targets”, Azure would tell me that I was using an incorrect API version. I gave it a few additional attempts, but I couldn’t get it to work. I was able to view the resource type its different API versions through the Azure Portal’s “Resource Explorer”. I was also unable to find the resource in the current ARM schemas.
I was not going to let that stop me and so I decided to use the trusty “Microsoft.Resources/deploymentScripts” resource, along with a custom PowerShell script that talks to the Chaos Studio API targets and capabilities endpoint. In my opinion, using a deployment script resource (which also required a custom role definition, user-assigned managed identity, and role assignment) substantially increased the complexity of my ARM template. I suppose I could refrain from using a deployment script resource in the ARM template and let my DevOps pipeline run the PowerShell script, instead. 😅 You can view the previous version of the ARM template over on GitHub.
Being able to deploy the extension-resources directly greatly simplifies my ARM template, which is excellent.
💡 As a final note, I believe the PowerShell script could be extended a little more to support onboarding targets that use the agent-based faults.
Conclusion
Although Azure Chaos Studio is still in the public preview I found it quite pleasant to work with. There are only a few fault actions available at the moment, but I have a feeling that this will be expanded upon as the service gets closer to general availability.
In the blog post I wrote last year about “Chaos Engineering on Azure”, I noted that I was able to test and see whether my application’s steady-state hypothesis (the system’s normal behaviour) was met. This does not seem to be possible with Azure Chaos Studio as it only orchestrates fault injection and can roll back the injected fault. Perhaps it could be useful to let us run custom PowerShell or Python scripts, as part of an action, to test the steady-state hypothesis?
Related posts
- Azure Chaos Studio and PowerShell
- Azure Purview
- Azure Resource Locks
- Local OpenShift 4 with Azure App Services on Azure Arc
- Verifying Azure AD tenant availability
- Open Policy Agent
- Azure Red Hat OpenShift 4
- Microsoft Entra Privileged Identity Management (for Azure Resources) Revisited
- SPIFFE and Entra Workload Identity Federation
- Chaos Engineering on Azure
- Azure Policies & Azure AD PIM breakdown - Part 2
- Azure Policies & Azure AD PIM breakdown - Part 1