Azure Purview
In this post
📣 Dive into the code samples from this blog on GitHub!
Last year, on December 3rd 2020, Microsoft announced the public preview of Azure Purview at the “Azure Data and Analytics digital” event. I didn’t have the time to closely inspect what the service was all about but at first glance, it became clear that the service was a data governance tool, one I quickly marked as “one to watch”.
Since then Azure Purview has been generating lots of buzz, too. Just about every month since its public preview announcement, I would receive updates about new features that had been implemented.
Then, at the end of August 2021, I had signed up for an event called “Maximize the value of your data in the Cloud”, which would take place on the 28th of September 2021. During this event, Rohan Kumar (Corporate VP Azure Data) would announce the general availability of Azure Purview. That was the last straw, I had to make some time so I could take a closer look! 🙃
Why Azure Purview?
Through conversations I’ve been having with customers that I provide consulting for, I’ve started noticing that they aren’t afraid of using multiple data systems from multiple vendors when it is appropriate. Microsoft has had similar patterns emerge with their customers, to list a few:
- Data volume is growing at exponential rates.
- Data is taking on a variety of different forms; structured, unstructured, flat files, reports, etc…
- Data is hosted in many different locations: on-premises, various public clouds and even at the edge.
When you think about your business’ data, you might have some questions that begin to arise.. For instance:
- “Where did this data originate?”
- “How is this data used?”
- “Who is the designated expert on this data”
- “Which data assets contain personally identifiable information”
- “Are there any security challenges lurking in my data assets”
- “Do any modifications happen to the data, and if so what is being done to it”
- “Is the usage of this data compliant with GDPR or other regulations”
The challenge becomes clear: “how do we manage all of that data and make correct business decisions”?
Keeping tabs on your data assets with a manually updated spreadsheet can work in the short term, but having to maintain it, as an organisation’s digital transformation marches on, will inevitably become extremely tedious (and possibly infuriating when multiple people are working in the same file 😅).
At any rate, I think if one is unaware of this data sprawl taking place, things can very quickly spiral out of control.
Azure Purview helps users with discovering and governing the data sprawl and make sense of their data estate, from a single location. It can source data that is hosted on-premises, in multiple clouds and even data that is stored in certain SaaS applications. It allows users to create comprehensive, up-to-date maps and overviews of their entire data estate through the use of automated scanning and can add context to your data through the use of classification mechanisms. To track your data’s life cycle, Azure Purview can connect with data processing, storage, and analytics systems to extract lineage information. Many additional features are currently under active development.
What’s inside the offering?
Now that we know why you might want to consider Azure Purview, let’s take a look at some of its features:
- Fully managed offering.
- As with many of Azure’s other data and analytical offerings, a lot of the complicated stuff is managed for you. (The service is not entirely hidden away, as you can access the managed resources similarly to how you could access the managed resources deployed by an Azure Kubernetes Service or Azure Databricks instance.)
- Data-plane RBAC
- Comes with pre-defined data-plane roles to help control who has access to collections.
- SLA for Azure Purview (September 2021)
- No SLA for the free tier.
- 99.9% availability, based on a ‘Monthly Uptime Percentage formula’.
- Supports scanning of a variety of data sources.
- From databases, BLOB storage, to file shares and SaaS apps.
- Lots of file types supported for scanning.
- Purview also supports custom file extensions and custom parsers.
- Integrates with Azure Information Protection
- Allows for scanning of emails, PDFs, etc.. in SharePoint and OneDrive
- Requires a Microsoft 365 subscription with the following SKUs: AIP P1, EMS E3, or M365 E3.
- Apache Atlas REST API support
- Plus additional enhancements made by Microsoft.
- Azure Private endpoint connections support.
- Assigns a private IP address from your Azure Virtual Network (VNET) address space for your Purview account.
- Network traffic between the clients and Purview account will flow through the VNET.
- Azure Monitor support.
- Useful for monitoring the life cycle of your scans.
Getting started with Azure Purview
There are a couple of large pieces that make up the Azure Purview experience, there is a lot to learn about the service but I will try to boil it down to the things that I think you should know to get started.
Deploying Azure Purview is very straightforward, you can search for “Purview accounts” under “All services” in the Azure Portal and then hit “Create”. To make it easier to test some of Azure Purview’s features and integrations, I have created an ARM template which you can find over on GitHub. The ARM template deploys the following resources:
- An Azure CosmosDB account with a SQL API database and an empty collection
- Serverless compute tier
- You could import a sample DB set, such as CosmicWorks.
- An Azure SQL Database, using the AdventureWorkLT sample db
- Serverless compute tier
- ⚠️ When testing connections in the GUI you may encounter a timeout, this is likely due to the serverless compute’s warm-up time. If this happens, simply give it another attempt.
- An Azure Data Lake Gen 2 storage account.
- An Azure Data Factory with a configured sample pipeline, datasets and linked services
- The sample pipeline will export all tables from the AdventureWorksLT database to the data lake.
- A Key vault, with some secrets and access policies
- Secrets
- Azure Cosmos DB primary readonly key
- Azure SQL Server admin password
- Azure Storage Account primary key
- Access policies
- Azure Data Factory managed identity: allow secret get and list.
- Azure Purview managed identity: allow secret get and list.
- Secrets
- An empty Azure Purview account
- You will need to register data sources, credential links with Azure Key Vault and a link with Data Factory to get data lineage support.
All of the above is useful for demonstration purposes only and not production ready, as you would likely need to apply additional security hardening techniques. At any rate, with all of those resources deployed we can have a look at some of Azure Purview’s foundational elements…
Data Map
Azure Purview contains a foundational component called the “Data Map”, which allows you to create an up-to-date view of your data estate. Through the “Data Map” user-interface you can easily register a variety of data sources, which can be hosted anywhere.
There are plenty of connectors available at your disposal, ranging from no/SQL database systems, Azure BLOB storage, Azure Files (file shares), etc… You could also connect to offerings that you would find with other public cloud providers such as AWS S3 and Google BigQuery. Additionally, you can register certain SaaS data sources, SAP for instance.
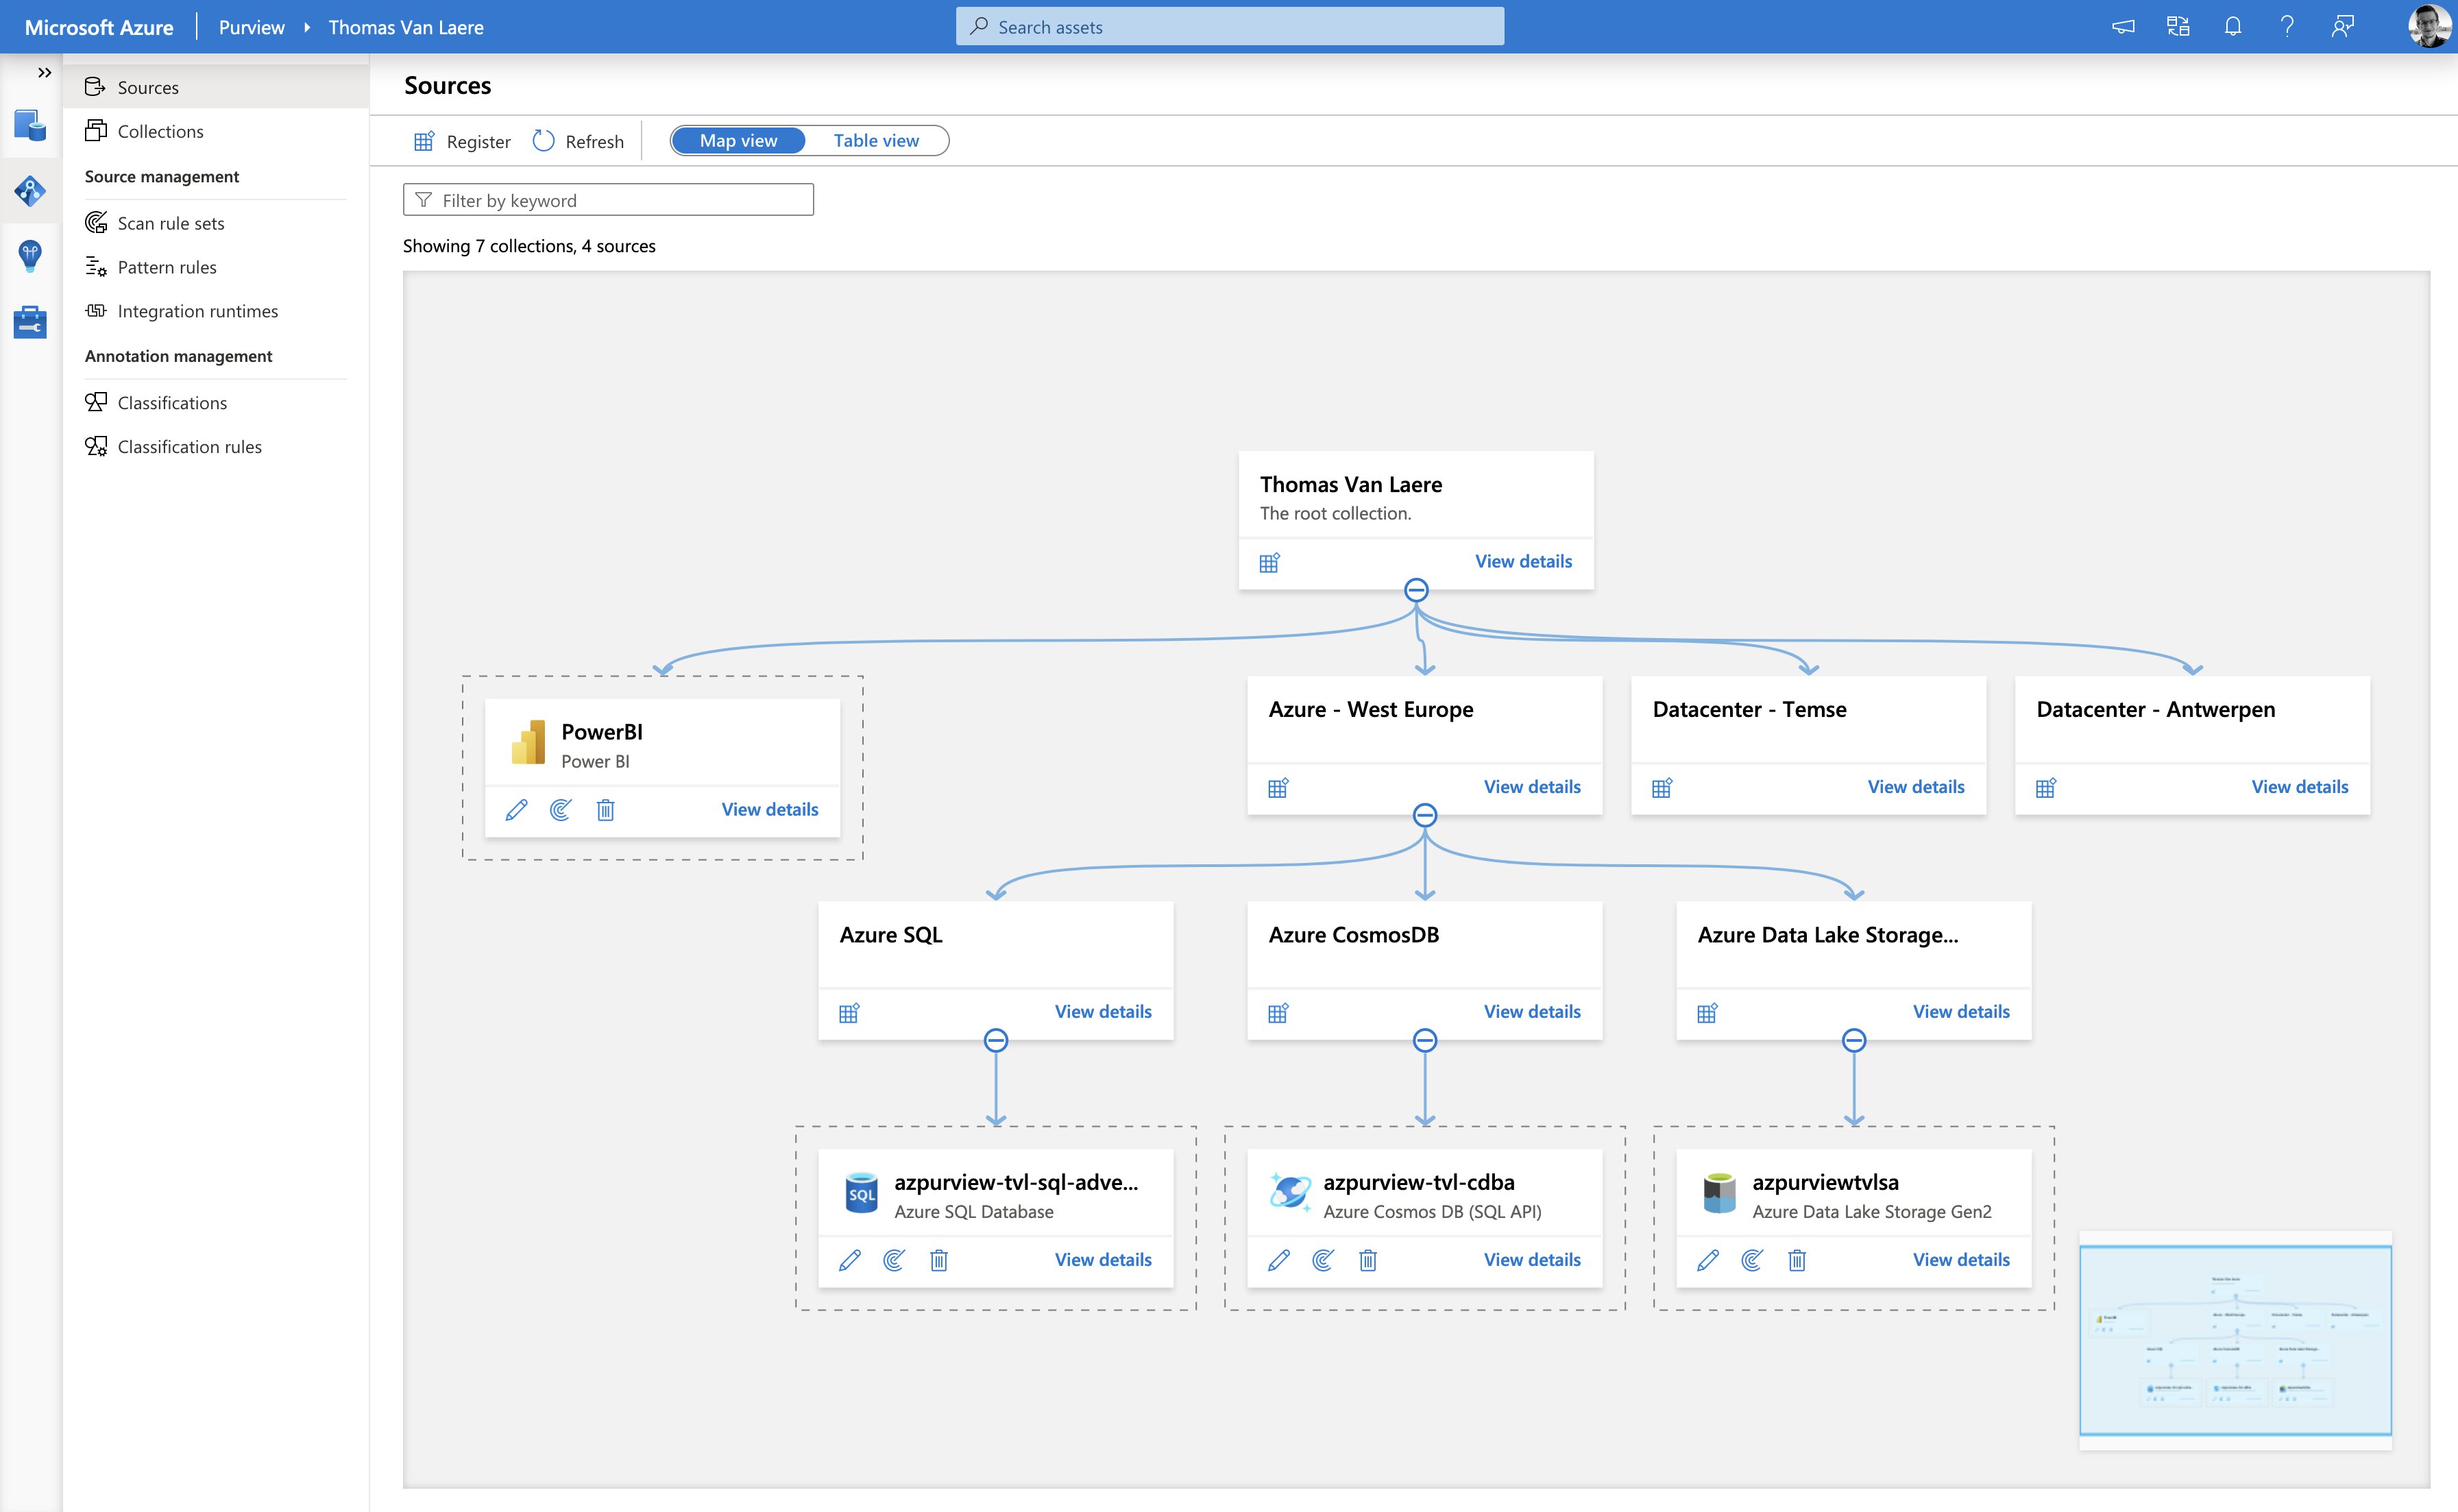
The “Data Map” allows you to place your data sources into “collections”, which are a way of grouping your data assets into logical containers, to simplify management and discovery. You can apply inherited permissions to a specific parent collection and its subcollections, this way you a user, group or service principal can only interact with a specific set of objects. In the screenshot above, I have categorized my assets into collections based on the datacenter location, but the assets could just as easily be categorized in a completely different manner!
Scans, scan rule sets and classifications
Once you have registered a data source with the “Data Map”, you will be able to run a “scan” to let the service gather your data source’s metadata. This metadata typically consists of names, file sizes, columns, etc… It is important to note that none of the data source its actual data is copied over to the service, only the data source its metadata will be copied. Scanning will impact the data source’s performance, but you can schedule the scans to take place during off-peak hours.
💡 If you operate in an industry where you need to be wary of where this metadata is stored, the “Data residency in Azure” page says the following about metadata residency: “For Azure Purview, certain table names, file paths and object path information are stored in the United States. Subject to aforementioned exception, the capability to enable storing all other customer data in a single region is currently available in all Geos.”
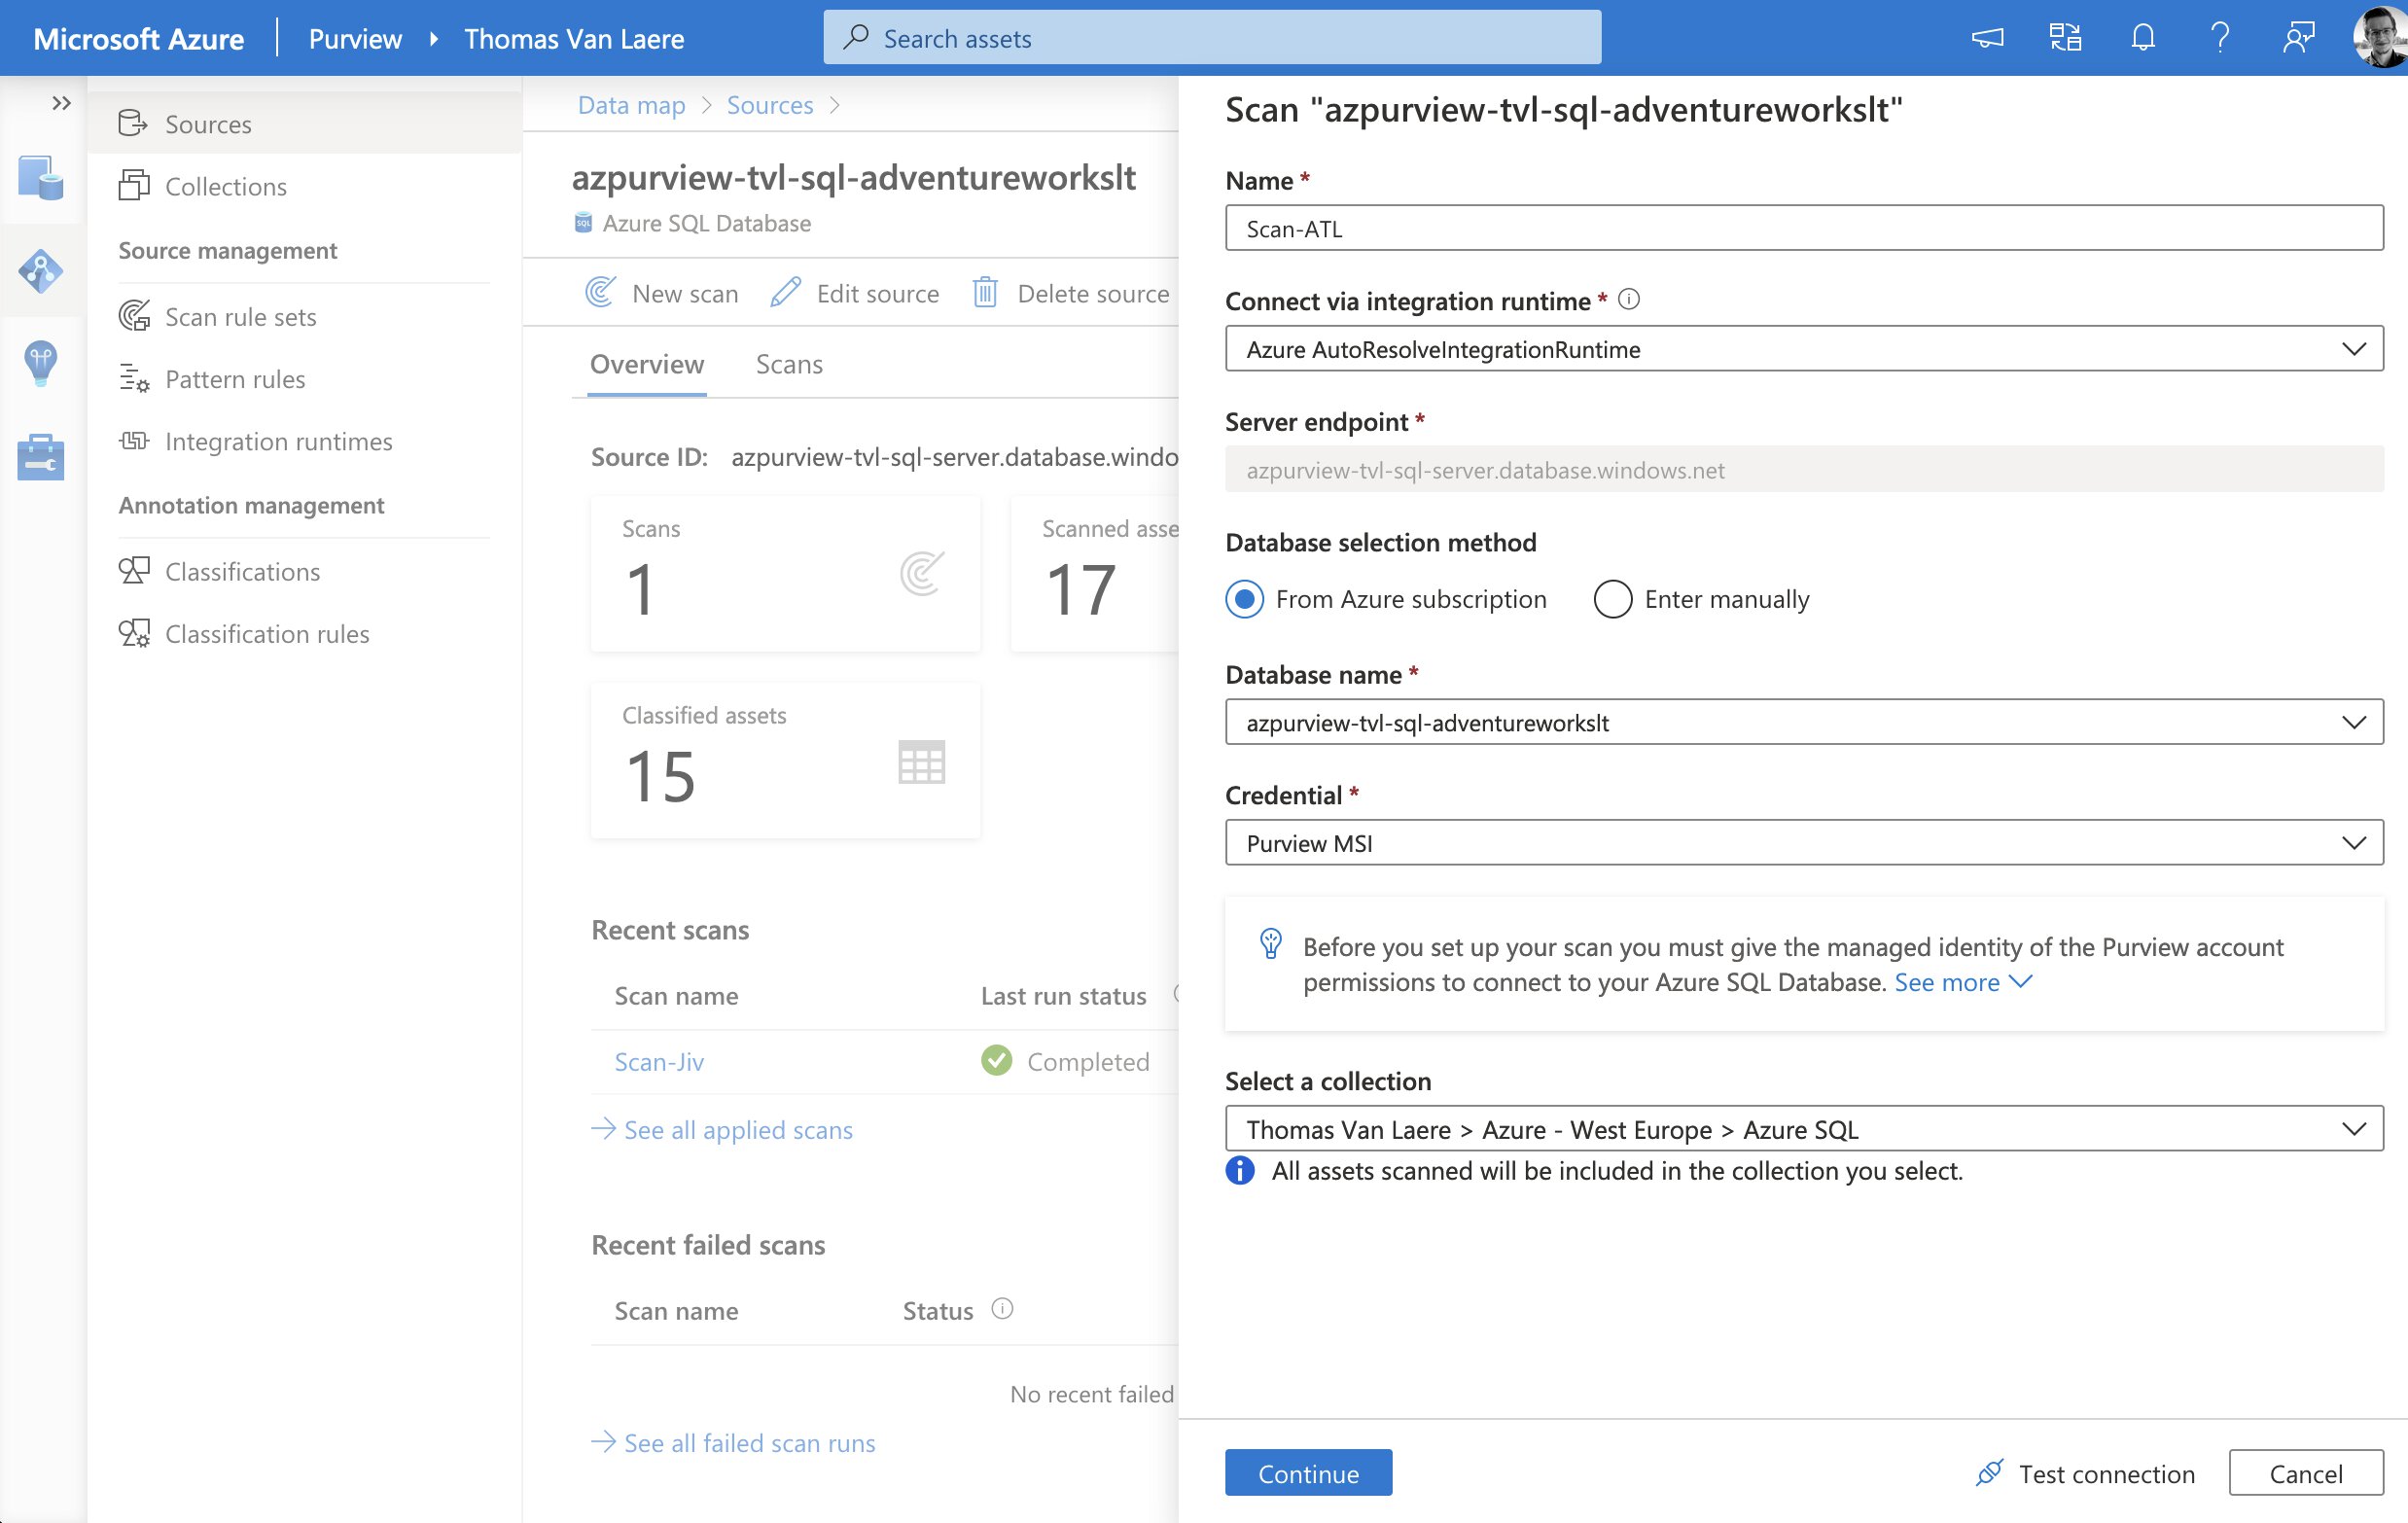
The scan process can authenticate with a data source by using either an Azure Managed Identity or by fetching the credentials from Azure Key Vault and thus this process is very similar to how Azure Data Factory handles authentication. Either option is a valid way to authenticate, though if you take the Key Vault route you will need to be aware of the fact that you will need to have a process in place, in case you rotate the secrets. Managed Identity, on the other hand, will typically only work with services that support it.
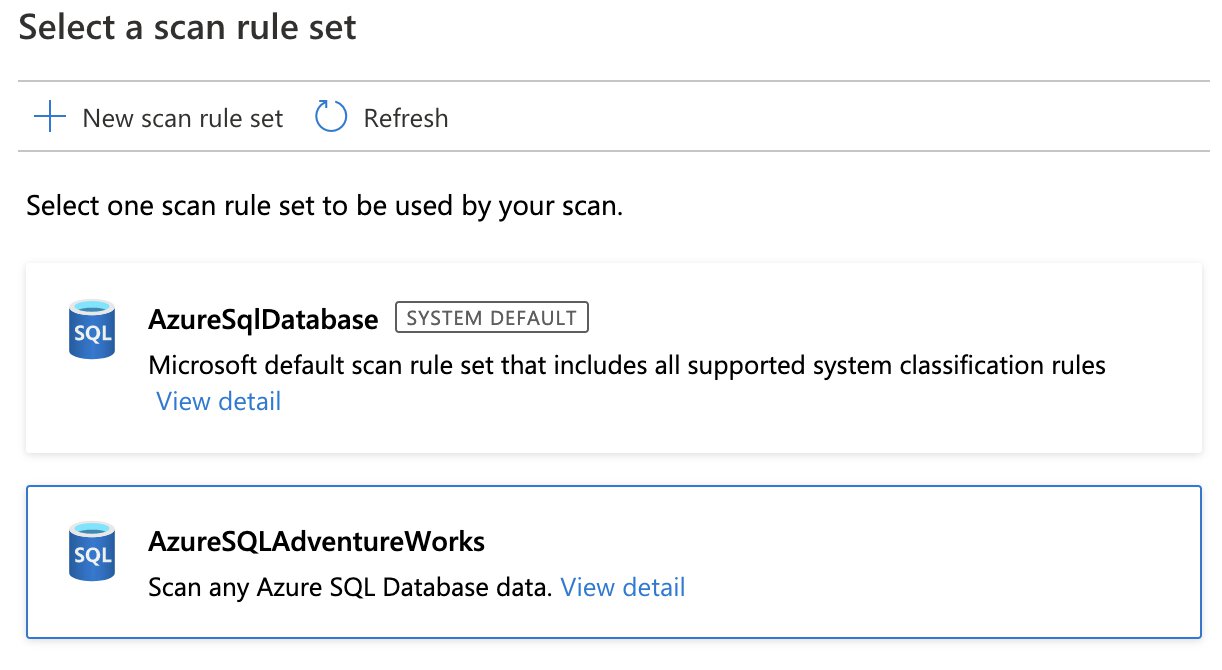
When initiating a scan on a data source, you must also select a specific “scan rule set”. A scan rule set will determine what kind of information a scan will look for, when a scan is running against your data source. A scan rule set consists of one or many “classification rules”.
A scan rule set will also let you target specific file types for schema extraction and classification, and is flexible enough to let you define new custom file types.
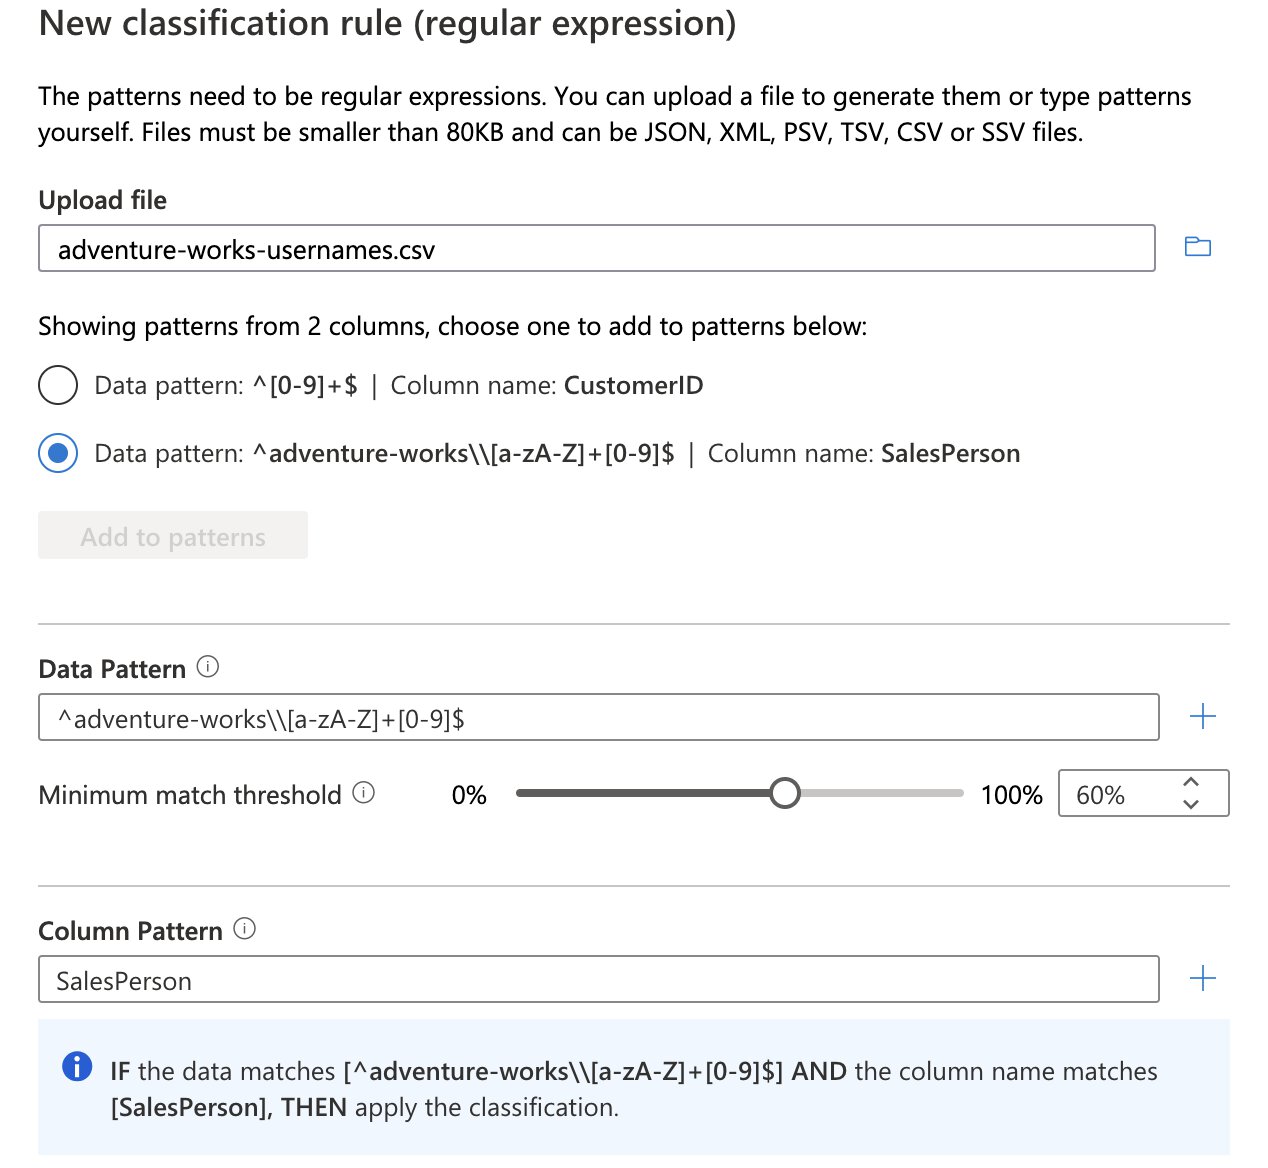
“Classifications” consist of one or many “classification rules” and are used to automatically detect certain data types. There are pre-defined system classifications that Microsoft has provided for us and you can easily create your own custom classifications.
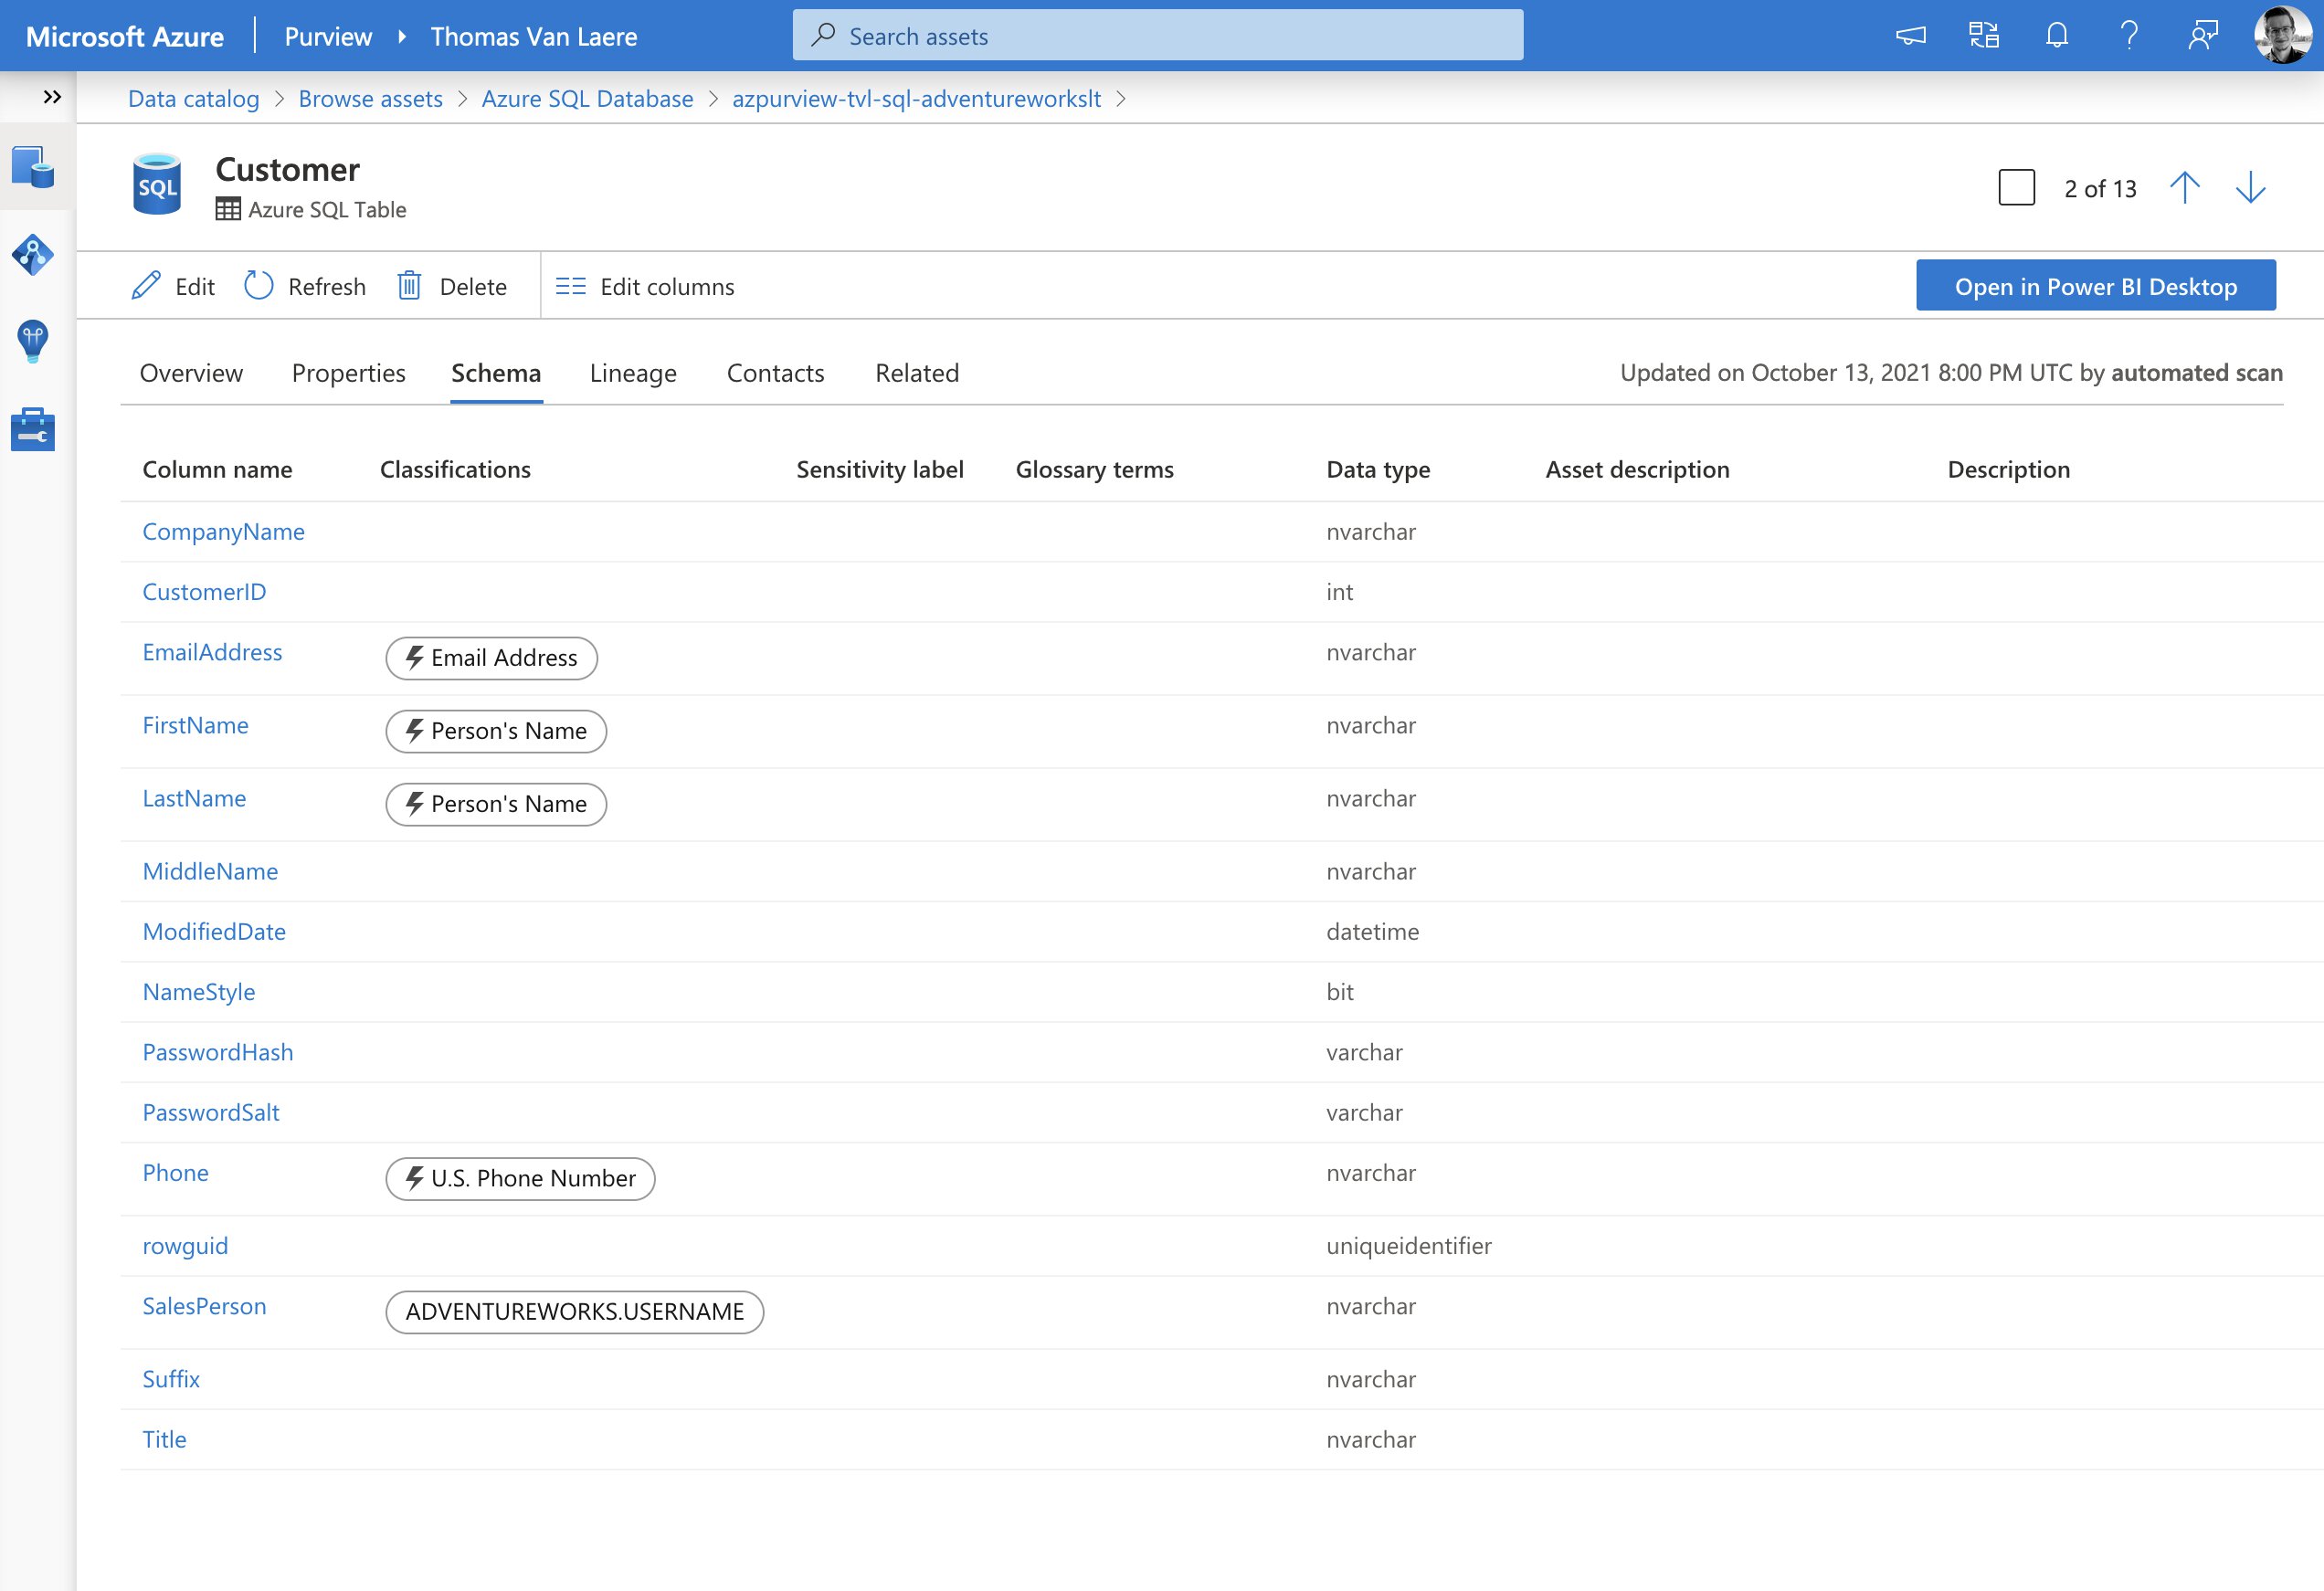
For instance, you can set up a custom classification that will mark assets that include usernames. To achieve this you could create a custom classification rule that uses a “Data Pattern” (a regular expression that looks at the data residing in a data field) for the format “adventure-works\<username>”. You can also use the “Column Pattern”, along with a regular expression pattern, to mark assets based on the name of a column.
After a scan has been completed you should be able to spot the data assets that include a username. Remember, the scan ran with the scan rule set that includes the classification rules which in turn are linked to a classification. Please note that, in the image below, the lightning bolt (⚡️) icon refers to the fact that a pre-defined system defined classification was detected.
Ingestion
The technical metadata or classifications identified by the scanning process are then sent to the data ingestion process, which is responsible for populating the “Data Map”. This process does a few things:
- Processes the input from the scan process.
- Applies resource set patterns
- A resource set is a single object in the catalog that represents a large number of assets in storage.
- Looks at all of the data that’s ingested via scanning and compares it to a set of defined patterns.
- Populates available lineage information.
Important to note is that even when your scan is complete, you must wait until the data ingestion process finishes to see the results appear in the “Data Map”.
Data Catalog
Your metadata is indexed and used to power Purview’s Data Catalog, which as the name suggest, contains a highly detailed compendium of your data estate. Your Azure Purview users can search the catalog to quickly find information about data and take a look at the data in their tool of choice. Conversely, you can search for information and get a list of associated data assets, as well!
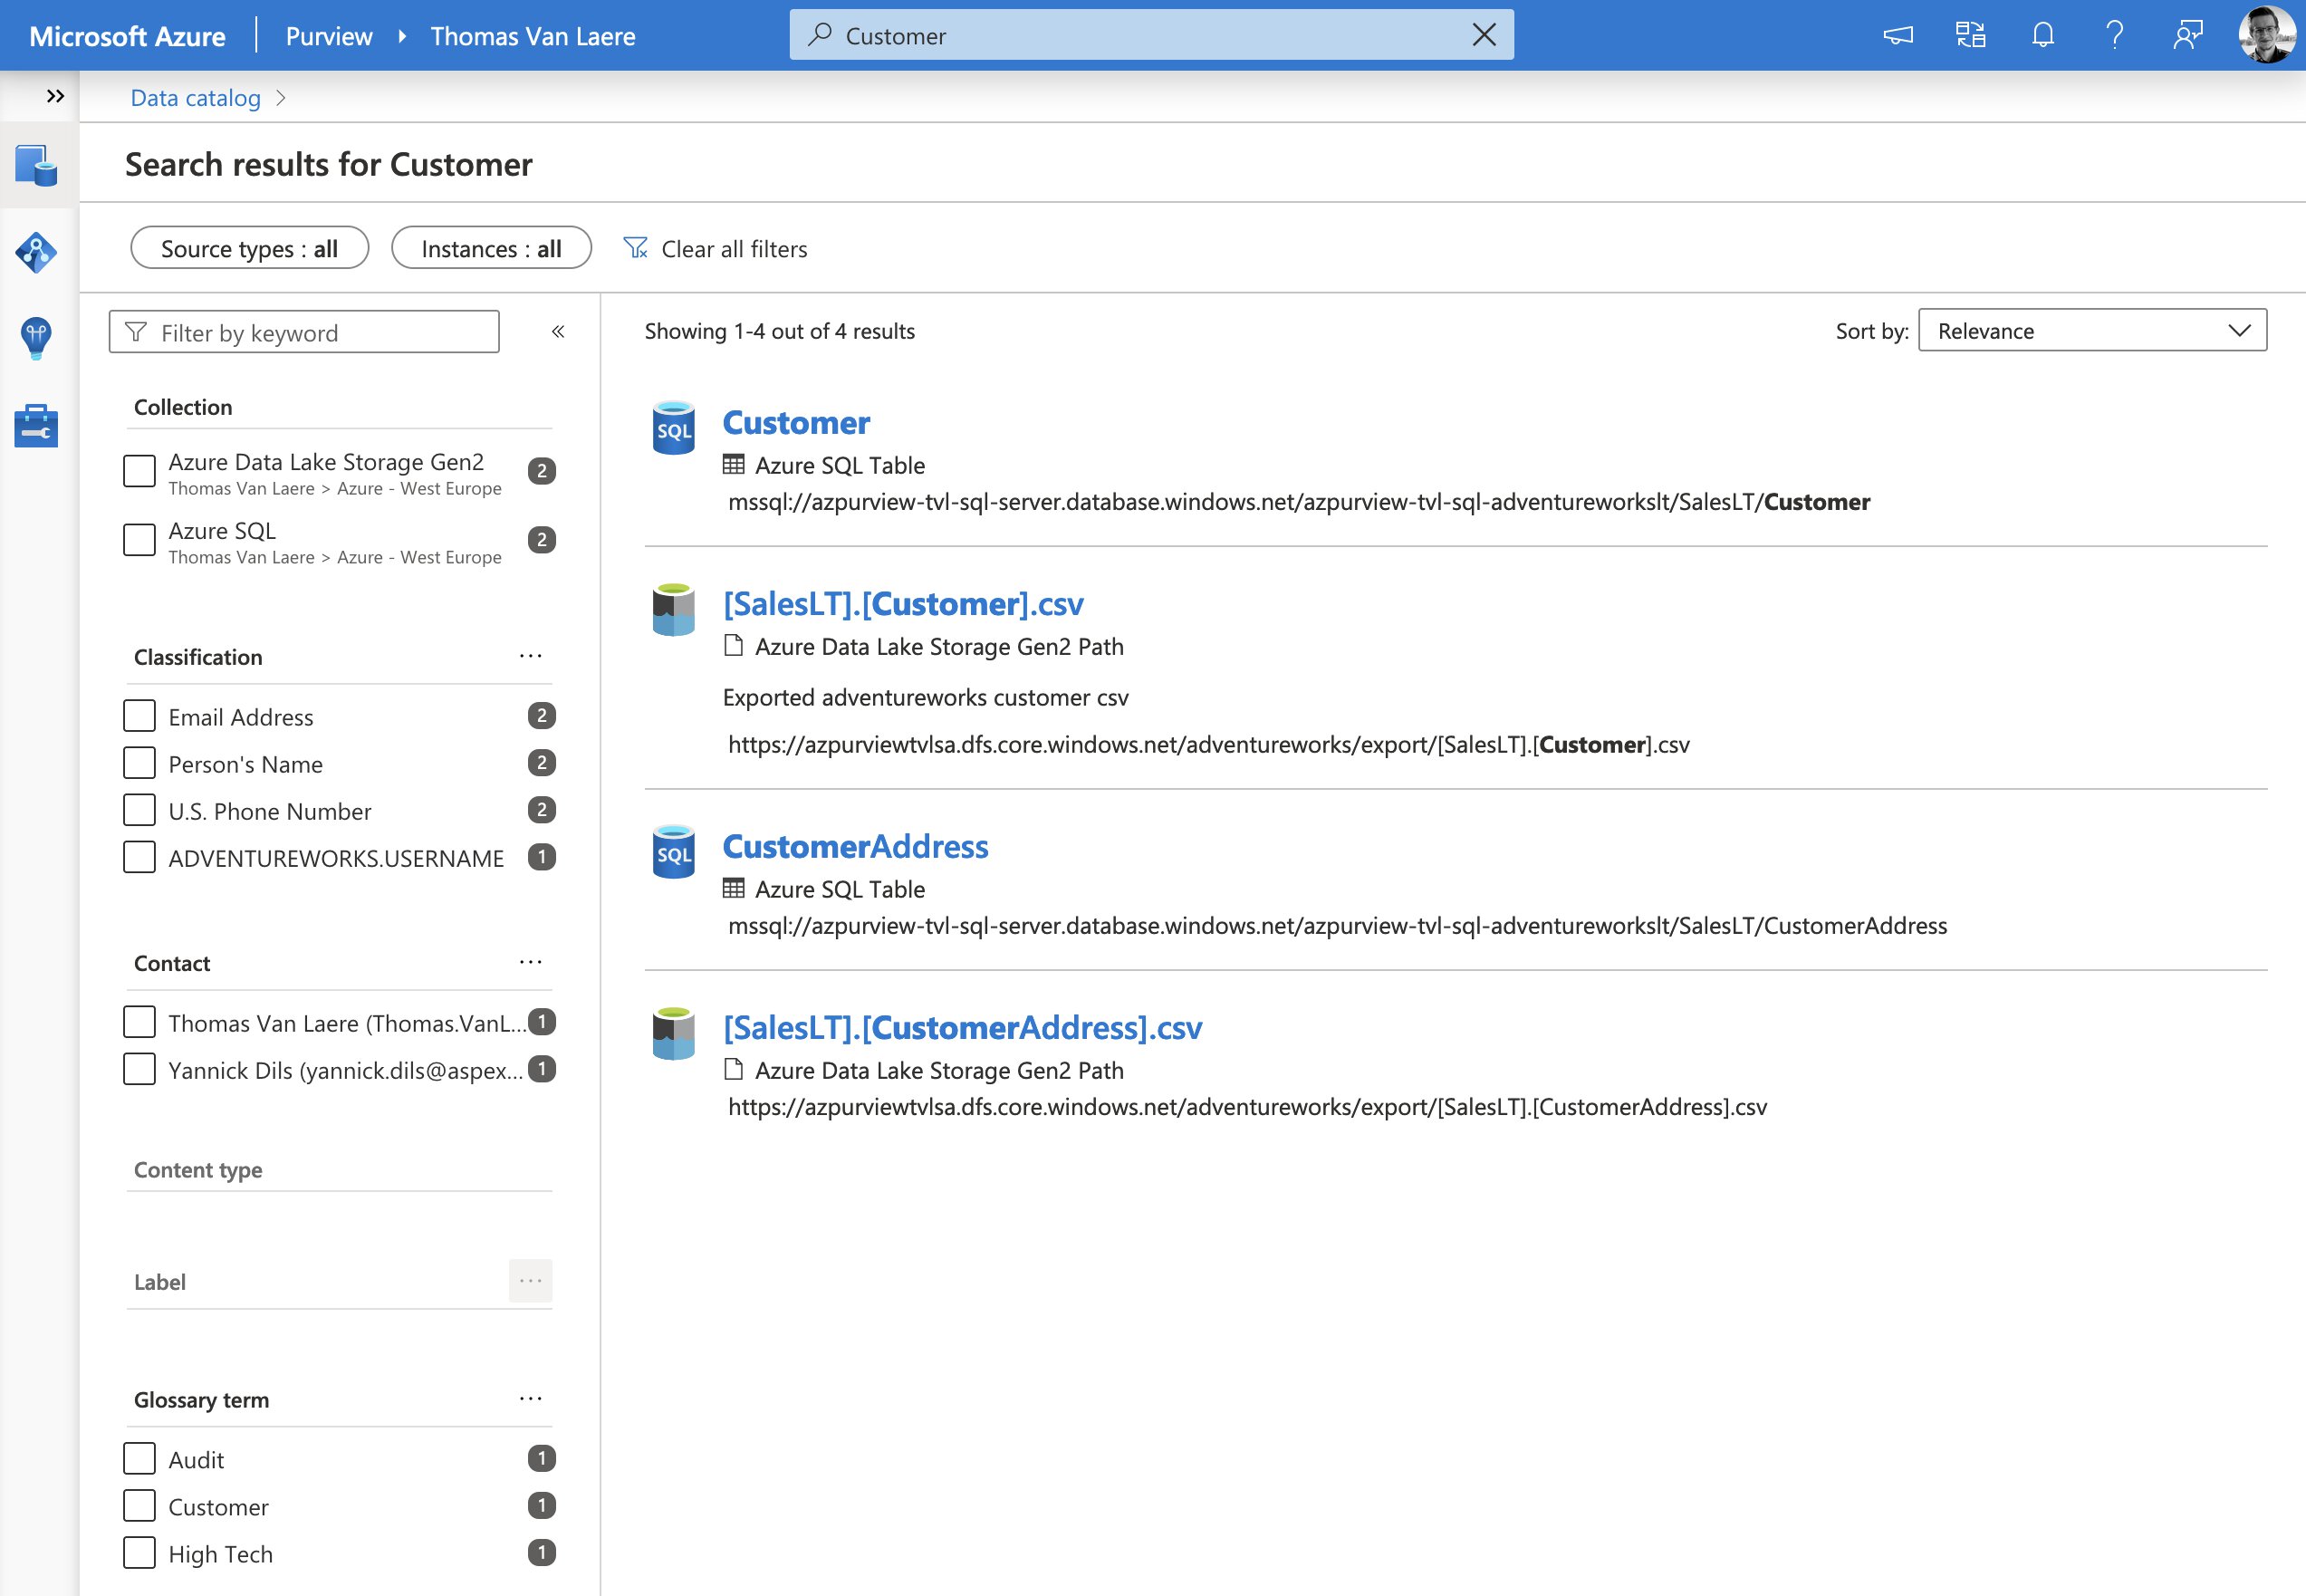
The information kept in the catalog is anything but static, though. In addition to being kept up-to-date by any additional scan that you may run, your users can contribute to the catalog by tagging, documenting, and annotating data sources.
Glossary Terms
To make the information more useful to your business users, you can add business-related information to your assets. You will need to create “glossary terms”, which can be represented in a hierarchy, that are relevant to your business. This helps in “abstracting the technical jargon associated with the data repositories and allows the business user to discover and work with data in the vocabulary that is more familiar to them”.
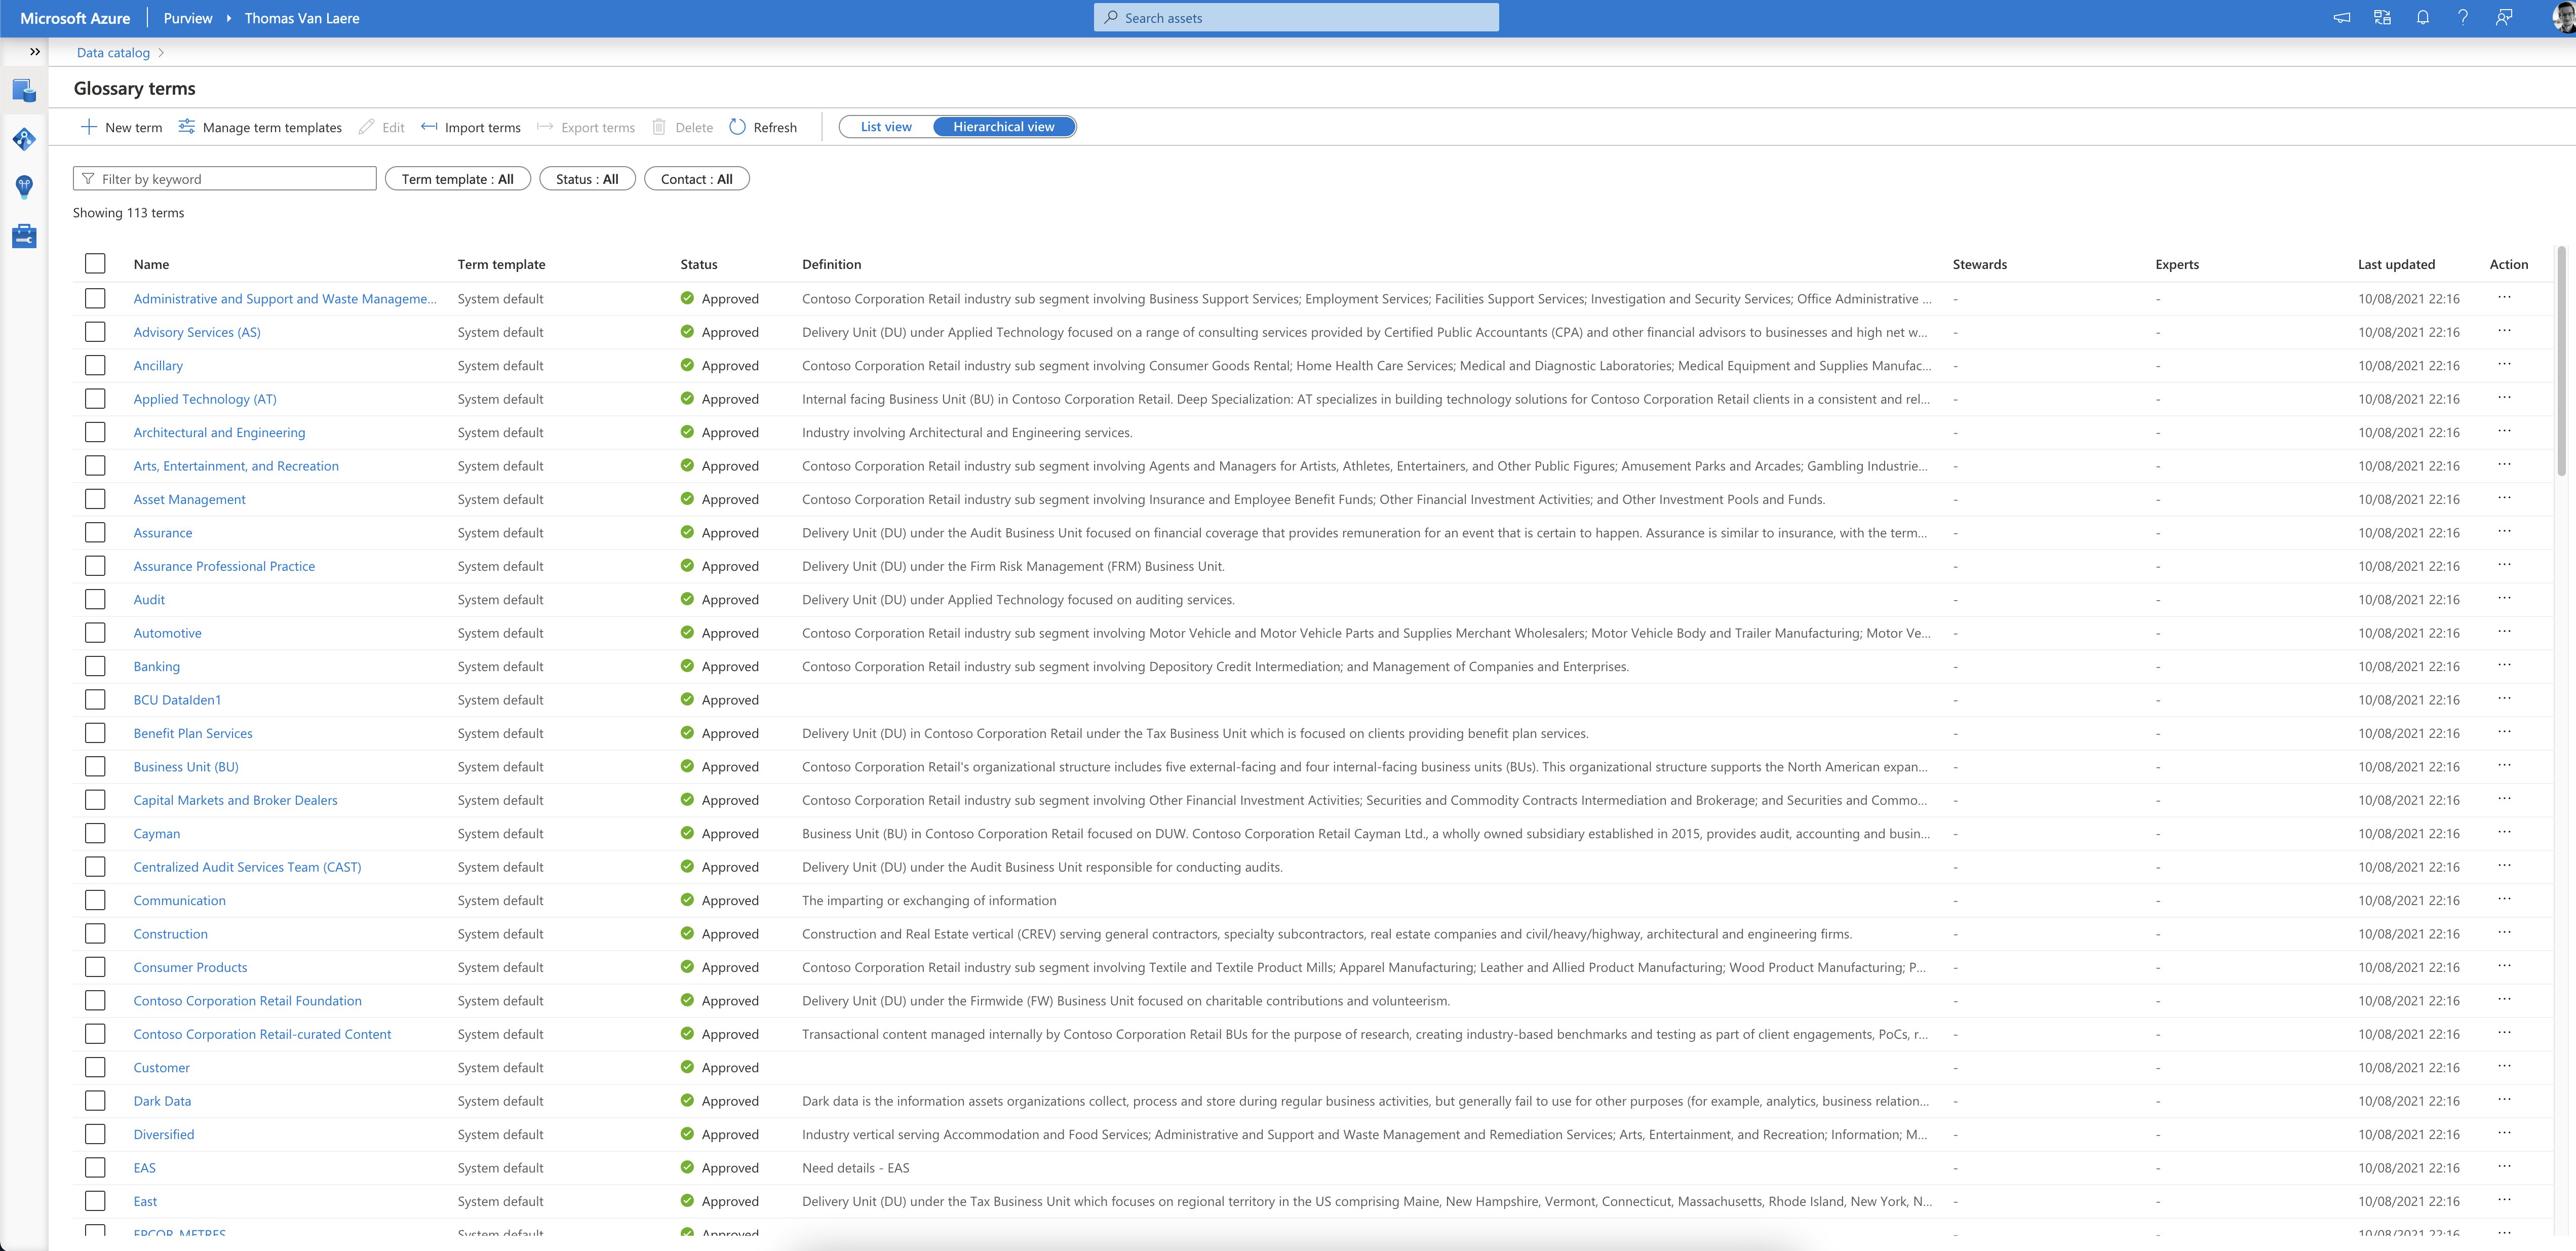
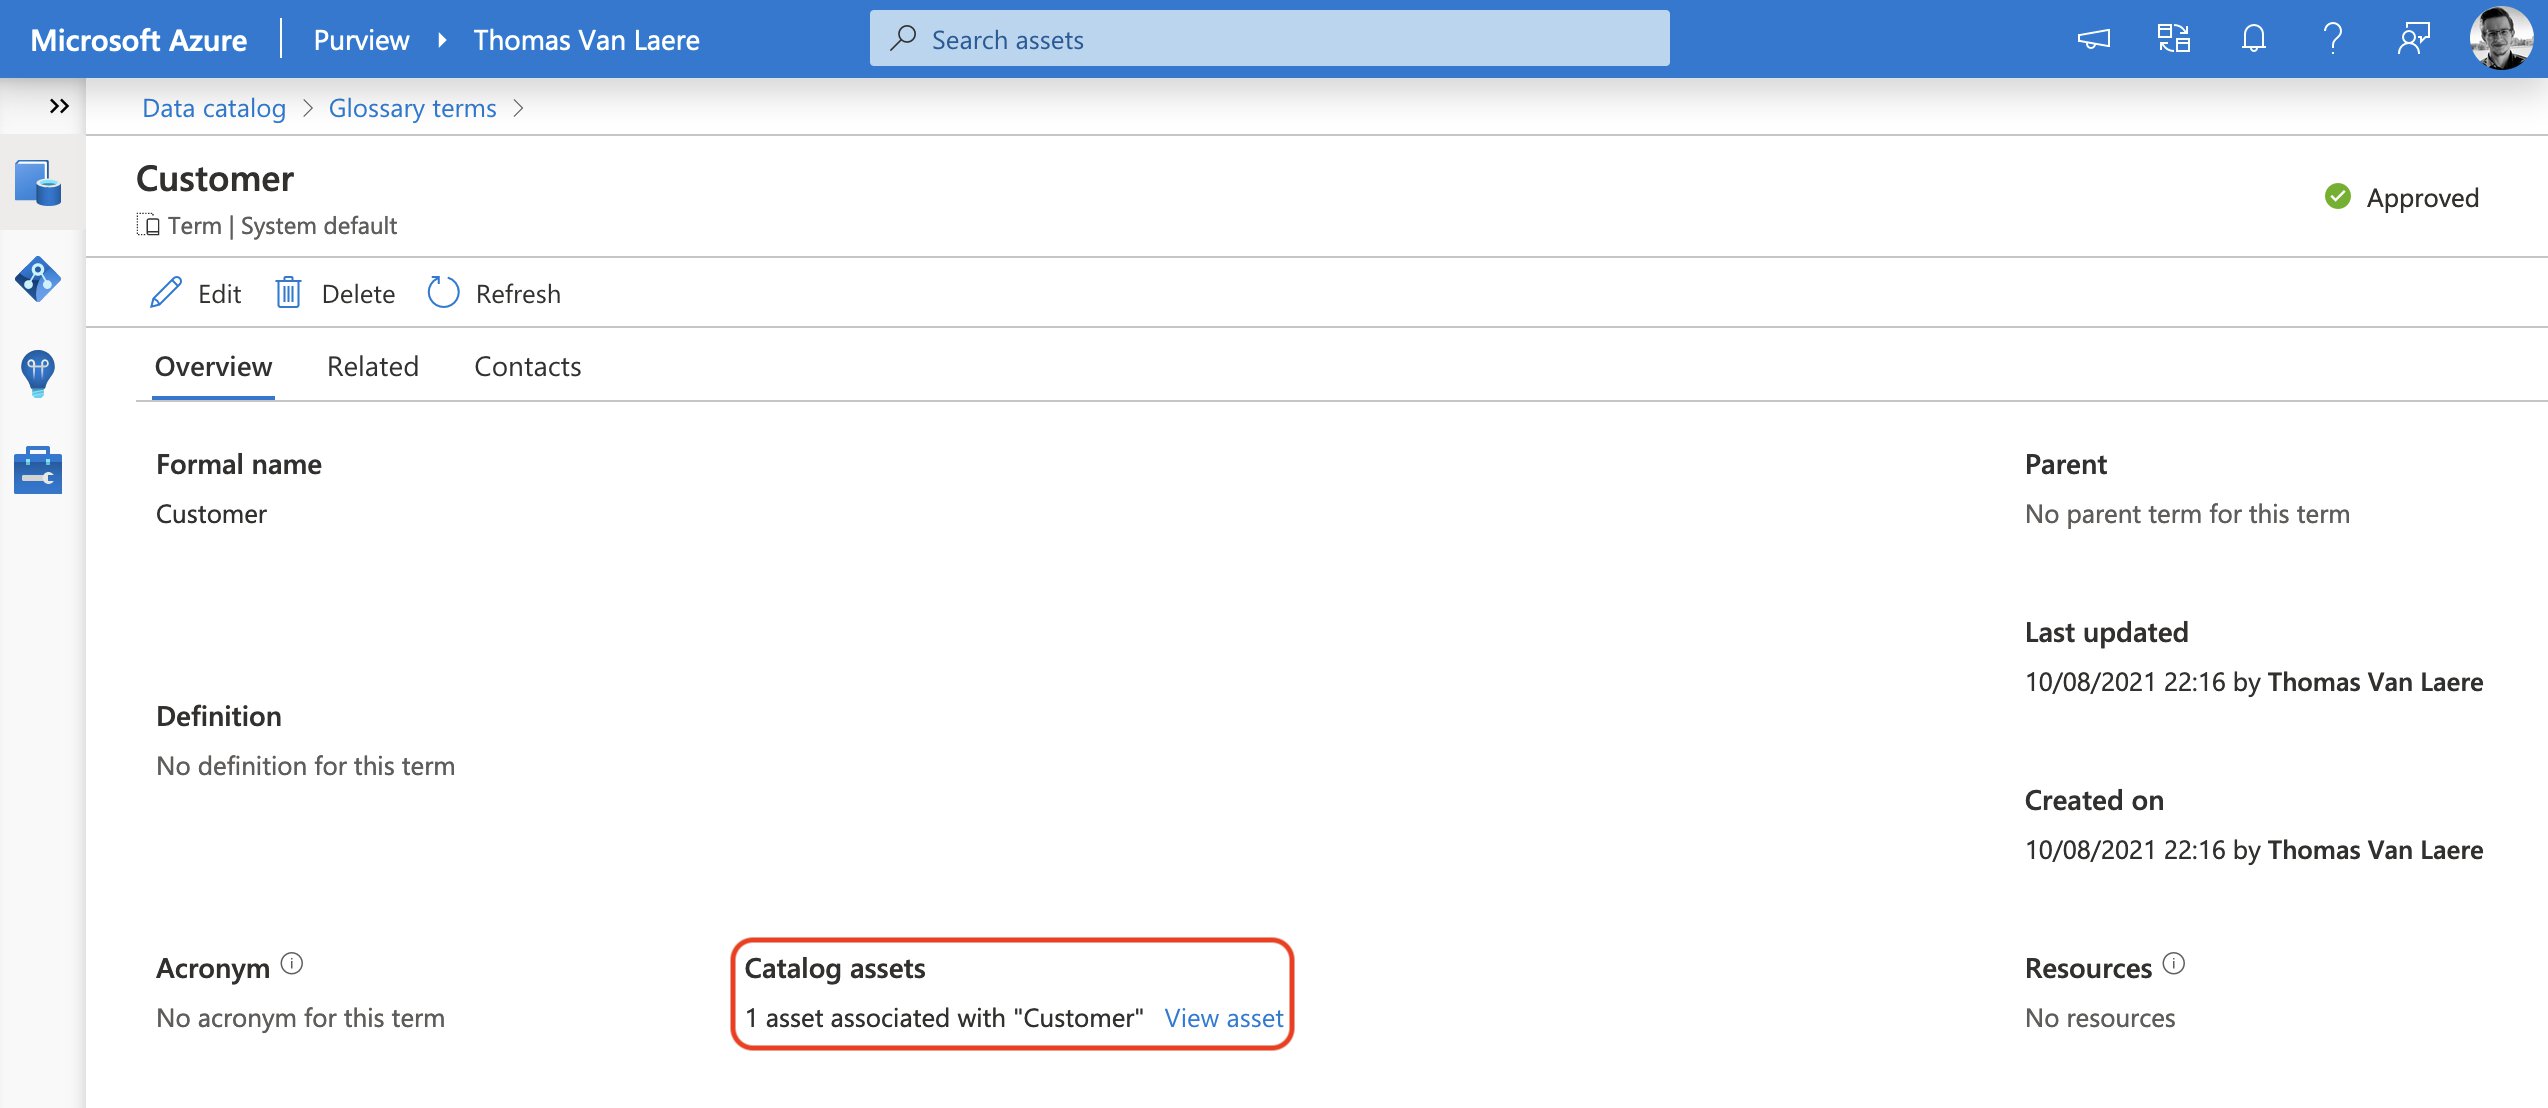
“Terms” are subject to an approval process, meaning that a team of business experts can draft, approve or reject terms. Once a term has been approved you can assign it to an asset. The terms themselves can have a parent term, synonym terms and related terms. You can also assign subject matter experts and owners to a specific term, which presents your business users with their contact information!
You can apply these glossary terms to just about every asset, whether it’s at the asset or schema level. Just hit the edit button on the top left and you can begin. Fortunately, this is a very straightforward experience.
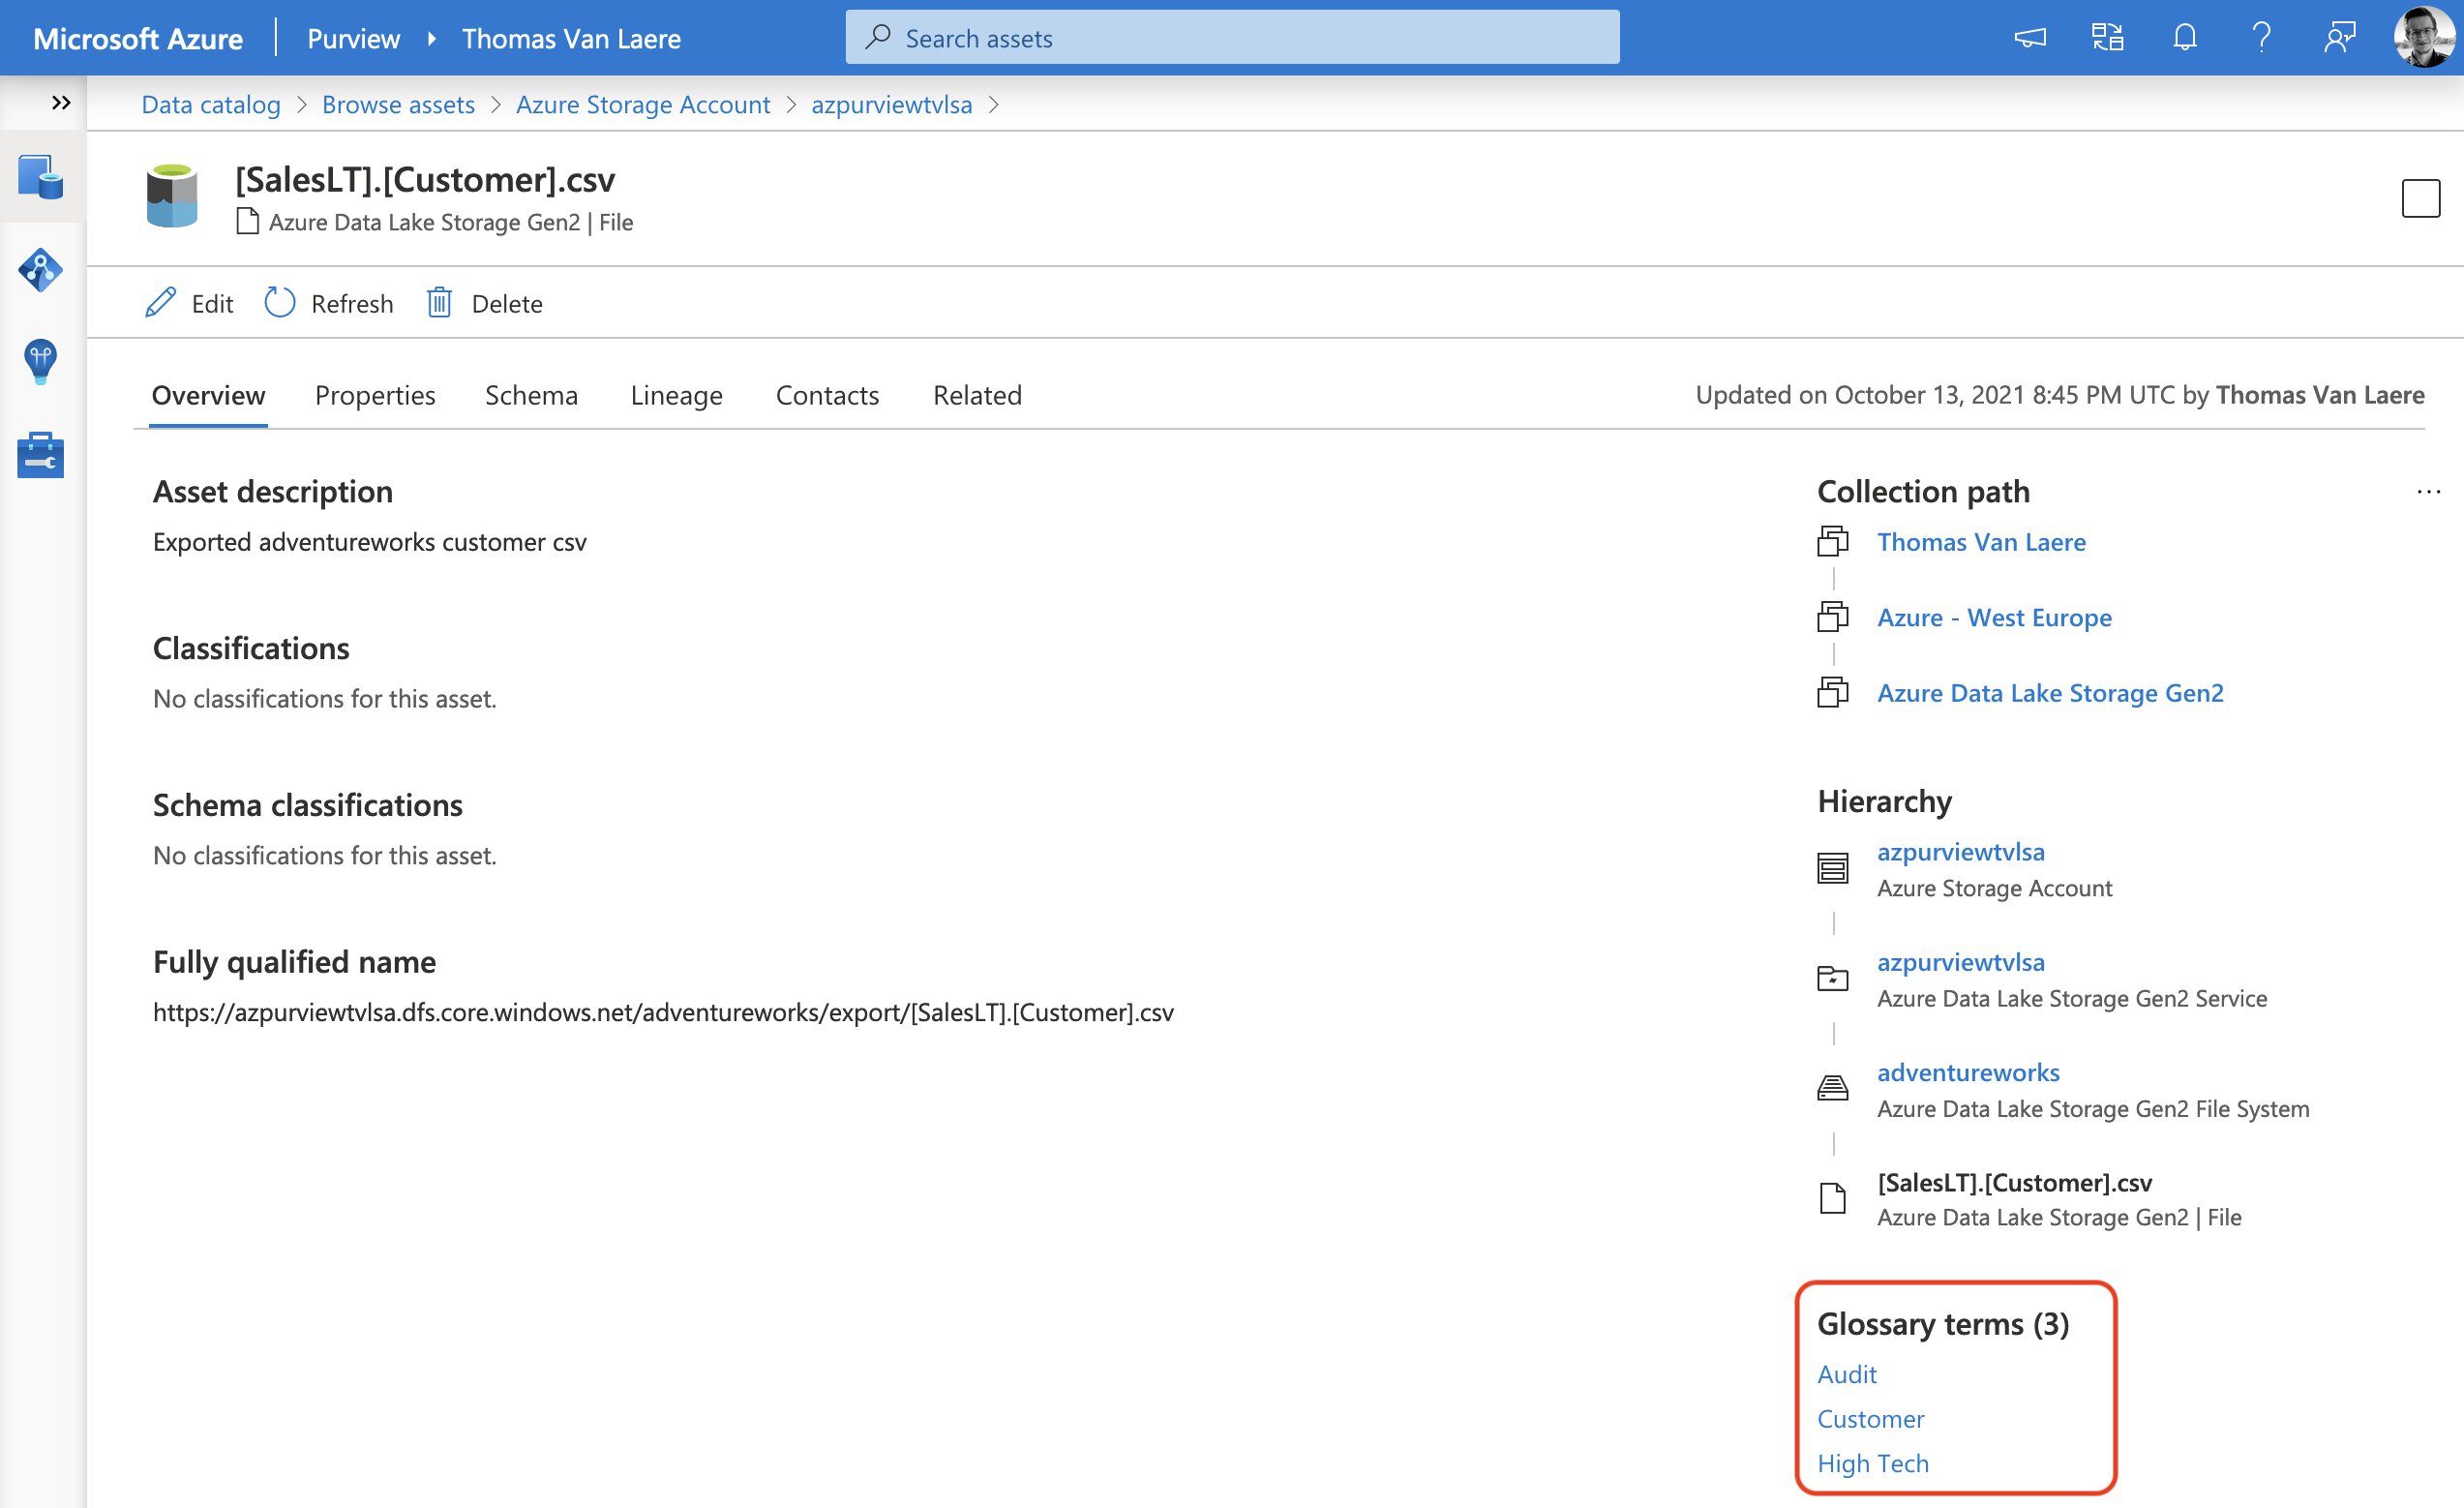
As I wrote earlier, you can also approach this from a business angle by going into the list of glossary terms first, selecting a term and you will be able to view all the associated assets.
Data Lineage
Data lineage is a concept that refers to the life cycle of data. If used correctly, Azure Purview can show you where your data originated from, how it is affected by data processes and how it flows on to the next output.
Take this example: once I have registered my Azure Data Factory, Azure SQL Database and Azure Data Lake Gen 2 in Azure Purview, ADF will automagically push the lineage from an ADF Pipeline that uses those data sources. My test pipeline is very simple, it will simply copy all of the available tables in the AdventureWorks database to an Azure Data Lake Gen 2 storage account.
Azure Data Factory has built-in support for pushing the data lineage back to Azure Purview, but only when using certain activities. You can create the connection between Purview and Data Factory by going into Purview Studio’s “Management” option and selecting “Data Factory”, under “Lineage connections”.
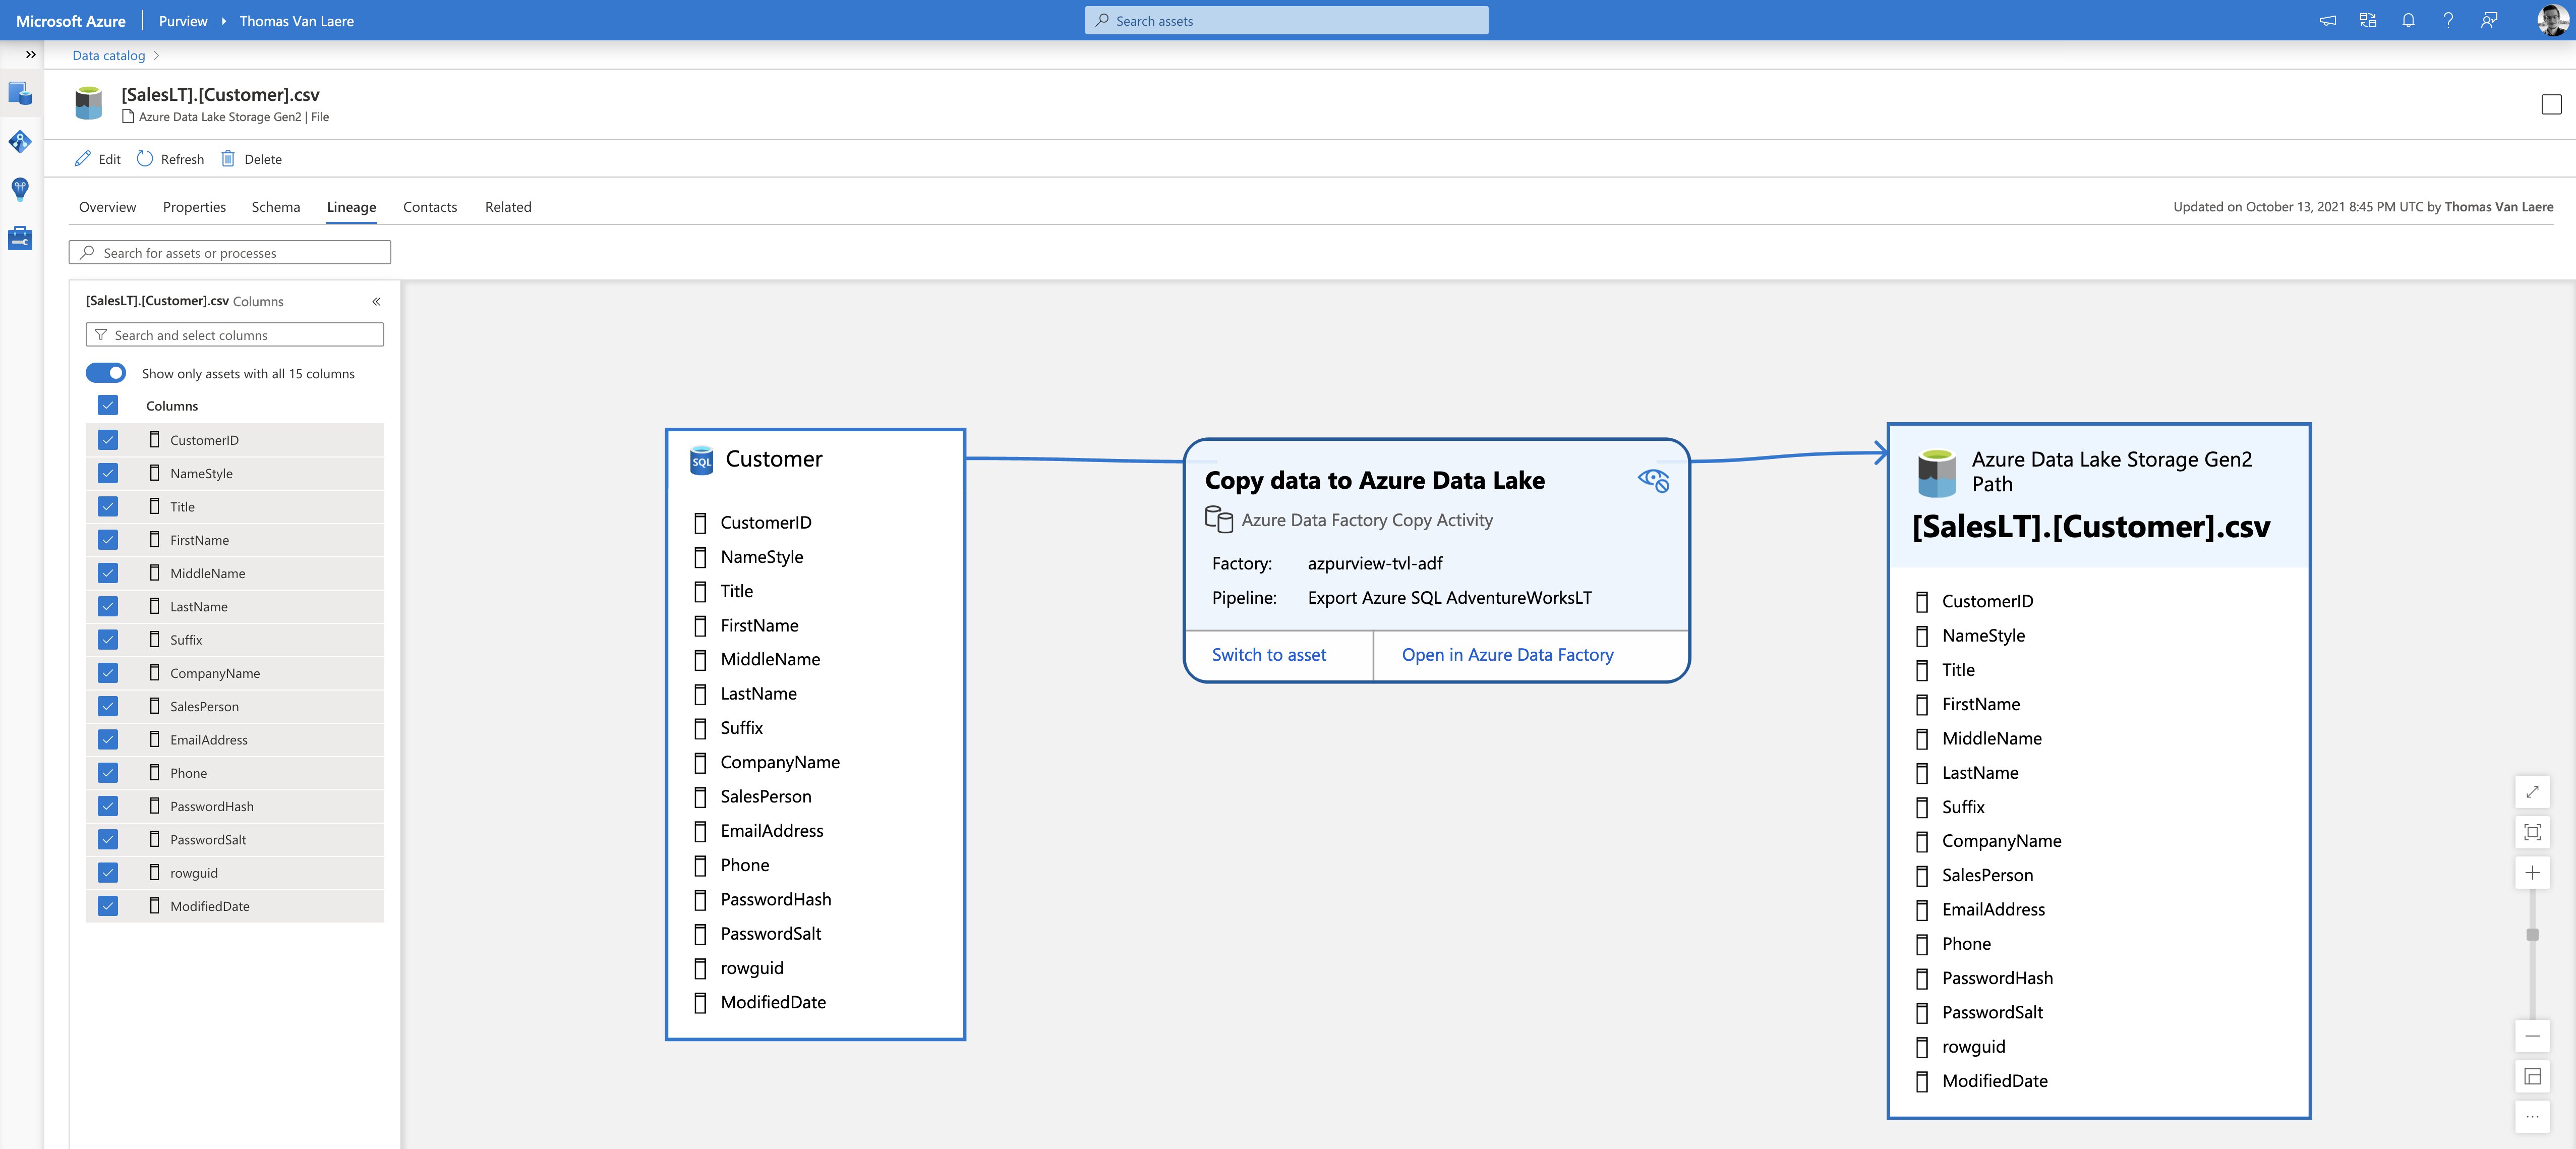
This example is a bit silly, I’ll admit. Since it only performs a 1-to-1 export. However, things can get rather interesting when you begin to introduce more data sources, rename columns and other complexities to the Data Factory Pipeline. For data processes that are not natively compatible with Azure Purview, you can use the Atlas API to push custom lineage information.
⚠️ An important note in regards to Azure Data Factory lineage support: “Azure Purview currently doesn’t support query or stored procedure for lineage or scanning. Lineage is limited to table and view sources only.” When you use the “Copy Data” activity in an Azure Data Factory Pipeline, make sure you set the “use query” option to “table”, in the “source” settings. Use different settings and you might not see the data lineage appear in Azure Purview.
For an overview of services that support pushing lineage to Azure Purview, I suggest taking a look at the Azure Purview documentation.
Insights
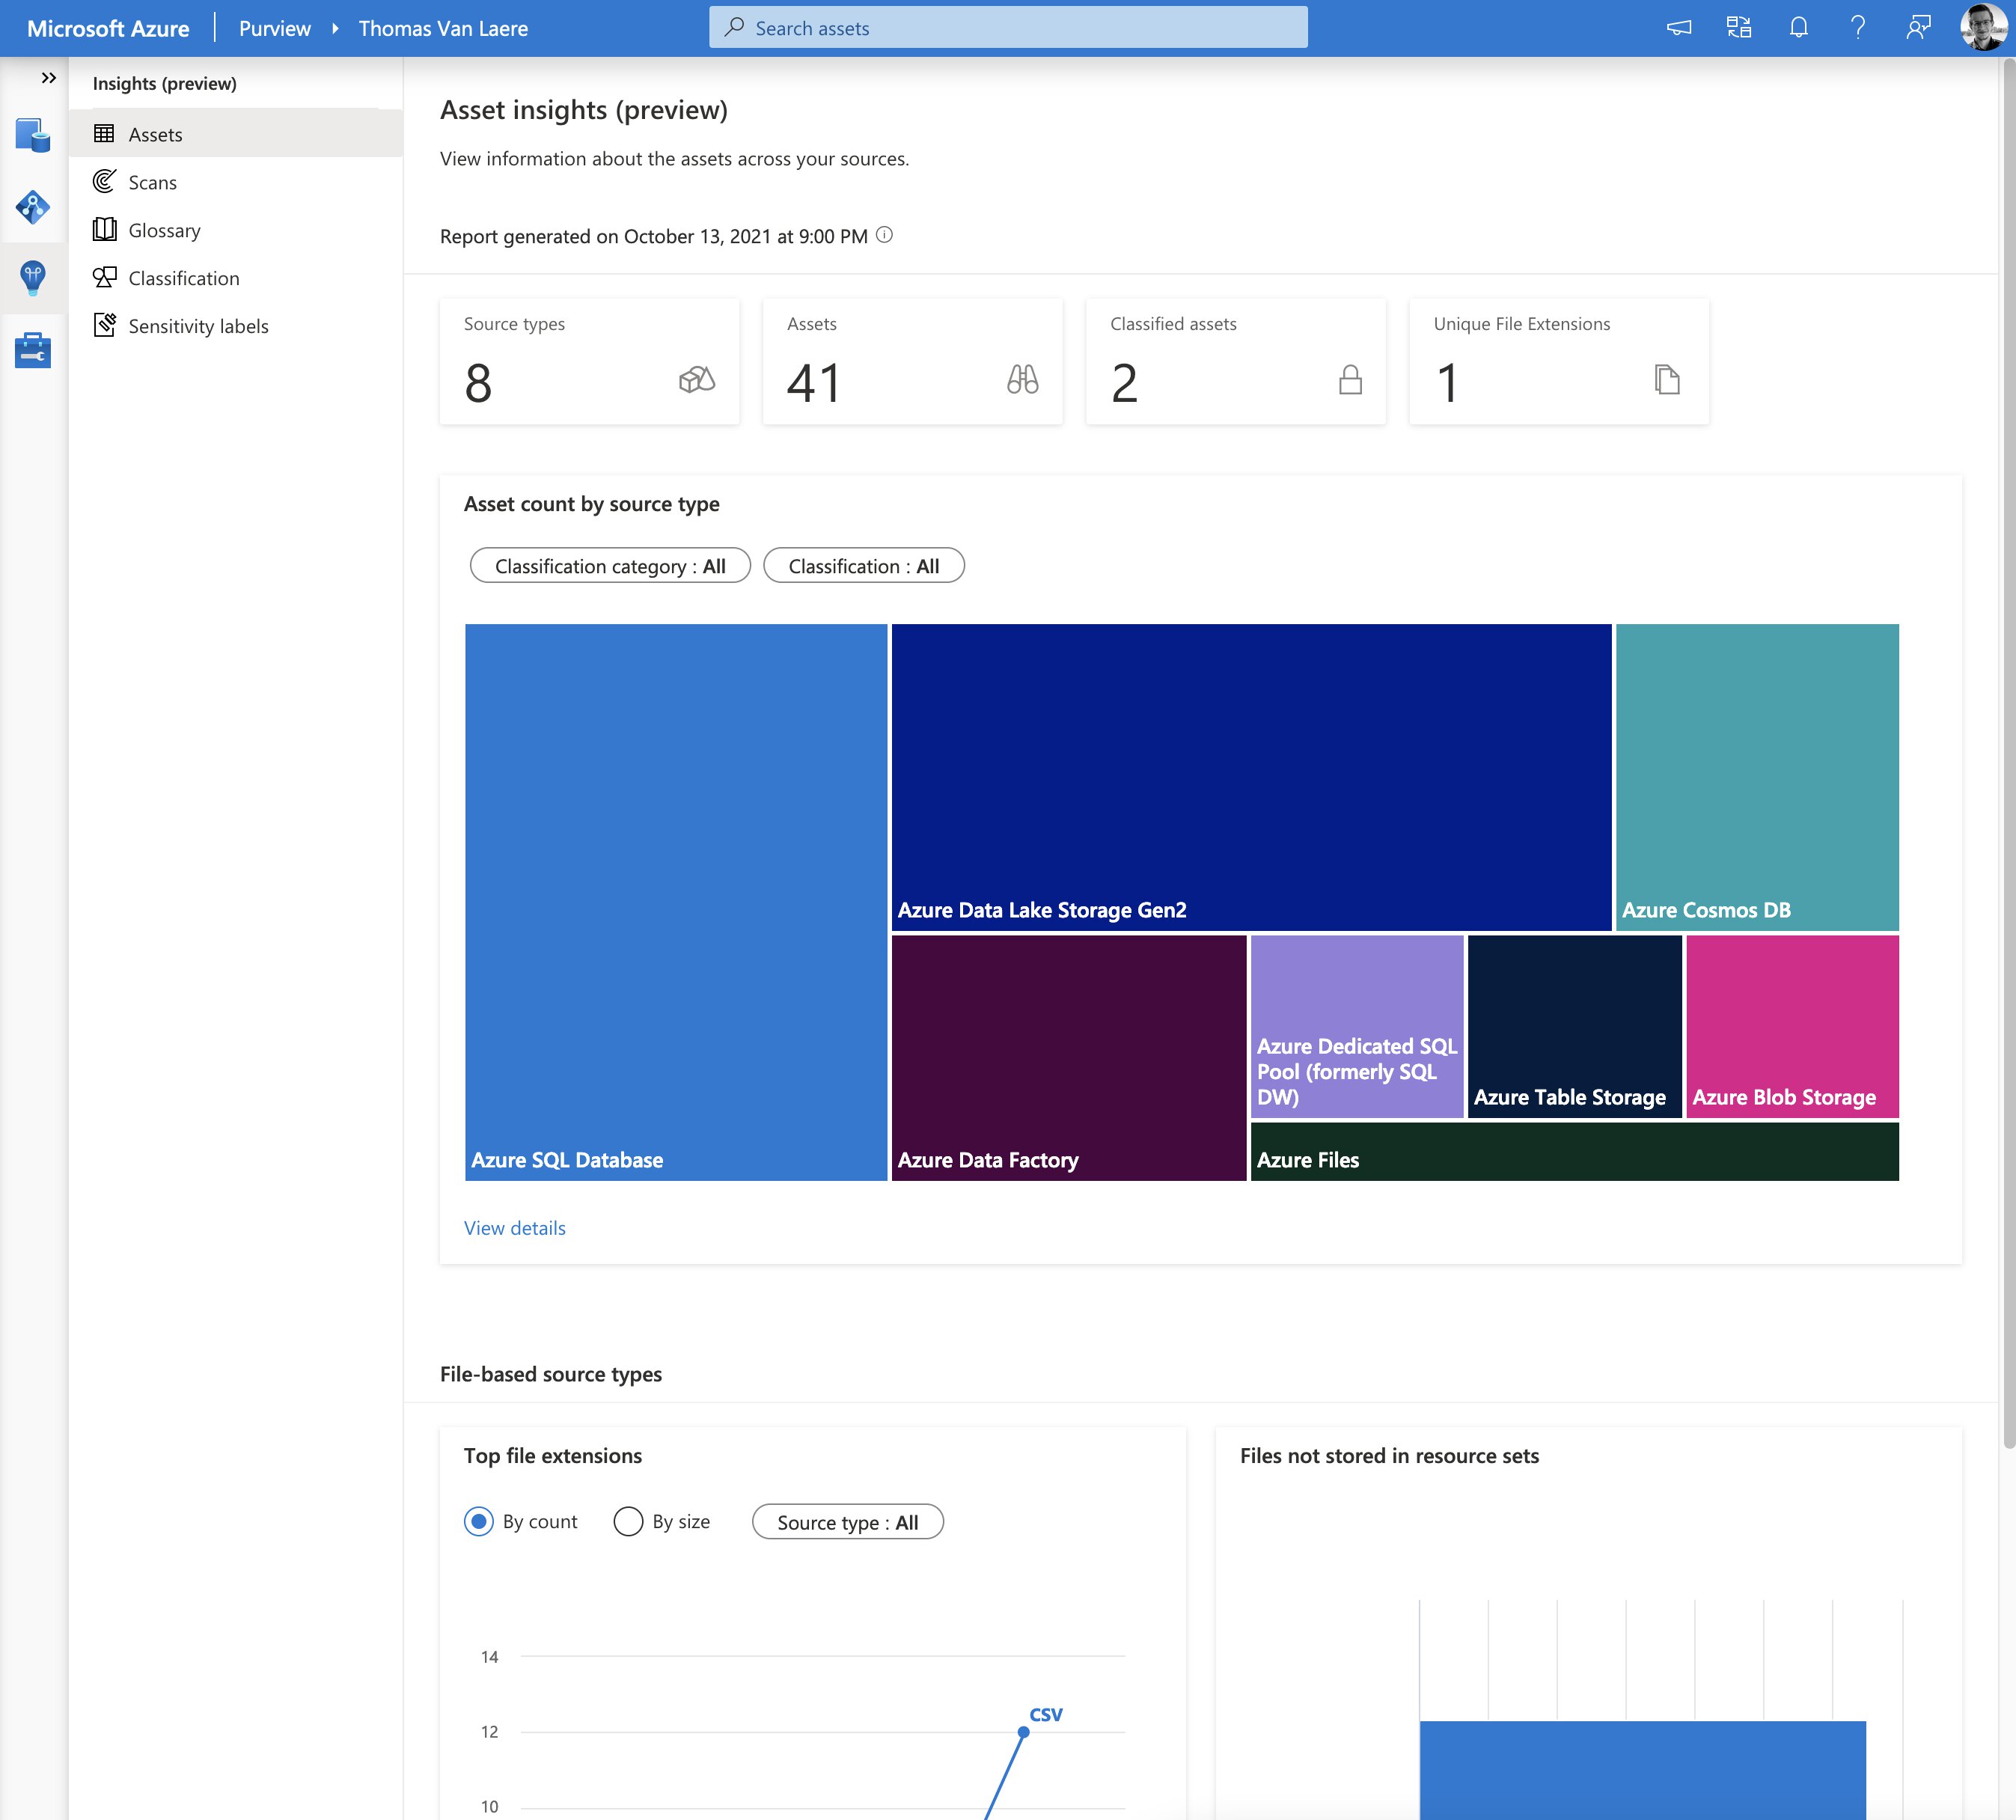
Even though Azure Purview is generally available, some of its components are still in preview. At the time of writing this post, the insights component is currently in preview and offers pre-fabricated reports related to assets, scans, glossary, classifications and sensitivity labels.
Pricing
As you might have guessed, there are many moving parts to keep in mind when you’re thinking about committing to Azure Purview. To narrow down your monthly/annual price, you have to be aware of the following:
- Direct costs related to the service itself:
- Elastic “Data Map”.
- Always on with a minimum of one capacity unit, scales up automatically based on usage.
- Each CU comprises 25 operations/second and 2 GB metadata storage, with incremental, consumption-based billing for each extra capacity unit by the hour.
- Automated scanning & classification.
- Pay as you go.
- Advanced resource sets.
- Pay as you go.
- When this optional feature is enabled in the Purview management, the service will run extra aggregations to compute additional information about resource set assets and allows you to define resource set pattern rules.
- Elastic “Data Map”.
- Indirect costs:
- Managed resources in the managed resource group
- Currently, this consists of an Azure Storage Account and an Azure Event Hub.
- Additional costs when activating Azure Private Endpoints and its prerequisites
- Possibly an additional VM that can run the self-hosted integration runtime, when required.
- As mentioned earlier, scanning can impact the data source’s performance so you may need to scale up your VMs.
- Information Protection requires Microsoft 365 licenses.
- Multi-cloud egress charges.
- Managed resources in the managed resource group
The Azure Purview documentation has a dedicated pricing guidelines page, where all of the aforementioned items are discussed in greater detail, you can find it here!
Conclusion
After testing the service out for a few weeks, I can say that I quite like the direction in which it is headed. I would recommend to anyone that is looking to try out a data governance tool, to test drive Azure Purview since it is now generally available, backed by an SLA and Microsoft support. There are lots of new features planned and enhancements to existing ones coming out soon and so I will be keeping an eye out.
If you’re looking for some additional tools and scripts to get started with Azure Purview, Microsoft has got you covered! The tools provided by Microsoft also contains a free hands-on lab, that walks you through all the different topics that were covered in this blog post.
I’ll close with a fun piece of trivia from the Azure Purview FAQ:
“Azure Purview originally began as Azure Data Catalog Gen 2, but has since broadened in scope.”
- Tags |
- Azure
- Governance
Related posts
- Azure Resource Locks
- Open Policy Agent
- Microsoft Entra Privileged Identity Management (for Azure Resources) Revisited
- Azure Policies & Azure AD PIM breakdown - Part 2
- Azure Policies & Azure AD PIM breakdown - Part 1
- Azure Chaos Studio and PowerShell
- Azure Chaos Studio - Public Preview
- Local OpenShift 4 with Azure App Services on Azure Arc
- Verifying Azure AD tenant availability
- Azure Red Hat OpenShift 4
- Exploring AI CPU-Inferencing with Azure Cobalt 100
- SPIFFE and Entra Workload Identity Federation
- Chaos Engineering on Azure