Azure Confidential Computing
In this post
Now and again I notice that Microsoft puts out a blog post about new capabilities that have been added to the compute platform. Confidential Compute has been, somewhat, a blind spot for me. I remember first hearing about ACC when Mark Russinovich talked about it at Ignite 2017 in his “Inside Microsoft Azure datacenter hardware and software architecture” session, which is still very interesting to watch.
When I was gathering research for my previous blog post on container internals, I stumbled across an announcement about Kubernetes powered by Azure Confidential Compute. I decided to take a closer look at ACC in general and write about what I learned, to the best of my ability.
What does it take to build something using Azure Confidential compute? Without further ado let’s take a look.
Why Azure Confidential Compute?
As you may know, Azure fully supports:
- End to end encryption
- Examples of E2E encryption are HTTPS and TLS.
- At rest encryption
- Azure Storage and SQL Server Transparent Database encryption are two common examples.
If these two types of encryption are first-class citizens in your software or architectures, that is to be applauded! Although from what I’ve come to learn we can take it a step further. There is still a missing piece that we could take into consideration when it comes to protecting our data, which is the encryption of data that is being processed. There are a few approaches to doing this, of which I will highlight two:
- Homomorphic encryption
- The main idea behind this concept is that all the inputs have been pre-encrypted and you will act on that encrypted data. The data is essentially never revealed while you’re performing computations on it. From what I read, this approach is fairly limited in terms of what you can do, especially when you go down the AI and ML path. It is a type of technology that is still evolving, like many others in this space.
- Trusted Execution Environments (TEEs)
- Trusted Execution Environments are tampering resistant environments that allow you to safely run sensitive workloads inside of an enclave. Enclaves are black-boxes that are protected by a Trusted Execution Environment provider. The provider creates the black box, which is isolated from specific levels of the system.
Security is often key when it comes to lowering the barriers to cloud adoption. Customers also want guarantees that the administrators, datacenter insiders or other (il)legal third parties cannot access the data without the customer’s consent. Sometimes the customer wants to be sure that the cloud infrastructure doesn’t contain exploits that can lead to hackers abusing them.
But besides finding ways to mitigate some of these issues operationally, Microsoft has also made it a priority to find technical solutions.
Let me give you a commonly used example of one such solution, the multi-party machine learning scenario. Let’s assume that you have two or more healthcare providers that wish to exchange confidential data sets with each other to train a machine learning model. All parties have regulatory concerns that must be met and are not able to share the datasets.
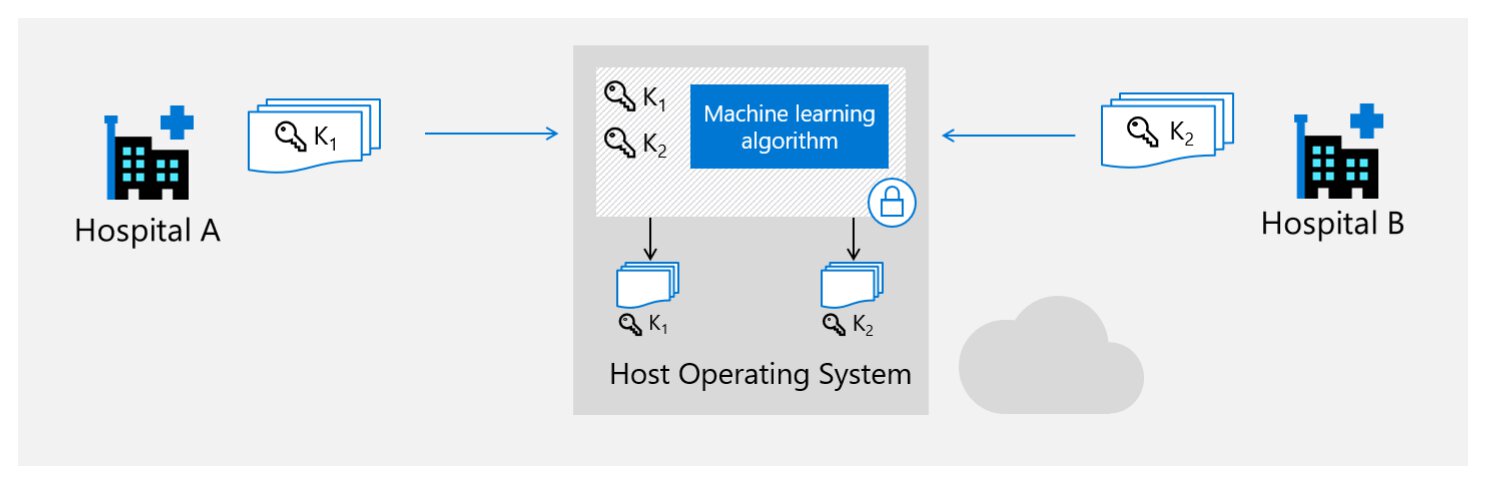
However, if all parties can agree upon using a specific algorithm, we can have that execute inside of an enclave using confidential compute. The tooling that accompanies ACC can confirm that it is, in fact, running a genuine, untampered, piece of code and ensures that the data remains encrypted while in use (more on how that works in a second). You will still want to release a party-specific key to the code running in ACC so it can decrypt a specific dataset and train the model. If every interested party does this, we can give each party their encrypted version of the ML model.
As you may be able to gather, firing up an enclave comes with a tiny caveat; instead of relying on general compute hardware, we need specific processors that can start these types of enclaves. On Azure, this exclusively works with processors that have Intel SGX capabilities. That is not to say that other TEE technologies do not exist, as a matter of fact, there are quite a few.
💡 Update March 15, 2021: AMD SEV-SNP enabled Azure VMs are coming soon!
TEEs in a little more depth
Enclaves get an isolated portion of processor and memory space. Code and data inside of the enclave are inaccessible to the outside and cannot be tampered with due to the CPU blocking off the access. The data cannot go out of the box in an unencrypted form. The result is typically the following:
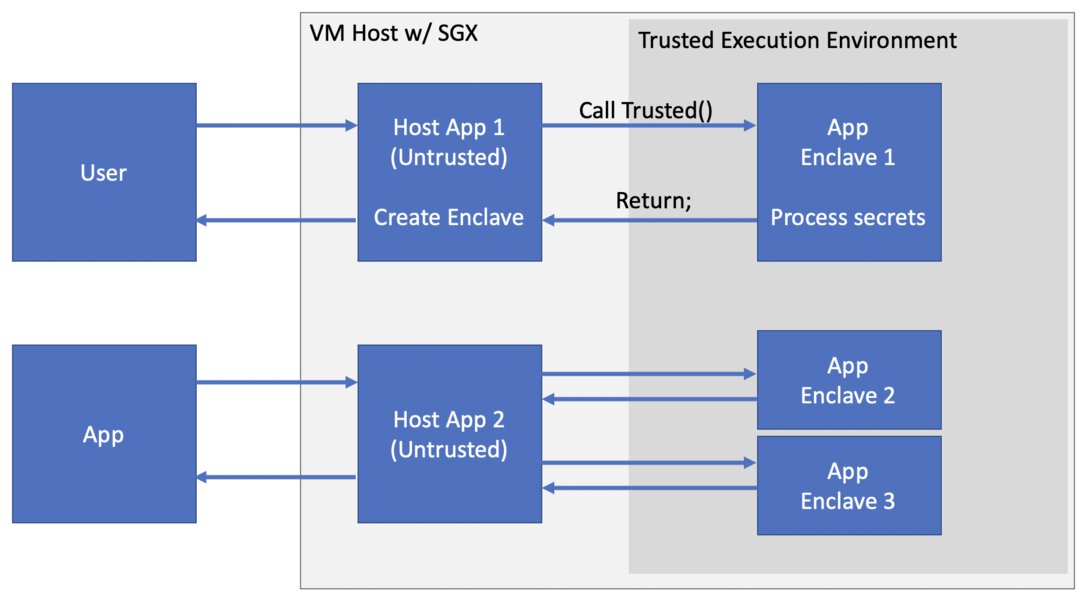
Your application will be partitioned into two parts, one trusted and one untrusted. When your application runs it will create the enclave, which will be placed into a protected memory region with restricted entry and exit locations that are defined by the developer. The entry location is called through a trusted function and the enclave executes a chunk of code. The enclave code as well as the data, inside the CPU perimeter, runs in the clear. Enclave data that is written to memory will be encrypted and integrity checked. The trusted function returns and your application continues its normal execution. Enclave data remains in the encrypted memory region.
Could you stuff your entire app inside of an enclave? Yes, you can, as long as you can provide a statically linked binary. But according to Intel, it creates a larger attack surface and that might not be the effect that you are looking for. ISVs should strive to minimize the enclave size.
Attestation Process with Intel SGX on Azure
One of the things that a TEE provider takes care of is the attestation process. It is a mechanism by which a third entity establishes that an algorithm is running on an Intel SGX enabled platform protected within an enclave, before provisioning that software with secrets and protected data.
Attestation allows a client application to be certain that it is communicating with a genuine enclave and that this enclave it is loaded without any alteration with the code and data provided to it. This guarantee is required by the client app before it can begin to communicate and transfer data to the enclave. The attestation mechanism itself is provided by the processor that runs the TEEs.
For the attestation to be considered trustworthy, the client must trust the platform hosting the enclaves. The trusted root, for example in the case of the Intel SGX implementation, is based on the presence of two root keys fused in the processor itself, these two generated keys being specific to each processor and integrated during the processor construction stage.
The Intel SGX architecture supports two forms of attestation. I had a look at the SGX documentation and here is what it boils down to:
Local Attestation
You may run into the scenario where you have multiple enclaves that need to be able to co-operate with one another to perform a specific task. If these enclaves happen to run on the same genuine processor they will need to prove their identity and authenticity to each other on that local platform. The enclave that is being called also has to be able to prove that it has not been modified since its creation.
An enclave can ask the hardware to generate a credential known as the report, which includes cryptographic proof that the enclave exists on the platform. This report can be given to another enclave who can verify that the enclave report was generated on the same platform. The authentication mechanism used for intra-platform enclave attestation uses a symmetric key system where only the enclave verifying the report structure and the enclave hardware creating the report know the key, which is embedded in the hardware platform.
Remote Attestation
An application that hosts an enclave can ask an enclave to produce a report and then pass this report to a platform service to produce a type of credential that reflects enclave and platform state. This credential is known as the quote, which can be passed to entities off of the platform. The enclave data contained in the quote is presented to the remote service provider at the end of the attestation process. This is the data the service provider will compare against a trusted configuration to decide whether to render the service to the enclave.
You can compare this setup to a challenge and response type system for the enclave to prove its identity.
Remote attestation relies on the Intel Attestation Service, which means you must have an active internet connection to be able to contact the service. Don’t fret, Microsoft has their very own “Azure Internal Attestation Service”. By using its attestation service, which is based on a caching technique, Azure will be able to continue to validate attestations for platforms hosted in its datacenter.
What do I need?
To use TEEs in virtual machines, you will need an Azure virtual machine that supports Intel SGX. Currently, Microsoft has these machines in the following offerings:
Standard_DCs- GEN 1
- In preview until the offering is deprecated.
- Standard_DCs_v2
- GEN 2
- Available in UK South, Canada Central, and US East at the time of writing
- DC1s V2 PAYG compute starts at EUR 184 per month (744 hours)
💡 Update June 22nd, 2020: Standard_DCs_v2 VMs are now available in West Europe.**
The generation has nothing to do with the VM series’ version number, it has to do with the type of Hyper-V virtual machine. If I recall correctly there used to be a time when picking a gen 2 VM meant that you could not hook it up to Azure Recovery Services Vaults, thus no backups. However at the time of writing this post that issue has been addressed. Though there is still no supported for Azure Disk Encryption in gen 2 VMs. There is an Azure Docs page dedicated to explaining the differences in capabilities between a gen 1 and gen 2 VM.
SDKs to help you build apps
New security features are exciting for developers building secure applications, but in practice, there is a big gap between having a raw capability and developing applications that leverage that capability.
Building useful enclave applications requires tools to construct, load, and operate TEEs. Doing useful work in an enclave requires programming-language support and access to core platform libraries. I came across several of these SDKs but decided to highlight three of them, since these come from vendors I am somewhat familiar with.
Open Enclave
The Open Enclave SDK, created by Microsoft, has been in open source development for two years now. It is a framework that aims at creating a unified TEE abstraction over Intel SGX and Open Portable Trusted Execution Environment (ARM TrustZone) by offering a consistent API surface. If you have an IoT Edge solution you can also use this SDK to protect code and data while in use at the edge.
For the moment it only allows for building applications in C and C++. The SDK also strives to provide a transparent solution that is agnostic to specific vendors, service providers and choice of operating systems.
Enarx
Enarx is not a development framework but rather an open-source application deployment system that enables apps to run within TEEs. Red Hat’s philosophy behind it is that you should not need to rewrite your application for any particular platform or SDK.
It allows you to use any language, as long as your language of choice can compile down to WebAssembly. Enarx will handle attestation and the delivery of your code into a run-time “Keep”. Currently works with AMD SEV and Intel SGX.
Asylo
Google’s Asylo is yet another open-source framework for developing enclave applications. It defines an abstract enclave model that can be mapped transparently onto a variety of enclave technologies, whether they are hardware or software-based. In Asylo, different TEEs can interact with one another by using gRPC based messages.
Asylo provides rich POSIX support for running full-blown applications such as Redis or SQLite inside an enclave. The goal of Asylo’s POSIX layer is to provide TEEs with functionality that is provided by a regular OS to non-enclave applications.
At the moment it supports C++, support for other languages is on the radar. Asylo applications can be turned into Docker images and you can run them as you normally would.
Hacking away with Open Enclave
To get a better understanding and some hands-on practice with Open Enclave I will try my best to walk through how to calculate the sum of two numbers, inside of a newly created enclave.
We will also call back into the untrusted part of the application to print a message. This isn’t a complex sample but hopefully, it will provide a clearer picture of how all the components work together.
This sample is available on GitHub.
Azure Confidential Compute VM
I will start with the easy part, provisioning an Intel SGX powered virtual machine on Azure. I will be creating an Ubuntu 18.04 VM with the following ARM template. This will create a VM, give it a public IP, allow an IP to pass through the NSG and it will output an SSH command:
💡 Update April 26, 2021: I was made aware that the sample did not run properly, I believe this is due to the fact that newer versions of OpenEnclave have introduced some breaking changes since I wrote my blog post. I’ve updated the deployment phase so that when you deploy the ARM template, it will also run a script on the newly created VM that will set up the environment. In the next section, the actions that this script performs will be explained.
{
    "$schema": "https://schema.management.azure.com/schemas/2015-01-01/deploymentTemplate.json#",
    "contentVersion": "1.0.0.0",
    "parameters": {
        "yourIp": {
            "type": "string"
        },
        "virtualMachines_adminUsername": {
            "type": "string"
        },
        "virtualMachines_adminPassword": {
            "type": "securestring"
        },
        "confidentialComputeRegion": {
            "type": "string",
            "defaultValue": "WestEurope",
            "allowedValues": [
                "UKSouth",
                "CanadaCentral",
                "EastUS",
                "WestEurope"
            ]
        },
        "confidentialComputeVmSize": {
            "type": "string",
            "defaultValue": "Standard_DC1s_v2",
            "allowedValues": [
                "Standard_DC1s_v2",
                "Standard_DC2s_v2",
                "Standard_DC4s_v2",
                "Standard_DC8s_v2"
            ]
        },
        "virtualMachines_name": {
            "defaultValue": "accvm",
            "type": "String"
        },
        "virtualNetwork_name": {
            "defaultValue": "accvnet",
            "type": "String"
        },
        "networkInterface_name": {
            "defaultValue": "accvmnic",
            "type": "String"
        },
        "publicIPAddress_ip_name": {
            "defaultValue": "accvmip",
            "type": "String"
        },
        "networkSecurityGroup_name": {
            "defaultValue": "accnsg",
            "type": "String"
        }
    },
    "variables": {},
    "resources": [
        {
            "type": "Microsoft.Network/virtualNetworks/subnets",
            "apiVersion": "2020-04-01",
            "name": "[concat(parameters('virtualNetwork_name'), '/default')]",
            "dependsOn": [
                "[resourceId('Microsoft.Network/virtualNetworks', parameters('virtualNetwork_name'))]"
            ],
            "properties": {
                "addressPrefix": "10.0.0.0/24"
            }
        },
        {
            "type": "Microsoft.Network/networkSecurityGroups",
            "apiVersion": "2020-04-01",
            "name": "[parameters('networkSecurityGroup_name')]",
            "location": "[parameters('confidentialComputeRegion')]",
            "properties": {
                "securityRules": [
                    {
                        "name": "default-allow-ssh",
                        "properties": {
                            "protocol": "TCP",
                            "sourcePortRange": "*",
                            "destinationPortRange": "22",
                            "sourceAddressPrefix": "[parameters('yourIp')]",
                            "destinationAddressPrefix": "*",
                            "access": "Allow",
                            "priority": 1000,
                            "direction": "Inbound"
                        }
                    }
                ]
            }
        },
        {
            "type": "Microsoft.Network/publicIPAddresses",
            "apiVersion": "2020-04-01",
            "name": "[parameters('publicIPAddress_ip_name')]",
            "location": "[parameters('confidentialComputeRegion')]",
            "sku": {
                "name": "Standard"
            },
            "properties": {
                "publicIPAllocationMethod": "Static",
                "publicIPAddressVersion": "IPv4"
            }
        },
        {
            "type": "Microsoft.Network/virtualNetworks",
            "apiVersion": "2020-04-01",
            "name": "[parameters('virtualNetwork_name')]",
            "location": "[parameters('confidentialComputeRegion')]",
            "properties": {
                "addressSpace": {
                    "addressPrefixes": [
                        "10.0.0.0/24"
                    ]
                },
                "subnets": [
                    {
                        "name": "default",
                        "properties": {
                            "addressPrefix": "10.0.0.0/24"
                        }
                    }
                ]
            }
        },
        {
            "type": "Microsoft.Compute/virtualMachines",
            "apiVersion": "2019-07-01",
            "name": "[parameters('virtualMachines_name')]",
            "location": "[parameters('confidentialComputeRegion')]",
            "dependsOn": [
                "[resourceId('Microsoft.Network/networkInterfaces', parameters('networkInterface_name'))]"
            ],
            "properties": {
                "hardwareProfile": {
                    "vmSize": "[parameters('confidentialComputeVmSize')]"
                },
                "storageProfile": {
                    "imageReference": {
                        "publisher": "Canonical",
                        "offer": "UbuntuServer",
                        "sku": "18_04-lts-gen2",
                        "version": "latest"
                    },
                    "osDisk": {
                        "osType": "Linux",
                        "name": "[concat(parameters('virtualMachines_name'), '_OsDisk_1')]",
                        "createOption": "FromImage",
                        "caching": "ReadWrite",
                        "managedDisk": {
                            "storageAccountType": "Premium_LRS"
                        },
                        "diskSizeGB": 30
                    }
                },
                "osProfile": {
                    "computerName": "[parameters('virtualMachines_name')]",
                    "adminUsername": "[parameters('virtualMachines_adminUsername')]",
                    "adminPassword": "[parameters('virtualMachines_adminPassword')]",
                    "linuxConfiguration": {
                        "disablePasswordAuthentication": false
                    }
                },
                "networkProfile": {
                    "networkInterfaces": [
                        {
                            "id": "[resourceId('Microsoft.Network/networkInterfaces', parameters('networkInterface_name'))]"
                        }
                    ]
                }
            }
        },
        {
            "name": "[concat(parameters('virtualMachines_name'),'/', 'setupscript')]",
            "type": "Microsoft.Compute/virtualMachines/extensions",
            "location": "[parameters('confidentialComputeRegion')]",
            "apiVersion": "2019-03-01",
            "dependsOn": [
                "[concat('Microsoft.Compute/virtualMachines/', concat(parameters('virtualMachines_name')))]"
            ],
            "properties": {
                "publisher": "Microsoft.Azure.Extensions",
                "type": "CustomScript",
                "typeHandlerVersion": "2.1",
                "autoUpgradeMinorVersion": true,
                "settings": {
                    "skipDos2Unix": false,
                    "timestamp": 1
                },
                "protectedSettings": {
                    "fileUris": [ "https://raw.githubusercontent.com/ThomVanL/blog-acc-openenclave-sample/master/azure/setup.sh" ],
                    "commandToExecute": "sh setup.sh",
                    "managedIdentity": {}
                }
            }
        },
        {
            "type": "Microsoft.Network/networkInterfaces",
            "apiVersion": "2020-04-01",
            "name": "[parameters('networkInterface_name')]",
            "location": "[parameters('confidentialComputeRegion')]",
            "dependsOn": [
                "[resourceId('Microsoft.Network/publicIPAddresses', parameters('publicIPAddress_ip_name'))]",
                "[resourceId('Microsoft.Network/virtualNetworks/subnets', parameters('virtualNetwork_name'), 'default')]",
                "[resourceId('Microsoft.Network/networkSecurityGroups', parameters('networkSecurityGroup_name'))]"
            ],
            "properties": {
                "ipConfigurations": [
                    {
                        "name": "ipconfig1",
                        "properties": {
                            "privateIPAllocationMethod": "Dynamic",
                            "publicIPAddress": {
                                "id": "[resourceId('Microsoft.Network/publicIPAddresses', parameters('publicIPAddress_ip_name'))]"
                            },
                            "subnet": {
                                "id": "[resourceId('Microsoft.Network/virtualNetworks/subnets', parameters('virtualNetwork_name'), 'default')]"
                            },
                            "primary": true
                        }
                    }
                ],
                "networkSecurityGroup": {
                    "id": "[resourceId('Microsoft.Network/networkSecurityGroups', parameters('networkSecurityGroup_name'))]"
                }
            }
        }
    ],
    "outputs": {
        "sshCommand": {
            "type": "string",
            "value": "[concat('ssh ', parameters('virtualMachines_adminUsername'),'@',reference(parameters('publicIPAddress_ip_name')).ipAddress)]"
        },
        "publicIp": {
            "type": "string",
            "value": "[reference(parameters('publicIPAddress_ip_name')).ipAddress]"
        }
    }
}
Installing Open Enclave on Linux
💡 Update April 26, 2021: The following steps are part of the “setup.sh” script, which will be pulled from GitHub by the Azure Linux Custom Script Extension during the deployment of the Intel SGX VM.
To install Open Enclave on Ubuntu 18.04 we will need to carefully follow the instructions that were provided by the Open Enclave team. We will start by configuring the Intel and Microsoft APT Repositories. If you wish to connect to the SGX VM via the Azure Cloud Shell’s SSH functionality, you will need to add its IP to the NSG SSH rule.
echo "APT Repositories: configuring.."
echo 'deb [arch=amd64] https://download.01.org/intel-sgx/sgx_repo/ubuntu bionic main' | sudo tee /etc/apt/sources.list.d/intel-sgx.list
wget -qO - https://download.01.org/intel-sgx/sgx_repo/ubuntu/intel-sgx-deb.key | sudo apt-key add - > /dev/null 2>&1

echo "deb http://apt.llvm.org/bionic/ llvm-toolchain-bionic-7 main" | sudo tee /etc/apt/sources.list.d/llvm-toolchain-bionic-7.list
wget -qO - https://apt.llvm.org/llvm-snapshot.gpg.key | sudo apt-key add - > /dev/null 2>&1

echo "deb [arch=amd64] https://packages.microsoft.com/ubuntu/18.04/prod bionic main" | sudo tee /etc/apt/sources.list.d/msprod.list
wget -qO - https://packages.microsoft.com/keys/microsoft.asc | sudo apt-key add - > /dev/null 2>&1

apt-get update -qq >/dev/null
echo "APT Repositories: configured!"
Remember that Azure attestation service that allows for remote attestation? To be able to talk to it, we need to install the Intel SGX DCAP driver, though some versions of Ubuntu come with the SGX driver pre-installed.
if [ -z '$(dmesg | grep -i intel_sgx)' ]; then
    echo "SGX driver: installing.."
    apt-get -qq -y install dkms >/dev/null

    # List of other SGX drivers versions: https://01.org/intel-software-guard-extensions/downloads
    wget https://download.01.org/intel-sgx/sgx-dcap/1.4/linux/distro/ubuntuServer18.04/sgx_linux_x64_driver_1.21.bin -O sgx_linux_x64_driver.bin
    chmod +x sgx_linux_x64_driver.bin
    ./sgx_linux_x64_driver.bin
    echo "SGX driver: installed!"
else
    echo "SGX driver: already installed!"
fi
All we need to do now is install the Open Enclave packages and dependencies, as this blog post was written to use “open-enclave=0.9.0”, we will also need “az-dcap-client=1.4”.
echo "OpenEnclave 0.9.0 (24 april 2020) and dependencies: installing.."
apt-get -qq -y install clang-7 libssl-dev gdb libsgx-enclave-common libsgx-enclave-common-dev libprotobuf10 libsgx-dcap-ql libsgx-dcap-ql-dev az-dcap-client=1.4 open-enclave=0.9.0 >/dev/null
echo "OpenEnclave 0.9.0 (24 april 2020) and dependencies: installed!"
Open Enclave, v0.9.0 at the time of writing, requires CMake version 3.12 or higher so I installed it like so:
wget https://github.com/Kitware/CMake/releases/download/v3.17.2/cmake-3.17.2-Linux-x86_64.sh
chmod u+x cmake-3.17.2-Linux-x86_64.sh
sudo mkdir /opt/cmake
sudo sh cmake-3.17.2-Linux-x86_64.sh --prefix=/opt/cmake --skip-license

sudo ln -s /opt/cmake/bin/ccmake /usr/local/bin/ccmake
sudo ln -s /opt/cmake/bin/cmake /usr/local/bin/cmake
sudo ln -s /opt/cmake/bin/cpack /usr/local/bin/cpack
sudo ln -s /opt/cmake/bin/ctest /usr/local/bin/ctest
VS Code setup
Visual Studio Code has quite a few wonderful extensions, one of them will allow us to use our SGX machine’s capabilities as if we were using it as a local dev box! Open up your extensions in VS Code, search for “ms-vscode-remote.vscode-remote-extensionpack” and go ahead and install it.
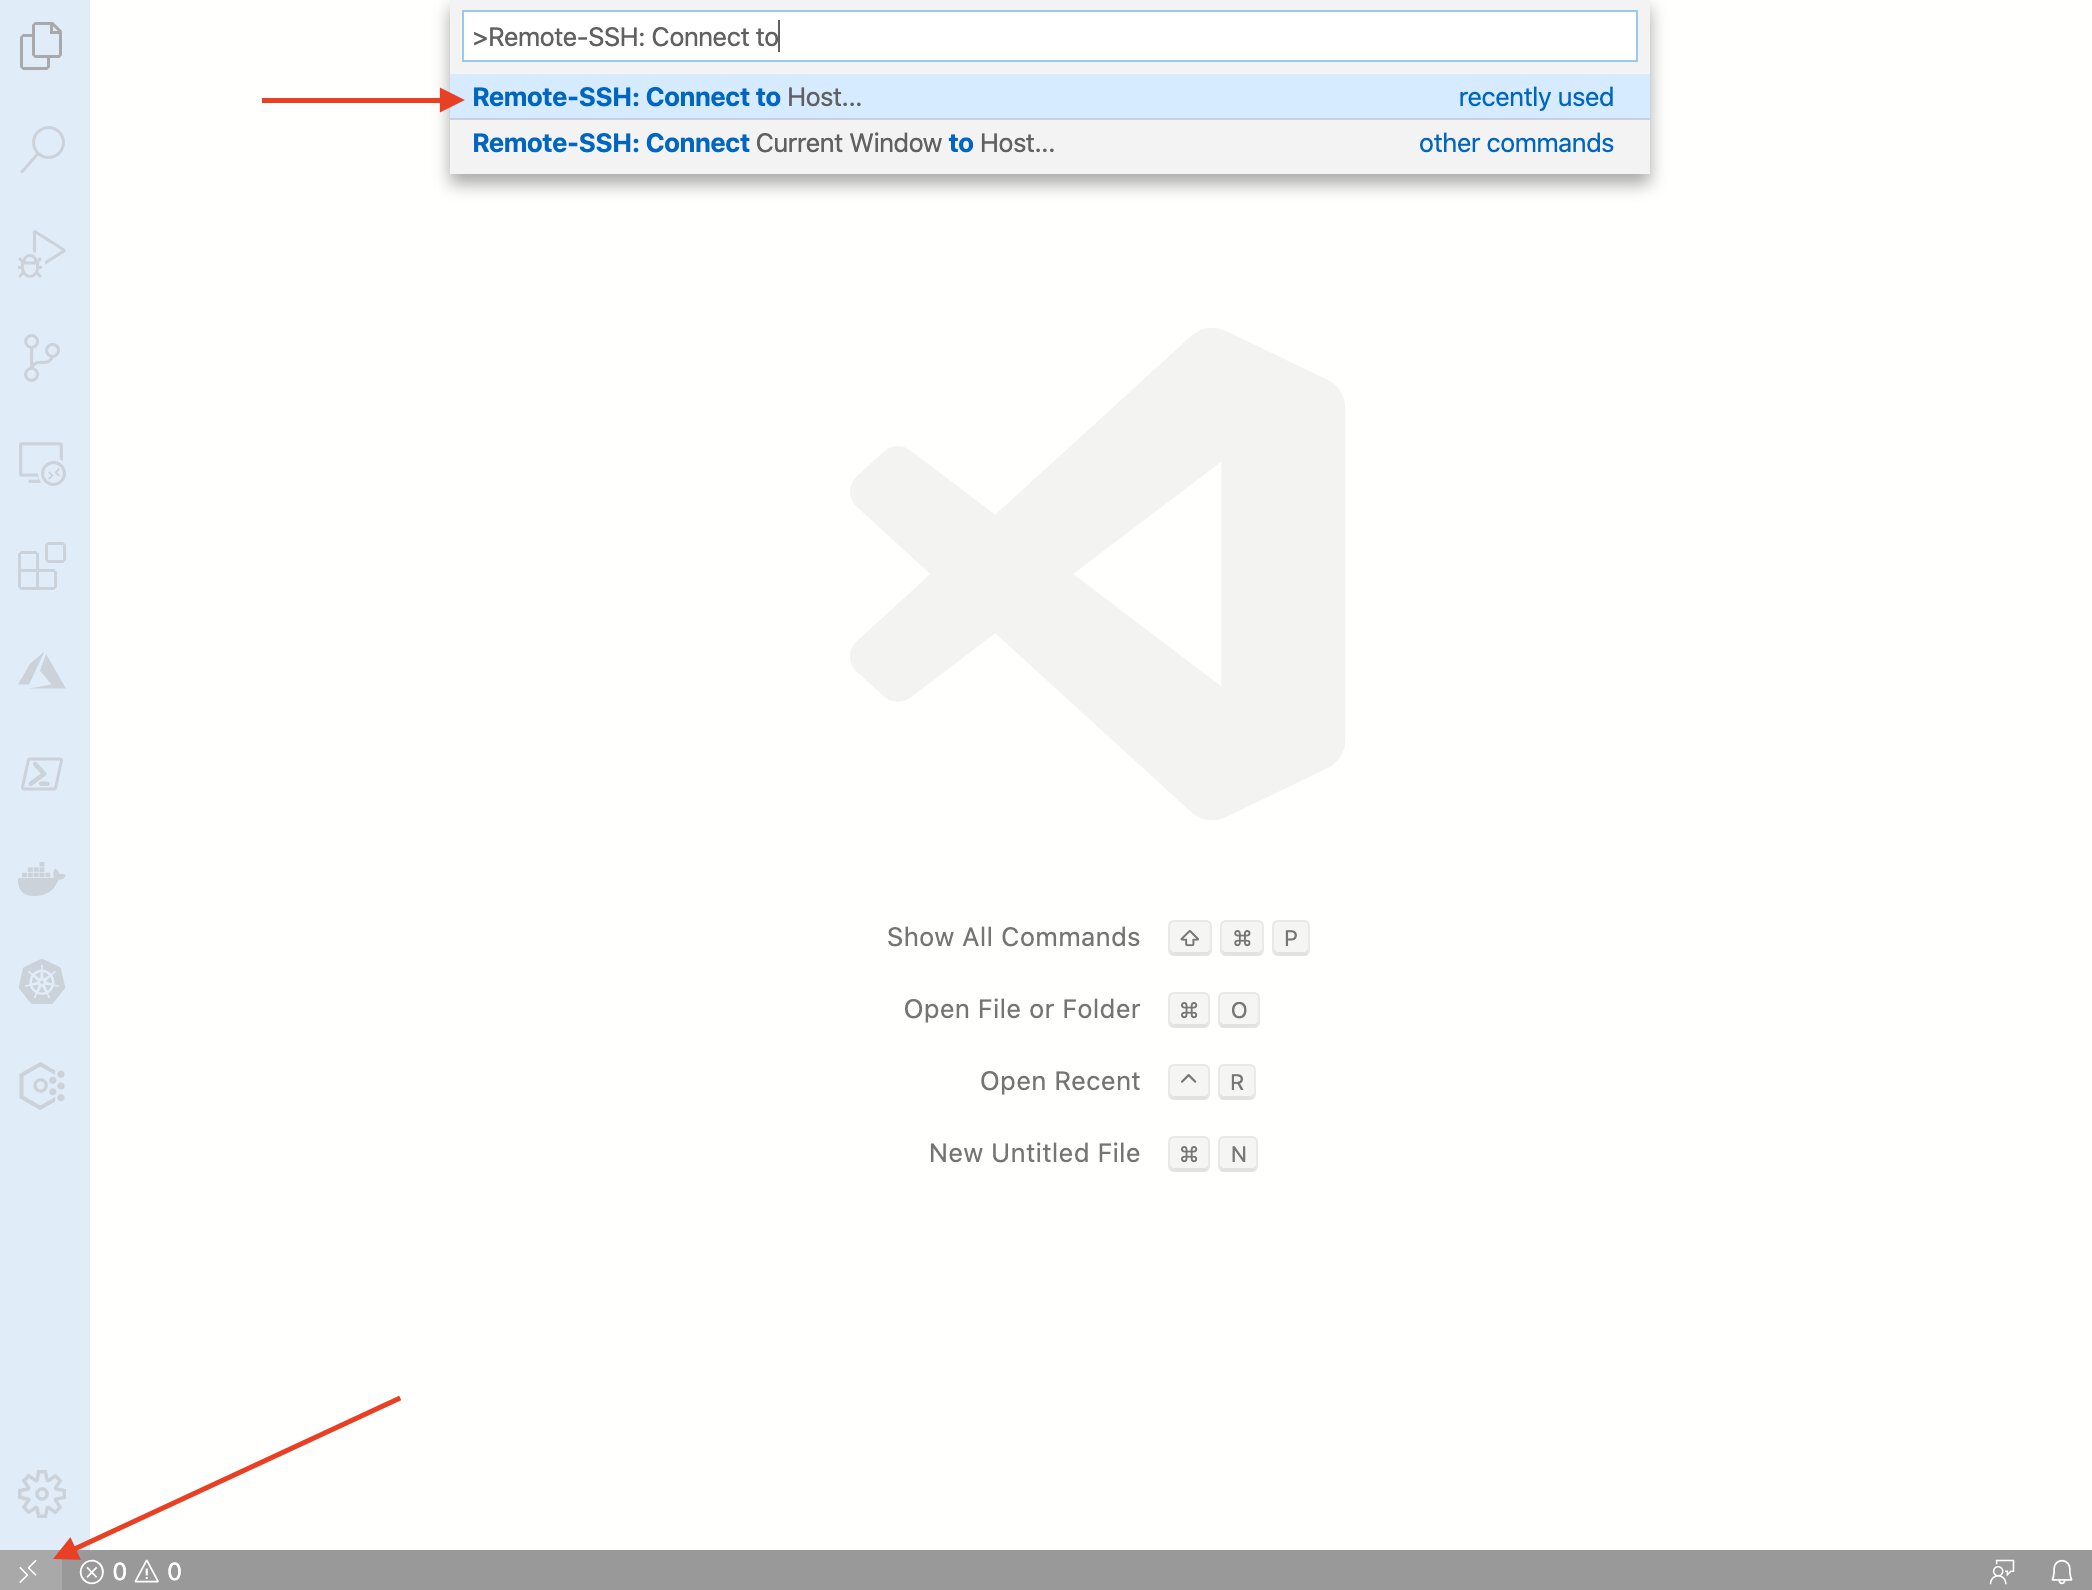
Once installed you can connect to your SGX virtual machine by opening the command palette (ctrl/⌘-shift-P), typing “Remote-SSH: Connect to Host” and selecting “+ Add new host”. You will be prompted to enter the SSH command, which you can retrieve from your Azure deployment output via the Azure Portal, it should be along the lines of “ssh <username>@<public_ip>”. Once you have gotten confirmation that the host has been added, run “Remote-SSH: Connect to Host” once more and select the public IP from the list. A new VS Code window will pop up and ask you for your password. You should now be connected to your SGX VM.
We will still have to go through some additional ceremony to get everything working nicely. Our remote environment currently does not have the required VS Code extensions installed, more specifically we need to install the following extensions:
- ms-vscode.PowerShell
- ms-vscode.cpptools
- ms-vscode.cmake-tools
There is also an Open Enclave extension for VS Code (ms-iot.msiot-vscode-openenclave) which is currently sitting at version 1.0.10 in the Visual Studio marketplace and has no support for Intel SGX on Linux. Upon inspecting the Open Enclave Github repo’s master branch, I noticed that the VS code extension was marked as version 2.0 and supports Intel SGX on Linux. However, unless I’m mistaken I cannot seem to get version 2.0 from the VS marketplace and thus I opted to look at the extension’s source code and “manually add support”.
I figured that even if I overlooked something in regards to the V2 extension, I’d get a more solid understanding of what it takes to set up a new Open Enclave project.
Enclave Definition Language
When building an enclave you define the interface to the enclave in an Enclave Definition Language file. The EDL specifies which functions are enclave calls (ECALLs), the functions that enter the enclave and which ones are outside calls(OCALLs), the calls to untrusted functions from within the enclave.
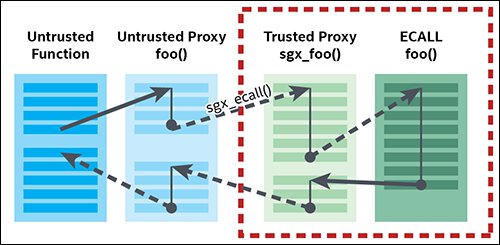
An app does not call the ECALL and OCALL functions directly, it calls the proxy code. When you make an ECALL, you call the untrusted proxy function for the ECALL, which in turn calls the trusted proxy function inside the enclave. When making an OCALL you call the trusted proxy function for the OCALL, which calls an untrusted proxy function outside the enclave that invokes the actual OCALL. When parameters are passed to enclave functions, they are marshalled into the protected memory space of the enclave.
Open Enclave comes with its own tool to generate proxy/marshalling code, based off of Intel’s SGX SDK Eder8r, which can be used to call between the trusted and untrusted parts of your app. Marshalling parameters from the host to the enclave is done for security purposes, this aims to mitigate certain processor vulnerabilities.
The basic format of an EDL file, a C-like containing function prototypes that resemble C function prototypes:
enclave {
    trusted {
        /*
        Format:
        public return_type enclave_method_1([parameter_constraints] parameter_type parameter_name);

        Example:  */
        public oe_result_t enclave_hello([in, string] char *this_is_a_string);
    };

    untrusted {
        /*
        Format:
        return_type host_method_1([parameter_constraints] parameter_type parameter_name
            );

        Example:  */
        oe_result_t host_hello([in, string] char *this_is_a_string);
    };
};
For parameters passed as values, no special action is required as the values are placed on the protected stack in the enclave just as they would be for any other function call. The situation is quite different for pointers, however. For parameters passed as pointers, the data referenced by the pointer must be marshalled into and out of the enclave. The proxy code needs to know two things:
- Which direction should the data be copied: into the proxy function, out of the proxy function, or both directions?
- What is the size of the data buffer referenced by the pointer?
| Direction | ECALL | OCALL |
|---|---|---|
| in | The buffer is copied from the application into the enclave. Changes will only affect the buffer inside the enclave. | The buffer is copied from the enclave to the application. Changes will only affect the buffer outside the enclave. |
| out | A buffer will be allocated inside the enclave and initialized with zeros. It will be copied to the original buffer when the ECALL exits. | A buffer will be allocated outside the enclave and initialized with zeros. This untrusted buffer will be copied to the original buffer in the enclave when the OCALL exits. |
| in, out | Data is copied back and forth. | Data is copied back and forth. |
| user_check | The pointer is not checked. The raw address is passed. | The pointer is not checked. The raw address is passed. |
Building the app
Via VS Code, while connected to the SGX VM, create a new folder and set it to as your current workspace.
Inside of our workspace, we will need several items.
| Item | Type | Description |
|---|---|---|
| CMakeLists.txt | File | Contains a set of directives and instructions describing the project’s source files and targets. |
| SecretCalc.edl | File | Contains the functions through which you will perform ECALLs and OCALLs. |
| .vscode | Directory | Contains the workspace settings. |
| .vscode/launch.json | File | Contains the launch settings. |
| .vscode/tasks.json | File | Contains the tasks settings. |
| bld | Directory | Contains your build outputs, depends on the target architecture. |
| bld/sgx | Directory | Contains your Intel SGX build files. |
| cmake | Directory | Contains files related to CMake. |
| cmake/add-enclave.cmake | File | Contains a set of directives and instructions describing the project’s source files and targets. |
| enc | Directory | Contains code, configs, etc.. related to the enclave. |
| enc/CMakeLists.txt | File | Contains a set of directives and instructions describing the project’s source files and targets. |
| enc/enc.c | File | Code |
| enc/SecretCalc_enclave.conf | File | File which defines enclave settings. |
| host | Directory | Contains code, EDLs, etc.. to be used inside of the enclave. |
| host/host.c | File | Code |
| host/host.h | File | Code |
| host/main.c | File | Code |
| host/CMakeLists.txt | File | Contains a set of directives and instructions describing the project’s source files and targets. |
In the root of the directory, we will use the following ELD to map our ECALLs and OCALLs.
SecretCalc.edl
enclave {
    trusted {
        public int ecall_calc_sum(int numberA, int numberB);
    };

    untrusted {
        int ocall_log([in, string] char *msg);
    };
};
You can generate the proxy code by issuing the following commands in the terminal:
/opt/openenclave/bin/oeedger8r SecretCalc.edl --trusted --trusted-dir enc
/opt/openenclave/bin/oeedger8r SecretCalc.edl --untrusted --untrusted-dir host
You should end up with some additional files in both the enc and host directory.
| host/SecretCalc_args.h | Defines the parameters that are passed to all functions defined in the edl file |
| host/SecretCalc_u.c | Contains the ecall_calc_sum(int numberA, int numberB) function with the marshaling code to call into the enclave version of the ecall_calc_sum(int numberA, int numberB) function |
| host/SecretCalc_u.h | Function prototype for ecall_calc_sum(int numberA, int numberB) function |
| enc/SecretCalc_args.h | Defines the parameters that are passed to all functions defined in the edl file |
| enc/SecretCalc_t.c | Contains the ocall_log() function with the marshaling code to call into the host version of the ocall_log() function |
| enc/SecretCalc_t.h | function prototype for ocall_log() function |
Enclave code
We have to implement the trusted methods that we defined in our EDL, in our case this is a single method named ecall_calc_sum. We will create a new file called ’enc.c’ and implement the trusted method.
An enclave library will be loaded into and run inside a host application, which is a user-mode process. To minimize possible attack vectors, one of the rules of writing enclave apps is to keep the trusted computing base small. Because of this, an enclave is restricted to use only a subset of APIs that devs may be familiar with, such as libc and libcxx. The untrusted/host part of an application can have access to the full range of libraries and APIs, as any other app in user mode would have.
Since I used fprintf, snprintf, malloc and free we need to verify that Open Enclave supports these calls. Looking at the libc support doc and the pluggable allocators design docs on Github, I assumed that these calls are all supported.
enc\enc.c
#include <stdio.h>
#include <malloc.h>
#include "SecretCalc_t.h"

int ecall_calc_sum(
    int numberA,
    int numberB)
{
    unsigned int enclave_msg_size = 512;
    char *enclaveMessage = (char *)malloc(enclave_msg_size * sizeof(char));
    int numberC = numberA + numberB;

    if (snprintf(
            enclaveMessage,
            enclave_msg_size,
            "{ \"sum\": %d }",
            numberC) < 0)
    {
        fprintf(stderr, "calculating sum failed\n");
        return 1;
    }

    int retval = 0;
    oe_result_t result = ocall_log(&retval, enclaveMessage);

    free(enclaveMessage);
    if (result != OE_OK)
    {
        fprintf(
            stderr,
            "Call to ecall_calc_sum failed: result=%u (%s)\n",
            result,
            oe_result_str(result));
        return 1;
    }

    return retval;
}

#define TA_UUID                                            \
    { /* 62da2184-18bb-4b45-a3f7-ea69e96b1603 */           \
        0x62da2184, 0x18bb, 0x4b45,                        \
        {                                                  \
            0xa3, 0xf7, 0xea, 0x69, 0xe9, 0x6b, 0x16, 0x03 \
        }                                                  \
    }

OE_SET_ENCLAVE_OPTEE(
    TA_UUID,
    1 * 1024 * 1024,
    12 * 1024,
    0,
    "1.0.0",
    "SecretCalc")
If you want to be able to build and sign OP-TEE enclaves you will need to include your very own TA_UUID constant. I generated mine from a PowerShell script, based off what the VS Code extension does.
function Set-UuidPart($uuid, $start, $end) {
    $uuidPart = ""
    for ($i = $start; $i -lt $end; $i++) {
        $uuidPart += $uuid[$i]
    }
    return "0x" + $uuidPart
}

$uuid = (new-guid).ToString()

$TA_UUID = @"
    { /* [[generated-uuid]] */                          \
        [[generated-uuid-part-1]], [[generated-uuid-part-2]], [[generated-uuid-part-3]],    \
        {                                               \
            [[generated-uuid-part-4-a]], [[generated-uuid-part-4-b]], [[generated-uuid-part-5-a]], [[generated-uuid-part-5-b]], [[generated-uuid-part-5-c]], [[generated-uuid-part-5-d]], [[generated-uuid-part-5-e]], [[generated-uuid-part-5-f]] \
        }                                               \
    }
"@

$TA_UUID = $TA_UUID.Replace("[[generated-uuid]]", $uuid)
$TA_UUID = $TA_UUID.Replace("[[generated-uuid-part-1]]", (Set-UuidPart -uuid $uuid -start 0 -end 8))
$TA_UUID = $TA_UUID.Replace("[[generated-uuid-part-2]]", (Set-UuidPart -uuid $uuid -start 9 -end 13))
$TA_UUID = $TA_UUID.Replace("[[generated-uuid-part-3]]", (Set-UuidPart -uuid $uuid -start 14 -end  18))
$TA_UUID = $TA_UUID.Replace("[[generated-uuid-part-4-a]]", (Set-UuidPart -uuid $uuid -start 19 -end  21))
$TA_UUID = $TA_UUID.Replace("[[generated-uuid-part-4-b]]", (Set-UuidPart -uuid $uuid -start 21 -end  23))
$TA_UUID = $TA_UUID.Replace("[[generated-uuid-part-5-a]]", (Set-UuidPart -uuid $uuid -start 24 -end  26))
$TA_UUID = $TA_UUID.Replace("[[generated-uuid-part-5-b]]", (Set-UuidPart -uuid $uuid -start 26 -end  28))
$TA_UUID = $TA_UUID.Replace("[[generated-uuid-part-5-c]]", (Set-UuidPart -uuid $uuid -start 28 -end  30))
$TA_UUID = $TA_UUID.Replace("[[generated-uuid-part-5-d]]", (Set-UuidPart -uuid $uuid -start 30 -end  32))
$TA_UUID = $TA_UUID.Replace("[[generated-uuid-part-5-e]]", (Set-UuidPart -uuid $uuid -start 32 -end  34))
$TA_UUID = $TA_UUID.Replace("[[generated-uuid-part-5-f]]", (Set-UuidPart -uuid $uuid -start 34 -end  36))

Write-Host $TA_UUID
$TA_UUID | Set-Clipboard
According to the OpenEnclave docs, the enclave config file is a file that, unsurprisingly, defines enclave settings. The following settings must be present in order for the enclave to load:
- Debug: Is the enclave allowed to load in debug mode?
- NumHeapPages: The number of pages to allocate for the enclave to use as heap memory.
- NumStackPages: The number of stack pages to allocate for each thread in the enclave.
- NumTCS: The number of thread control structures to allocate in the enclave. This determines the maximum number of concurrent threads that can be executing in the enclave.
- ProductID: The product identity for the developer to distinguish between different enclaves signed with the same MRSIGNER value.
- SecurityVersion: The security version number for the enclave, which can be used to prevent rollback attacks against sealing keys. This value should be incremented whenever a security fix is made to the enclave code.
enc/SecretCalc_enclave.conf
# Copyright (c) Open Enclave SDK contributors.
# Licensed under the MIT License.

# Enclave settings:
Debug=1
NumHeapPages=1024
NumStackPages=1024
NumTCS=1
ProductID=1
SecurityVersion=1
Host code
The host part of your app is responsible for managing the lifetime of the enclave and invoking its methods. You should try to avoid handling unencrypted secrets that are intended to be used within enclaves.
With my example I will be throwing caution to the wind, but you can imagine that you might want to get some sort of encrypted version of numberA and numberB from a specific source and decrypt them within the enclave to perform the addition.
host\host.c
#include <stdio.h>
#include <openenclave/host.h>

// Include the untrusted SecretCalc header that is generated
// during the build. This file is generated by calling the
// SDK's oeedger8r tool against the SecretCalc.edl file.
#include "SecretCalc_u.h"

static oe_enclave_t *g_enclave = NULL;

bool check_simulate_opt(int *argc, const char *argv[])
{
    for (int i = 0; i < *argc; i++)
    {
        if (strcmp(argv[i], "--simulate") == 0)
        {
            fprintf(stdout, "Running in simulation mode\n");
            memmove(&argv[i], &argv[i + 1], (*argc - i) * sizeof(char *));
            (*argc)--;

            return true;
        }
    }
    return false;
}

bool check_debug_opt(int *argc, const char *argv[])
{
    for (int i = 0; i < *argc; i++)
    {
        if (strcmp(argv[i], "--debug") == 0)
        {
            fprintf(stdout, "Running in debug mode\n");
            memmove(&argv[i], &argv[i + 1], (*argc - i) * sizeof(char *));
            (*argc)--;
            return true;
        }
    }
    return false;
}

// This is the function that the enclave will call back into to print a message.
int ocall_log(char *msg)
{
    if (fprintf(stdout, "Enclave called into host to print: %s\n", msg) < 0)
    {
        return 1;
    }
    return 0;
}

int create_enclave(int argc, const char *argv[])
{
    oe_result_t result = OE_OK;
    uint32_t flags = 0;

    if (check_debug_opt(&argc, argv))
    {
        flags |= OE_ENCLAVE_FLAG_DEBUG;
    }

    if (check_simulate_opt(&argc, argv))
    {
        flags |= OE_ENCLAVE_FLAG_SIMULATE;
    }

    // Create the enclave.
    result = oe_create_SecretCalc_enclave(
        argv[1], OE_ENCLAVE_TYPE_AUTO, flags, NULL, 0, &g_enclave);
    if (result != OE_OK)
    {
        fprintf(
            stderr,
            "oe_create_enclave(): result=%u (%s)\n",
            result,
            oe_result_str(result));

        return 1;
    }
    return 0;
}

int call_enclave_calc_sum(
    int numberA,
    int numberB)
{
    oe_result_t result = OE_OK;
    int hostResult;
    // Call into the enclave.
    result = ecall_calc_sum(g_enclave,
        &hostResult,
        numberA,
        numberB);
    if (result != OE_OK)
    {
        fprintf(stderr,
            "calling into ecall_calc_sum failed: result=%u (%s)\n",
            result,
            oe_result_str(result));
        return 1;
    }
    else if (hostResult != 0)
    {
        fprintf(stderr, "ecall_calc_sum failed: result=%u\n", hostResult);
        return 1;
    }
    return 0;
}

int terminate_enclave()
{
    oe_result_t result;
    // Clean up the enclave if we created one.
    if (g_enclave)
    {
        result = oe_terminate_enclave(g_enclave);
        if (result != OE_OK)
        {
            fprintf(
                stderr,
                "calling into oe_terminate_enclave failed: result=%u (%s)\n",
                result,
                oe_result_str(result));
            return 1;
        }
    }
    return 0;
}
I almost forgot to mention the accompanying header file.
host\host.h:
int create_enclave(int argc, const char *argv[]);
int terminate_enclave();
int call_enclave_calc_sum(int numberA, int numberB);
And the main.c we will ensure that we have an entrypoint:
host\main.c:
#include <errno.h>
#include <stdio.h>
#include <stdlib.h>

#include "host.h"

int main(int argc, const char *argv[])
{
    int result = create_enclave(argc, argv);
    if (result != 0)
    {
        fprintf(stderr, "Failed to create enclave with result = %i.\n", result);
        return result;
    }

    result = call_enclave_calc_sum(123, 456);
    if (result != 0)
    {
        fprintf(stderr, "Failed to call enclave with result = %i.\n", result);
        terminate_enclave();
        return result;
    }

    result = terminate_enclave();
    if (result != 0)
    {
        fprintf(
            stderr, "Failed to terminate enclave with result = %i.\n", result);
    }

    return result;
}
CMAKE configuration
We will need a few CMakeLists files to configure our build system. Open Enclave currently supports Intel SGX and ARM OP-TEE as platform targets. The following build definition reflects that:
CMakeLists.txt
# Copyright (c) Open Enclave SDK contributors.
# Licensed under the MIT License.

cmake_minimum_required(VERSION 3.12 FATAL_ERROR)

project(
  "SecretCalc"
  VERSION 1.0
  LANGUAGES C CXX)


  set(OE_TEE
  ""
  CACHE STRING "Select a Trusted Execution Environment (TEE) implementation.")
  set_property(CACHE OE_TEE PROPERTY STRINGS "SGX" "OP-TEE")

  set(OE_OPTEE_PLATFORM CACHE STRING "Select the target OP-TEE platform")
  set_property(CACHE OE_OPTEE_PLATFORM PROPERTY STRINGS "Grapeboard" "QEMU-ARMv8")

if ("${OE_TEE}" STREQUAL "SGX")
  set(OE_SGX ON)
  set(OE_OPTEE OFF)
elseif ("${OE_TEE}" STREQUAL "OP-TEE")
  set(OE_SGX OFF)
  set(OE_OPTEE ON)
else ()
  message(FATAL_ERROR "OE_TEE must be one of 'SGX' or 'OP-TEE'.")
endif ()

if (OE_OPTEE)
  if ("${OE_OPTEE_PLATFORM}" STREQUAL "QEMU-ARMv8")
    set(OE_OPTEE_QEMU_ARMV8 ON)
    set(OE_OPTEE_GRAPEBOARD OFF)
  elseif ("${OE_OPTEE_PLATFORM}" STREQUAL "Grapeboard")
    set(OE_OPTEE_QEMU_ARMV8 OFF)
    set(OE_OPTEE_GRAPEBOARD ON)
  else ()
    message(
      FATAL_ERROR
        "OE_OPTEE_PLATFORM must be one of 'QEMU-ARMv8' or 'Grapeboard'.")
  endif ()
endif ()

if (OE_OPTEE)
  set(OE_PACKAGE_PREFIX ${CMAKE_SOURCE_DIR}/devkit/sdk/optee)

  if (OE_OPTEE_QEMU_ARMV8)
    set(OE_PACKAGE_OPTEE_PLATFORM vexpress-qemu_armv8a)
  elseif (OE_OPTEE_GRAPEBOARD)
    set(OE_PACKAGE_OPTEE_PLATFORM ls-ls1012grapeboard)
  endif ()

  set(OpenEnclave_DIR
      ${OE_PACKAGE_PREFIX}/${OE_PACKAGE_OPTEE_PLATFORM}/lib/openenclave/cmake)
endif ()

string(TOUPPER ${CMAKE_BUILD_TYPE} OE_BUILD_TYPE)
if ("${OE_BUILD_TYPE}" STREQUAL "DEBUG")
  set(OE_DEBUG ON)
else ()
  set(OE_DEBUG OFF)
endif ()

find_package(OpenEnclave CONFIG REQUIRED)

list(APPEND CMAKE_MODULE_PATH "cmake")

set(CMAKE_CXX_STANDARD 11)

set(CMAKE_RUNTIME_OUTPUT_DIRECTORY ${CMAKE_BINARY_DIR}/out/bin)
set(CMAKE_LIBRARY_OUTPUT_DIRECTORY ${CMAKE_BINARY_DIR}/out/bin)
set(CMAKE_ARCHIVE_OUTPUT_DIRECTORY ${CMAKE_BINARY_DIR}/out/lib)

add_subdirectory(enc)
add_subdirectory(host)
At the very bottom of the previous CMakeLists.txt file, you can see that we will add two additional directories to the build. The following two CMakeLists.txt files in those two directories (enc and host) will be processed immediately by CMake before processing the previous CMakeLists.txt file ends.
With the following CMakeLists.txt file we will once again generate the proxy code that goes into the enclave part of the application.
enc\CMakeLists.txt
# Copyright (c) Open Enclave SDK contributors.
# Licensed under the MIT License.

include(../cmake/add-enclave.cmake)

add_custom_command(
  OUTPUT
    SecretCalc_t.h
    SecretCalc_t.c
    SecretCalc_args.h
  DEPENDS ${CMAKE_SOURCE_DIR}/SecretCalc.edl
  COMMAND openenclave::oeedger8r --trusted ${CMAKE_SOURCE_DIR}/SecretCalc.edl)

add_enclave(
  TARGET SecretCalc_enclave
  UUID 62da2184-18bb-4b45-a3f7-ea69e96b1603
  SOURCES
    enc.c
    ${CMAKE_CURRENT_BINARY_DIR}/SecretCalc_t.c)
Once the proxy code has been generated, the add_enclave macro will determine whether you’re building for SGX or OP-TEE so your build system can run the appropriate signing tools.
cmake\add-enclave.cmake
# Copyright (c) Open Enclave SDK contributors.
# Licensed under the MIT License.

macro(add_enclave)
  set(options CXX)
  set(oneValueArgs TARGET UUID CONFIG KEY)
  set(multiValueArgs SOURCES)
  cmake_parse_arguments(ENCLAVE
    "${options}"
    "${oneValueArgs}"
    "${multiValueArgs}"
    ${ARGN})

  if(OE_SGX)
    add_enclave_sgx(
      CXX ${ENCLAVE_CXX}
      TARGET ${ENCLAVE_TARGET}
      CONFIG ${ENCLAVE_CONFIG}
      KEY ${ENCLAVE_KEY}
      SOURCES ${ENCLAVE_SOURCES})
  elseif(OE_OPTEE)
    add_enclave_optee(
      CXX ${ENCLAVE_CXX}
      TARGET ${ENCLAVE_TARGET}
      UUID ${ENCLAVE_UUID}
      KEY ${ENCLAVE_KEY}
      SOURCES ${ENCLAVE_SOURCES})
  endif()
endmacro()

function(add_enclave_sgx)
  set(options CXX)
  set(oneValueArgs TARGET CONFIG KEY)
  set(multiValueArgs SOURCES)
  cmake_parse_arguments(ENCLAVE
    "${options}"
    "${oneValueArgs}"
    "${multiValueArgs}"
    ${ARGN})

  if(WIN32)
    maybe_build_using_clangw(enclave)
  endif()

  add_executable(${ENCLAVE_TARGET} ${ENCLAVE_SOURCES})
  target_compile_definitions(${ENCLAVE_TARGET} PUBLIC OE_API_VERSION=2)
  target_include_directories(${ENCLAVE_TARGET} PRIVATE ${CMAKE_CURRENT_BINARY_DIR})
  target_link_libraries(${ENCLAVE_TARGET} openenclave::oeenclave openenclave::oelibc)

  add_custom_command(OUTPUT ${ENCLAVE_TARGET}-private.pem ${ENCLAVE_TARGET}-public.pem
    COMMAND openssl genrsa -out ${ENCLAVE_TARGET}-private.pem -3 3072
    COMMAND openssl rsa -in ${ENCLAVE_TARGET}-private.pem -pubout -out ${ENCLAVE_TARGET}-public.pem)

  add_custom_command(OUTPUT ${ENCLAVE_TARGET}.signed
    DEPENDS ${ENCLAVE_TARGET} ${ENCLAVE_TARGET}.conf ${ENCLAVE_TARGET}-private.pem
    COMMAND openenclave::oesign sign -e $<TARGET_FILE:${ENCLAVE_TARGET}> -c ${CMAKE_CURRENT_SOURCE_DIR}/${ENCLAVE_TARGET}.conf -k ${ENCLAVE_TARGET}-private.pem)

  add_custom_target(sign ALL DEPENDS ${ENCLAVE_TARGET}.signed)
endfunction()

macro(add_enclave_optee)
   set(options CXX)
   set(oneValueArgs TARGET UUID KEY)
   set(multiValueArgs SOURCES)
   cmake_parse_arguments(ENCLAVE
     "${options}"
     "${oneValueArgs}"
     "${multiValueArgs}"
     ${ARGN})

  # Set up the linker flags exactly as we need them such that the resulting
  # binary be compatible with OP-TEE's loader.
  set(CMAKE_SHARED_LIBRARY_LINK_C_FLAGS)
  set(CMAKE_SHARED_LIBRARY_LINK_CXX_FLAGS)
  set(CMAKE_EXE_EXPORTS_C_FLAG)

  string(REPLACE "gcc" "ld" LINKER ${CMAKE_C_COMPILER})
  set(CMAKE_C_LINK_EXECUTABLE "${LINKER} <CMAKE_CXX_LINK_FLAGS> <LINK_FLAGS> <OBJECTS> <LINK_LIBRARIES> -lgcc -o <TARGET>")
  set(CMAKE_CXX_LINK_EXECUTABLE "${LINKER} <CMAKE_CXX_LINK_FLAGS> <LINK_FLAGS> <OBJECTS> <LINK_LIBRARIES> -lgcc -o <TARGET>")

  # Generate linker script from template.
  string(REPLACE "gcc" "cpp" C_PREPROCESSOR ${CMAKE_C_COMPILER})
  set(TA_LINKER_SCRIPT ${CMAKE_CURRENT_BINARY_DIR}/ta.ld)
  add_custom_target(${ENCLAVE_TARGET}.ld
    COMMAND
      ${C_PREPROCESSOR} -Wp,-P -DASM=1 -DARM64 -nostdinc ${OE_PACKAGE_PREFIX}/ta.ld.S > ${TA_LINKER_SCRIPT}
    SOURCES ${OE_PACKAGE_PREFIX}/ta.ld.S
    DEPENDS ${OE_PACKAGE_PREFIX}/ta.ld.S
    BYPRODUCTS ${TA_LINKER_SCRIPT})

  # Ask GCC where is libgcc.
  execute_process(
    COMMAND ${CMAKE_C_COMPILER}
      -print-libgcc-file-name
    OUTPUT_VARIABLE LIBGCC_PATH
    OUTPUT_STRIP_TRAILING_WHITESPACE)
  get_filename_component(LIBGCC_PATH ${LIBGCC_PATH} DIRECTORY)

  # Set up the target.
  add_executable(${ENCLAVE_TARGET} ${ENCLAVE_SOURCES})
  set_property(TARGET ${ENCLAVE_TARGET} PROPERTY C_STANDARD 99)
  set_target_properties(${ENCLAVE_TARGET} PROPERTIES OUTPUT_NAME ${ENCLAVE_UUID})
  set_target_properties(${ENCLAVE_TARGET} PROPERTIES SUFFIX ".elf")
  add_dependencies(${ENCLAVE_TARGET} ${ENCLAVE_TARGET}.ld)
  target_include_directories(${ENCLAVE_TARGET} PRIVATE ${CMAKE_CURRENT_BINARY_DIR})
  target_link_libraries(${ENCLAVE_TARGET} openenclave::oeenclave)
  if(ENCLAVE_CXX)
    target_link_libraries(${ENCLAVE_TARGET} openenclave::oelibcxx)
  endif()

  # Strip unneeded bits.
  string(REPLACE "gcc" "objcopy" OBJCOPY ${CMAKE_C_COMPILER})
  add_custom_target(${ENCLAVE_TARGET}.stripped.elf
    COMMAND
      ${OBJCOPY}
        --strip-unneeded $<TARGET_FILE:${ENCLAVE_TARGET}>
        $<TARGET_FILE_DIR:${ENCLAVE_TARGET}>/${ENCLAVE_UUID}.stripped.elf
    BYPRODUCTS $<TARGET_FILE_DIR:${ENCLAVE_TARGET}>/${ENCLAVE_UUID}.stripped.elf)
  add_dependencies(${ENCLAVE_TARGET}.stripped.elf ${ENCLAVE_TARGET})

  # Sign the TA with the given key, or with the default key if none was given.
  if(NOT ENCLAVE_KEY)
    set(ENCLAVE_KEY ${OE_PACKAGE_PREFIX}/default_ta.pem)
  endif()
  add_custom_target(${ENCLAVE_TARGET}.ta ALL
    COMMAND
      ${OE_PACKAGE_PREFIX}/sign.py
        --key ${ENCLAVE_KEY}
        --uuid ${ENCLAVE_UUID}
        --version 0
        --in $<TARGET_FILE_DIR:${ENCLAVE_TARGET}>/${ENCLAVE_UUID}.stripped.elf
        --out $<TARGET_FILE_DIR:${ENCLAVE_TARGET}>/${ENCLAVE_UUID}.ta
    BYPRODUCTS $<TARGET_FILE_DIR:${ENCLAVE_TARGET}>/${ENCLAVE_UUID}.ta)
  add_dependencies(${ENCLAVE_TARGET}.ta ${ENCLAVE_TARGET}.stripped.elf)

  # Set linker options.
  # NOTE: This has to be at the end, apparently:
  #       https://gitlab.kitware.com/cmake/cmake/issues/17210
  set(CMAKE_EXE_LINKER_FLAGS "-T ${TA_LINKER_SCRIPT} -L${LIBGCC_PATH} --entry=_start")
  if(ENCLAVE_CXX)
    set(CMAKE_EXE_LINKER_FLAGS "${CMAKE_EXE_LINKER_FLAGS} --eh-frame-hdr")
  endif()
endmacro()
And finally we have the commands for building our host app.
host\CMakeLists.txt
#Copyright (c) Open Enclave SDK contributors.
# Licensed under the MIT License.

add_custom_command(
  OUTPUT
    SecretCalc_u.h
    SecretCalc_u.c
    SecretCalc_args.h
  DEPENDS ${CMAKE_SOURCE_DIR}/SecretCalc.edl
  COMMAND openenclave::oeedger8r --untrusted ${CMAKE_SOURCE_DIR}/SecretCalc.edl)

add_executable(SecretCalc
    host.c
    main.c
    ${CMAKE_CURRENT_BINARY_DIR}/SecretCalc_u.c)

target_include_directories(SecretCalc PRIVATE ${CMAKE_CURRENT_BINARY_DIR})

target_link_libraries(SecretCalc openenclave::oehost)
Building and debugging
Let’s ensure we can build and debug our application, create a folder called “.vscode” and in it you will need to create two JSON files.
Launch.json will contain the two commands through which we can either launch our binary with Intel SGX simulation or hardware mode. I thought the latter would be more interesting since we deployed the specialized VM in the previous step.
launch.json
{
    "version": "0.2.0",
    "configurations": [
        {
            "name": "(oegdb) Launch Intel SGX (Hardware)",
            "type": "cppdbg",
            "request": "launch",
            "program": "${workspaceFolder}/bld/sgx/out/bin/SecretCalc",
            "args": [
                "${workspaceFolder}/bld/sgx/out/bin/SecretCalc_enclave.signed",
                "--debug"
            ],
            "stopAtEntry": false,
            "cwd": "${workspaceFolder}",
            "preLaunchTask": "Build for Intel SGX (x64)",
            "environment": [],
            "externalConsole": false,
            "MIMode": "gdb",
            "miDebuggerPath": "/opt/openenclave/bin/oegdb",
            "setupCommands": [
                {
                    "description": "Enable pretty-printing for gdb",
                    "text": "-enable-pretty-printing",
                    "ignoreFailures": true
                }
            ]
        },
        {
            "name": "(oegdb) Launch Intel SGX (Simulation)",
            "type": "cppdbg",
            "request": "launch",
            "program": "${workspaceFolder}/bld/sgx/out/bin/SecretCalc",
            "args": [
                "${workspaceFolder}/bld/sgx/out/bin/SecretCalc_enclave.signed",
                "--debug",
                "--simulate"
            ],
            "stopAtEntry": false,
            "cwd": "${workspaceFolder}",
            "preLaunchTask": "Build for Intel SGX (x64)",
            "environment": [],
            "externalConsole": false,
            "MIMode": "gdb",
            "miDebuggerPath": "/opt/openenclave/bin/oegdb",
            "setupCommands": [
                {
                    "description": "Enable pretty-printing for gdb",
                    "text": "-enable-pretty-printing",
                    "ignoreFailures": true
                }
            ]
        }
    ]
}
In tasks.json I added two commands that we need to build our binaries. You can always choose to run the “Build for Intel SGX (x64)” option since it will also run the “Configure for Intel SGX (x64)”.
tasks.json
{
    "version": "2.0.0",
    "tasks": [
        {
            "label": "Configure for Intel SGX (x64)",
            "type": "process",
            "command": "cmake",
            "options": {
                "cwd": "${workspaceFolder}/bld/sgx"
            },
            "args": [
                "-DOE_TEE=SGX",
                "-DCMAKE_BUILD_TYPE=Debug",
                "${workspaceFolder}"
            ],
            "problemMatcher": []
        },
        {
            "label": "Build for Intel SGX (x64)",
            "type": "process",
            "command": "make",
            "options": {
                "cwd": "${workspaceFolder}/bld/sgx"
            },
            "problemMatcher": [],
            "dependsOn": [
                "Configure for Intel SGX (x64)"
            ]
        }
    ]
}
Bring up the command palette (ctrl/⌘-shift-P), type “Tasks: Run task” and select “Build for Intel SGX (x64)”, this will generate the make files which in turn will give you a binary file.
> Executing task: cmake -DOE_TEE=SGX -DCMAKE_BUILD_TYPE=Debug /home/azureuser/dev/SecretCalc <

-- Looking for crypto library - found
-- Looking for dl library - found
-- Configuring done
-- Generating done
-- Build files have been written to: /home/azureuser/dev/SecretCalc/bld/sgx

Terminal will be reused by tasks, press any key to close it.

> Executing task: make  <

[ 36%] Built target SecretCalc_enclave
[ 45%] Generating SecretCalc_enclave.signed
Created /home/azureuser/dev/SecretCalc/bld/sgx/out/bin/SecretCalc_enclave.signed
[ 54%] Built target sign
[100%] Built target SecretCalc

Terminal will be reused by tasks, press any key to close it.

> Executing task: cmake -DOE_TEE=SGX -DCMAKE_BUILD_TYPE=Debug /home/azureuser/dev/SecretCalc <

-- The C compiler identification is GNU 7.5.0
-- The CXX compiler identification is GNU 7.5.0
-- Check for working C compiler: /usr/bin/cc
-- Check for working C compiler: /usr/bin/cc - works
-- Detecting C compiler ABI info
-- Detecting C compiler ABI info - done
-- Detecting C compile features
-- Detecting C compile features - done
-- Check for working CXX compiler: /usr/bin/c++
-- Check for working CXX compiler: /usr/bin/c++ - works
-- Detecting CXX compiler ABI info
-- Detecting CXX compiler ABI info - done
-- Detecting CXX compile features
-- Detecting CXX compile features - done
-- Looking for pthread.h
-- Looking for pthread.h - found
-- Performing Test CMAKE_HAVE_LIBC_PTHREAD
-- Performing Test CMAKE_HAVE_LIBC_PTHREAD - Failed
-- Looking for pthread_create in pthreads
-- Looking for pthread_create in pthreads - not found
-- Looking for pthread_create in pthread
-- Looking for pthread_create in pthread - found
-- Found Threads: TRUE
-- Looking for crypto library - found
-- Looking for dl library - found
-- Performing Test OE_SPECTRE_MITIGATION_C_FLAGS_SUPPORTED
-- Performing Test OE_SPECTRE_MITIGATION_C_FLAGS_SUPPORTED - Failed
-- Performing Test OE_SPECTRE_MITIGATION_CXX_FLAGS_SUPPORTED
-- Performing Test OE_SPECTRE_MITIGATION_CXX_FLAGS_SUPPORTED - Failed
-- Configuring done
-- Generating done
-- Build files have been written to: /home/azureuser/dev/SecretCalc/bld/sgx

Terminal will be reused by tasks, press any key to close it.

> Executing task: make  <

[  9%] Generating SecretCalc_t.h, SecretCalc_t.c, SecretCalc_args.h
Generating edge routines for the Open Enclave SDK.
Success.
Scanning dependencies of target SecretCalc_enclave
[ 18%] Building C object enc/CMakeFiles/SecretCalc_enclave.dir/enc.c.o
[ 27%] Building C object enc/CMakeFiles/SecretCalc_enclave.dir/SecretCalc_t.c.o
[ 36%] Linking C executable ../out/bin/SecretCalc_enclave
[ 36%] Built target SecretCalc_enclave
Scanning dependencies of target sign
[ 45%] Generating SecretCalc_enclave-private.pem, SecretCalc_enclave-public.pem
Generating RSA private key, 3072 bit long modulus (2 primes)
.............................................................................................++++
................................................................++++
e is 3 (0x03)
writing RSA key
[ 54%] Generating SecretCalc_enclave.signed
Created /home/azureuser/dev/SecretCalc/bld/sgx/out/bin/SecretCalc_enclave.signed
[ 54%] Built target sign
[ 63%] Generating SecretCalc_u.h, SecretCalc_u.c, SecretCalc_args.h
Generating edge routines for the Open Enclave SDK.
Success.
Scanning dependencies of target SecretCalc
[ 72%] Building C object host/CMakeFiles/SecretCalc.dir/host.c.o
[ 81%] Building C object host/CMakeFiles/SecretCalc.dir/main.c.o
[ 90%] Building C object host/CMakeFiles/SecretCalc.dir/SecretCalc_u.c.o
[100%] Linking C executable ../out/bin/SecretCalc
[100%] Built target SecretCalc

Terminal will be reused by tasks, press any key to close it.
Great, so if I take this one step further I should be able to run the application and can I attach the debugger?
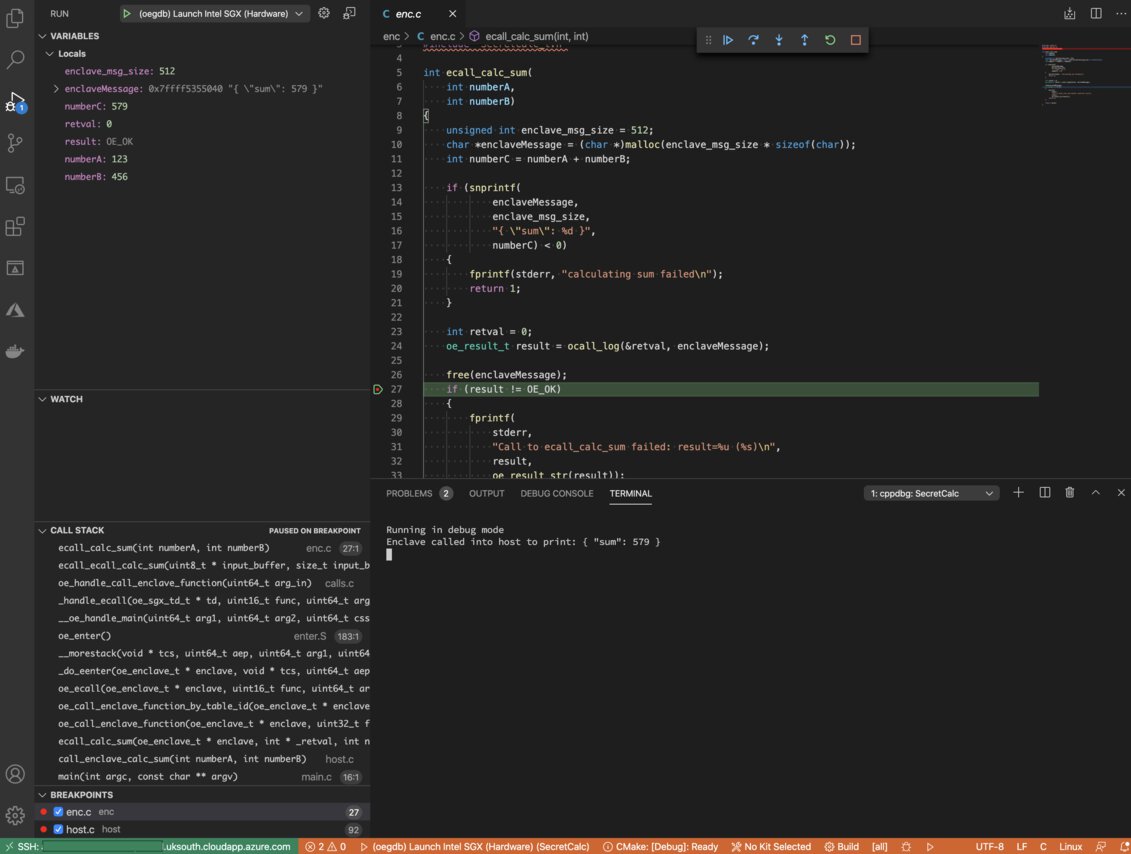
It seems to be working just fine, I can place breakpoints inside the enclave and the host parts of the app and the debugging experience is the same as it is with C and C++.
Wrapping up
I must stress again that this isn’t the most groundbreaking example of what you can do with Open Enclave, I can only speak for myself that by keeping this fairly simple I’ve managed to understand how it all works and fits together.
By the way
I think that anyone who is seriously considering using enclave technologies should take a look at the pros and cons.
As I was working my way through this blog I began to think about the security aspect of SGX, I ended up coming across a research paper called A tale of two worlds: Assessing the vulnerability of enclave shielding runtimes. It “analyzes the vulnerability space arising in Trusted Execution Environments (TEEs) when interfacing a trusted enclave application with untrusted, potentially malicious code”. Give it a look, it’s incredibly insightful!
At any rate, I hope this blog post has provided you with some more insight in regards to Azure Confidential Compute and where you need to look for additional information.
Related posts
- Making Sense of AI
- Azure Confidential Computing: Confidential GPUs and AI
- Windows Containers: Azure Pipeline Agents with Entra Workload ID in Azure Kubernetes Service
- Register Azure Pipeline Agents using Entra Workload ID on Azure Kubernetes Service
- Azure Confidential Computing: CoCo - Confidential Containers
- Azure Confidential Computing: Confidential Temp Disk Encryption
- Azure Confidential Computing: Secure Key Release - Part 2
- Azure Confidential Computing: Microsoft Azure Attestation
- Azure Confidential Computing: Azure RBAC for Secure Key Release
- Azure Confidential Computing: Verifying Microsoft Azure Attestation JWT tokens
- Azure Confidential Computing: Secure Key Release
- Azure Confidential Computing: Confidential VMs
- Azure Confidential Computing: IaaS
- Key Vault for Azure virtual machines extension
- Azure Linux OS Guard on Azure Kubernetes Service