Azure Policies & Azure AD PIM breakdown - Part 2
In this post
In December 2019 my colleague Micha Wets and I were at it again, with another session, at another great conference. This time we were invited to speak at CloudBrew 2019 in Belgium. The topic that we would be discussing with Azure governance.
Time to turn things up another notch. Let us assume that we have all these great governance features in place, to prevent us from doing something outrageously dangerous, how do we improve upon what we discussed in part one even further?
We will not only discuss how you can use Azure AD PIM through the Azure Portal, but also highlight how you can use it via PowerShell with a Service Principal. As far as we have been able to tell there is hardly any documentation surrounding the latter.
🔥 Deprecation notice – January 2025
Hi there, this is future Thomas speaking! A lot has changed since this blog post was written. So much so that I’ve revisited the topic in a brand-new post: Microsoft Entra Privileged Identity Management (PIM) Revisited.
The post you’re currently reading focuses on the Iteration 2 PIM API endpoint, while my updated article dives into the Iteration 3 PIM API endpoint, which has made automation far more straightforward. With the new API, functionality is integrated into the Azure REST API, allowing you to use tools like ARM templates, Bicep, Terraform, PowerShell, and more with relative ease. No need for the complex setups discussed here, things are so much simpler now!
I hope you enjoy both perspectives, but make sure to check out the updated post for the latest guidance!
Azure Active Directory Privileged Identity Management
Azure Active Directory Privileged Identity Management, try saying that five times, gives us the capability to provide time- and approval-based role activation.
We can require our users to provide a justification when they request for elevated permissions and require them to use multi-factor authentication. It gives us an opportunity to mitigate the risk of excessive or misuse of access permissions on resources that are absolutely critical to your organization. Perhaps equally important is the fact that PIM provides you with notifications, access reviews and audited logs.
You can assign the following types of roles:
- Azure AD roles
- Azure AD custom roles
- Azure Resource roles
Azure RBAC vs Azure AD PIM
The following question might have popped into your mind; when do you use Azure RBAC and when do you use PIM?
RBAC and PIM are not mutually exclusive, you can use both at the same time. In my particular understanding you can use them in the following manner:
- RBAC: I want to quickly assign a role to a security principal without the need of extensive auditing.
- PIM: I want to assign a role to a security principal while also applying additional settings in terms of activation duration, activation requirements (MFA, etc), approval flow, notifications and auditing to the role.
AAD PIM - Azure resource roles demo
During our demo scenario we introduced Kim, who is a support engineer and is part of the “Support” Azure AD group. In our fictitious organization, we have an RBAC rule in place that makes it so the support group has been assigned the “Reader” role at the subscription level of our West Europe Production subscription.
Our management group hierarchy looks something like this:
- MG ASPEX Root
- MG ASPEX Dev
- MG ASPEX Infrastructre
- MG ASPEX Production
- MG ASPEX Production CUS
- CentralUS Production Subscription
- MG ASPEX Production WEU
- WestEurope Production Subscription
- MG ASPEX Production CUS
- MG ASPEX Testing
On our Cental US Production subscription however, something has gone terribly haywire with one of our storage accounts and since Kim is the a calm, cool and collected engineer, she has decided to fix the issue. In order to do so she will use PIM to request for the Storage Account Contributor role, which should help her to change some of the settings of said storage account.
Prerequisites
In order for Kim to have the option to elevate her permissions we need to do some tasks in order for that to happen. Let’s assume that what we are about to do has been done prior to the “incident”.
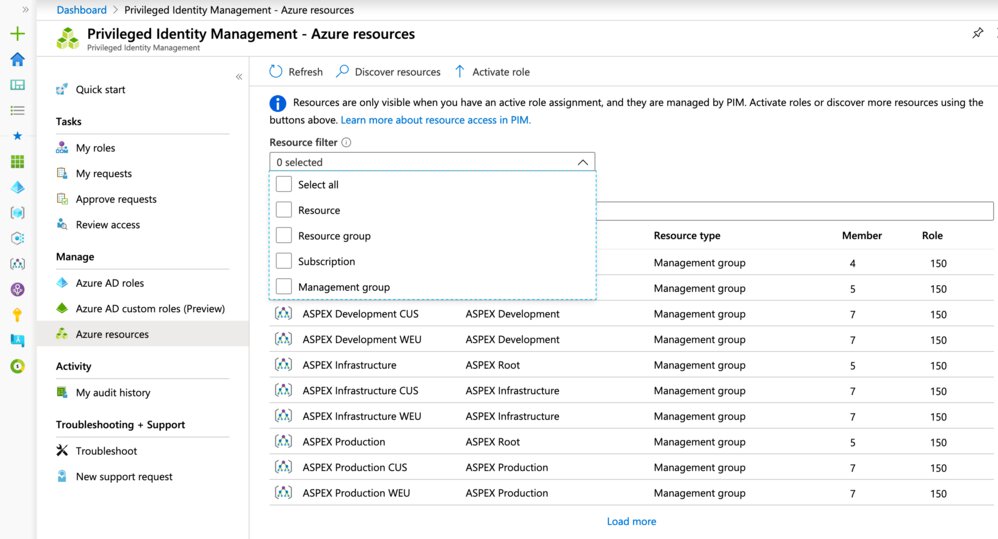
With a User Access Administrator we will go to Azure AD PIM and select the “Azure Resources” option, under “Manage”. We can specify which target resource, resource group, subscription or management group we want to have our assignment apply to, similar to how you assign roles via RBAC.
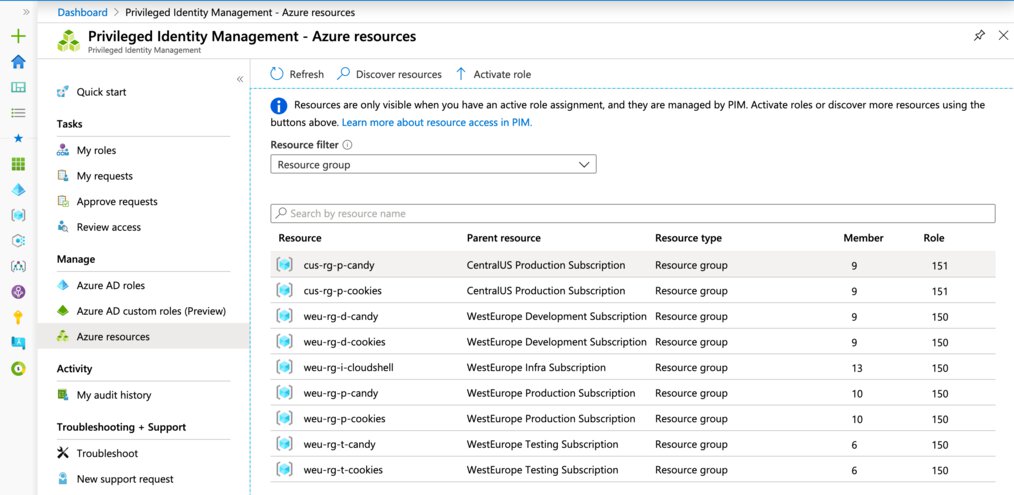
We will not just scope our role assignment to the entire subscription, but instead limit it to a specific resource group within the target subscription. This is just for demonstration purposes and you can use the same methodology on any of the other targets
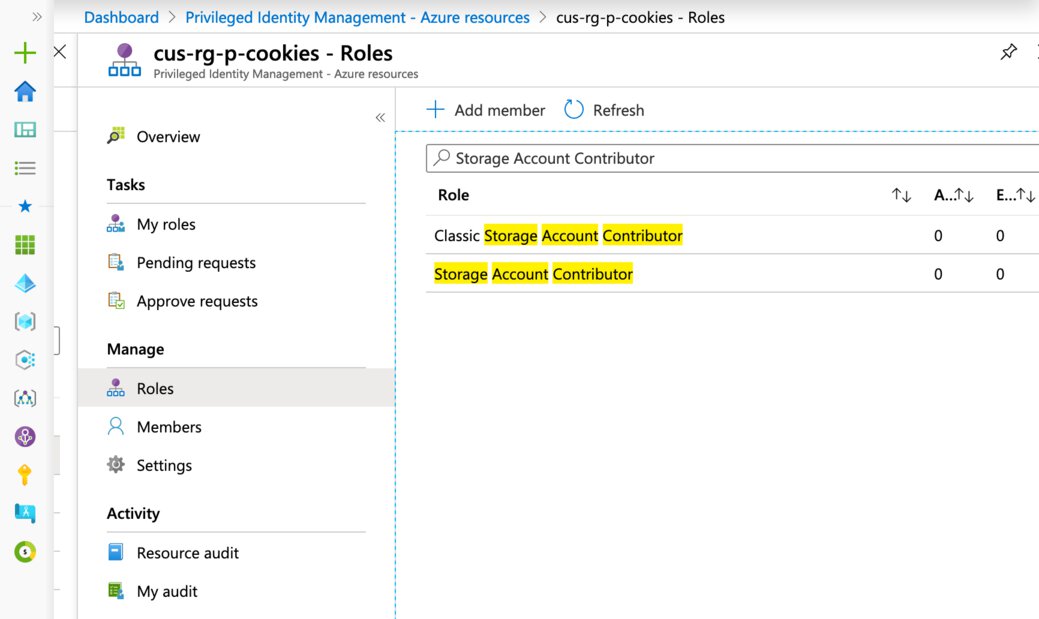
select the “Roles” option under the manage section, here you search for all of the available RBAC roles. We will search the “Storage Account Contributor” role.
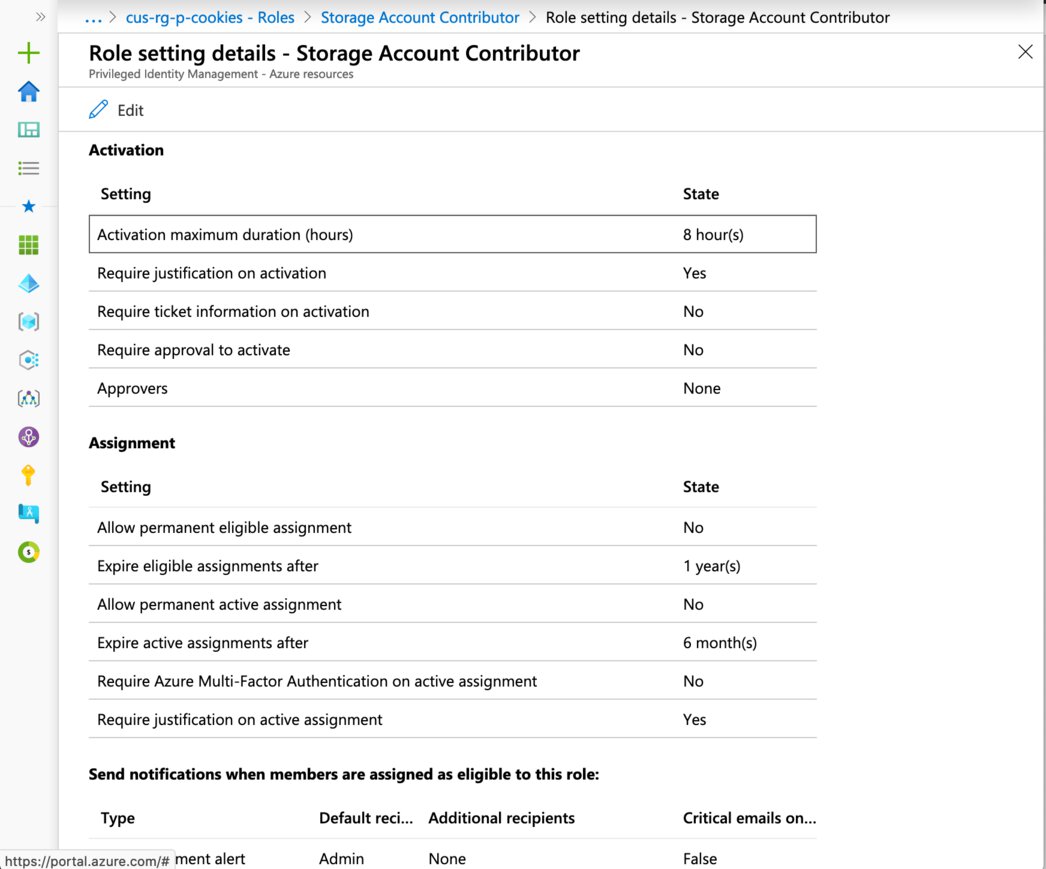
You can get an overview of how this specific role is configured for this specific Azure resource, this means that you can actually specify different settings for same roles on different Azure resources and it’s fairly important to take a moment to point this out.
For example, you are perfectly able to configure the “Storage Account Contributor” role’s “Activation maximum duration (hours)” setting to one hour on resource group A. You then configure the “Storage Account Contributor” role’s, on resource group B and set its “Activation maximum duration (hours)” to three hours.
If you’d like to take this one step further still you could even have different settings on subscription on management group levels. Let’s assume we’re doing this, we apply the same steps as before, you configure the “Storage Account Contributor” role’s “Activation maximum duration (hours)” setting to 16 hours on subscription C, but also have it so your user goes through the MFA sequence.
The end result is that our support user will be able to choose from three options:
- Storage Account Contributor, Resource Group A
- Max one hour
- Storage Account Contributor, Resource Group B
- Max three hours
- Storage Account Contributor, Subscription C
- Max 16 hours
- Requires MFA
Not to worry, we’re keeping it simple and will only apply the role to a single resource group. Just be aware of the fact that you have a great degree of flexibility inside of PIM.
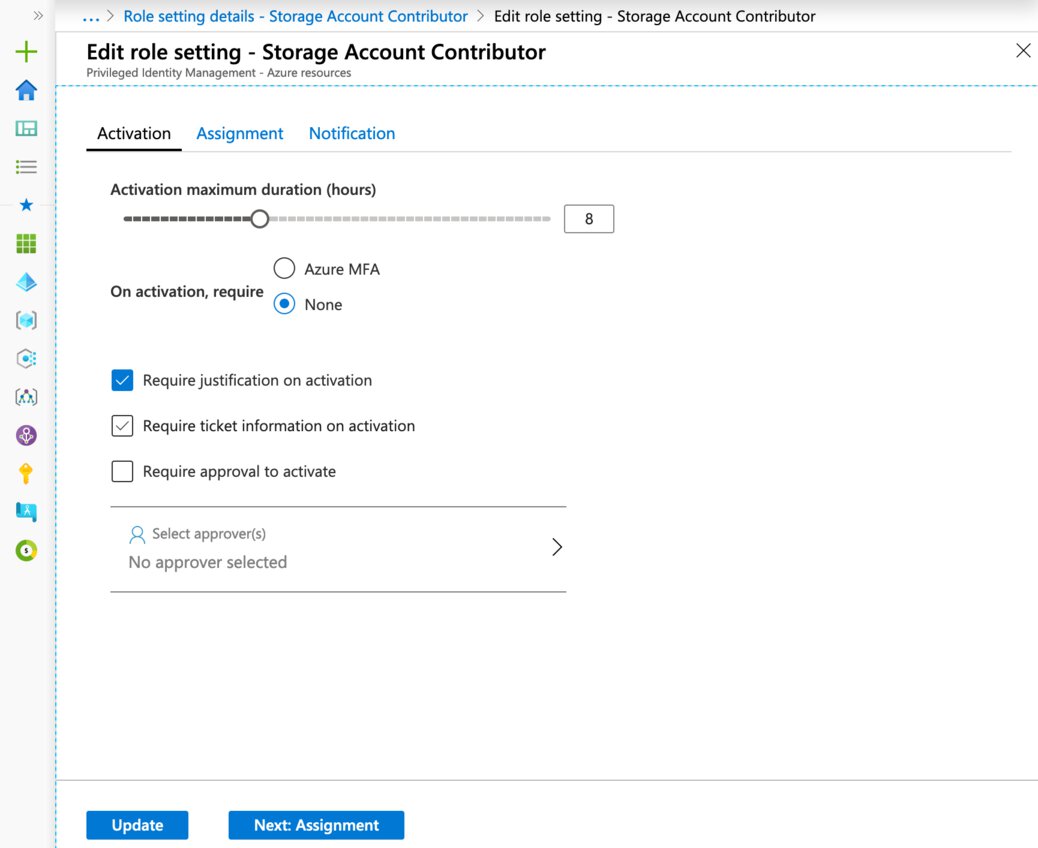
Here you can see all the available options in the settings’ activation tab. You can configure an approval email, which requires a single user or group to approve the support user’s activation request prior to it being activated.
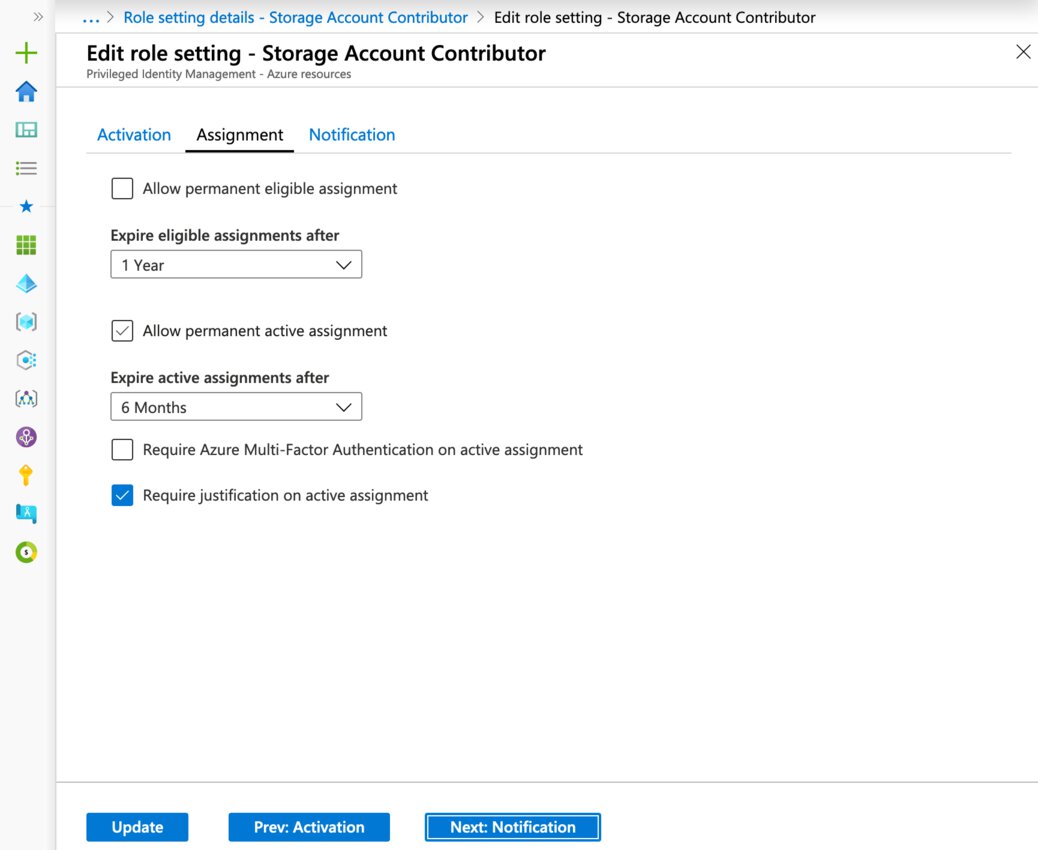
Neatly hidden away is the “Allow permanent eligible/active assignment”. Permanently active assignments are sometimes useful for assigning service principals, if your security team will allow permanent assignments.
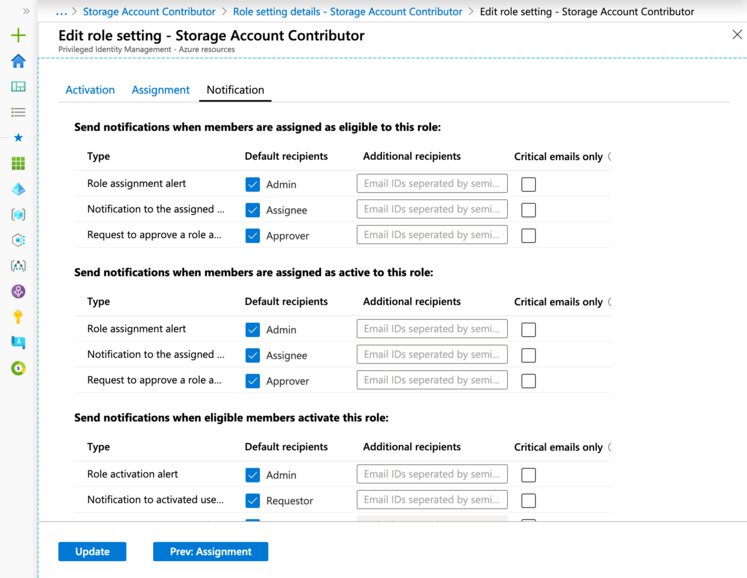
Lastly there’s the notification’s tab, here you are able to set up which notifications are sent out. You can also specify additional recipients, as well as enable a filter for PIM to exclusively send out critical emails.
“Critical Emails Only” implies that PIM will continue to send emails to the configured recipients only when the email requires an immediate action. For example, emails asking users to extend their role assignment will not be triggered while an emails requiring admins to approve an extension request will be triggered.
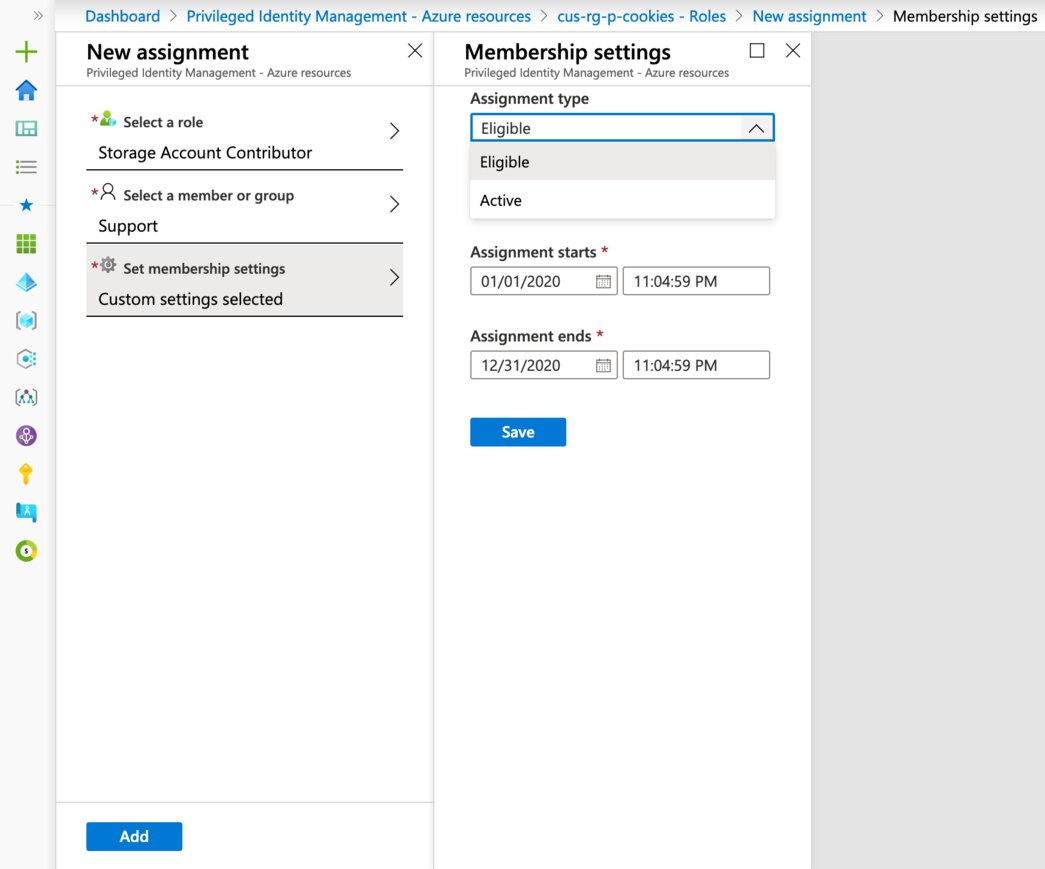
As you can tell from the breadcrumb path in the screenshot, We used the “cus-rg-p-cookies” resource group and selected the “Roles” option, afterwards you should be able to select the “Add member” button. You will be greeted by the “New assignment” blade.
This is relatively straightforward, you simply select the role that you want to make available. Now you can select the user, group or service principal. We will use the Storage Account Contributor role and the Support AAD group.
As for the membership setting you can do either of the following:
- Eligible
- Max assignment duration: 1 year
- Unless permanently eligible!
- Users will need to request their elevated role.
- Requires a business justification by the user.
- Max assignment duration: 1 year
- Active
- Max assignment duration: 6 months -Unless permanently assigned!
- Users will be permanently in their elevated role for the assignment duration.
- Requires a business justification by the admin.
Support engineer flow
Okay, we’re done with all the setup from the previous section. This next part is fairly straightforward, so we will breeze though it.
Let’s log in as Kim and have a look.

The support group has read permissions on the “WestEurope Production Subscription”, something has happened and she need to change the settings on a storage account in the “cus-rg-p-cookies” resource group which is in the “Central US Production Subscription”.

Kim opens up Azure AD PIM, selects “My roles” option and then selects the “Azure Resources” option. She can see that she is eligible for the “Storage Account Contributor role” on the “cus-rg-p-cookies” resource, which is a resource group. She proceeds by selecting “Activate”.
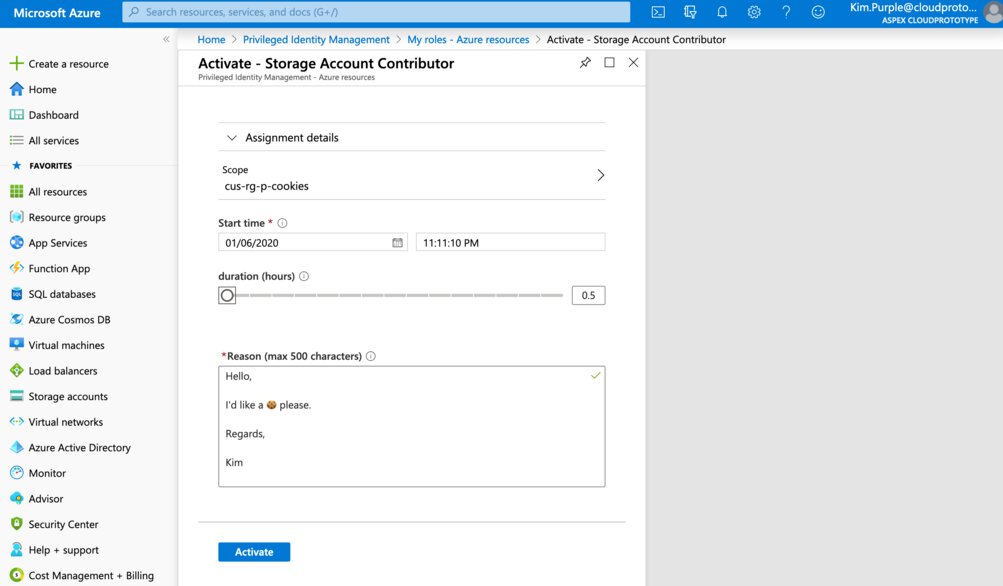
Kim has to select a start time and duration for her assignment. She must also provide a justification for auditing purposes. She selects “Activate”!
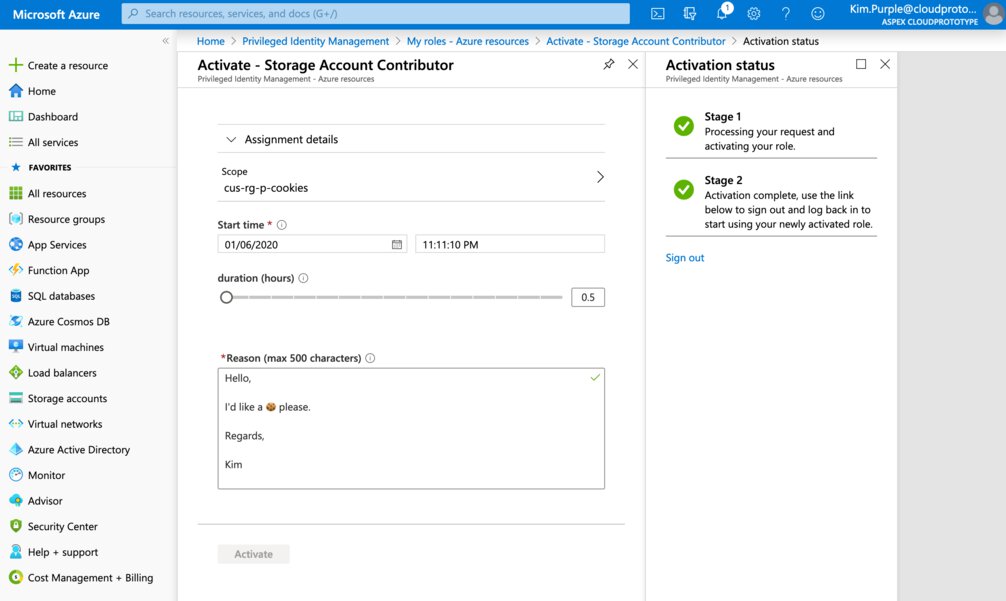
PIM will now process the activation and Kim will be prompted to log out and log back in, again.

When Kim opens our the resource groups tab she will see the additional resource group appear.
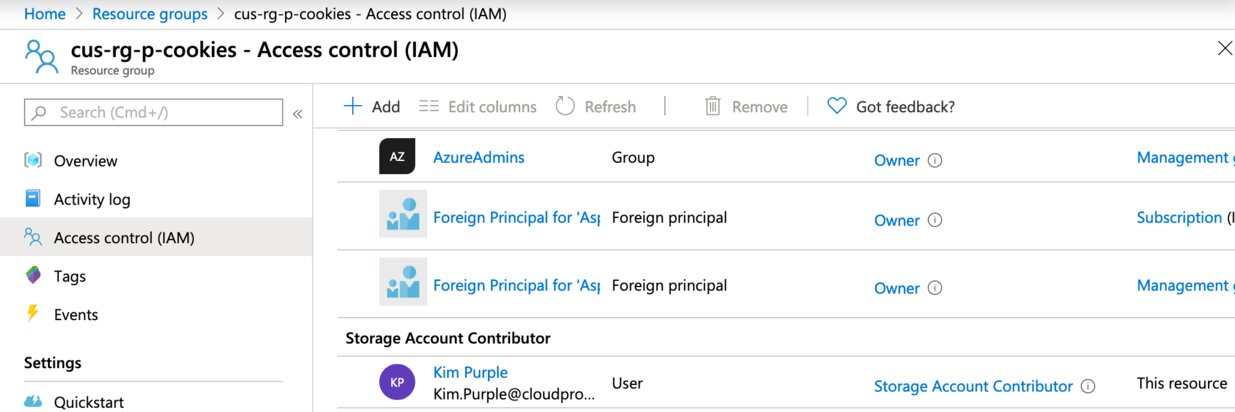
And as you can tell from the RBAC tab of the “cus-rg-p-cookies” resource group Kim has been added as a “Storage Account Contributor”.
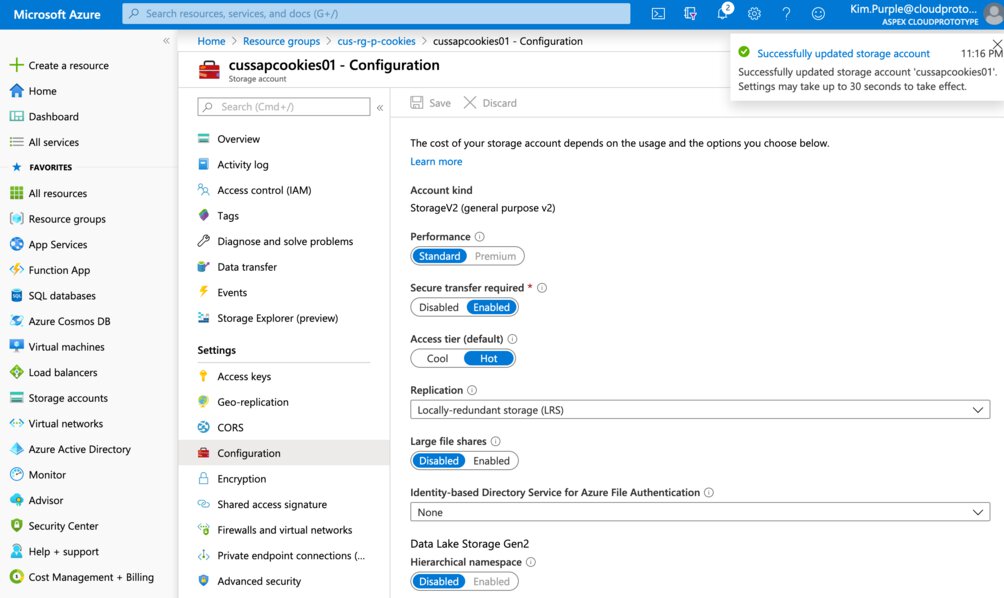
She is able to change the storage account’s settings and the crisis has been averted.
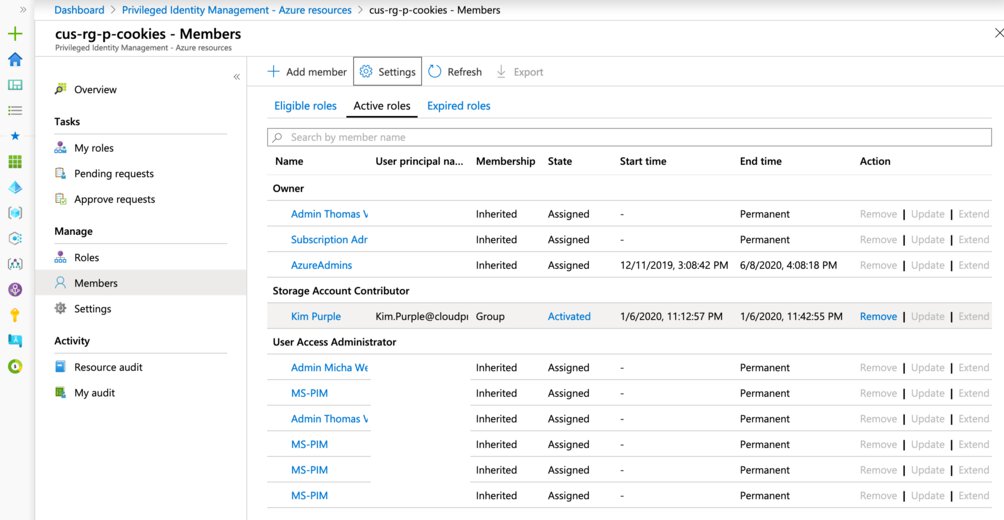
Meanwhile the administrators are able to see that Kim has activated the role and can remove her from that role should it be required to do so.
AAD PIM - Automating with PowerShell
Now you’re in for a treat, let’s assume your development teams redeploy their dev/test environment completely each time they do a release. They remove the resource group, then recreate the resource group and proceed to deploy an ARM template that ends up provisioning the environment.
If you’re familiar with how Azure DevOps works you might know that you can perform deployments by using a security principal, which you can scope to a resource group. You can scope it to a subscription, true, but if you were to share the service principal with other team projects that can potentially mean that Team A can deploy to Team B’s resource group and we do not want to go down that road.
If you read the previous section you will most likely realize that doing this setup in PIM isn’t too difficult if you’re doing it via the Portal, but what if you want to automate this via a (Power)Shell script?
Micha and myself encountered this problem as well and we came up with a, relatively stable, solution. We went straight to Google and ended up with the following solutions
- Microsoft.Azure.ActiveDirectory.PIM.PSModule
- A relatively small module with about five commands: three related to your connection to the API, one do set an assignment and one to get an assignment. Not enough for our use case but it did give us insights as to which API calls were being made.
- Microsoft Graph beta
- We’re assuming this is the preferred way of dealing with PIM, if it wasn’t for the banner on its documentation site exclaiming that it should not be used in production.
- AzSk/DevOpsKit
- The Secure DevOps Kit for Azure, I had never heard of this up until a few weeks ago but I assume that this would’ve helped us considerably if we only looked at it more closely. It still wouldn’t have covered all our use cases but it would have saved us several hours of reverse engineering.
We opened up Fiddler and used Microsoft.Azure.ActiveDirectory.PIM.PSModule to connect to the PIM API endpoint, we had a look at what happened when we performed PIM actions through the Azure portal. To much of our surprise both connect to the same API endpoint!
We ended up reverse engineering the way we acquire access tokens and invoked the API. We had simply performed role assignments, filtered resources and roles and looked at which API paths we were invoking. Then we copied those URLs and edited them so they could receive parameters.
GUIDs everywhere
In the previous section we mentioned that you can apply different settings to the same roles on every Azure resource. When you think about it this sounds great, but how does it work behind the scenes? Every single ID in PIM is a different GUID but unique identifiers within Azure are, mostly, resource uris.
In AAD PIM, Azure resources are stored in the following manner:
| DisplayName | ID | Type | ExternalID |
|---|---|---|---|
| cus-rg-p-cookies | 1e8fb10c-b198-4c52-b261-ffbb54ba4819 | resourcegroup | /subscriptions/00000000-0000-0000-0000-000000000001/resourceGroups/cus-rg-p-cookies |
| cus-rg-p-candy | 3e7ccd92-6ed6-49ce-891f-63918eafa2c9 | resourcegroup | /subscriptions/00000000-0000-0000-0000-000000000001/resourceGroups/cus-rg-p-candy |
| CentralUS Production Subscription | 0cb2c365-8017-4fd8-8e3d-d26712930b90 | subscription | /subscriptions/00000000-0000-0000-0000-000000000001 |
The rabbit hole goes deeper still, since every PIM role within an Azure resource has a different ID. Let’s take another look at our “Storage Account Contributor” role’s properties, to clarify what I mean:
| RG | DisplayName | ID | TemplateId | ResourceId | ExternalID |
|---|---|---|---|---|---|
| cus-rg-p-cookies | Storage Account Contributor | da3f03ac-d917-4ba5-b251-e34db3813abf | 17d1049b-9a84-46fb-8f53-869881c3d3ab | 1e8fb10c-b198-4c52-b261-ffbb54ba4819 | /subscriptions/00000000-0000-0000-0000-000000000001/providers/Microsoft.Authorization/roleDefinitions/17d1049b-9a84-46fb-8f53-869881c3d3ab |
| cus-rg-p-candy | Storage Account Contributor | fa1cb0cd-e2c1-4569-8747-0ba1a049e598 | 17d1049b-9a84-46fb-8f53-869881c3d3ab | 3e7ccd92-6ed6-49ce-891f-63918eafa2c9 | /subscriptions/00000000-0000-0000-0000-000000000001/providers/Microsoft.Authorization/roleDefinitions/17d1049b-9a84-46fb-8f53-869881c3d3ab |
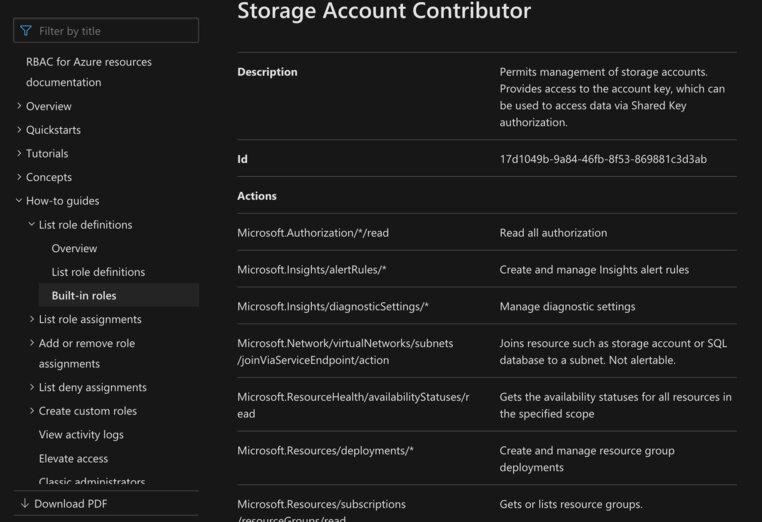
The template ID is important here because it allows you to map the PIM role back to the Microsoft.Authorization roleDefinition, which is what we saw with RBAC. If you were to enter “17d1049b-9a84-46fb-8f53-869881c3d3ab” as a search query in your favorite search engine you might just end up at the following page.
Powershell, Service Principals and AAD PIM
Great so now, with our newfound knowledge in hand, all we need to do is fire requests at the API endpoint and all should be fine. Famous last words because this isn’t as straight forwards as one might hope.
First of all it’s important to realize that Azure AD PIM can work with application permissions, even though Microsoft Graph beta states that it cannot. You can create a service principal and use the application id and certificate (or client secret) combo to get an access token. Afterwards you add the service principal to a Management Group or Azure subscription with appropriate permissions, for our demo we gave it owner permissions but be careful with this.
Import-Module Az
Import-Module AzureAD
function Get-PIMAccessToken {
    param(
      [Parameter(Mandatory = $true)]
      $ClientId
    )
    $currentContext = Get-AzContext
    if (-not $currentContext) {
        write-error "Use Connect-AzAccount to log in."
    }

    $tokenCache = $currentContext.TokenCache.ReadItems() | Where-Object { $_.ClientId -eq $ClientId }
    if ($null -eq $tokenCache) {
        Write-Error -Message "No tokencache"
    }
    $accessToken = $tokenCache.AccessToken
    if ($null -eq $accessToken) {
        Write-Error -Message "Error getting AccessToken"
    }
    return $accessToken
}

$ClientId = "00000000-0000-5555-0000-000000000000"
$ClientCertificateThumbprint = "D010D49D4081FBD892341E0EA32C6B679F2C01F3"
$TenantId = "00000000-2222-0000-0000-000000000000"

Connect-AzAccount -ServicePrincipal -ApplicationId $ClientId -CertificateThumbprint $ClientCertificateThumbprint -Tenant $TenantId
Connect-AzureAD -ApplicationId $ClientId -CertificateThumbprint  $ClientCertificateThumbprint -TenantId $TenantId ##Only available on Windows

$Headers = @{
        "Authorization" = "Bearer {0}" -f (Get-PIMAccessToken -ClientId $ClientId)
}
$URL = 'https://api.azrbac.mspim.azure.com/api/v2/privilegedAccess/azureResources/resources?$select=id,displayName,type,externalId&$expand=parent&$filter=(type eq %27resourcegroup%27)&$orderby=displayName&$top=10' #type eq 'resourcegroup' to fetch resource groups
$QueryResponse = Invoke-RestMethod -Uri $URL -Headers $Headers -Method GET
$QueryResponse.value
We invoke the API, with our access token in the header, if the URL syntax is alien to you do not fret, because you can read all about OData here. The response will contain a list of all your resource groups.
{
    "@odata.context": "https://api.azrbac.mspim.azure.com/api/v2/$metadata#governanceResources(id,displayName,type,externalId,parent)",
    "value": [
        {
            "@odata.id": "https://api.azrbac.mspim.azure.com/api/v2/privilegedAccess('azureResources')/resources('1e8fb10c-b198-4c52-b261-ffbb54ba4819')",
            "id": "1e8fb10c-b198-4c52-b261-ffbb54ba4819",
            "displayName": "cus-rg-p-cookies",
            "type": "resourcegroup",
            "externalId": "/subscriptions/00000000-0000-0000-0000-000000000001/resourceGroups/cus-rg-p-cookies",
            "[email protected]": "https://api.azrbac.mspim.azure.com/api/v2/$metadata#governanceResources('1e8fb10c-b198-4c52-b261-ffbb54ba4819')/parent/$entity",
            "parent": {
                "id": "0cb2c365-8017-4fd8-8e3d-d26712930b90",
                "externalId": "/subscriptions/00000000-0000-0000-0000-000000000001",
                "type": null,
                "displayName": "CentralUS Production Subscription",
                "status": "Active",
                "onboardDateTime": null,
                "registeredDateTime": null,
                "managedAt": null,
                "registeredRoot": null
            }
        },
        {
            "@odata.id": "https://api.azrbac.mspim.azure.com/api/v2/privilegedAccess('azureResources')/resources('3e7ccd92-6ed6-49ce-891f-63918eafa2c9')",
            "id": "3e7ccd92-6ed6-49ce-891f-63918eafa2c9",
            "displayName": "cus-rg-p-candy",
            "type": "resourcegroup",
            "externalId": "/subscriptions/00000000-0000-0000-0000-000000000001/resourceGroups/cus-rg-p-candy",
            "[email protected]": "https://api.azrbac.mspim.azure.com/api/v2/$metadata#governanceResources('3e7ccd92-6ed6-49ce-891f-63918eafa2c9')/parent/$entity",
            "parent": {
                "id": "0cb2c365-8017-4fd8-8e3d-d26712930b90",
                "externalId": "/subscriptions/00000000-0000-0000-0000-000000000001",
                "type": null,
                "displayName": "CentralUS Production Subscription",
                "status": "Active",
                "onboardDateTime": null,
                "registeredDateTime": null,
                "managedAt": null,
                "registeredRoot": null
            }
        }
    ]
}
You can then use the resource group PIM IDs to list all the roles that are available in for said resource, in PIM. This step cannot be skipped by using IDs from the ‘Microsoft.Authorization’ provider. Every role within an Azure Resource in PIM also has its own unique identifier, regardless of whether or not it is used across multiple resources. This is, to my understanding, so you can create different setting definitions for these roles, on different Azure resources.
#Query to get ResourceGroup ID in PIM
$ResourceGroupName = "cus-rg-p-cookies"
$rgqueryUrl = ("https://api.azrbac.mspim.azure.com/api/v2/privilegedAccess/azureResources/resources?`$select=id,displayName,type,externalId&`$expand=parent&`$filter=((type eq 'resourcegroup') and contains(tolower(displayName), '{0}')) &`$orderby=displayName&`$top=100" -f $ResourceGroupName)
$rgQueryResponse = Invoke-RestMethod -Uri $rgqueryUrl -Headers $Headers -Method GET

#Query to get Contributor RoleID on this ResourceGroup
$roleQuery = ("https://api.azrbac.mspim.azure.com/api/v2/privilegedAccess/azureResources/resources/{0}/roleDefinitions?&`$select=id,displayName,type,templateId,resourceId,externalId,isbuiltIn,subjectCount,eligibleAssignmentCount,activeAssignmentCount&`$orderby=displayName" -f $rgQueryResponse.value[0].id)
$roleQueryResponse = Invoke-RestMethod -Uri $roleQuery -Headers $Headers -Method GET
$role = $roleQueryResponse.value | Where-Object { $_.DisplayName -eq "Storage Account Contributor" }
The roleQueryResponse variable will contain a list of role definitions for a given resource. We’ve omitted some values from the value array, normally it should contain a lengthy list.
{
    "@odata.context": "https://api.azrbac.mspim.azure.com/api/v2/$metadata#governanceResources('1e8fb10c-b198-4c52-b261-ffbb54ba4819')/roleDefinitions(id,displayName,type,templateId,resourceId,externalId,isbuiltIn,subjectCount,eligibleAssignmentCount,activeAssignmentCount)",
    "value": [
        {
            "id": "da3f03ac-d917-4ba5-b251-e34db3813abf",
            "displayName": "Storage Account Contributor",
            "type": "BuiltInRole",
            "templateId": "17d1049b-9a84-46fb-8f53-869881c3d3ab",
            "resourceId": "1e8fb10c-b198-4c52-b261-ffbb54ba4819",
            "externalId": "/subscriptions/00000000-0000-0000-0000-000000000001/providers/Microsoft.Authorization/roleDefinitions/17d1049b-9a84-46fb-8f53-869881c3d3ab",
            "subjectCount": 1,
            "eligibleAssignmentCount": 2,
            "activeAssignmentCount": 0
        }
    ]
}
With all of our required PIM IDs assembled we can now perform the role assignment request.
$azureAdGroup =  Get-AzADGroup -DisplayName "Support"
$roleAssignmentRequestsUrl = "https://api.azrbac.mspim.azure.com/api/v2/privilegedAccess/azureResources/roleAssignmentRequests"
$roleAssignmentRequestsBody = @{
    "resourceId"       = $rgQueryResponse.value[0].id
    "roleDefinitionId" = $role.id
    "subjectId"        = $azureAdGroup.Id
    "roleDefinition"   =
    @{
        "displayName" = $role.displayName
        "id"          = $role.id
        "resource"    =
        @{
            "id" = $rgQueryResponse.value[0].id
        }
    }
    "subject"          =
    @{
        "id"          = $azureAdGroup.Id
        "displayName" = $azureAdGroup.DisplayName
        "type"        = "Group"
        "email"       = ""
    }
    "assignmentState"  = "Active"
    "type"             = "AdminAdd"
    "reason"           = "Some reason goes here."
    "schedule"         =
    @{
        "type"          = "Once"
        "startDateTime" = "2020-01-01T12:00:01.000Z"
        "endDateTime"   = "2020-06-30T12:00:01.000Z"
    }
    "scopedResource"   = $null
    "scopedResourceId" = $null
}

Invoke-RestMethod -Uri $roleAssignmentRequestsUrl -Headers $Headers -Method Post  -ContentType "application/json" -Body ($roleAssignmentRequestsBody | ConvertTo-Json -Depth 99)
If you want to create a permanent assignment you will need to modify the role’s setting definition first, before you submit your roleAssignmentRequest. Here is how we did it.
#Get role settings definition
$memberSettingsQuery = ("https://api.azrbac.mspim.azure.com/api/v2/privilegedAccess/azureResources/roleSettings?`$expand=resource,roleDefinition(`$expand=resource)&`$filter=(resource/id+eq+%27{0}%27)&`$orderby=lastUpdatedDateTime+desc" -f $rgQueryResponse.value[0].id)
$memberSettingsResponse = Invoke-RestMethod -Uri $memberSettingsQuery -Headers $Headers
$roleSettings = $memberSettingsResponse.value | Where-Object { $_.roleDefinitionId -eq $role.id }

#Get Storage Account Contributor role settings
$roleSettingsQuery = ("https://api.azrbac.mspim.azure.com/api/v2/privilegedAccess/azureResources/roleSettings/{0}?`$expand=resource,roleDefinition(`$expand=resource)" -f $roleSettings.id)
$memberSettingsResponse = Invoke-RestMethod -Uri $roleSettingsQuery -Headers $Headers

$updatedSettings = @{
    "id"                    = $roleSettings.id
    "adminEligibleSettings" = @(
        @{
            "ruleIdentifier" = "ExpirationRule"
            "setting"        = "{`"permanentAssignment`":false,`"maximumGrantPeriodInMinutes`":525600}"
        }
    )
    "adminMemberSettings"   = @(
        @{
            "ruleIdentifier" = "ExpirationRule"
            "setting"        = "{`"permanentAssignment`":true,`"maximumGrantPeriodInMinutes`":259200}" #Important bit
        },
        @{
            "ruleIdentifier" = "MfaRule"
            "setting"        = "{`"mfaRequired`":false}"
        },
        @{
            "ruleIdentifier" = "JustificationRule"
            "setting"        = "{`"required`":false}"
        }
    )
    "userEligibleSettings"  = @()
    "userMemberSettings"    = @(
        @{
            "ruleIdentifier" = "ExpirationRule"
            "setting"        = "{`"permanentAssignment`":true,`"maximumGrantPeriodInMinutes`":480}" #Important bit
        },
        @{
            "ruleIdentifier" = "MfaRule"
            "setting"        = "{`"mfaRequired`":false}"
        },
        @{
            "ruleIdentifier" = "JustificationRule"
            "setting"        = "{`"required`":true}"
        },
        @{
            "ruleIdentifier" = "TicketingRule"
            "setting"        = "{`"ticketingRequired`":false}"
        },
        @{
            "ruleIdentifier" = "ApprovalRule"
            "setting"        = "{`"enabled`":false,`"approvers`":[]}"
        },
        @{
            "ruleIdentifier" = "AcrsRule"
            "setting"        = "{`"acrsRequired`":false,`"acrs`":`"`"}"
        }
    )
    "roleDefinition"        = @{
        "id"          = $roleSettings.roleDefinitionId
        "templateId"  = $roleSettings.roleDefinition.templateId
        "displayName" = $roleSettings.roleDefinition.displayName
        "resource"    = @{
            "id"                 = $roleSettings.roleDefinition.resource.id
            "externalId"         = $roleSettings.roleDefinition.resource.externalId
            "type"               = $roleSettings.roleDefinition.resource.type
            "displayName"        = $roleSettings.roleDefinition.resource.displayName
            "status"             = $roleSettings.roleDefinition.resource.status
            "onboardDateTime"    = $roleSettings.roleDefinition.resource.onboardDateTime
            "registeredDateTime" = $roleSettings.roleDefinition.resource.registeredDateTime
            "managedAt"          = $roleSettings.roleDefinition.resource.managedAt
            "registeredRoot"     = $roleSettings.roleDefinition.resource.registeredRoot
        }
    }
    "resource"              = @{
        "id"                 = $roleSettings.resource.id
        "externalId"         = $roleSettings.resource.externalId
        "type"               = $roleSettings.resource.type
        "displayName"        = $roleSettings.resource.displayName
        "status"             = $roleSettings.resource.status
        "onboardDateTime"    = $roleSettings.resource.onboardDateTime
        "registeredDateTime" = $roleSettings.resource.registeredDateTime
        "managedAt"          = $roleSettings.resource.managedAt
        "registeredRoot"     = $roleSettings.resource.registeredRoot
    }
}
$updatedSettings = $updatedSettings | ConvertTo-Json -Depth 99

#PATCH the role settings to enable permanent assignments
$roleSettingsPatch = ("https://api.azrbac.mspim.azure.com/api/v2/privilegedAccess/azureResources/roleSettings/{0}" -f $roleSettings.id)
Invoke-RestMethod -Uri $roleSettingsPatch -Headers $Headers -Method Patch -ContentType "application/json" -Body $updatedSettings
Afterwards you need to edit the role assignment request so that the body has the following property values.
$updatedSettings @{
# ... omitted
    "schedule"         =
    @{
        "type"          = "Once"
        "startDateTime" = "2020-01-01T12:00:01.000Z"
        "endDateTime"   = $null #use $null to make it permanent
    }
# ... omitted
}
As you can see it isn’t an ideal solution, but it gets the job done until Microsoft Graph gets updated. We’re not entirely sure but we suspect that many of these api calls can be mapped directly on to Microsoft Graph beta since it does appear to be using the same paths and request bodies. The only thing we would need is a different way to get an access token, since now we’re using the access token that you get from using Connect-AzAccount.
AAD PIM - Gotchas
There’s a couple of points which we want to highlight, as we believe you should be aware of when using PIM.
AAD PIM - Licensing
Your PIM users, plain old Azure AD users, will require at least one of the following paid or trial licenses:
- Azure AD Premium P2
- Enterprise Mobility + Security (EMS) E5
- Microsoft 365 M5
AAD PIM and Azure Service Management (ASM)
You will not be able to manage classic subscription administrator roles.
AAD PIM and Office 365
Roles in Exchange/Sharepoint Online cannot be managed, except for Exchange and/or Sharepoint Administrators!
AAD PIM first-time onboarding
You should be aware of the fact that the first user to open PIM has to onboard the company and will have to add additional users. This user will be assigned the Security Administrator and Privileged Role Administrator roles in the directory, the latter of which grants the user the ability to manage assignments for all Azure AD roles including the Global Administrator role.
Related posts
- Azure Policies & Azure AD PIM breakdown - Part 1
- Microsoft Entra Privileged Identity Management (for Azure Resources) Revisited
- Azure Purview
- Azure Resource Locks
- Open Policy Agent
- Chaos Engineering on Azure
- Exploring AI CPU-Inferencing with Azure Cobalt 100
- SPIFFE and Entra Workload Identity Federation
- Azure Chaos Studio and PowerShell
- Azure Chaos Studio - Public Preview
- Local OpenShift 4 with Azure App Services on Azure Arc
- Verifying Azure AD tenant availability
- Azure Red Hat OpenShift 4