Azure Policies & Azure AD PIM breakdown - Part 1
In this post
In December 2019 my colleague Micha Wets and I were at it again, with another session, at another great conference. This time we were invited to speak at CloudBrew 2019 in Belgium. The topic that we would be discussing with Azure governance.
When it comes to Microsoft Azure, this is a topic that has been getting more and more attention and this is a very good thing. Perhaps you can remember what is was like the first time you opened up the Azure portal?
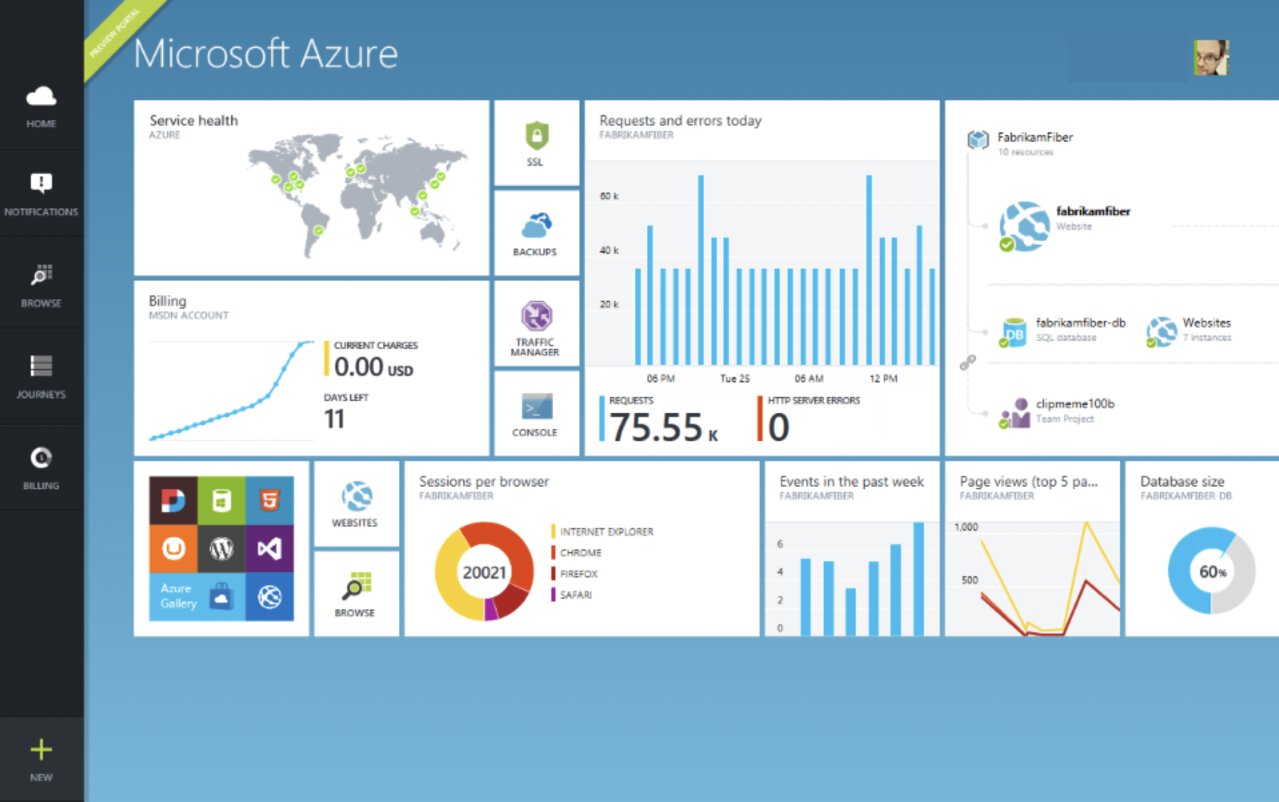
This is what it looked like back in 2015.
If you were like me then you probably, immediately, took advantage of the fact that you can easily deploy resources to meet some specific goal, to add value relatively quickly. This did mean that the brakes were off and you could just deploy anything you wanted to.
How do we ensure that we meet compliancy targets; how do we set up the rules of the game so that we need to abide to specific standards? This is where governance tools come into play and if you’ve been following conferences such as Build, Ignite, etcetera you probably will have noticed that a lot has been improved on this front. The governance tools are growing in terms of what they are capable of..
Azure Governance Challenges
What are some of the challenges that you can expect to come across when it comes to adopting Azure?
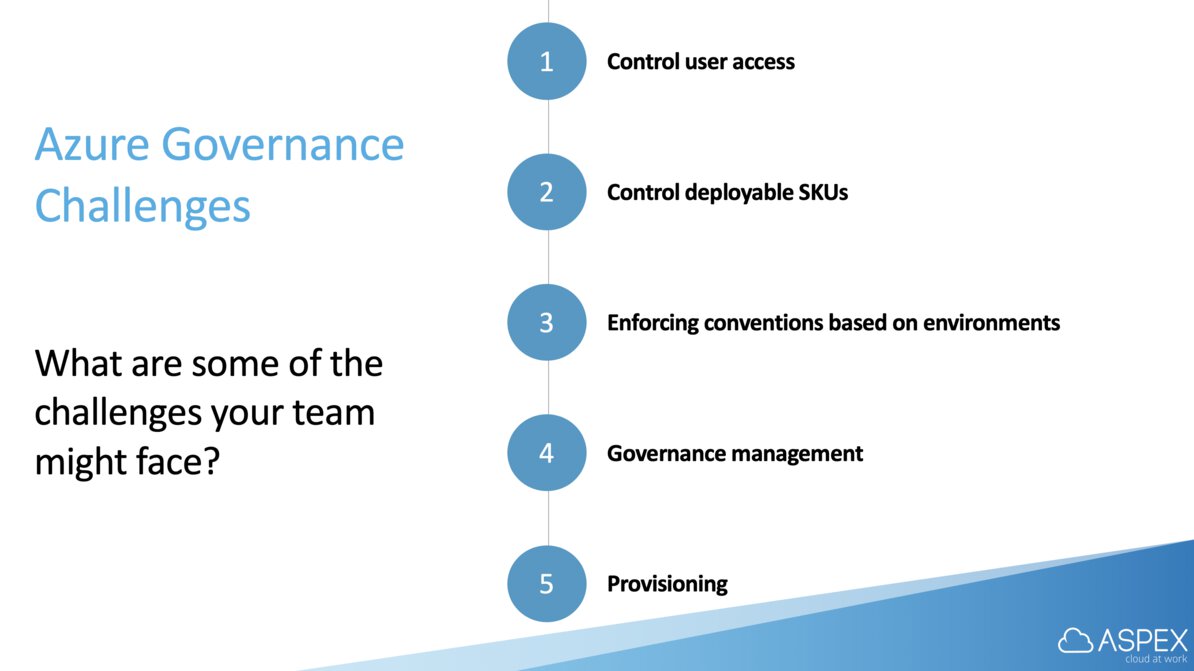
You’re going to want to control which users can access certain Azure resources, for instance virtual machines. Perhaps you have a group of support engineers that can only start but not stop VMs and allow your operations group to do many more, potentially vastly different tasks. Another big one is placing limits on the types of SKUs you can deploy, think of not being allowed to deploy certain VM series.
The next one is a good example because you might want to adhere to a specific naming convention when deploying to a specific subscription and/or region. When you’ve managed to implement those rules, you’re going to want to have a way of managing them across multiple subscriptions. And lastly, you’re going to come to a point where you need a way to apply these rules to a new subscription, preferably in some sort of automated fashion or have it set up in such a way that the rules are down in a parents-child structure.
Let’s start of with the very first example of this.
Azure RBAC
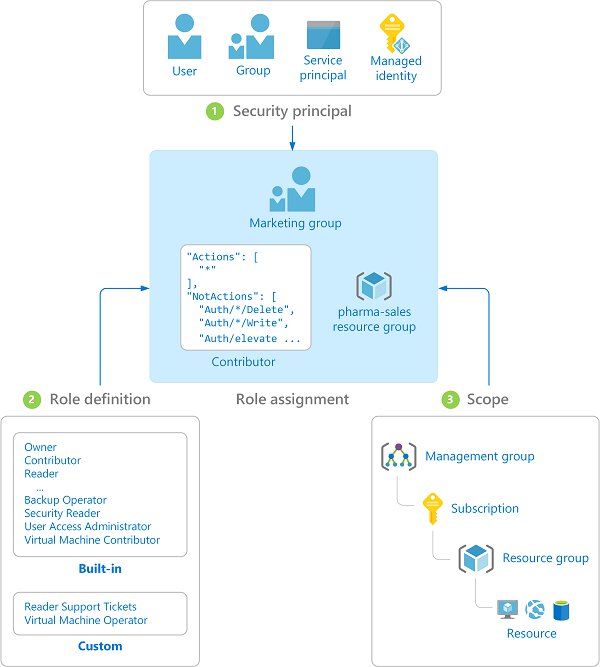
Azure Role-based Access Control is a way to control who can perform specific actions on the Azure platform.
You might be thinking; hold on a moment, I thought this was about Azure Policies? Hear me (us) out, because in order to understand where Policies and PIM work, it is crucial to understand where RBAC fits in to the grand scheme of things.
Roles
Azure includes several built-in roles that you can use, however we believe that the following four roles are fundamental roles.
- Owner - Has full access to all resources including the right to delegate access to others.
- Contributor - Can create and manage all types of Azure resources but can’t grant access to others.
- Reader - Can view existing Azure resources.
- User Access Administrator - Lets you manage user access to Azure resources.
There are many more built-in roles that are much more specific in which actions they allow you to perform and if you can’t find one that fits your needs you can always create a custom role.
Security Principals
A security principal is an object that represents a user, group, service principal, or managed identity that is requesting access to Azure resources. Again, four types:
- User - An individual who has a profile in Azure Active Directory.
- Group - A set of users created in Azure Active Directory.
- Service principal - A security identity used by applications or services to access specific Azure resources. You can think of it as a user identity (username and password or certificate) for an application.
- Managed identity - An identity in Azure Active Directory that is automatically managed by Azure. You typically use managed identities when developing cloud applications to manage the credentials for authenticating to Azure services.
Scope
Scope is the set of resources that the access applies to. When you make a role assignment, you can further limit the actions allowed by defining a scope. This is helpful if you want to grant someone a Website Contributor role, but only on one specific resource group.
In Azure, you can specify a scope at multiple levels:
- Management group
- Subscription
- Resource group
- Resource
Scopes are structured in a parent-child relationship.
Assignment
When you incorporate all of the three previous ingredients you get an assignment. I have shamelessly stolen the following image from the Azure documentation because I think it clears up a lot.
Custom Roles
As I stated earlier you can create your own custom roles if you really want to have full control over what a security principal can and cannot do. Again, RBAC is all about what resource provider actions your security principal is capable of and this is reflected in the way that roles are defined in JSON.
{
  "Name": "Virtual Machine Operator",
  "Id": "88888888-8888-8888-8888-888888888888",
  "IsCustom": true,
  "Description": "Can monitor and restart virtual machines.",
  "Actions": [
    "Microsoft.Storage/*/read",
    "Microsoft.Network/*/read",
    "Microsoft.Compute/*/read",
    "Microsoft.Compute/virtualMachines/start/action",
    "Microsoft.Compute/virtualMachines/restart/action",
    "Microsoft.Authorization/*/read",
    "Microsoft.ResourceHealth/availabilityStatuses/read",
    "Microsoft.Resources/subscriptions/resourceGroups/read",
    "Microsoft.Insights/alertRules/*",
    "Microsoft.Insights/diagnosticSettings/*",
    "Microsoft.Support/*"
  ],
  "NotActions": [],
  "DataActions": [],
  "NotDataActions": [],
  "AssignableScopes": [
    "/subscriptions/{subscriptionId1}",
    "/subscriptions/{subscriptionId2}",
    "/subscriptions/{subscriptionId3}/resourceGroups/{rgname}",
    "/providers/Microsoft.Management/managementGroups/{mgid}"
  ]
}
This custom role can view storage accounts, network, VM, access control, alerts, availability statuses, resource groups and diagnostic settings. It can also perform the start and restart actions on virtual machines, plus it has full control over Azure support tickets. This is all limited to a specific scope.
As you can see you have a few interesting properties:
- Actions - Things I am allowed to do.
- NotActions - Things I am not allowed to do.
- DataActions - Things I am allowed do to certain PAAS components.
- Example: Read the contents of an Azure Storage BLOB.
- NotDataActions - Things I am not allowed do to certain PAAS components.
- AssignableScopes - If I am assigned this role, where am I allowed to use it?
You can be either very specific or very generic in your actions and assignable scopes, Microsoft even lets you use the asterisks wildcard (*).
Automation
You can of course automate the creation of custom roles, if needed.
if (!(Get-AzContext)) {
  Connect-AzAccount
}

#Set current scope
$subscription = Select-AzSubscription "Your subscription name"

$fullPathToJson = (Join-Path -Path . -ChildPath "custom-role-virtual-Machine-operator.json")
@"
{
    "Name": "[CUSTOMROLE] Virtual Machine Operator",
    "IsCustom": true,
    "Description": "Can monitor and restart virtual machines.",
    "Actions": [
      "Microsoft.Storage/*/read",
      "Microsoft.Network/*/read",
      "Microsoft.Compute/*/read",
      "Microsoft.Compute/virtualMachines/start/action",
      "Microsoft.Compute/virtualMachines/restart/action",
      "Microsoft.Authorization/*/read",
      "Microsoft.ResourceHealth/availabilityStatuses/read",
      "Microsoft.Resources/subscriptions/resourceGroups/read",
      "Microsoft.Insights/alertRules/*",
      "Microsoft.Insights/diagnosticSettings/*",
      "Microsoft.Support/*"
    ],
    "NotActions": [],
    "DataActions": [],
    "NotDataActions": [],
    "AssignableScopes": [
      "/subscriptions/$($subscription.Subscription.Id)"
    ]
    }
"@ | Out-File -FilePath $fullPathToJson

New-AzRoleDefinition -InputFile $fullPathToJson
Get-AzRoleDefinition | Where-Object {$_.Name -ilike "[CUSTOMROLE]*"} | Format-Table -Property Id, Name -AutoSize
In its most simplest form, you can perform an assignment of a user by executing the following piece of PowerShell.
if(!(Get-AzContext)){
    Connect-AzAccount
}

#Set correct scope
Select-AzSubscription "Your subscription name"
#Get all users and hope your search query is unique enough to return a single user.
$user = Get-AzADUser | Where-Object {$_.UserPrincipalName -like "*Some UserPrincipalName*"}
#Give a user the Storage Account Contributor role
New-AzRoleAssignment -RoleDefinitionName "Storage Account Contributor" `
                     -SignInName  $user.UserPrincipalName`
                     -ResourceGroupName "some-rg-name"
If you want to know how to perform an assignment to a group or service principal, have a look at the example section of the New-AzRoleAssignment and see which parameters you need to use.
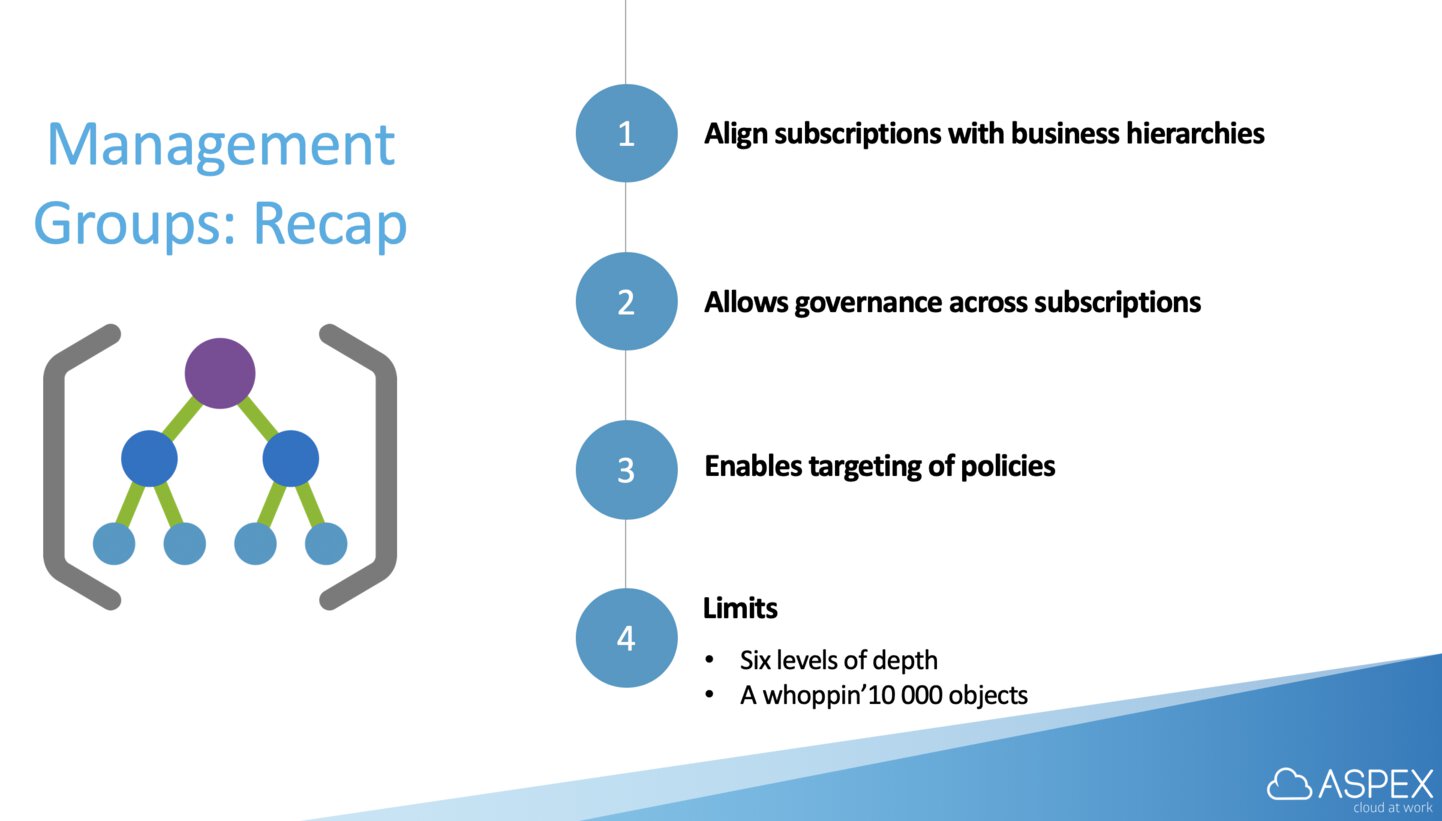
Azure Management Groups
We’ve established that RBAC is a great way to ensure that you can really lock down what a user is able to do on the platform. This is fine for one, maybe two subscriptions.
What if we need a way to more efficiently manage access, policies, and compliance for those subscriptions? Azure management groups provide a level of scope above subscriptions. You organize subscriptions into these management groups and apply your governance conditions to the management groups.
All subscriptions within a management group automatically inherit the conditions applied to the management group. A commonly used example of such a hierarchy is much like this one that I, again, shamelessly stole from the Azure docs:
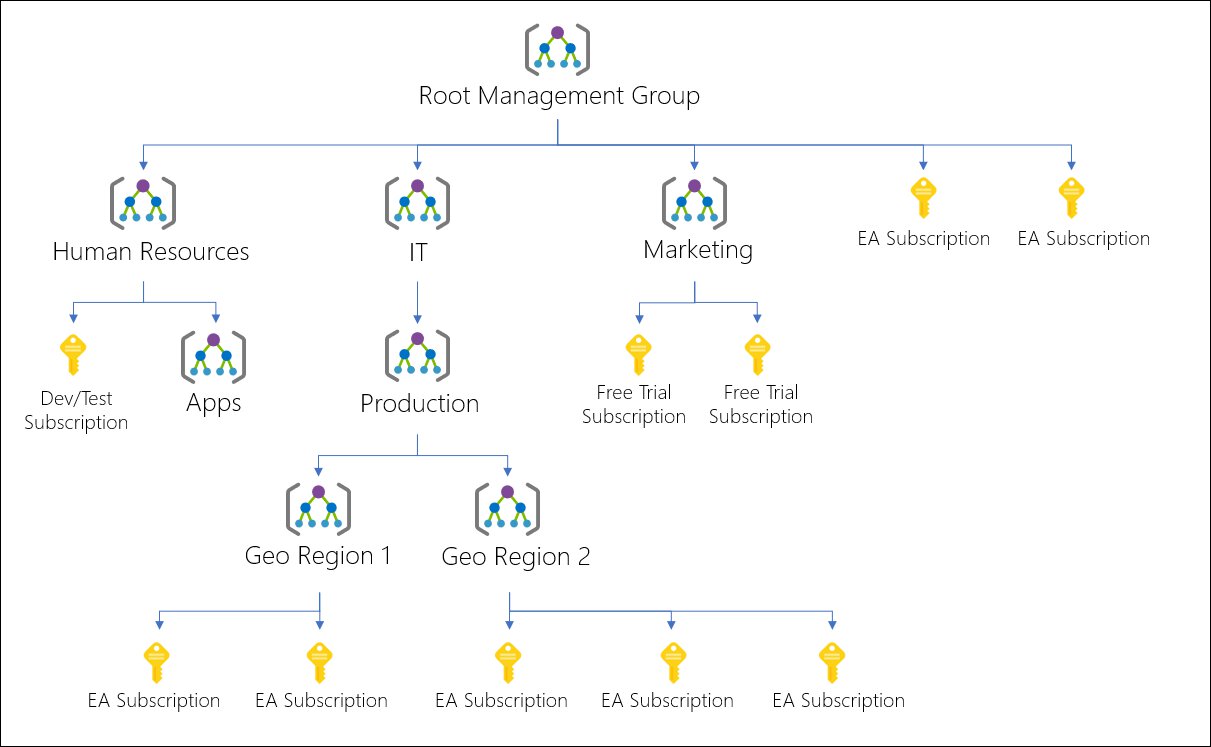
The aim here is to align your Azure subscriptions with your business’ hierarchies. You can optionally split them up again according to geographic location, be aware though that you can only have six levels of depth so give them some taught before running along with your ideal hierarchy.
There is not much more to it than what I’ve just described, besides a couple of gotchas that you should be aware of when first playing around with management groups.
Azure Policies
Even though we are now able to ensure that users, groups or applications can perform certain actions on the Azure platform platform they still have a carte blanche in many cases when it comes to creating or updating Azure resources. We still need some way in which we can enforce certain standards on resources’ properties.
For instance we only want our users to be able to deploy VMs that fit our budget and since we want to use Azure cost management, we want to enforce our users to apply appropriate tagging to those resources. Another, perhaps slightly more advanced, example would be to audit the existence of a CosmosDB IP firewall configuration..
With RBAC we limit which actions a user is able to perform, with Policies we limit, change or audit which values they can set on resources’ properties. These policies enforce different conventions and effects over your resources, so those resources stay compliant with your corporate standards and service level agreements.
Policies
Resource policy definitions are used by Azure Policy to establish conventions for resources. Each definition describes resource compliance and what effect to take when a resource is non-compliant.
Here is a quick overview of all of the possible effects, courtesy of the Microsoft docs:
- Append
- Adds additional fields to the requested resource during creation or update.
- Audit
- Creates a warning event in the activity log when evaluating a non-compliant resource, but it doesn’t stop the request.
- AuditIfNotExists
- AuditIfNotExists enables auditing on resources that match the if condition, but doesn’t have the components specified in the details of the then condition.
- Deny
- Used to prevent a resource request that doesn’t match defined standards through a policy definition and fails the request.
- DeployIfNotExists
- Executes a template deployment when the condition is met.
- Disabled
- Useful for testing situations or for when the policy definition has parameterized the effect. This flexibility makes it possible to disable a single assignment instead of disabling all of that policy’s assignments.
- EnforceOPAConstraint (preview)
- EnforceRegoPolicy (preview)
- Modify
- Add, update, or remove tags on a resource during creation or update.
Azure Policies processes requests against every applicable policy definition and in order to prevent unnecessary processing it uses the following order of evaluation:
- Disabled
- Checked first to determine if the- policy rule should be evaluated.
- Append and Modify
- Since- either could alter the request, a change made- may prevent an audit or deny effect from- triggering.
- Deny
- By evaluating deny- before audit, double logging of an undesired- resource is prevented.
- Audit
- Evaluated before the request going- to the Resource Provider.
Initiatives
An initiative definition, formerly known as a PolicySet, is a way of bundling policy definitions. This is useful because it enables you to only assign one collection of policies instead of assigning multiple separate policies. You can add parameters into the mix and use them for a variety of scenarios.
Parameters can help with simplifying your policy management by reducing the number of policy definitions. Think of parameters like the fields on a form – name, address, city, state. These parameters always stay the same, however their values change based on the individual filling out the form. By including parameters in a policy definition, you can reuse that policy for different scenarios by using different values.
Creating a policy, initiative and assignment
We will be creating a policy that will enforce a naming convention that is between a specific amount of characters, by default it will be between three and 20 characters, but it is possible to change this by using parameters.
You can deploy Azure policies in various ways:
- Portal
- PowerShell
- Azure CLI
- ARM templates
We’ll go into the Azure portal and open up the Azure Policies. Under authoring, select the “definitions” option and finally click the “+ Policy definition” button.
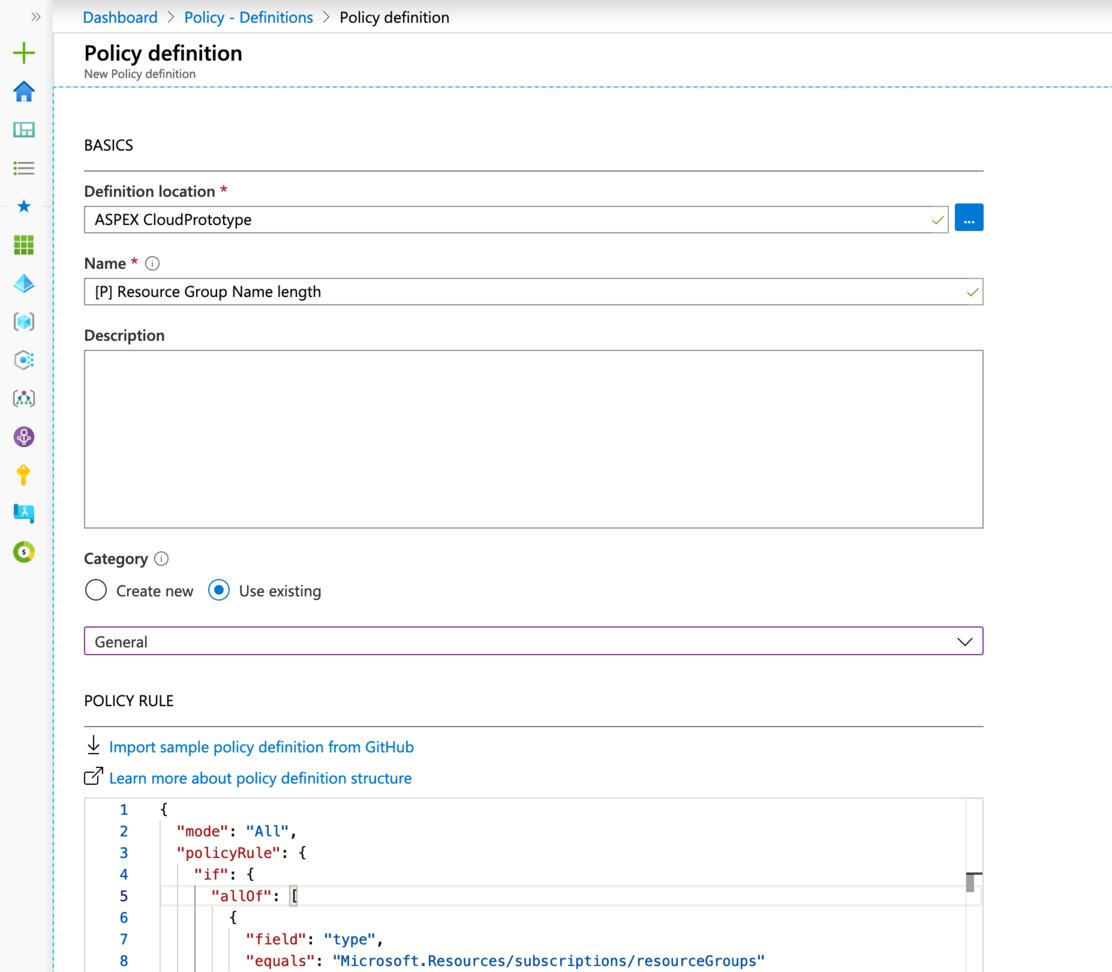
We want save this policy definition to the root management group so we can assign it at that level.
You can paste the following policy rule:
{
  "mode": "All",
  "policyRule": {
    "if": {
      "allOf": [
        {
          "field": "type",
          "equals": "Microsoft.Resources/subscriptions/resourceGroups"
        },
        {
          "anyOf": [
            {
              "value": "[less(length(field('name')), parameters('nameMinLength'))]",
              "equals": true
            },
            {
              "value": "[greater(length(field('name')), parameters('nameMaxLength'))]",
              "equals": true
            }
          ]
        }
      ]
    },
    "then": {
      "effect": "deny"
    }
  },
  "parameters": {
    "nameMinLength": {
      "type": "Integer",
      "metadata": {
        "displayName": "nameMinLength",
        "description": "Minimum length."
      },
      "defaultValue": 3
    },
    "nameMaxLength": {
      "type": "Integer",
      "metadata": {
        "displayName": "nameMaxLength",
        "description": "Maximum length."
      },
      "defaultValue": 20
    }
  }
}
A quick word regarding resource manager modes, the mode determines which resource types will be evaluated for a policy.
The supported modes are:
- all: evaluate resource groups and all resource types
- indexed: only evaluate resource types that support tags and location. While not required, it prevents resources that don’t support tags and locations from showing up as non-compliant in the compliance results. The exception to this rule are resource groups, they will not be evaluated when this mode has been select.
This mean that sometimes you will need to create a policy that has an index mode value of all, but that filters type down to “Microsoft.Resources/subscriptions/resourceGroups”.
The next step is optional when you have one policy that you wish to assign, but we will often create an initiative regardless. Simply click the “+ Initiative definition” button, select the root management group as the definition location. If you use the filters to only show the custom policies, you should see the “[P] Resource Group name length” policy definition.
As for the initiative name, we’ve choose “[I] Resource Group Name length”
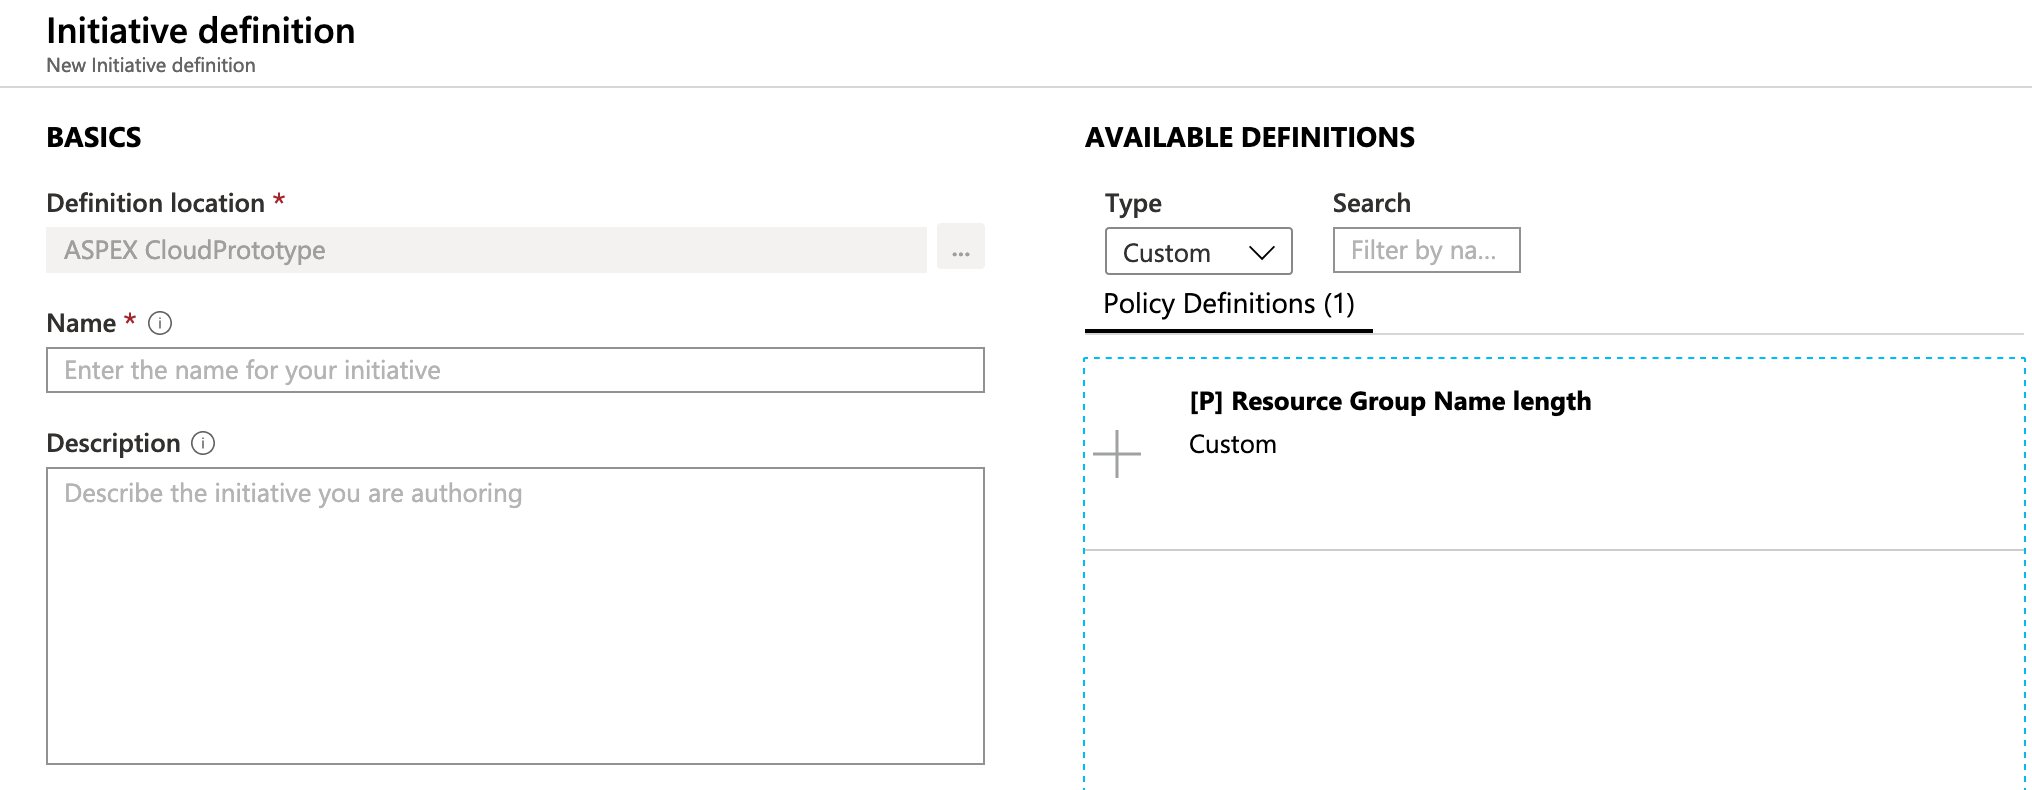
You should now be able to fill in the parameters as well, you can either use different parameter values per policy or you can create a set of initiative parameters and pass those on to your policies. We’ve opted to do the latter.

Almost there, we ony need to create the assignment at this stage. Go back to the Azure Policies tab and under authoring select the “Assignments” option, there you will find two buttons:
- Assign Initiative
- Assign Policy
We will assign our newly created initiative. You can choose which resources should get the policy assignment enforced on by selecting an appropriate scope, you do not need to select the root management group here if you don’t want this policy to apply to all sub management groups and their subscriptions.
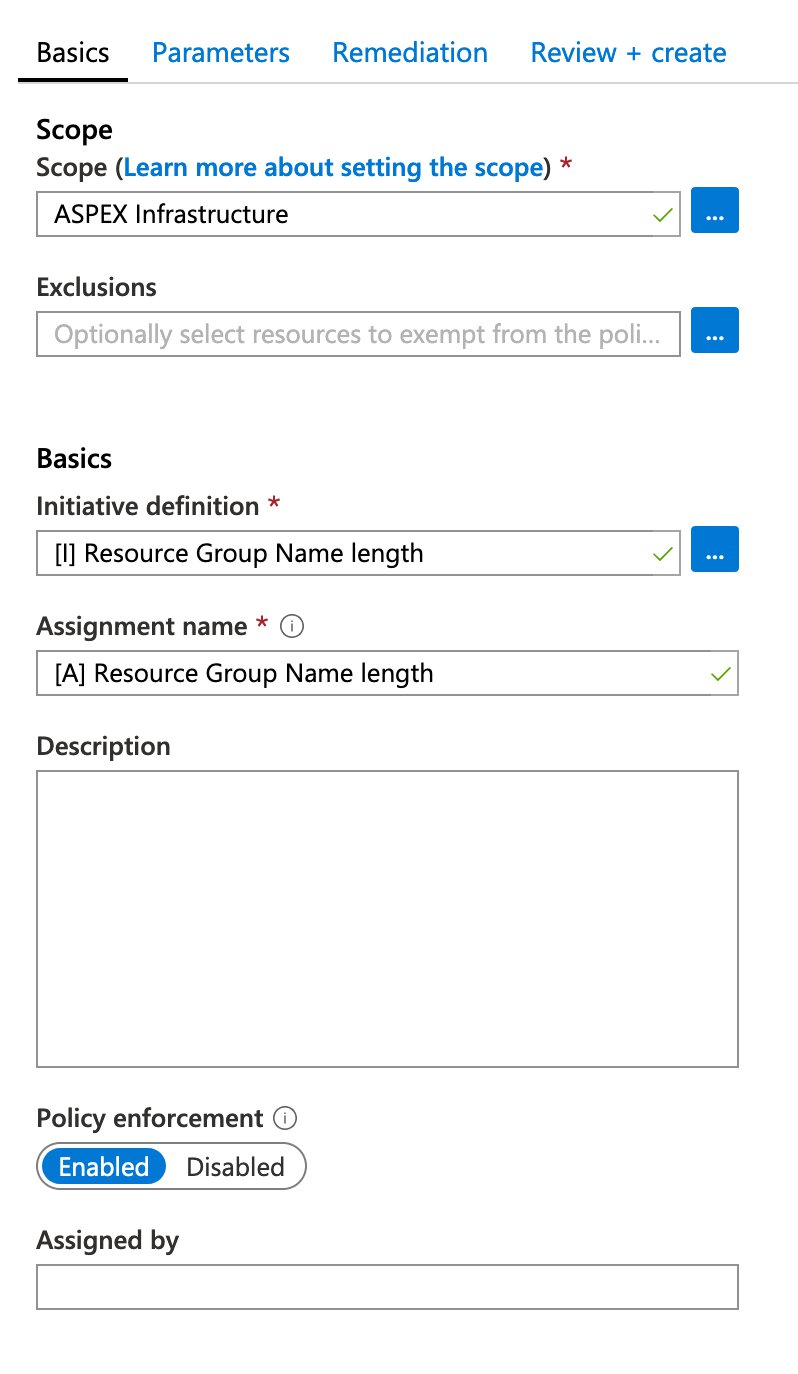
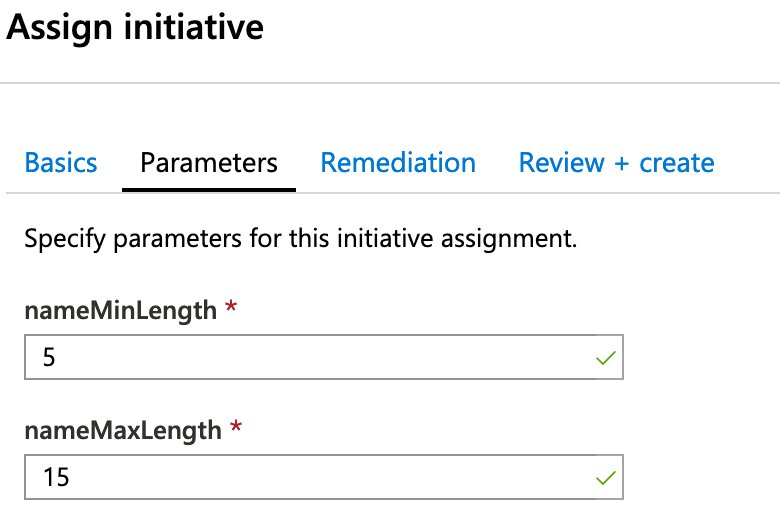
We can enter the policy initiative parameters in the parameters tab, these will be passed to the policy definition. We will use the following values:
- nameMinLength: 5
- nameMaxLength: 15
We can skip the remediation tab, since we do not have any policies that have a modify or deployIfNotExists effect. We can simply hit the “Review and Create” button and then hit it again to kick off the deployment.
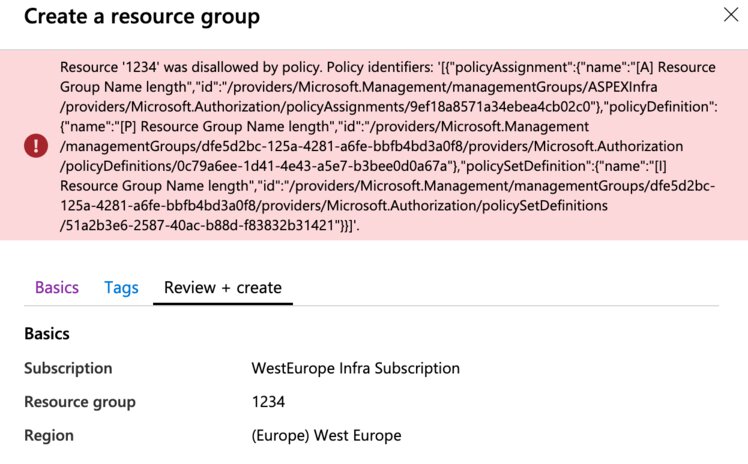
You will receive the following message:
Creating initiative assignment ‘[A] Resource Group Name length’ in ‘ASPEX Infrastructure’ was successful. Please note that the assignment takes around 30 minutes to take effect.
If you were to try to create a new Azure Resource group right away with an incorrect length, the Resource Manager will actually bounce your deployment. In this case the assignment is very simple and will work instantly.
Creating a policy, initiative and assignment through PowerShell
If we were to do it all over again, but through PowerShell, it would look something like this..
if (!(Get-AzContext)) {
    Connect-AzAccount
}

$pathBase = $env:TEMP
if (-not $pathBase) {
    #Assume Linux/macOS
    $pathBase = $env:HOME
}

$tenantRootManagementGroupId = "<tenantRootManagementGroupId>"
$scope = "/providers/Microsoft.Management/managementGroups/$($tenantRootManagementGroupId)"

$policyPath = (Join-Path $pathBase -ChildPath  "azurepolicy.json")
$policyParamsPath = (Join-Path $pathBase -ChildPath  "azurepolicy.parameters.json")
$policyRulesPath = (Join-Path $pathBase -ChildPath  "azurepolicy.rules.json")

$policySetPath = (Join-Path $pathBase -ChildPath  "azurepolicyset.json")
$policySetDefPath = (Join-Path $pathBase -ChildPath  "azurepolicyset.definitions.json")
$policySetParamsPath = (Join-Path $pathBase -ChildPath  "azurepolicyset.parameters.json")

#First of, our Policy definition as a JSON document
#Optionally start from a PowerShell hash table
@"
{
  "mode": "All",
  "policyRule": {
    "if": {
      "allOf": [
        {
          "field": "type",
          "equals": "Microsoft.Resources/subscriptions/resourceGroups"
        },
        {
          "anyOf": [
            {
              "value": "[less(length(field('name')), parameters('nameMinLength'))]",
              "equals": true
            },
            {
              "value": "[greater(length(field('name')), parameters('nameMaxLength'))]",
              "equals": true
            }
          ]
        }
      ]
    },
    "then": {
      "effect": "deny"
    }
  },
  "parameters": {
    "nameMinLength": {
      "type": "Integer",
      "metadata": {
        "displayName": "nameMinLength",
        "description": "Minimum length."
      },
      "defaultValue": 3
    },
    "nameMaxLength": {
      "type": "Integer",
      "metadata": {
        "displayName": "nameMaxLength",
        "description": "Maximum length."
      },
      "defaultValue": 20
    }
  }
}
"@ | Set-Content -Path $policyPath

#Snip out the parameters property and make a json file out of it
(Get-Content -Path $policyPath | ConvertFrom-Json).parameters | ConvertTo-Json -Depth 20 | Set-Content -Path $policyParamsPath -Force
#Snip out the policyRule property and make a json file out of it
(Get-Content -Path $policyPath | ConvertFrom-Json).policyRule | ConvertTo-Json -Depth 20 | Set-Content -Path $policyRulesPath -Force

#Create the Policy Definition from the files
$definition = New-AzPolicyDefinition -Name "p-resource-group-name-length" -DisplayName "[P] Resource Group Name length" -description "[P] Resource Group Name length" -Policy $policyRulesPath -Parameter $policyParamsPath -Mode All -ManagementGroupName $tenantRootManagementGroupId

#Next up, our initiative
@"
{
    "properties": {
        "parameters": {
          "nameMinLength": {
            "type": "Integer",
            "metadata": {
              "displayName": "nameMinLength",
              "description": "Minimum length."
            },
            "defaultValue": 3
          },
          "nameMaxLength": {
            "type": "Integer",
            "metadata": {
              "displayName": "nameMaxLength",
              "description": "Maximum length."
            },
            "defaultValue": 20
          }
        },
        "policyDefinitions": [
            {
                "policyDefinitionId": "$($definition.PolicyDefinitionId)",
                "parameters": {
                    "nameMinLength": {
                        "value": "[parameters('nameMinLength')]"
                    },
                    "nameMaxLength": {
                        "value": "[parameters('nameMaxLength')]"
                    }
                }
            }
        ]
    },
    "type": "Microsoft.Authorization/policySetDefinitions"
}
"@ | Set-Content -Path $policySetPath

#Snip out the parameters child property and make a json file out of it
(Get-Content -Path $policySetPath | ConvertFrom-Json).properties.parameters | ConvertTo-Json -Depth 20 | Set-Content -Path $policySetParamsPath -Force
#Snip out the policyDefinitions child property and make a json file out of it
(Get-Content -Path $policySetPath | ConvertFrom-Json).properties.policyDefinitions | ConvertTo-Json -Depth 20 -AsArray | Set-Content -Path $policySetDefPath -Force

#Create the Initiative
$policyset = New-AzPolicySetDefinition -Name "i-rg-name-length" -DisplayName "[I] Resource Group Name length" -Description "[I] Resource Group Name length" -PolicyDefinition $policySetDefPath -Parameter $policySetParamsPath -ManagementGroupName $tenantRootManagementGroupId

#Create the assignment
New-AzPolicyAssignment -PolicySetDefinition $policyset -Name "a-rg-name-length" -DisplayName "[A] Resource Group Name length" -Description "[A] Resource Group Name length"  -Scope $scope  -PolicyParameterObject @{nameMinLength = 5 ; nameMaxLength = 15 }
Azure Blueprints
🔥 Deprecation notice – December 2025
On July 11, 2026, Blueprints (Preview) will be deprecated. Migrate your existing blueprint definitions and assignments to Template Specs and Deployment Stacks. You can consult the docs for more information on how to proceed further.
You might be wondering to yourself which steps could I take in order to use some of these role and policy assignments in a repeatable manner. Should you write a single (or more) PowerShell script(s) that you can execute against a specific subscription?
Even though that would be a perfectly viable option, it would also require quite a bit of pluming code to get the job done. There’s nothing wrong with this approach if you don’t mind the verbosity that comes along with it.
If you are used to working with JSON files, and by extension ARM templates, you could take a look at Azure Blueprints. It is a way of using, another, JSON-based template that allows you to enforce compliancy and governance rules across your organization. Since it’s just another file it also integrates nicely with DevOps workflows.
Besides being able to deploy roles and policy assignment, Blueprints allow you to also deploy mandatory resources via an ARM template. In the near future you will be able to execute scripts against the subscription where the Blueprint is being applied to.
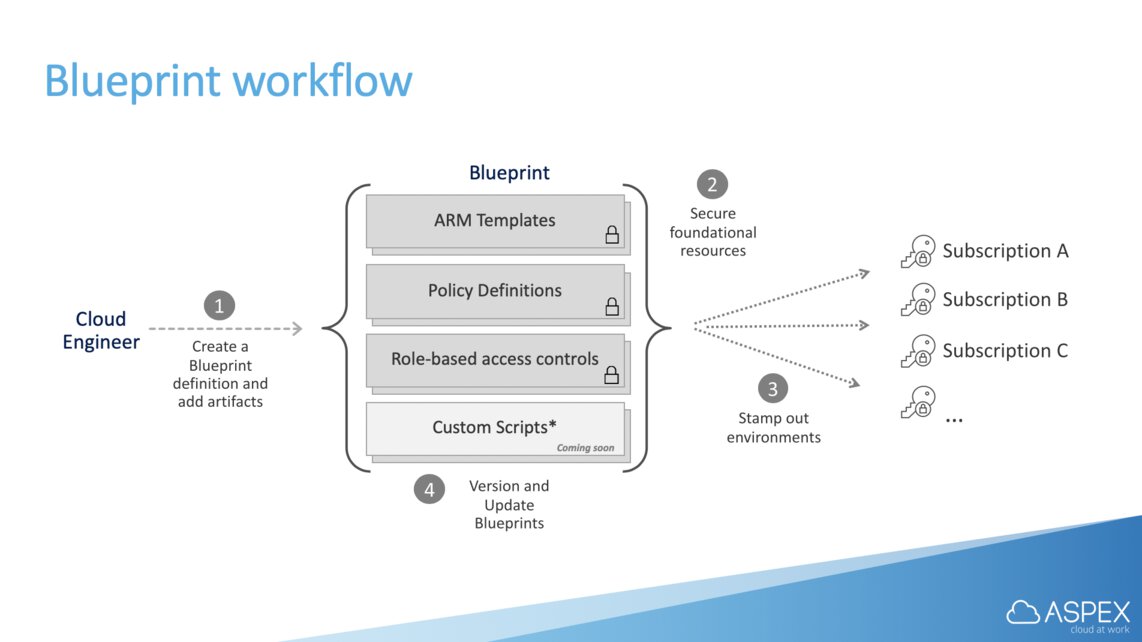
Creating and applying a blueprint
For our demo we decided to keep things simple, here is what we were trying to achieve. Every new subscriptions in our infra management group, regardless of region, will have the following items applied to them:
- Mandatory resources: deployed as an ARM template.
- RBAC: Owner role for the ‘AzureAdmins’ Azure AD group.
- RBAC: Contributor role for for the ‘Operations’ Azure AD group.
Let’s assume we have the following directory structure.
aspex-infra-blueprint
├── aspex-infa
│   ├── Blueprint.json
│   └── Artifacts
│      ├── arm-resourcegroup.json
│      ├── rbac-subscription-azureadmins.json
│      └── rbac-subscription-operations.json
└── Blueprint.ps1
aspex-infra/Blueprints.json
{
  "properties": {
    "targetScope": "subscription",
    "parameters": {
      "storageaccount_storageAccounts_name": {
        "type": "string",
        "metadata": {
          "displayName": "storageAccounts_name (Required storage account)"
        },
        "defaultValue": "",
        "allowedValues": []
      }
    },
    "resourceGroups": {
      "ResourceGroup1": {
        "metadata": {
          "displayName": "Required resouce group"
        },
        "dependsOn": []
      }
    }
  }
}
Artifacts/arm-resourcegroup.json
{
  "kind": "template",
  "properties": {
    "displayName": "Required storage account",
    "description": "",
    "dependsOn": [],
    "resourceGroup": "ResourceGroup1",
    "parameters": {
      "storageAccounts_name": {
        "value": "[parameters('storageaccount_storageAccounts_name')]"
      }
    }
    "template": {
      "$schema": "https://schema.management.azure.com/schemas/2015-01-01/deploymentTemplate.json#",
      "contentVersion": "1.0.0.0",
      "parameters": {
        "storageAccounts_name": {
          "defaultValue": "",
          "type": "String"
        }
      },
      "variables": {},
      "resources": [
        {
          "type": "Microsoft.Storage/storageAccounts",
          "apiVersion": "2019-04-01",
          "name": "[parameters('storageAccounts_name')]",
          "location": "[resourceGroup().location]",
          "sku": {
            "name": "Standard_LRS",
            "tier": "Standard"
          },
          "kind": "StorageV2",
          "properties": {
            "networkAcls": {
              "bypass": "AzureServices",
              "virtualNetworkRules": [],
              "ipRules": [],
              "defaultAction": "Allow"
            },
            "supportsHttpsTrafficOnly": true,
            "encryption": {
              "services": {
                "file": {
                  "enabled": true
                },
                "blob": {
                  "enabled": true
                }
              },
              "keySource": "Microsoft.Storage"
            },
            "accessTier": "Hot"
          }
        }
      ]
    },

  }
}
Nothing to fancy happening here, our ARM template contains a simple storage account. Remember that every subscription you apply this blueprint to will execute the ARM template deployment.
It is important to point out that if you were to copy/paste an existing ARM template in here you need to replace everything inside of the template parameter. This JSON file isn’t just an ARM template, even though it contains one.
Artifacts/rbac-subscription-azureadmins.json
{
  "kind": "roleAssignment",
  "properties": {
    "displayName": "AzureAdmins (null) : Owner",
    "dependsOn": [],
    "roleDefinitionId": "/providers/Microsoft.Authorization/roleDefinitions/8e3af657-a8ff-443c-a75c-2fe8c4bcb635",
    "principalIds": [
      "fff01605-7143-4e68-9a25-4884b1f5b7ec"
    ]
  }
}
As you can see we’re appling the owner role definition ‘8e3af657-a8ff-443c-a75c-2fe8c4bcb635’ to the AzureAdmins group, which in our case has the service principal id ‘fff01605-7143-4e68-9a25-4884b1f5b7ec’.
Artifacts/rbac-subscription-operations.json
{
  "kind": "roleAssignment",
  "properties": {
    "displayName": "Operations (null) : Contributor",
    "dependsOn": [],
    "roleDefinitionId": "/providers/Microsoft.Authorization/roleDefinitions/b24988ac-6180-42a0-ab88-20f7382dd24c",
    "principalIds": [
      "7ea0058b-4295-4347-b4ed-bdd0398e57f5"
    ]
  }
}
Same thing with the contributor role, ‘b24988ac-6180-42a0-ab88-20f7382dd24c’, which we are applying to the Operations Azure AD group with service principal ID ‘7ea0058b-4295-4347-b4ed-bdd0398e57f5’.
Blueprints.ps1
Import-Module Az
Import-Module Az.Blueprint

if (!(Get-AzContext)) {
    Connect-AzAccount
}

#Import the whole thing, naming conventions matter!
#Expects a Blueprint.json + Artifacts folder
Import-AzBlueprintWithArtifact -Name 'aspex-infra-blueprint' `
    -ManagementGroupId "ASPEXInfra" `
    -InputPath "./aspex-infra-blueprint/"

#Get the newly created blueprint
$blueprint = Get-AzBlueprint -Name 'aspex-infra-blueprint' `
    -ManagementGroupId "ASPEXInfra"

#Publish the blueprint
#Version number is something you want to have your CI/CD solution handle for you.
Publish-AzBlueprint -Blueprint $blueprint `
    -Version "1.0"

#Subscription must be inside of the management group that we specified earlier
New-AzBlueprintAssignment -Name 'Assignment-aspex-infra-blueprint' `
    -Blueprint $blueprint `
    -Location "west europe" `
    -SubscriptionId "00000000-0000-0000-0000-000000000000" `
    -Lock None `
    -SystemAssignedIdentity `
    -Parameter @{
      'storageaccount_storageAccounts_name' = 'weusaidefault01'
    } `
    -ResourceGroupParameter @{
      ResourceGroup1 =
      @{
          name     = 'weu-rg-i-default'
          location = 'west europe'
        }
      #,
      # ResourceGroup2 =
      # @{
      #     name     = 'a-way-to-add-another-rg'
      #     location = 'west europe'
      #   }
    }

do {
    $assignmentProgress = Get-AzBlueprintAssignment  -Name 'Assignment-aspex-infra-blueprint' `
        -SubscriptionId "00000000-0000-0000-0000-000000000000"

    $assignmentProgress
    Start-Sleep -Seconds 5
} until ($assignmentProgress.ProvisioningState -ieq "Succeeded")
First we import the entire blueprint package as and proceed to import the files we have in the aspex-infra-blueprint folder, which will create a draft blueprint. You cannot publish the blueprint just by name and you need an object reference to do so, which is why we’re doing a Get-AzBlueprint prior to publishing the blueprint.
In order to assign the blueprint we need to be aware of the the fact that Azure Blueprints will temporarily create a managed identity in a specific region, which will responsible for executing several commands to the Azure Resource Manager.
There are two parameters that we need to fill in:
- -Parameter - refers to artifact parameters
- -ResourceGroupParameter - refers to resource group parameters
If you want to know more about New-AzBlueprintAssignment and how it works you can view the docs here.
After a few minutes, depending on whatever is inside of your ARM template, you will notice that the blueprint has been applied successfully. If you’d like you can adapt this script to work inside of an Azure DevOps pipeline.
Related posts
- Azure Policies & Azure AD PIM breakdown - Part 2
- Microsoft Entra Privileged Identity Management (for Azure Resources) Revisited
- Azure Purview
- Azure Resource Locks
- Open Policy Agent
- Chaos Engineering on Azure
- Exploring AI CPU-Inferencing with Azure Cobalt 100
- SPIFFE and Entra Workload Identity Federation
- Azure Chaos Studio and PowerShell
- Azure Chaos Studio - Public Preview
- Local OpenShift 4 with Azure App Services on Azure Arc
- Verifying Azure AD tenant availability
- Azure Red Hat OpenShift 4